Setting the Area, Date and Time
Example:
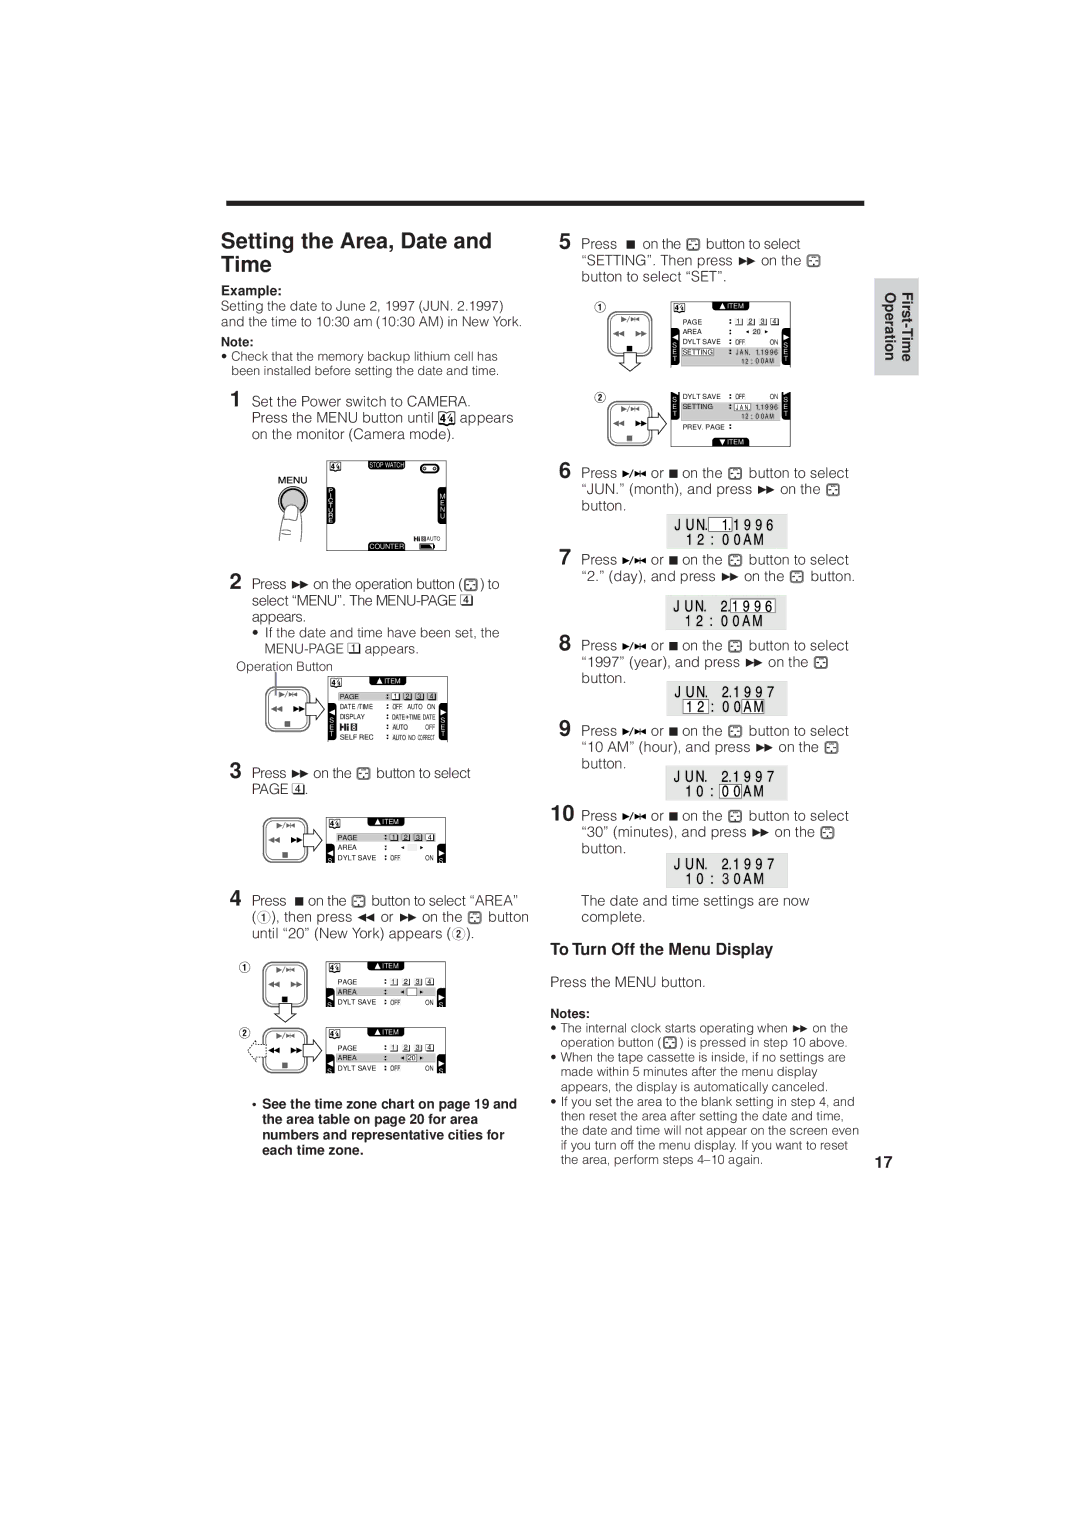
Setting the date to June 2, 1997 (JUN. 2.1997) and the time to 10:30 am (10:30 AM) in New York.
Note:
•Check that the memory backup lithium cell has been installed before setting the date and time.
1 Set the Power switch to CAMERA. Press the MENU button until ![]() appears on the monitor (Camera mode).
appears on the monitor (Camera mode).
STOP WATCH
M
E
N
U
![]() AUTO
AUTO
COUNTER
2 Press B on the operation button (![]() ) to select “MENU”. The
) to select “MENU”. The
•If the date and time have been set, the MENU-PAGE 1 appears.
Operation Button
![]() ITEM
ITEM
PAGE | 1 | 2 | 3 | 4 |
| DATE /TIME | OFF | AUTO ON |
| |||
| DISPLAY |
|
|
|
| DATE |
|
S | DATE | TIME | S | ||||
|
|
|
| ||||
E |
| AUTO |
| OFF | E | ||
T | SELF REC |
|
| NO CORRECT | T | ||
AUTO | |||||||
3 Press B on the | button to select | |||||
PAGEÊ4 . |
|
|
|
|
|
|
|
| ITEM |
|
|
|
|
| PAGE | 1 | 2 | 3 | 4 |
|
| AREA |
|
|
|
|
|
S | DYLT SAVE | OFF |
|
| ON | S |
4 Press Aon the ![]() button to select “AREA” (Q), then press C or B on the
button to select “AREA” (Q), then press C or B on the ![]() button until “20” (New York) appears (W).
button until “20” (New York) appears (W).
|
| ITEM |
|
|
|
|
| PAGE | 1 | 2 | 3 | 4 |
|
| AREA |
|
|
|
|
|
S | DYLT SAVE | OFF |
|
| ON | S |
|
| ITEM |
|
|
|
|
| PAGE | 1 | 2 | 3 | 4 |
|
| AREA |
|
| 20 |
|
|
S | DYLT SAVE | OFF |
|
| ON | S |
•See the time zone chart on page 19 and the area table on page 20 for area numbers and representative cities for each time zone.
5 Press A on the ![]() button to select “SETTING”. Then press B on the
button to select “SETTING”. Then press B on the ![]() button to select “SET”.
button to select “SET”.
T |
| ITEM |
|
|
| T | Operation | |
| PAGE | 1 | 2 | 3 | 4 |
|
|
|
| AREA |
| 20 |
|
|
|
|
|
S | DYLT SAVE | OFF |
|
| ON | S |
|
|
E | SETTING | J A N | 1 | 1 9 9 6 | E |
|
| |
|
| 1 2 | 0 | 0AM |
|
|
| |
S | DYLT SAVE | OFF |
|
| ON | S |
|
| |||||
E | SETTING | J A N | 1 | 1 9 9 6 | E | |
T |
| 1 2 | 0 | 0AM | T | |
PREV. PAGE
![]() ITEM
ITEM
6 Press ![]()
![]() orAon the
orAon the ![]() button to select “JUN.” (month), and press B on the
button to select “JUN.” (month), and press B on the ![]() button.
button.
7 Press ![]()
![]() orAon the
orAon the ![]() button to select “2.” (day), and press B on the
button to select “2.” (day), and press B on the ![]() button.
button.
8 Press ![]()
![]() orAon the
orAon the ![]() button to select “1997” (year), and press B on the
button to select “1997” (year), and press B on the ![]() button.
button.
9 Press ![]()
![]() orAon the
orAon the ![]() button to select “10 AM” (hour), and press B on the
button to select “10 AM” (hour), and press B on the ![]() button.
button.
10 Press ![]()
![]() orAon the
orAon the ![]() button to select “30” (minutes), and press B on the
button to select “30” (minutes), and press B on the ![]() button.
button.
The date and time settings are now complete.
To Turn Off the Menu Display
Press the MENU button.
Notes:
• The internal clock starts operating when B on the operation button (![]() ) is pressed in step 10 above.
) is pressed in step 10 above.
•When the tape cassette is inside, if no settings are made within 5 minutes after the menu display appears, the display is automatically canceled.
•If you set the area to the blank setting in step 4, and then reset the area after setting the date and time, the date and time will not appear on the screen even
if you turn off the menu display. If you want to reset |
|
the area, perform steps | 17 |