INSTALLATION

Note:ifthecenterlinecannotbemet, the adjustable sections will have to be cut.

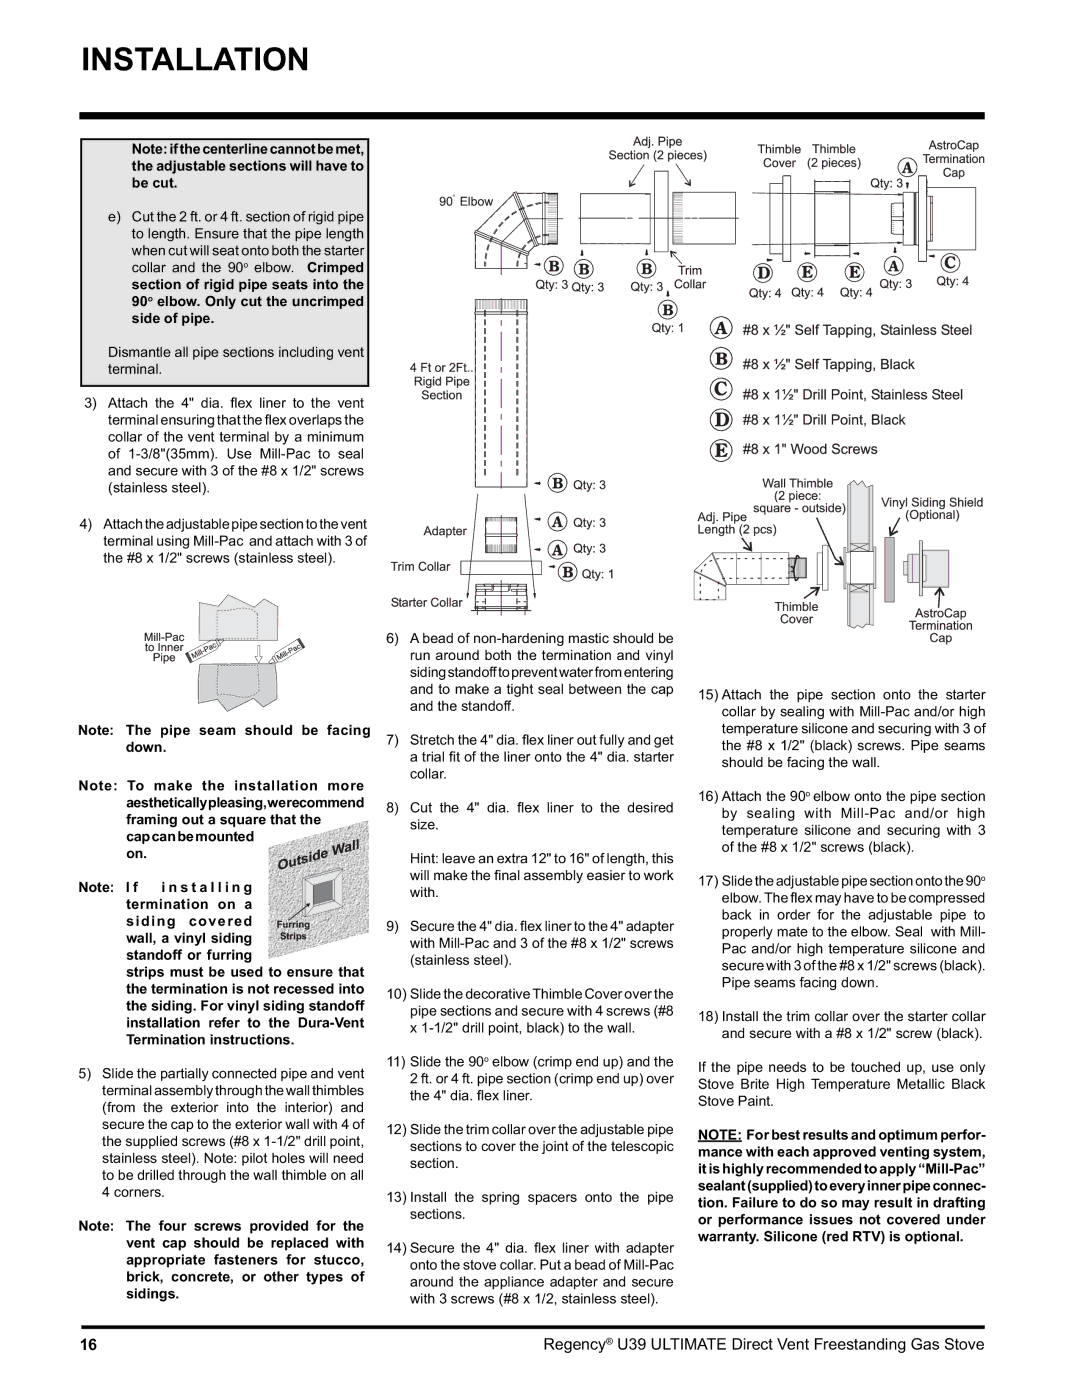
e)Cut the 2 ft. or 4 ft. section of rigid pipe to length. Ensure that the pipe length when cut will seat onto both the starter collar and the 90o elbow. Crimped section of rigid pipe seats into the 90o elbow. Only cut the uncrimped side of pipe.

Dismantle all pipe sections including vent terminal.

3)Attach the 4" dia. fl ex liner to the vent terminal ensuring that the fl ex overlaps the collar of the vent terminal by a minimum of 1-3/8"(35mm). Use Mill-Pac to seal and secure with 3 of the #8 x 1/2" screws (stainless steel).

4)Attach the adjustable pipe section to the vent terminal using Mill-Pac and attach with 3 of the #8 x 1/2" screws (stainless steel).

Note: The pipe seam should be facing down.

Note: To make the installation more aestheticallypleasing,werecommend framing out a square that the

capcanbemounted on.

Note: I f i n s t a l l i n g termination on a siding covered wall, a vinyl siding standoff or furring

strips must be used to ensure that the termination is not recessed into the siding. For vinyl siding standoff installation refer to the Dura-Vent Termination instructions.

5)Slide the partially connected pipe and vent terminal assembly through the wall thimbles (from the exterior into the interior) and secure the cap to the exterior wall with 4 of the supplied screws (#8 x 1-1/2" drill point, stainless steel). Note: pilot holes will need to be drilled through the wall thimble on all 4 corners.

Note: The four screws provided for the vent cap should be replaced with appropriate fasteners for stucco, brick, concrete, or other types of sidings.

6)A bead of non-hardening mastic should be run around both the termination and vinyl sidingstandofftopreventwaterfromentering and to make a tight seal between the cap and the standoff.

7)Stretch the 4" dia. fl ex liner out fully and get a trial fi t of the liner onto the 4" dia. starter collar.

8)Cut the 4" dia. fl ex liner to the desired size.

Hint: leave an extra 12" to 16" of length, this will make the fi nal assembly easier to work with.

9)Secure the 4" dia. fl ex liner to the 4" adapter with Mill-Pac and 3 of the #8 x 1/2" screws (stainless steel).

10)Slide the decorative Thimble Cover over the pipe sections and secure with 4 screws (#8 x 1-1/2" drill point, black) to the wall.

11)Slide the 90o elbow (crimp end up) and the 2 ft. or 4 ft. pipe section (crimp end up) over the 4" dia. fl ex liner.

12)Slide the trim collar over the adjustable pipe sections to cover the joint of the telescopic section.

13)Install the spring spacers onto the pipe sections.

14)Secure the 4" dia. fl ex liner with adapter onto the stove collar. Put a bead of Mill-Pac around the appliance adapter and secure with 3 screws (#8 x 1/2, stainless steel).

15)Attach the pipe section onto the starter collar by sealing with Mill-Pac and/or high temperature silicone and securing with 3 of the #8 x 1/2" (black) screws. Pipe seams should be facing the wall.

16)Attach the 90o elbow onto the pipe section by sealing with Mill-Pac and/or high temperature silicone and securing with 3 of the #8 x 1/2" screws (black).

17)Slide the adjustable pipe section onto the 90o elbow. The fl ex may have to be compressed back in order for the adjustable pipe to properly mate to the elbow. Seal with Mill- Pac and/or high temperature silicone and secure with 3 of the #8 x 1/2" screws (black). Pipe seams facing down.

18)Install the trim collar over the starter collar and secure with a #8 x 1/2" screw (black).

If the pipe needs to be touched up, use only Stove Brite High Temperature Metallic Black Stove Paint.

NOTE: For best results and optimum perfor- mance with each approved venting system, it is highly recommended to apply “Mill-Pac” sealant(supplied)toeveryinnerpipeconnec- tion. Failure to do so may result in drafting or performance issues not covered under warranty. Silicone (red RTV) is optional.

16

Regency® U39 ULTIMATE Direct Vent Freestanding Gas Stove

Page 16
Image 16
Regency U39-LP1, U39-NG1 installation manual Capcanbemounted on

U39-LP1, U39-NG1 specifications

The Regency U39-LP1 and U39-NG1 are innovative heating appliances designed for modern homes, emphasizing both efficiency and style. These units encapsulate the essence of contemporary design while ensuring high-performance heating solutions. The U39 series stands out for its user-friendly features and advanced technologies that cater to the demands of varied environments.

One of the main features of the U39-LP1 is its propane-fueled operation, allowing it to generate an impressive amount of heat while remaining energy-efficient. The unit is designed with a remarkable heating capacity, making it ideal for larger spaces or for those chilly evenings where comfort is paramount. In contrast, the U39-NG1 operates on natural gas, appealing to homeowners looking for a more sustainable option. Both models allow for quick and effective heating, ensuring a cozy atmosphere within moments.

The technology embedded in both models reflects a commitment to top-tier performance. The advanced electronic ignition system provides reliability, ensuring seamless operation. The units also incorporate a built-in thermostat, which allows for precise control over the temperature, enhancing comfort while conserving energy. Furthermore, the U39 series features a sleek ceramic glass front that not only adds an aesthetic element but also enhances efficiency by radiating heat effectively into the room.

Another hallmark of the Regency U39 series is its design versatility. Both models are available in various finishes, enabling them to blend seamlessly into different décor styles, whether traditional, modern, or minimalist. The compact dimensions of these units ensure they fit effortlessly into a variety of spaces, from living rooms to basements.

Safety is also a significant focus with the U39-LP1 and U39-NG1. The units come equipped with a variety of safety features, including automatic shut-off and heat-resistant materials, ensuring peace of mind for users.

In summary, the Regency U39-LP1 and U39-NG1 models exemplify modern heating solutions characterized by efficiency, advanced technology, and stylish design. With their user-centric features and commitment to safety, these units are perfect additions for anyone seeking warmth and comfort in their homes. Whether powered by propane or natural gas, the U39 series continues to redefine the standard for home heating.