INSTALLATION

DURA-VENT

HORIZONTAL

TERMINATIONS

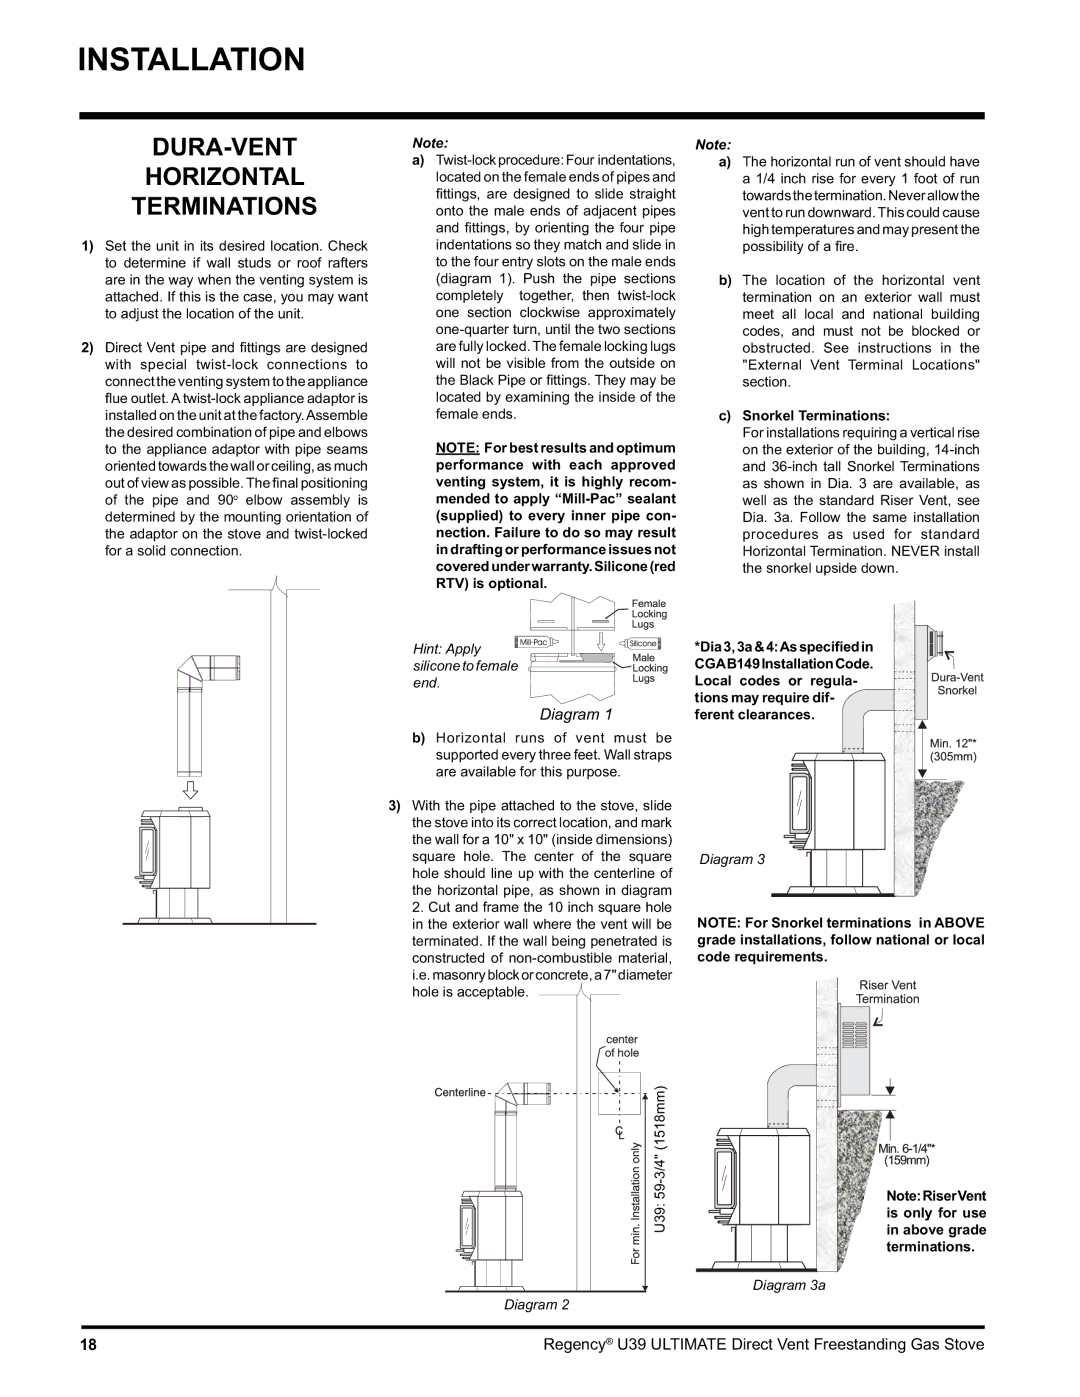
1)Set the unit in its desired location. Check to determine if wall studs or roof rafters are in the way when the venting system is attached. If this is the case, you may want to adjust the location of the unit.

2)Direct Vent pipe and fi ttings are designed with special twist-lock connections to connect the venting system to the appliance fl ue outlet. A twist-lock appliance adaptor is installed on the unit at the factory.Assemble the desired combination of pipe and elbows to the appliance adaptor with pipe seams oriented towards the wall or ceiling, as much out of view as possible. The fi nal positioning of the pipe and 90o elbow assembly is determined by the mounting orientation of the adaptor on the stove and twist-locked for a solid connection.

Note:

a)Twist-lockprocedure:Four indentations, located on the female ends of pipes and fi ttings, are designed to slide straight onto the male ends of adjacent pipes and fi ttings, by orienting the four pipe indentations so they match and slide in to the four entry slots on the male ends (diagram 1). Push the pipe sections completely together, then twist-lock one section clockwise approximately one-quarter turn, until the two sections are fully locked. The female locking lugs will not be visible from the outside on the Black Pipe or fi ttings. They may be located by examining the inside of the female ends.

NOTE: For best results and optimum performance with each approved venting system, it is highly recom- mended to apply “Mill-Pac” sealant (supplied) to every inner pipe con- nection. Failure to do so may result in drafting or performance issues not coveredunderwarranty.Silicone(red RTV) is optional.

Note:

a)The horizontal run of vent should have a 1/4 inch rise for every 1 foot of run towardsthetermination.Neverallowthe vent to run downward. This could cause high temperatures and may present the possibility of a fi re.

b)The location of the horizontal vent termination on an exterior wall must meet all local and national building codes, and must not be blocked or obstructed. See instructions in the "External Vent Terminal Locations" section.

c)Snorkel Terminations:

For installations requiring a vertical rise on the exterior of the building, 14-inch and 36-inch tall Snorkel Terminations as shown in Dia. 3 are available, as well as the standard Riser Vent, see Dia. 3a. Follow the same installation procedures as used for standard Horizontal Termination. NEVER install the snorkel upside down.

Hint: Apply silicone to female end.

Diagram 1

b)Horizontal runs of vent must be supported every three feet. Wall straps are available for this purpose.

3)With the pipe attached to the stove, slide the stove into its correct location, and mark the wall for a 10" x 10" (inside dimensions) square hole. The center of the square hole should line up with the centerline of the horizontal pipe, as shown in diagram 2. Cut and frame the 10 inch square hole in the exterior wall where the vent will be terminated. If the wall being penetrated is constructed of non-combustible material, i.e.masonryblockorconcrete,a7"diameter hole is acceptable.

*Dia3,3a&4:Asspecifiedin CGAB149InstallationCode. Local codes or regula- tions may require dif- ferent clearances.

Diagram 3

NOTE: For Snorkel terminations in ABOVE grade installations, follow national or local code requirements.

U39: 59-3/4" (1518mm)

Diagram 2

Note:RiserVent is only for use in above grade terminations.

Diagram 3a

18

Regency® U39 ULTIMATE Direct Vent Freestanding Gas Stove

Page 18
Image 18
Regency U39-LP1, U39-NG1 installation manual DURA-VENT Horizontal Terminations, Snorkel Terminations

U39-LP1, U39-NG1 specifications

The Regency U39-LP1 and U39-NG1 are innovative heating appliances designed for modern homes, emphasizing both efficiency and style. These units encapsulate the essence of contemporary design while ensuring high-performance heating solutions. The U39 series stands out for its user-friendly features and advanced technologies that cater to the demands of varied environments.

One of the main features of the U39-LP1 is its propane-fueled operation, allowing it to generate an impressive amount of heat while remaining energy-efficient. The unit is designed with a remarkable heating capacity, making it ideal for larger spaces or for those chilly evenings where comfort is paramount. In contrast, the U39-NG1 operates on natural gas, appealing to homeowners looking for a more sustainable option. Both models allow for quick and effective heating, ensuring a cozy atmosphere within moments.

The technology embedded in both models reflects a commitment to top-tier performance. The advanced electronic ignition system provides reliability, ensuring seamless operation. The units also incorporate a built-in thermostat, which allows for precise control over the temperature, enhancing comfort while conserving energy. Furthermore, the U39 series features a sleek ceramic glass front that not only adds an aesthetic element but also enhances efficiency by radiating heat effectively into the room.

Another hallmark of the Regency U39 series is its design versatility. Both models are available in various finishes, enabling them to blend seamlessly into different décor styles, whether traditional, modern, or minimalist. The compact dimensions of these units ensure they fit effortlessly into a variety of spaces, from living rooms to basements.

Safety is also a significant focus with the U39-LP1 and U39-NG1. The units come equipped with a variety of safety features, including automatic shut-off and heat-resistant materials, ensuring peace of mind for users.

In summary, the Regency U39-LP1 and U39-NG1 models exemplify modern heating solutions characterized by efficiency, advanced technology, and stylish design. With their user-centric features and commitment to safety, these units are perfect additions for anyone seeking warmth and comfort in their homes. Whether powered by propane or natural gas, the U39 series continues to redefine the standard for home heating.