Users Manual
ENGLISH
Check the camera’s power Check Removable Disk
Set up the camera driver Take a picture Insert the USB cable
Instructions
READY
Contents
PLAY
RECORDING
SOFTWARE
SETUP
Connecting an External DeviceUSB
Setting up the application software
About the icons
Getting to know your camera
DANGER
Danger
An FCC warning
refer to page 55~62 Down loading image files from camera to computer
This digital camera can be used for
refer to page
Viewing images on a TV. refer to page Taking a picture
Creation of a digital photo album Recording your voice refer to page
Taking a self-portrait and using the image to personalize calendar
Recording a movie clip refer to page
Inserting images directly into any electronic document
Manufacturers contents
Front & Top
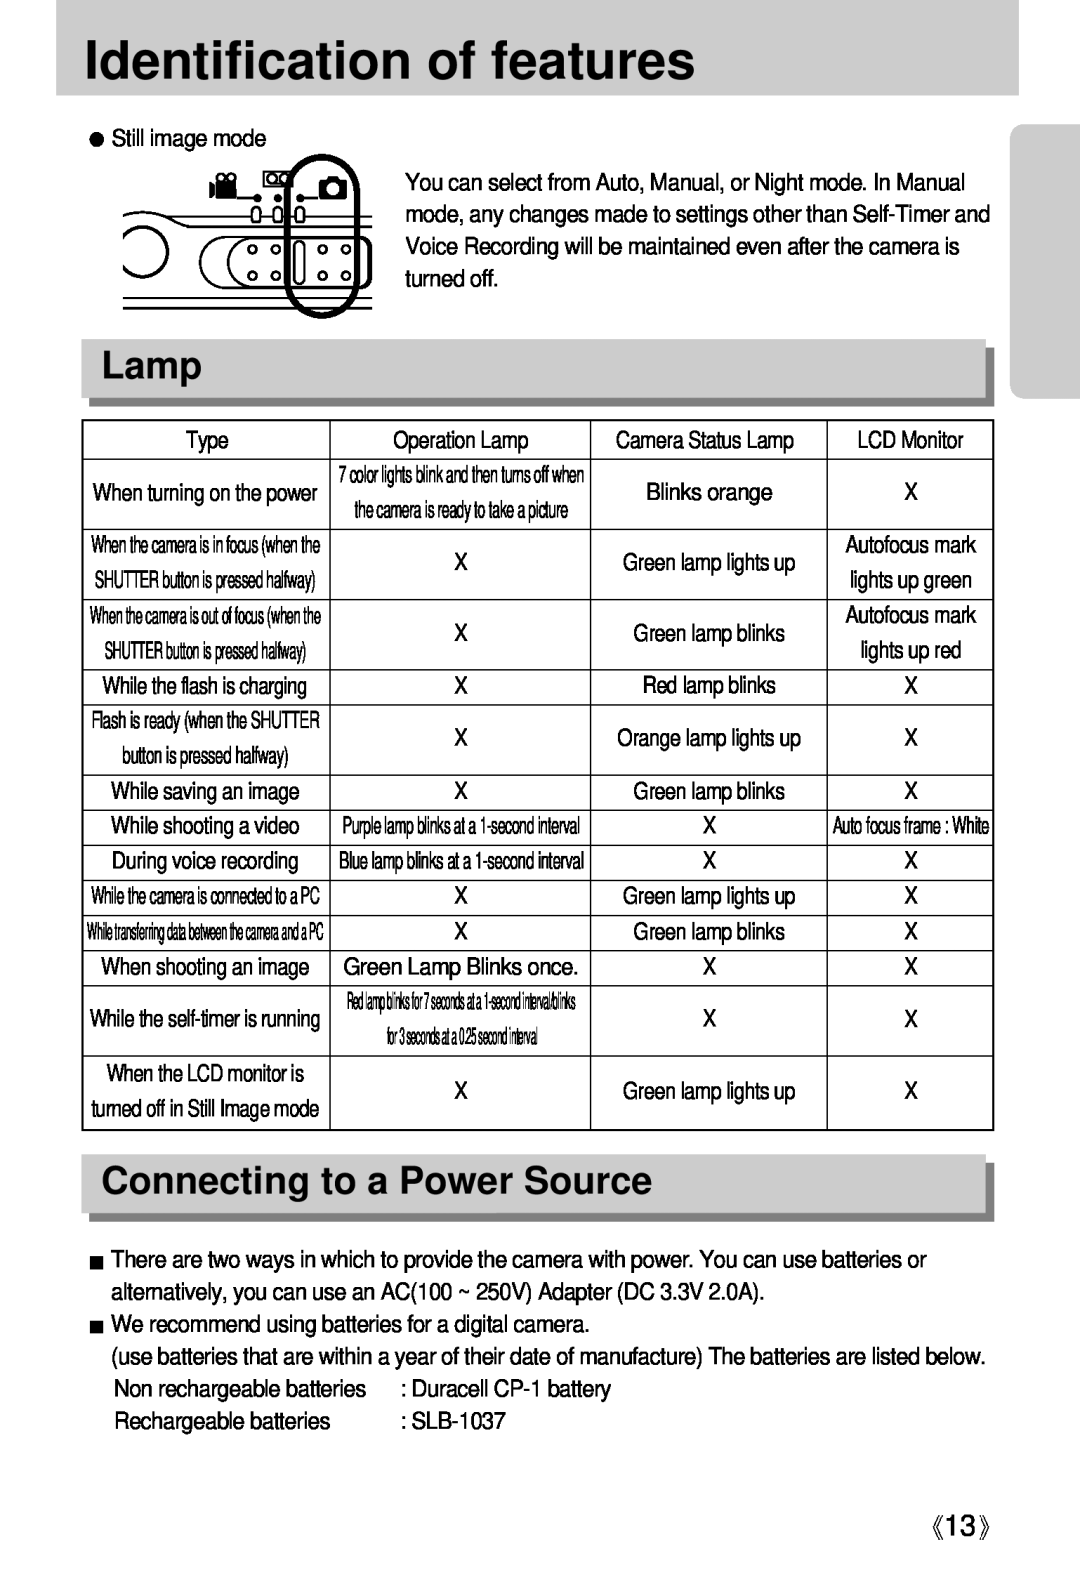
Identification of features
Back & Bottom
Side/ 5-function button
Mode switch
Lamp
Connecting to a Power Source
We recommend using batteries for a digital camera
Still image mode
INFORMATION
Connecting to a Power Source
Using the AC power adapter 3.3V 2.0A
Using the batteries
Removing the battery
Precautions on Using the Memory Stick Duo
Preserving the memory card data
Maintenance of the Memory Stick Duo
Removing the memory card
Inserting the memory card
When Using the Camera for the First Time
Page
LCD monitor indicator
Time
p.33
Starting the recording mode
STANDBY START.SHUTTER
Starting recording mode
Things to watch out for when taking pictures
POWER button
Using the camera buttons to adjust the camera
SHUTTER button
WIDE / TELE button
until the minimum setting is reached
WIDE / TELE button
TELE Zoom
Optical zoom TELE
To use the digital zoom the LCD monitor has to be turned on
Voice memo / UP button
Voice memo / UP button
Macro / Down button Focusing
Pressing the MACRO button Autofocus Macro
FLASH / LEFT button
Focus lock
LEFT button
FLASH
Selecting the 10SEC self-timer
Self-timer / Right button
+/- button
MENU/ OK button
+/- button
1. Press the +/- button, and the use the UP button to select
White paper
such as lighting value or subject brightness
Userset mode
LCD button
Using the LCD monitor to adjust the camera settings
Press the LEFT
How to use the menu
or RIGHT button
Size
Mode
AUTOAUTO MANUAL NIGHT
Quality
Effect
Metering
will be biased towards the centre of the
Sharpness
Effect
R G B
SHARP
Starting play mode
Steps from 1-2 are the same as those to play back a still
voice file, the voice indicator
will be displayed on the
3. Select the recorded voice that you want to play back by
LCD monitor indicator
Thumbnail / Enlargement button
Voice memo / Up button
Thumbnail / Enlargement button
Play & Pause / Down button
Voice memo / Up button
LCD button
LEFT / RIGHT/ MENU/ OK button
Delete button
Setting up the play back function using the LCD monitor
ALL PICS
ONE PIC
SIZE
A6, A4, B5
Protecting images
Deleting all images
DEL.ALL
Starting the slide show
Protecting images
menu tab
3. Use the UP and DOWN buttons to select the desired
RESIZE
Resize
DPOF PRINT ORDER
Rotating an image
If OFF is selected Press the OK button to cancel the
button
DPOF INDEX
DPOF STANDARD
3. Select the INDEX menu by pressing the UP/ DOWN
button and press the RIGHT button
DPOF PRINT SIZE
DPOF CANCEL
Setting the Print Size
SIZE DEFAULT, 3X5, 4X6, 5X7
PictBridge
be set to PRINTER before you connect the camera to
PictBridge Picture Selection
the printer.See p.58
2. The PICTBRIDGE menu will appear
The print format will be set to the printers default
PictBridge Print Setting
A window from which the user can set up the print
Setting the quality of the picture to be printed
Fatal error
PictBridge Picture Printing
Recoverable error
PictBridge DPOF AUTO PRINT
PictBridge RESET
P”CCK»…
Setup menu
2. Press the LEFT/ RIGHT button and select the SETUP
File name
Assigning File Names
MENU button
File name
Auto power off
Formatting a memory card
Language
4. Select a desired sub menu by pressing the UP/ DOWN
Imprinting the recording date
Setting up the Date/ Time/ Date type
Function lamp
Imprinting the recording date
During voice recording
LCD brightness
Sound
Selecting Video out type
CANCEL OKCONFIRM
Quick view
InitializationRESET ALL
Connecting an External Device USB
3. Select the RESET menu by pressing the UP/ DOWN
Selecting an External Device
Avatar
Setting up the MYCAM menu
MyCAM
Avatar
AVATER S.IMAGE S.SOUND BACKSETOK
Start up image
Start up sound
Start up image
Shutter sound
Setting the Startup Sound
Voice
List of camera functions
recording
Still image
Exposure
Camera working
List of camera functions
FULL
POSTCARD
INDEX
PLAIN
RESIZE
Voice memo recording
Be sure to observe the following precautions
Important notes
Caution on Using the Lens
Sand can be particularly troublesome to cameras
Camera Maintenance
There are several warnings that may appear on the LCD display
Warning indicator
Please check the following
Before contacting a service center
The flash does not
Take a picture within the flash range
occurred while the
If the subject is closer than 0.8m, select
The external monitor has not
Auto, Daylight, Cloudy, Fluorescent, Tungsten, Custom
Specifications
Included power source may vary depending on sales region
Rechargeable battery 3.7V Li-ion battery SLB-1037
Digimax Viewer, QuickTime Player, ArcSoft PhotoImpression
System Requirements
Software Notes
About the software
DigiStudio Software for creating 3D avatars
VideoImpression Movie clip editing program
Setting up the application software
7. The Choose Installation Type window will open. Click Next
14. Installation is complete. Click Close
12. Set up your browser for QuickTime plug-in. Click Next
window appears. Click Next
with QuickTime. Click Finish
The QuickTime Player will launch, the readme file will open, and the Step 15 window will open. Click on the Close 1 and Close 2 buttons to exit the program
Click the OK button
Setting up the application software
Setting up the application software
Setting up the application software
39. Turn the camera power on
After installing the camera driver, you have to restart your PC
Operating System
DigiStudio Installation guide
Cautions on the Graphic Card VGA
DigiStudio Installation
Select Recommended, and then click Next
8. The Choose Installation Type will open
12. The Introduction window will open. Click Next
and select the desired transfer rate
and then press the OK button
Starting PC mode
8. Connect the PC and the camera via the USB cable
USB connection terminal
Starting PC Mode
7. An image file is transferred from the camera to your PC
1. Trace Start Settings and click Control Panel
Removing the USB Driver for Windows 98SE
4. Uninstallation is complete
To remove the USB driver, refer to the process shown below
Removable Disk
5. A Safe to Remove Hardware window will open. Click the OK button
Removing the removable disk
Using the USB Driver for MAC
Setting up the USB Driver for MAC
Digimax Viewer
Using PhotoImpression
INFORMATION
Using VideoImpression
Add still images, movie clips or audio files to Album window
It is only applicable to movie clip project
How to make an MPEG-4 movie clip for the SAMSUNG U-CA3/4
Page
Manager, there are Unknown Devices or
Bus controllers
MEMO
MEMO
MEMO
SAMSUNG OPTO-ELECTRONICS AMERICA, INC. HEADQUARTERS
6806-2171
SAMSUNG OPTO-ELECTRONICS UK LIMITED SAMSUNG HOUSE
SAMSUNG FRANCE S.A.S