| Make Scene | |||
|
|
| ||
|
|
| Scene No. 001 | |
|
|
| Start | End |
| Title List : 1/6 | 00:00:10 | 00:00:00 | |
► |
|
|
| 00:00:10 |
Start | End | Make |
| Return |
MOVE | ENTER | RETURN | EXIT | |
| Make Scene | |||
|
|
| ||
|
|
| Scene No. 001 | |
|
|
| Start | End |
| Title List : 1/6 | 00:00:10 | 00:10:00 | |
| II |
|
| 00:10:00 |
Start | End | Make |
| Return |
MOVE | ENTER | RETURN | EXIT | |
|
| Edit Playlist | ||
APR/23/2007 |
|
|
| 1/5 |
|
| No. | Title | Length Edit |
|
| 01 APR/23/2007 12:00 00:00:21 ► | ||
|
| 02 APR/23/2007 12:30 00:00:03 ► | ||
|
| 03 APR/24/2007 12:00 00:00:15 ► | ||
APR/23/2007 12:00 AM | 04 APR/24/2007 12:30 00:00:16 ► | |||
05 APR/25/2007 12:00 00:06:32 ► | ||||
1 Scene |
|
|
|
|
APR/23/2007 12:00 AM |
|
|
| |
MOVE | ENTER |
| RETURN | EXIT |
|
|
|
| Edit Playlist | |||||
| APR/24/2007 |
|
|
|
| 3/5 |
|
| |
|
|
|
|
|
|
| |||
|
|
|
| No. | Title |
| Length Edit | ||
|
|
|
|
| |||||
|
|
|
| 01 APR/23/2007 12:00 00:00:21 ► |
| ||||
|
|
|
| 02 APR/23/2007 12:3Play |
| ||||
|
|
|
| 03 APR/24/2007 12:0 | 00:00:15 ► |
|
| ||
|
|
|
|
|
|
| Rename |
| |
|
|
|
| 04 APR/24/2007 12:3 |
| 00:00:16 ► |
| ||
| APR/24/2007 12:00 AM |
|
|
|
| Edit Scene |
| ||
|
| 05 APR/25/2007 12:0 |
|
|
|
| |||
|
|
| 00:06:32 ► |
| |||||
| 1 Scene |
|
|
|
|
| Copy |
| |
|
|
|
|
|
|
|
|
| |
| APR/24/2007 12:00 AM |
|
|
|
| Delete |
| ||
|
|
|
|
|
|
|
|
|
|
| MOVE | ENTER |
| RETURN |
| EXIT | |||
|
|
|
|
|
|
|
|
|
|
Advanced Editing (Playlist)
 ▌Creating a Playlist
(VR mode)
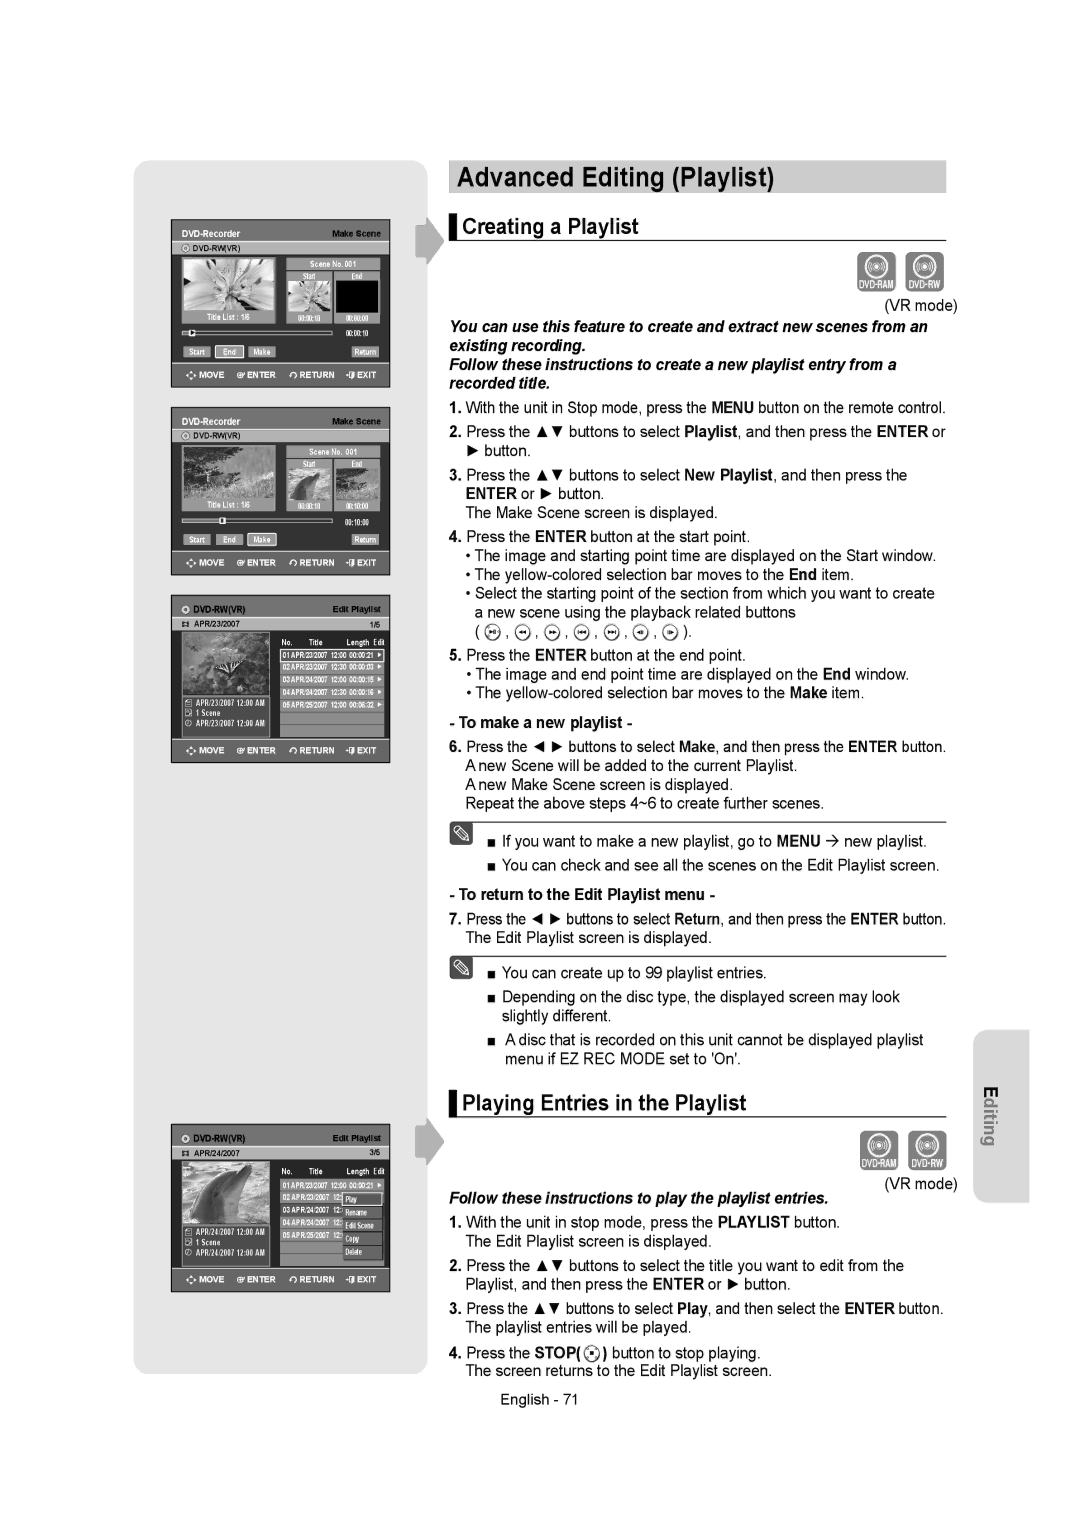
You can use this feature to create and extract new scenes from an existing recording.
Follow these instructions to create a new playlist entry from a recorded title.
1.With the unit in Stop mode, press the MENU button on the remote control.
2.Press the ▲▼ buttons to select Playlist, and then press the ENTER or ► button.
3.Press the ▲▼ buttons to select New Playlist, and then press the ENTER or ► button.
The Make Scene screen is displayed.
4.Press the ENTER button at the start point.
•The image and starting point time are displayed on the Start window.
•The
•Select the starting point of the section from which you want to create a new scene using the playback related buttons
( ![]() ,
, ![]() ,
, ![]() ,
, ![]() ,
, ![]() ,
, ![]() ,
, ![]() ).
).
5.Press the ENTER button at the end point.
•The image and end point time are displayed on the End window.
•The
- To make a new playlist -
6.Press the ◄ ► buttons to select Make, and then press the ENTER button. A new Scene will be added to the current Playlist.
A new Make Scene screen is displayed.
Repeat the above steps 4~6 to create further scenes.
■ If you want to make a new playlist, go to MENU new playlist.
■You can check and see all the scenes on the Edit Playlist screen.
-To return to the Edit Playlist menu -
7.Press the ◄ ► buttons to select Return, and then press the ENTER button. The Edit Playlist screen is displayed.
■ You can create up to 99 playlist entries.
■Depending on the disc type, the displayed screen may look slightly different.
■A disc that is recorded on this unit cannot be displayed playlist menu if EZ REC MODE set to 'On'.
▌Playing Entries in the Playlist
(VR mode)
Follow these instructions to play the playlist entries.
1.With the unit in stop mode, press the PLAYLIST button. The Edit Playlist screen is displayed.
2.Press the ▲▼ buttons to select the title you want to edit from the Playlist, and then press the ENTER or ► button.
3.Press the ▲▼ buttons to select Play, and then select the ENTER button. The playlist entries will be played.
4.Press the STOP( ![]() ) button to stop playing. The screen returns to the Edit Playlist screen.
) button to stop playing. The screen returns to the Edit Playlist screen.
