|
|
|
| Edit Playlist | |||
| Dolphin |
|
|
|
| 3/4 |
|
|
|
|
|
|
| ||
|
|
|
| No. | Title | Length Edit | |
|
|
|
| ||||
|
|
|
| 01 | Science | Play |
|
|
|
|
| 02 | Sky | Rename00:00:06 √ |
|
|
|
|
| 03 | Dolphin | Edit00:00:06Scene |
|
|
|
|
| 04 | Natural | Copy00:00:37 |
|
| Dolphin |
|
|
|
|
|
|
|
|
|
|
| Delete |
| |
| 7 Scene |
|
|
|
|
| |
|
|
|
|
|
|
| |
| APR/23/2007 06:43 AM |
|
|
|
|
| |
|
|
|
|
|
|
|
|
| MOVE | ENTER | RETURN | EXIT | |||
|
|
|
|
|
|
|
|
| Edit Playlist | |||
Dolphin |
|
| 5/5 | |
| No. | Title | Length | Edit |
| 01 | Science | 00:00:17 | ► |
| 02 | Sky | 00:00:06 | ► |
| 03 | Dolphin | 00:00:06 | ► |
Dolphin | 04 | Natural | 00:00:37 | ► |
05 | Dolphin | 00:00:06 | ► | |
7 Scene |
|
|
|
|
APR/23/2007 06:43 AM |
|
|
| |
MOVE | ENTER | RETURN | EXIT | |
|
|
| Edit Playlist | ||
| Dolphin |
|
|
| 5/5 |
|
|
|
| Do you want to delete? | |
|
|
|
|
|
|
| Dolphin |
|
| Yes | No |
| 7 Scene |
|
|
|
|
| APR/23/2007 06:43 AM |
|
|
| |
|
|
|
|
|
|
| MOVE | ENTER | RETURN | EXIT | |
|
|
|
|
|
|
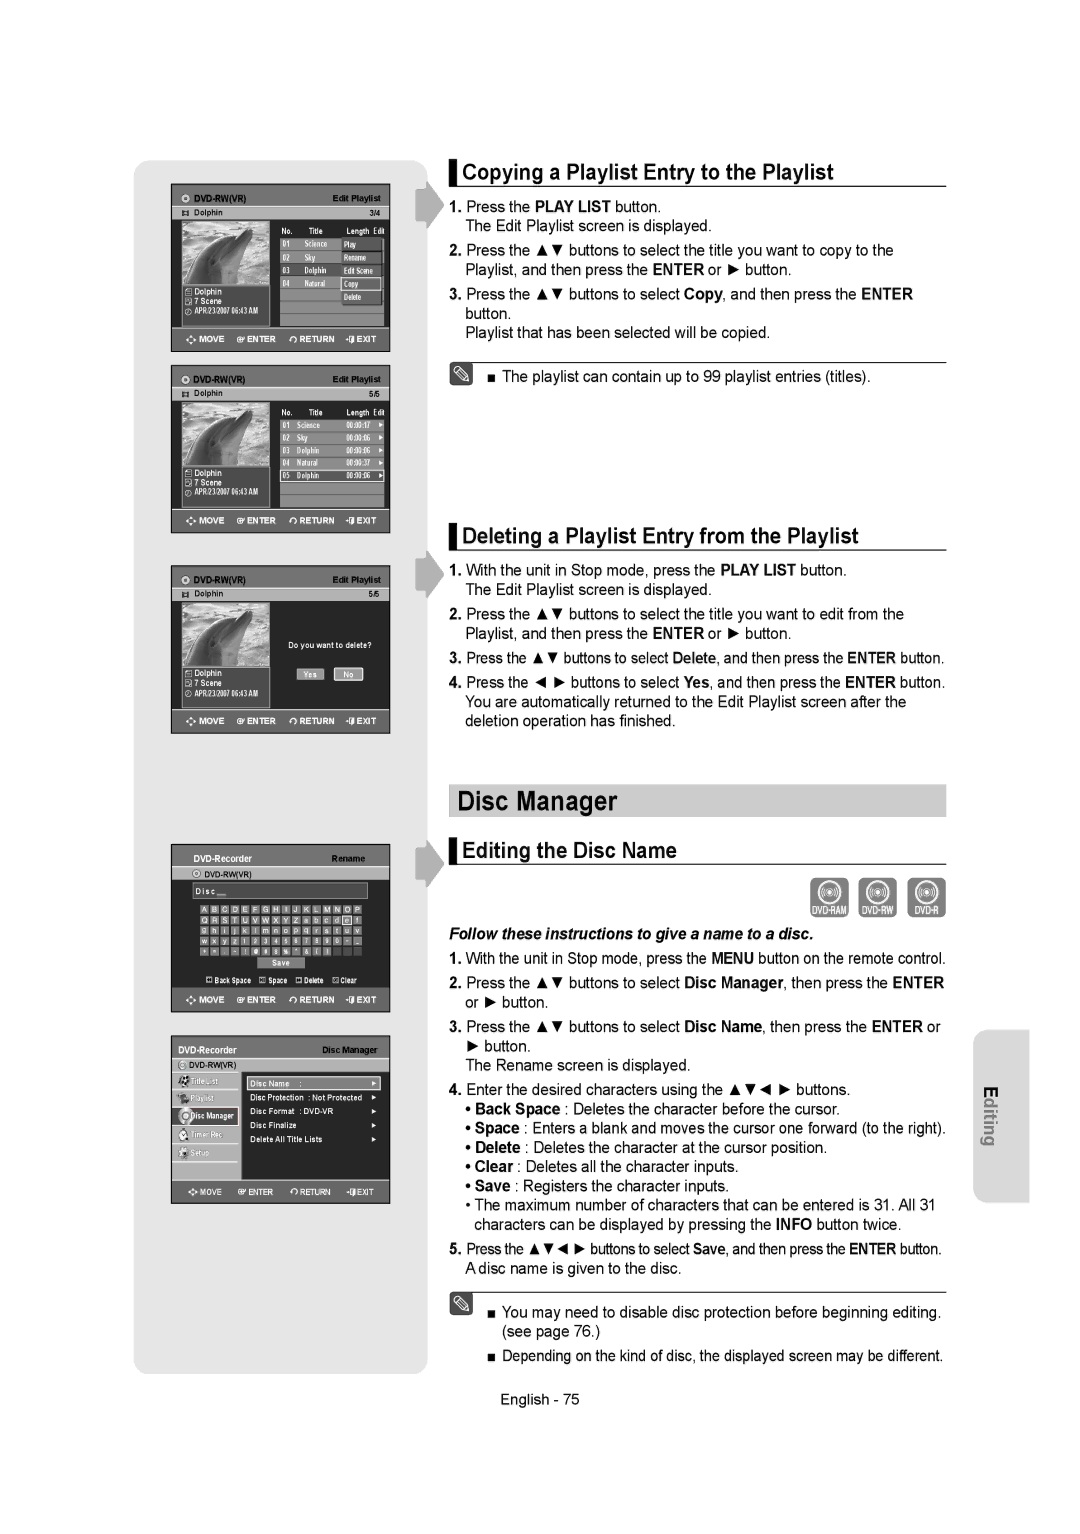
▌Copying a Playlist Entry to the Playlist
1.Press the PLAY LIST button.
The Edit Playlist screen is displayed.
2.Press the ▲▼ buttons to select the title you want to copy to the Playlist, and then press the ENTER or ► button.
3.Press the ▲▼ buttons to select Copy, and then press the ENTER button.
Playlist that has been selected will be copied.
■ The playlist can contain up to 99 playlist entries (titles).
▌Deleting a Playlist Entry from the Playlist
1.With the unit in Stop mode, press the PLAY LIST button. The Edit Playlist screen is displayed.
2.Press the ▲▼ buttons to select the title you want to edit from the Playlist, and then press the ENTER or ► button.
3.Press the ▲▼ buttons to select Delete, and then press the ENTER button.
4.Press the ◄ ► buttons to select Yes, and then press the ENTER button. You are automatically returned to the Edit Playlist screen after the deletion operation has finished.
| Rename | |||
|
|
| ||
Disc |
|
|
|
|
|
| Save |
|
|
Back Space | Space | Delete | Clear | |
MOVE | ENTER | RETURN | EXIT | |
| Disc Manager | |||
|
|
|
| |
Title List | Disc Name | : |
| ► |
Playlist | Disc Protection : Not Protected | ► | ||
Disc Manager | Disc Format : |
| ► | |
Disc Finalize |
|
| ► | |
Timer Rec. |
|
| ||
Delete All Title Lists |
| ► | ||
|
| |||
Setup |
|
|
|
|
MOVE | ENTER | RETURN | EXIT | |
Disc Manager
 ▌Editing the Disc Name
Follow these instructions to give a name to a disc.
1.With the unit in Stop mode, press the MENU button on the remote control.
2.Press the ▲▼ buttons to select Disc Manager, then press the ENTER or ► button.
3.Press the ▲▼ buttons to select Disc Name, then press the ENTER or ► button.
The Rename screen is displayed.
4.Enter the desired characters using the ▲▼◄ ► buttons.
•Back Space : Deletes the character before the cursor.
•Space : Enters a blank and moves the cursor one forward (to the right).
•Delete : Deletes the character at the cursor position.
•Clear : Deletes all the character inputs.
•Save : Registers the character inputs.
•The maximum number of characters that can be entered is 31. All 31 characters can be displayed by pressing the INFO button twice.
5.Press the ▲▼◄ ► buttons to select Save, and then press the ENTER button. A disc name is given to the disc.
■ You may need to disable disc protection before beginning editing. (see page 76.)
■Depending on the kind of disc, the displayed screen may be different.
