SAMSUNG LASER PRINTER
User’s Guide
Centronics is a trademark of Centronics Data Computer Corporation
Chapter 2 SETTING UP YOUR PRINTER
Chapter 1 INTRODUCTION
CONTENTS
Chapter 4 PRINTING TASKS
Chapter 3 USING PRINT MATERIALS
Chapter 6 SOLVING PROBLEMS
Chapter 5 MAINTAINING YOUR PRINTER
Chapter 7 APPENDIX
Laser Safety Statement
Environmental and Safety Consideration
Ozone Safety
Power Saver
Recycling
Radio Frequency Emissions
FCC regulations
Canadian Radio Interference Regulations
viii
Declaration of Conformity European Countries
Approvals and Certifications
EC Certification
Page
Do not disassemble the printer. Doing so may give you an electric shock
1 INTRODUCTION
Special Features Printer Components Understanding the Control Panel
Create professional documents
Special Features
Print with excellent quality and high speed
Handle paper flexibly
Save your time and money
Print in various environments
You can print in Windows 95/98/Me/NT 4.0/2000/XP
Output Support Front Cover Manual Feeder guide
Printer Components
Front View
Control Panel Power switch Tray Paper level indicator
Toner cartridge Front Cover
Inside View
Rear View
Power receptacle Parallel port USB port
On Line/Error and Toner Save LEDs
Understanding the Control Panel
Description
Toner Save mode
Cancel button
Cleaning inside
Canceling print job
1.8 INTRODUCTION
Printing a Demo Page Installing Printer Software
2 Setting Up Your Printer
Unpacking Installing the Toner Cartridge Loading Paper
Connecting a Printer Cable Turning the Printer on
Components may differ from one country to another
Unpacking
Clearance Space
Selecting a Location
Installing the Toner Cartridge
4 Locate the cartridge slots inside the printer, one on each side
Loading Paper
4 Load paper with the print side facing down
Make sure that all four corners are flat in the tray
6 Slide the tray back into the printer
Do not push the width guide far enough to cause the material to warp
Changing the Paper Size in the Tray
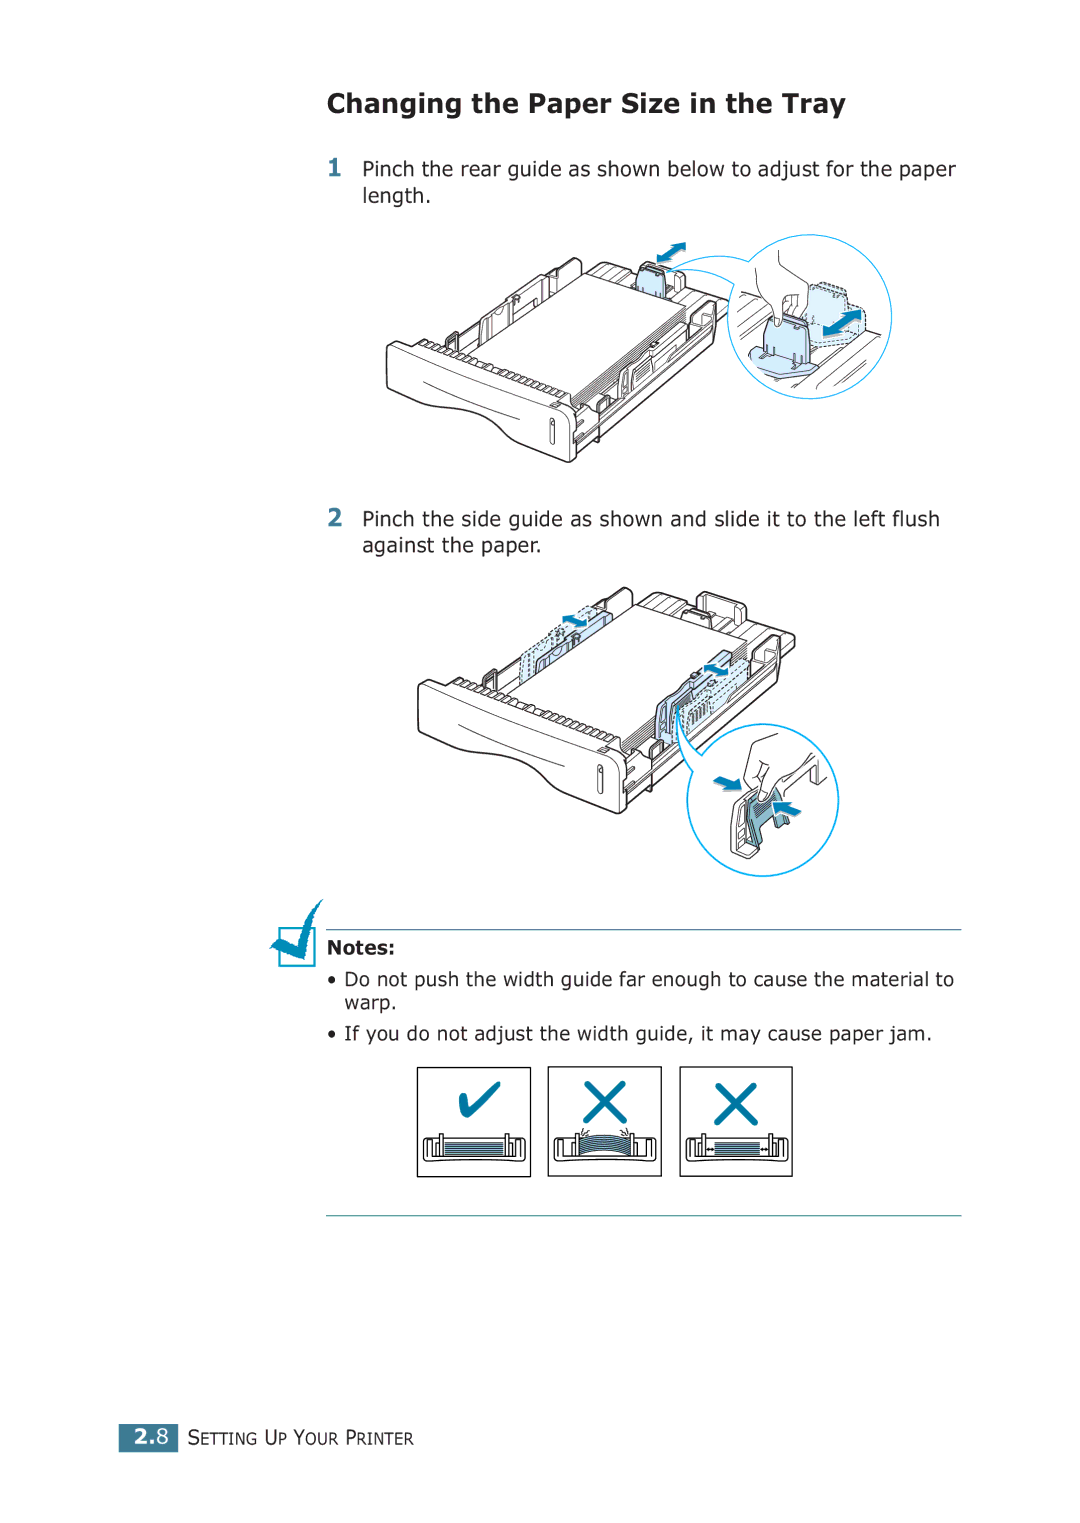
1 Pinch the rear guide as shown below to adjust for the paper length
If you do not adjust the width guide, it may cause paper jam
Using a Parallel Cable
Connecting a Printer Cable
Using a USB Cable
2.10 SETTING UP YOUR PRINTER
To the USB port on your computer
Turning the Printer on
Printing a Demo Page
2 The Demo page shows the printer’s current configuration
ML-1710P Series
Installing Printer Software
If you are printing from Windows
If you are printing in Linux
Printer Driver Features
Feature
Printer Driver
If the CD-ROM drive does not automatically run
Installing Printer software in Windows
Installing Printer Software
System Requirements
3 Choose the installation type
6 To register yourself as a user of Samsung Printers, select
2 Select Samsung ML-1710 Series and then Printer Maintenance
Repairing the Printer software
2 Select Samsung ML-1710 Series and Language Selection
Removing the Printer software
Changing the Display Language
2 Select Samsung ML-1710 Series and then Printer Driver Maintenence
2 Select Samsung ML-1710 Series and View User’s Guide
Viewing the User’s Guide
Printing on Transparencies
3 Using Print Materials
Choosing Paper and Other Materials Selecting the Output Location
Loading Paper Printing on Envelopes Printing on Labels
Choosing Paper and Other Materials
Tray
Sizes and Capacities
Size
Input Source/Capacitya
Guidelines for Paper and Special Materials
Printing to the Top Output Tray Face down
Selecting the Output Location
To open the rear output tray
Printing to the Rear Output Tray Face up
Using the Tray
Loading Paper
Paper empty
Using the Manual Feeder
To cancel a print job in Manual Feed mode 1 Turn the printer off
Guidelines
Printing on Envelopes
4 Press the Cancel button to start feeding
Guidelines
Printing on Labels
Note To prevent labels from sticking to each other, do not let the
Printing on Transparencies
printed label sheets stack up as they are printed out
Guidelines
3.14 USING PRINT MATERIALS
Guidelines
Printing on Card Stock or Custom-sized Materials
Guidelines
Printing on Preprinted Paper
Load with the design face down, bottom edge towards the printer
3.18 USING PRINT MATERIALS
Printing Overlays Using the Status Monitor
Printing a Document Setting Paper Properties
Using the Toner Save Mode
Printing Posters Setting Graphic Properties Printing Watermarks
Printing a Document
The Layout tab is first displayed
Canceling a Print Job
To stop a print job from the Control Panel
3 Select the Samsung ML-1710 Series printer
To stop a print job from the Printers folder
Using a Favorite Setting
Using Help
3 From the Document menu, select Cancel Printing
Description
Setting Paper Properties
➀ ➁ ➂ ➃
Property
➂ Make sure that Source is set to the corresponding paper tray
Color Paper
Property
Description
From the Control Panel
Using the Toner Save Mode
From the software application
4.10 PRINTING TASKS
Printing Multiple Pages on One Sheet of Paper N-Up Printing
Down
Right then
Left
Down then
4.12 PRINTING TASKS
Scaling Your Document
Fitting Your Document to a Selected Paper Size
4.14 PRINTING TASKS
Printing Posters
4 Click the Paper tab, select the paper source, size and type
Toner Save
Setting Graphic Properties
Resolution
➀ ➁ ➂
Advanced Options Darkness
Property
Description
printer about how to image the text in your
➂ True-Type Options
Advanced
Options
Printing Watermarks
Using an existing Watermark
4.20 PRINTING TASKS
Creating a Watermark
Deleting a Watermark
Editing a Watermark
What is an Overlay?
Printing Overlays
Creating a New Page Overlay
4 In the Overlays window, click Create Overlay
4.24 PRINTING TASKS
Using a Page Overlay
4 Click Delete Overlay
Deleting a Page Overlay
Opening the Status Monitor
Using the Status Monitor
Changing the Status Monitor Program Setting
Windows 9x/Me
Setting Up Locally Shared Printer
Setting Up Host Computer
Setting Up Client PC
Windows NT/2000/XP
Setting Up Host Computer
Setting Up Client PC
4.30 PRINTING TASKS
9 Fill in the Enter a port name field, and enter the shared name
10Click OK, and click Close 11Click OK. Windows NT
Click Apply, and click OK. Windows 2000/XP
Maintaining the Toner Cartridge Cleaning the Printer
Consumables and Replacement Parts
5 Maintaining Your Printer
Saving toner
Maintaining the Toner Cartridge
Toner cartridge storage
Toner cartridge life expectancy
Cautions
Redistributing Toner
5.4 MAINTAINING YOUR PRINTER
Replacing the Toner Cartridge
Cleaning inside the printer
Cleaning the Printer
Cleaning the Outside
Cleaning the Inside
5 Plug in the power cord, and turn the printer on
Printing a cleaning sheet
Consumables and Replacement Parts
Items
Yield Average
Troubleshooting Error Messages Common Windows Problems
6 Solving Problems
Troubleshooting Checklist Solving General Printing Problems
Clearing Paper Jams Solving Print Quality Problems
Check
Troubleshooting Checklist
Solution
Line/Error LED is on
Solution
Solving General Printing Problems
Problem
Possible Cause
The printer driver may
Problem
Solution
Possible Cause
reboot the computer. Turn the printer off
Problem
Solution
functionality with the following command
Solution
Download as Bit Image in the
Advanced options of the Graphic
Problem
In the Paper Exit Area
Clearing Paper Jams
5 Open and close the front cover. Printing can be resumed
6.8 SOLVING PROBLEMS
2 Open the rear output tray
4 Close the rear output tray
4 Open and close the front cover. Printing can be resumed
In the Paper Feed Area
1 Slide out the tray to expose the jammed paper
3 Slide the tray back into the printer
6.10 SOLVING PROBLEMS
Around the Toner Cartridge
Rotate option to 90º
Tips for Avoiding Paper Jams When Printing on the A5-sized Paper
Solving Print Quality Problems
Print Quality Checklist
Tips for Avoiding Paper Jams
Dropouts
Solving Print Quality Problems
Light or faded
print
Gray background
Toner smear
Solution
Vertical lines
Page skew
scatter
Misformed
characters
Solution
Wrinkles or
Black pages
Problem
Character Voids
Curl
Problem
Solution
LED pattern
Troubleshooting Error Messages
Possible Problems and Solutions
LED status legend
Common Windows Problems
Possible Cause and Solution
Problem
Possible Cause and Solution
Common Linux Problems
the /etc/printcap file
Problem
Problem
Possible Cause and Solution
work correctly for some
Problem
Possible Cause and Solution
How do I specify the IP
Using Your Printer in Linux Printer Specifications
Paper Specifications
7 APPENDIX
Supported OS
Using Your Printer in Linux
Installing the Printer Driver
Installing Printer Driver
Install
7.4 APPENDIX
11To exit, click OK
7.6 APPENDIX
Changing the Printer Connection Method
5 Select Complete uninstall and then click Uninstall
Uninstalling the Printer Driver
Using the Configuration Tool
3 The Info tab shows general information about the printer
Changing LLPR Properties
3 The LLPR Properties window opens
Specifications and Description
Printer Specifications
Overview
Paper Specifications
Paper
Dimensionsa
Weight
Supported Sizes of Paper
Solution
Guidelines for Using Paper
Symptom
Problem with
Category
Paper Specifications
Specifications
Paper Output Capacity
Printer and Paper Storage Environment
7.18 APPENDIX
INDEX
status monitor, use
software install 2.15 Linux 7.2 overview
system requirements 2.15 uninstall specification paper 7.13 printer
toner install 2.4 life 5.2 recycle 5.2 redistribute 5.3 replace
Rev.2.00
Visit us at