❈If the power is turned off after PRESET, AUTO PAN, SCAN, PATTERN function is activated and no other control is made, camera will do the same function after the power is turned on.
❈Menu setting is available only when tilt position is under 90°. When tilt position is over 90° and
Use the controller to press the MENU selection key and the following
| (CAMERA SET) |
|
| |
|
|
| ||
|
|
|
| |
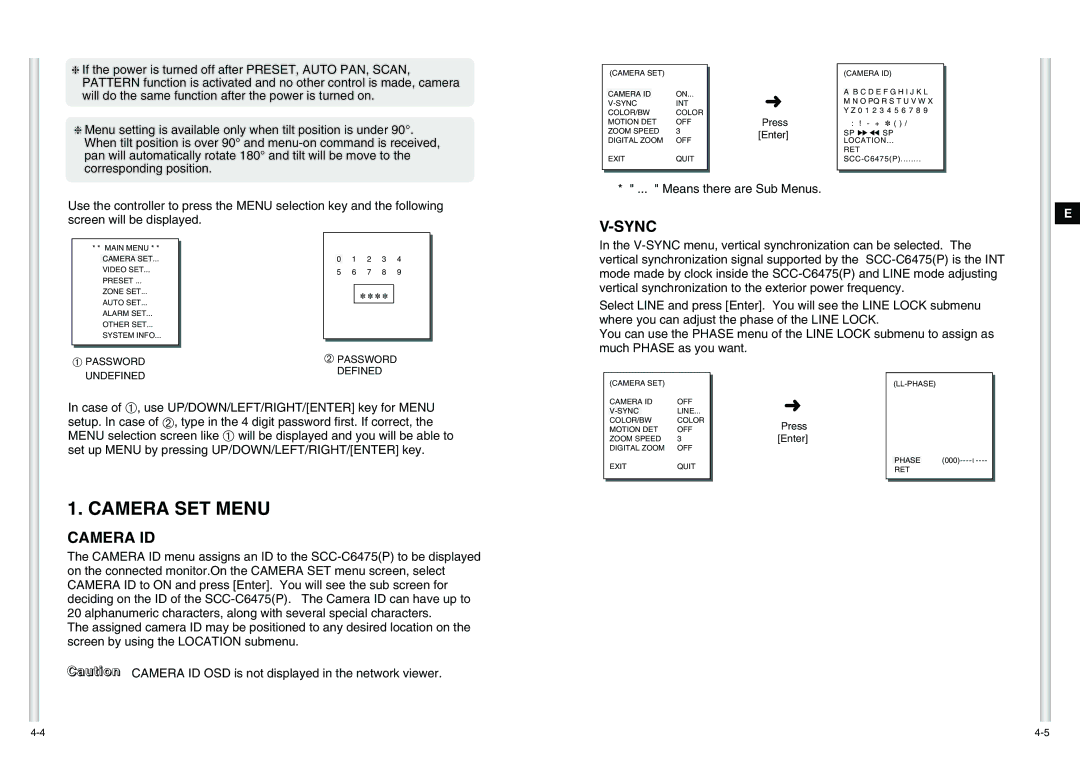
| CAMERA ID |
| ON... | ➜ |
| INT | |||
| COLOR/BW | COLOR | Press | |
| MOTION DET | OFF | ||
| ZOOM SPEED | 3 | [Enter] | |
| DIGITAL ZOOM | OFF | ||
|
| |||
| EXIT | QUIT |
| |
|
|
|
|
|
|
|
|
|
|
* " ... " Means there are Sub Menus.
(CAMERA ID)
AB C D E F G H I J K L M N O PQ R S T U V W X Y Z 0 1 2 3 4 5 6 7 8 9
:! - + ✽ ( ) /
SP ï î SP LOCATION...
RET
E
screen will be displayed.
V-SYNC
* * MAIN MENU * *
CAMERA SET...
VIDEO SET...
PRESET ...
ZONE SET...
AUTO SET...
ALARM SET...
OTHER SET...
SYSTEM INFO...
➀PASSWORD UNDEFINED
0 1 2 3 4
5 | 6 | 7 | 8 | 9 |
✽ ✽ ✽ ✽
➁PASSWORD DEFINED
In the
Select LINE and press [Enter]. You will see the LINE LOCK submenu where you can adjust the phase of the LINE LOCK.
You can use the PHASE menu of the LINE LOCK submenu to assign as much PHASE as you want.
(CAMERA SET) |
In case of ➀, use UP/DOWN/LEFT/RIGHT/[ENTER] key for MENU setup. In case of ➁, type in the 4 digit password first. If correct, the MENU selection screen like ➀ will be displayed and you will be able to set up MENU by pressing UP/DOWN/LEFT/RIGHT/[ENTER] key.
1. CAMERA SET MENU
CAMERA ID
The CAMERA ID menu assigns an ID to the
The assigned camera ID may be positioned to any desired location on the screen by using the LOCATION submenu.
Caution CAMERA ID OSD is not displayed in the network viewer.
CAMERA ID | OFF | |
| LINE... | |
COLOR/BW | COLOR | |
MOTION DET | OFF | |
ZOOM SPEED | 3 | |
DIGITAL ZOOM | OFF | |
EXIT | QUIT | |
➜
Press [Enter]
PHASE
RET