Manual DE Instrucciones
Advertencia
För att helt koppla från strömmen, dra ut stickproppen
Warnung
Avertissement
U T I O N
Introduction
Never operate the register with wet hands
Contents
Other Basic Sales Entries
Part2 for the Operator
Part3 for the Manager
Correction After Finalizing a Transaction Void mode
External View Front view Rear view
Parts and Their Functions
Printer
X2/Z2
Mode Switch and Mode Keys
Keyboard Keyboard layout Key names
X1/Z1
Drawer Lock Key
Machine state symbols
Displays Operator display
Customer display Pop-up type
Initializing the Cash Register
Preparing the Cash Register
Push the printer cover forward and detach it
Installing Batteries
Be careful with the paper cutter, so as not to cut yourself
Feed the end of the paper along with
Installing a Paper Roll
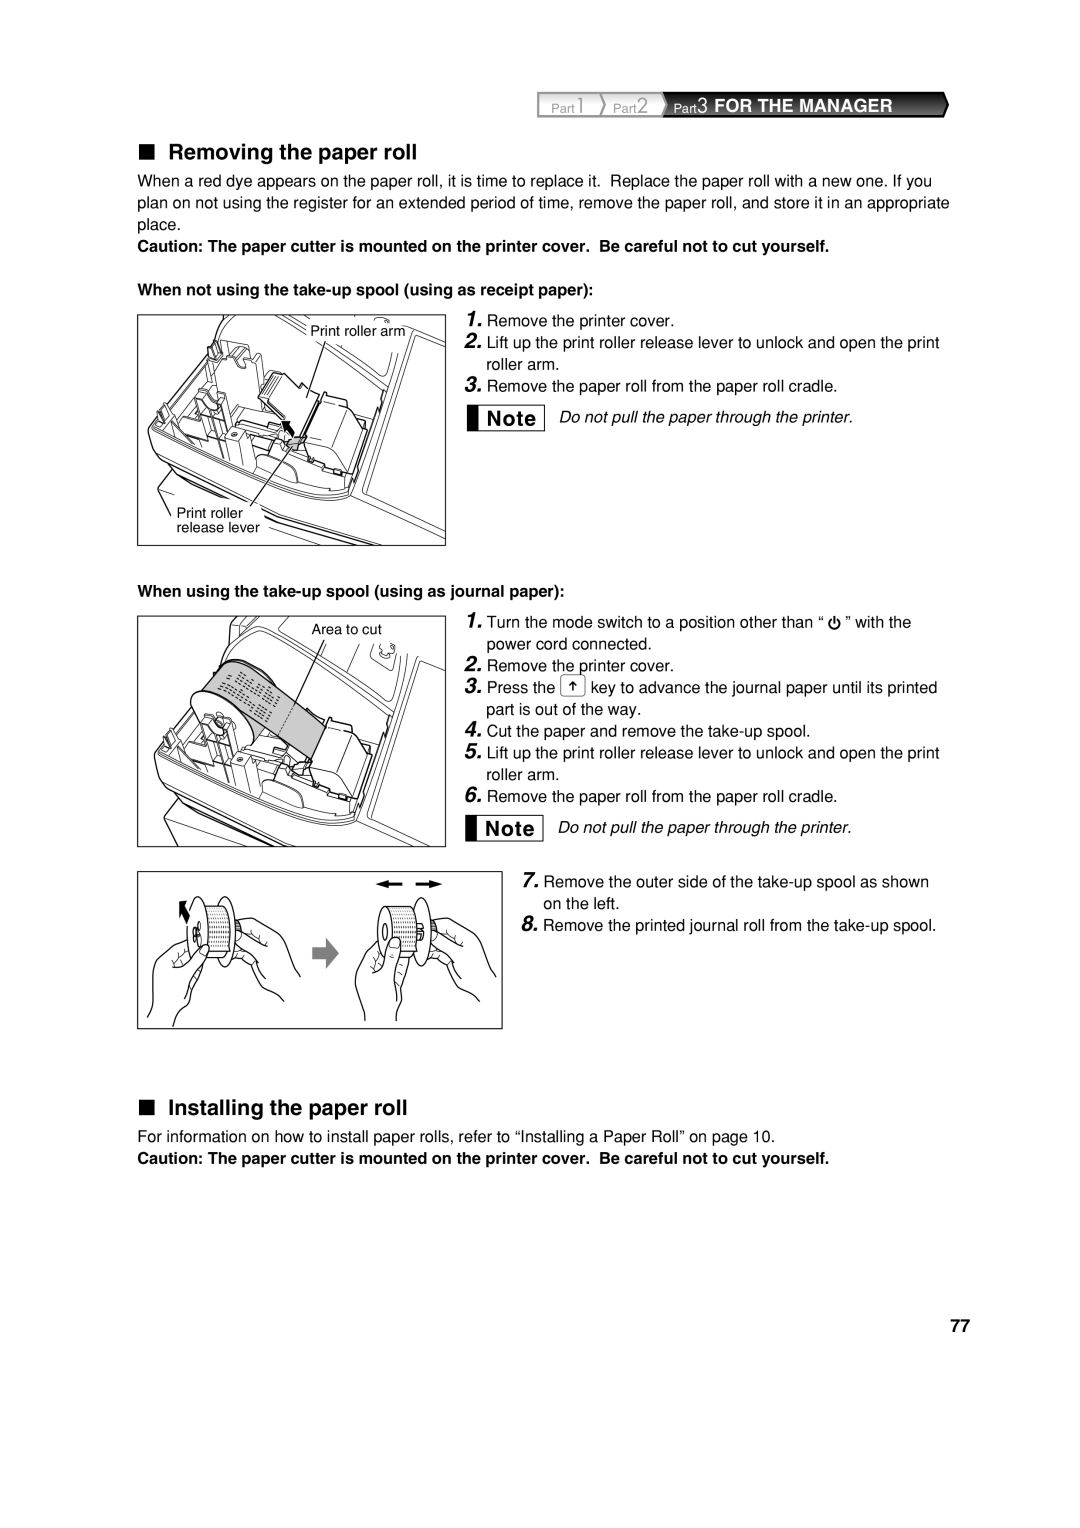
When using the take-up spool using as journal paper
When not using the take-up spool using as receipt paper
Printing guidance messages
Sample print of Time Setting
Help Function
Printing the help menu
Abbreviations and Terminology
Basic Function Programming
Description of special keys
Guidance for text programming
Using character keys on the keyboard
Key operation example Print
Language Selection
Date and Time Programming
Time
Tax rate programming
Tax Programming
Sign and tax rate X YYY.YYYY
Dept. code VAT/tax status Sign
Department Programming
Department status
To delete a tax rate, use the following sequence
Preset unit price
Department text item label 12 digits
S1 P
Unit price and associated department assignment
PLU Price Look-Up and Subdepartment Programming
To delete a PLU code, use the following sequence
PLU text item label 12 digits
PLU/subdepartment selection
For subdepartment or 1 for PLU
Clerk names 12 digits
Text Programming
Rounding system
Decimal point position tab setting for domestic currency
Programming Other Necessary Items
Logo message print format 3 types
Receipt print
Basic Sales Entry
Basic Sales Entry Example
Key operation example Operator display
PLU Entry
Enter a PLU code using numeric keys and press the pkey
Key operation exampleOperator displayReceipt print
Key operation example Operator display Receipt print
Cancellation of the Numeric Entry
Correction
Correction of the Last Entry direct void
Subtotal Void
10 p 12 p
Page
Full sales report
Full Sales Report Z Report
Key operation Sample report
Periodic consolidation
Error code table
Before Calling for Service
Other Basic Sales Entries
Error Warning
Additional Information for Basic Sales Entry
Department entries
Item Entries Single item entries
PLU/subdepartment entries
Key operation example Receipt print
Repeat entries
PLU entries
Subdepartment open PLU entries
Single item cash sale Sics entry
Multiplication entries
Cheque tendering
Displaying Subtotals
Finalization of Transaction Cash or cheque tendering
Cash or cheque sale that does not require tender entry
Enter items and press a credit key cor b
Credit sale
Mixed-tender sale
Computation of VAT Value Added Tax/tax VAT/ tax system
Automatic VAT 1 and automatic tax 2-4 system
Auxiliary Entries Percent calculations premium or discount
Optional Features
Deduction entries
Non-add code number entries and printing
Refund entries
Deduction for item entries
Exchange rate 0.000000 to
Applying preset exchange rate
Auxiliary Payment Treatment Currency exchange
Applying manual exchange rate
Automatic Sequence Key akey Entries
Received-on-account entries
Paid-out entries
No sale exchange
Prior to Programming
Procedure for programming
Entering character codes with numeric keys on the keyboard
165
Alphanumeric character code table
DC Double-size character code
Rate for %, &and
Miscellaneous Key Programming
Amount for
+/- sign
When programming for percent keys, always enter 0 for D
Percent rate limitation for %and
Function parameters for %, &and
Function parameters for
Amount tendered entry only for X, Y, c, band a
When programming for ror R, always enter 0 for a and B
1Item Selection Entry
Footer printing only for X, Y, c, band a
Domestic currency symbol 4 digits
Foreign currency symbol 4 digits
Other Text Programming
Function text 12 digits
Training mode text 12 digits
Cash
List of function texts
Register number
Register Number and Consecutive Number Programming
Consecutive number
Function selection for miscellaneous keys
Various Function Selection Programming
Job code Selection Entry
Receipt print format
Print format
Printing style
Other programming
Job code Selection Entry
Compression print on journal
Part3 for the Manager
Job code Selection Entry
Action when EJ memory area is full
PGM mode operation records type
Temporary EJ printing during a transaction
Printing data on EJ Z report
Power save mode
Logo message print format
Training clerk specification for training mode
Thermal printer density
Auto 2 p100 +
Auto key programming Automatic sequence key
Exchange calculation method
Euro system settings
Automatic Euro modification operation settings
Euro Programming
Key sequence for reading stored program
Date setting for Euro modification operation
Time setting for Euro modification operation
Reading Stored Programs
Programming report
Sample printouts
Printer density programming report
Training mode text 6 PLU programming report
Programming report Department programming report
Auto key programming report
1000
Training Mode
Summary of Reading X and Resetting Z Reports
Reading X and Resetting Z of Sales Totals
Hourly report
When you take Z1 report, Z1 is printed
Daily Sales Totals
PLU report by designated range Individual clerk report
Sample EJ report
To reset all of the data
Printing journal data on the way of a transaction
Sample print
Override Entries
Incorrect receipt Cancellation receipt
Period
Euro Migration Function
How currencies are treated in your register
Automatic Euro modification operation
Euro status
Items
Checking the current Euro status
Optional Programming for the Introduction of Euro
Programming for Exchange Key
Case of Power Failure
Operator Maintenance
Case of Printer Error
Replacing the Paper Roll
Paper specification
How to set the paper roll
Replacing the Batteries
Removing the paper roll
Installing the paper roll
Opening the Drawer by Hand
Cleaning the Printer Print Head / Sensor / Roller
Removing a Paper Jam
Removing the Drawer
Specifications
European Union
European Union
Other Countries outside the EU
Österreich 08-205 505
Einleitung
Wichtig
Hotline Nummern
Teil
Inhalt
Fehlercodetabelle
Andere Grundlegenden Registrierungen
Teil 2 FÜR DEN Bediener
Korrektur Nach Abschluss Einer Transaktion Storno-Modus
Teil 3 FÜR DEN Geschäftsinhaber
Vorsichtig verfahren, damit Sie keine Schnittverletzungen
SCHRITT1 Teile UND Ihre Funktionen
Außenansicht Vorderansicht
Drucker
Tastatur Tastaturanordnung Tastenbezeichnungen
Funktionsschloss und Funktionsschlüssel
Schubladenschlüssel
Registrierkassen-Statussymbol
Bedieneranzeige
Pop-Up-Typ
Initialisierung der Registrierkasse
SCHRITT2 Vorbereitung DER Registrierkasse
Einsetzen der Batterien
Führen Sie das Ende des
Einsetzen einer Papierrolle
Teil1 Schnellstartanleitung
Druckbeispiel für Uhrzeit Setzen
SCHRITT3 HELP-TASTE
Ausdrucken des HELP-Menüs
Tastenbedienung Druck
Beschreibung spezieller Tasten
SCHRITT4 Programmierung DER Grundlegenden Funktionen
Abkürzungen und Terminologie
Vor der Programmierung Vorgang für die Programmierung
Verwendung der Zeichentasten der Tastatur
Leitfaden zur Textprogrammierung
Einstellung von Datum und Uhrzeit Einstellung des Datums
Sprachauswahl
Einstellung der Uhrzeit
Programmierung des Steuersatzes
Mehrwertsteuerprogrammierung
Warengruppen MwSt-Status Vorzeichen
Programmierung für Warengruppen
Warengruppenstatus
Um einen MwSt-Satz zu löschen, gehen Sie wie folgt vor
Einzelpreis
Um die gegenwärtige Einstellung beizubehalten
Zuordnung des Einzelpreises und der Warengruppen
Programmierung für PLUs Einzelartikel und Sub-Warengruppen
Programmierung von PLU-Text Artikelbezeichnung 12 Stellen
Wahl der PLU/Sub-Warengruppe Offenes PLU
Für Sub-Warengruppe oder 1 für PLU
Bedienernamen 12 Stellen
Textprogrammierung
Logotext 6 Zeilen und 24 Stellen für jede Zeile
Logodruckformat 3 Typen
Programmierung anderer erforderlicher Positionen
Tastenbedienung Bedieneranzeige
Beispiel für die grundlegende Registrierung
Kassenbondruck
Tastenbedienung Bedieneranzeige Kassenbondruck
PLU-Registrierung
Löschen eingegebener Ziffern
SCHRITT6 Korrekturen
Korrektur der letzten Registrierung Sofortstorno
Zwischensummenstorno
Zwischensummenstorno
Page
Tastenbedienung Berichtsbeispiel
Gesamtumsatzbericht
Periodische Berichte
Fehlercodetabelle
Kassenbonduplikat
Fehlermeldung
Bedienerzuordnung
Kassenbonausgabe EIN/AUS
Bei Verwendung der Warengruppentasten für Warengruppe 1 bis
Postenregistrierungen Einzelpostenregistrierung
Warengruppenregistrierung
Fehleraufhebungsfunktion
Wiederholungsregistrierung
Einzelposten-Barverkauf SICS-Registrierung
Multiplikationsregistrierung
Abschluss einer Transaktion Bar- oder Scheckeingabe
Anzeige von Zwischensummen
Scheckzahlung
Gemischte Zahlung
Kreditverkauf
Wenn das manuelle
Prozentberechnung für Postenregistrierungen
Optionale Merkmale
AbzugsRabatt-Registrierungen
Prozentberechnung für Zwischensumme
Eingabe und Ausdrucken von nicht-addierenden Nummern
Retourenregistrierung
Abzug für Postenregistrierungen
Umrechnungskurs 0.000000 bis
Zahlungshandhabung Fremdwährungsumrechnung
Verwendung des programmierten Umrechnungskurses
Verwendung des manuell einzugebenden Umrechnungskurses
Registrierung mit der Automatik-Eingabetaste a
Einzahlungsregistrierungen
Auszahlungsregistrierungen
Kein Verkauf Geldwechsel
Eingabe von Zeichencodes mit den Zifferntasten der Tastatur
VOR DER Programmierung
DC Code für Zeichen in doppelter Größe
Alphanumerische Zeichencodetabelle
Programmierung verschiedener Tasten
Programmierung Zusätzlicher Funktionen
Programmierung des Rabattastenbetrags
Obere Eingabe-Betragsgrenze nur für Rabattaste
Programmierung der Prozentsatzbegrenzung %und
+/- Vorzeichen
Posten %/Posten
Programmierung der Funktionsparameter für die V-Taste
Zahlgeldeingabe nur für die Tasten X, Y, c, bund a
Bund Awenn als TL-Taste verwendet
1Positionen Wahl Eingabe
Ausdruck der Fusszeile nur für die Tasten X, Y, c, bund a
Inlandswährungssymbol 4 Stellen
Fremdwährungssymbol 4 Stellen
Andere Textprogrammierung
Funktionstext 12 Stellen
Text im Schulungsmodus 12 Stellen
Funktionstextliste
Fortlaufende Nummer
Weiterführende Funktionsprogrammierung
Programmierung der Maschinennummer und der laufenden Nummer
Maschinennummer
Funktionswahl für verschiedene Tasten
Programmierung der Wahl für zusätzliche Funktionen
Job-Code Positionen Wahl Eingabe
Kassenbon-Druckformat
Druckformat
Druckformat
Sonstige Programmierung
Job-Code Positionen Wahl Eingabe
Komprimierter Journalausdruck
Teil2 Teil3 FÜR DEN Geschäftsinhaber
Norwegen Zahlung Willkürlich Nur
Aufzeichnung der PGM-Programmierungen im Journal
Vorübergehender E-Journalausdruck bei einer Transaktion
Rundungssystem
Stromsparmodus
Thermodrucker-Druckdichte
Logodruckformat
Schulungsmodus
P100 +
Programmierung der Automatik-Eingabetaste
Währungsumrechnungsmethode
EURO-Programmierung
Einstellungen des EURO-Systems
Einstellungen für automatische EURO-Modifikationsoperation
Zeiteinstellung für EURO-Modifikationsoperation
Datumseinstellung für EURO-Modifikationsoperation
Abruf gespeicherter Programminhalte
Programmierbericht
Druckbeispiele
PLU-Programmierbericht
Programmierbericht Warengruppen-Programmierbericht
Schulungsbetriebsart
Tastenbedienung
Abruf X UND Nullstellung VON Umsätzen
Gesamtbedienerbericht
Tagesumsatzberichte
PLU-Bericht von bis Einzelbedienerbericht
Stundenumsatzbericht
Abrufen aller Daten Journalberichtsbeispiel
Abruf UND Nullstellung DES Elektronischen Journals EJ
Ausdrucken der Journaldaten während einer Transaktion
Druckbeispiel
Fehlerhafter Kassenbon Storno-Kassenbon
Überschreibung VON BETRAGS- EINGABE-BEGRENZUNGEN
Periode
EURO-UMRECHNUNGSFUNKTION
So werden Währungen von Ihrer Registrierkasse behandelt
Automatische EURO-Modifikationsoperation
EURO-Währung beruhen
Gegenstand
EURO-Status
Converted auf dem Bericht Nr ausgedruckt
Überprüfen des gegenwärtigen EURO-Status
Optionale Programmierung für die Einführung des Euro
Programmierung für Fremdwährungs-Umrechnungstaste
Vorsichtshinweise zur Handhabung des Thermopapiers
Wartung Durch DEN Bediener
Verhalten bei Stromausfall
Bei Eintritt einer Druckerstörung
Einsetzen und Herausnehmen der Papierrolle
Austauschen der Batterien
Wichtig
Einsetzen der Papierrolle
Herausnehmen der Papierrolle
Entfernen Sie die Druckwerkabdeckung
Öffnen der Schublade von Hand
Behebung eines Papierstaus
Reinigung des Druckers Thermodruckkopf / Sensor / Walze
Entfernen der Schublade
Technische Daten
Anderen Ländern außerhalb der EU
Entsorgungsinformationen für Benutzer aus Privathaushalten
Entsorgungsinformationen für gewerbliche Nutzer
Der Europäischen Union
Hotline France
Table des codes d’erreurs
Table DES Matieres
Partie 1 Guide DE Demarrage Rapide
Annulation d’un total partiel
Autres Entrees DE Ventes DE Base
Partie 2 Pour L’OPERATEUR
Avant UNE Programmation
Partie 3 Pour LE Directeur
Imprimante
Vue extérieure Vue frontale Vue arrière
Nota
Clavier Disposition du clavier Noms des touches
Commutateur de mode et clés de mode
Clé de verrouillage du tiroir
Symboles de condition de la machine
Affichages Affichage de l’opérateur
Affichage du client Type à éjection
Initialisation de la caisse enregistreuse
ETAPE2 Preparatifs DE LA Caisse Enregistreuse
Poussez le capot de l’imprimante vers l’avant et retirez-le
Installation des piles
Insérez l’extrémité du papier le long
Installation d’un rouleau de papier
Des guides de positionnement du
Partie1 Guide DE Demarrage Rapide
Manipulation des touches Impression
ETAPE3 Fonction D’AIDE
Impression du menu d’aide
Impression des messages de guidage
Description de touches spéciales
Abréviations et terminologie
Utilisation des touches de caractères sur le clavier
Guidage pour la programmation d’un texte
Exemple de manipulation des touches Impression
Choix d’une langue
Programmation de la date et de l’heure Date
Heure
Programmation d’un taux d’une taxe
Programmation de taxes
Code du rayon Statut de la T.V.A./taxe Signe
Programmation de rayons
Statuts des rayons
Pour annuler un taux de taxe, utilisez la séquence suivante
Sics Vente au comptant d’un seul article
Prix unitaire préréglé
Article Sélection Entrée
Statut de T.V.A./taxes taxable 1 à 4/non taxable
Texte d’un rayon indicatif d’un article 12 chiffres
Pour annuler le code d’un PLU, utilisez la séquence suivante
Affectation d’un prix unitaire et d’un rayon associé
Texte d’un PLU indicatif de l’article 12 chiffres
Sélection d’un PLU/rayon auxiliaire
Pour le rayon auxiliaire ou 1 pour le PLU
Nom des employés 12 chiffres
Programmation d’un texte
Disposition de l’impression du message logotype 3 sortes
Programmation d’autres articles nécessaires
Système d’arrondissement
Impression du reçu
Tournez le commutateur de mode sur la position REG
Exemple d’entrée pour des ventes de base
Appuyez sur la touche spour faire afficher le dû du montant
Affichage de l’opérateur Impression du reçu
Entrée de PLU prix par article déjà programmé
Annulation d’une entrée numérique
ETAPE6 Rectification
Rectification de la dernière entrée annulation directe
Annulation d’un total partiel
Page
Manipulation des touches Echantillon d’un rapport
Rapport complet sur les ventes
Manipulation des touches
Regroupement périodique
Offre obligatoire Effectuez une opération d’offre
Table des codes d’erreurs
Statut de l’erreur Action
Pour un achèvement direct
Fonction de mise en circuit/hors circuit des reçus
Mode d’économie d’énergie
Avertissement d’une erreur
Affectation d’un employé
Lorsqu’on utilise la touche d’entrée du code d’un rayon
Entrées d’articles Entrées d’un seul article
Entrées de rayons
Fonction d’échappement à une erreur
Entrées de PLU/rayons auxiliaires
Entrées répétées
Entrées de la vente au comptant d’un seul article Sics
Entrées multiplicatives
Offre contre un chèque
Affichage de totaux partiels
Vente contre une offre mixte
Vente à crédit
Système de T.V.A automatique et de taxes 2-4 automatique
Calcul d’un pourcentage pour des entrées d’articles
Fonctions Facultatives
Entrées de déductions
Calcul d’un pourcentage pour un total partiel
Entrées de numéros de codes non-additifs et impression
Entrées de remboursements
Déduction pour des entrées d’articles
Taux de change 0.000000 à
Traitement d’un payement annexe Change d’une monnaie
Application d’un taux de change préréglé
Application d’un taux de change manuel
Entrées de touche touche a dans une séquence automatique
Entrées de comptes admis
Entrées de décaissements
Pas de vente échange
Avant UNE Programmation
’un rouleau de papier à la page 76 pour le remplacement
Procédure pour la programmation
Table des codes de caractères alphanumériques
DC Code d’un caractère à double dimension
Taux pour %, &et
Programmation de touches diverses
Montant pour
’un article/d’un article
Limitation du taux de pourcentage pour %et
Paramètres de fonction pour %, &et
Signe +
Paramètres de fonction pour
Entrée de l’offre d’une somme seulement pour X, Y, c, bet a
Impression au bas d’un reçu seulement pour X, Y, c, bet a
Symbole d’une monnaie nationale 4 chiffres
Symbole d’une monnaie étrangère 4 chiffres
Programmations d’autres textes
Texte d’un fonction 12 chiffres
Texte pour le mode de formation 12 chiffres
NET2
Liste des textes de fonctions
Numéro consécutif
Numéro de l’enregistreuse
Sélection de fonctions pour des touches diverses
Programmation 1 pour la sélection de diverses fonctions
Code de travail Article Sélection Entrée
Disposition d’impression d’un reçu
Disposition pour une impression
Type d’impression
Autres programmations
Code de travail Article Sélection Entrée
Impression condensée sur la bande de détails quotidiens
Seulement
Norvège Payement Arbitrairement
Intervention lorsque la zone de la mémoire EJ est pleine
Type d’enregistements pour des opérations sur le mode PGM
Système d’arrondi
Programmation 2 pour la sélection de diverses fonctions
Mode d’économie d’énergie
Impression de données sur le rapport Z EJ
Densité de l’imprimante thermique
Disposition de l’impression d’un message logotype
Automatique
Réglages du système de l’EURO
Programmation de l’EURO
Méthode de calcul d’un change
Nom du rapport Séquence des touches
Lecture de programmes mémorisés
Rapport sur la programmation
Exemples d’impressions
Rapport sur la programmation d’un PLU
Mode DE Formation
Résumé des rapports de lectures X et de remises à zéro Z
Lecture X ET Remise a Zero DES Totaux DE Ventes
Exemple d’un rapport
Totaux de ventes quotidiennes
Rapport horaire
Rapport de l’ensemble des employés
Pour remettre à zéro toutes les données
Exemple d’impression
Pour lire toutes les données
Exemple d’un rapport EJ
Reçu incorrect Annulation du reçu
Entrees DE Surpassements
Opération de modification automatique de l’EURO
Comment les monnaies sont traitées dans votre enregistreuse
Période
Statut 2 de l’EURO
Articles
Vérification du statut en cours de l’EURO
Programmation facultative pour l’introduction de l’EURO
Programmation pour la touche de change
Dans le cas d’une panne de courant
Entretien PAR L’OPERATEUR
Dans le cas d’une erreur de l’imprimante
Pour remplacer les piles
Remplacement des piles
Remplacement d’un rouleau de papier
Comment installer le rouleau de papier
Enlèvement du rouleau de papier
Installation du rouleau de papier
Enlèvement du tiroir
Suppression d’un bourrage du papier
Ouverture du tiroir à la main
Donnees Techniques
Pays hors de l’Union européenne
Au sein de l’Union européenne
Importante
Introduccion
No opere nunca la caja registradora con las manos mojadas
Parte 1 Guia DE Inicio Rapido
Cancelación del subtotal
Tabla de códigos de error
Indice
Otros Registros Basicos DE Ventas
Parte 2 Para EL Operador
Antes DE LA Programacion
Parte 3 Para EL Administrador
Vista exterior Vista delantera Vista trasera
PASO1 Partes Y SUS Funciones
Impresora
Teclado Disposición del teclado Nombres de las teclas
Selector de modo y llaves de modo
Llave de la cerradura del cajón
Visualizadores Visualizador para el operador
Visualizador para el cliente tipo emergente
Símbolos del estado de la máquina
Inicialización de la caja registradora
PASO2 Preparacion DE LA Caja Registradora
Instalación de las pilas
Haga avanzar el extremo del papel
Instalación de un rollo de papel
Parte1 Guia DE Inicio Rapido
Operación de teclas Impresión
PASO3 Funcion DE Ayuda
Impresión del menú de ayuda
Impresión de mensajes de guía
Impuesto al valor añadido
Abreviaturas y terminología
Descripción de las teclas especiales
Sección
Empleo de las teclas de caracteres del teclado
Guía para la programación de texto
Procedimiento
Selección del idioma
Programación de la fecha y de la hora Fecha
Hora
Programación de la tasa de impuestos
Programación de los impuestos
Signo y tasa de impuestos X YYY.YYYY
Estado de sección
Programación de secciones
Código de sección Estado de IVA/impuestos Signo
Sics Venta en metálico de un solo artículo
Precio unitario preajustado
Elemento Selección Registro
Estado de IVA/impuestos imponible 1 a 4 / no imponible
Texto de sección etiqueta de artículo 12 dígitos
Asignación de precios unitarios y de secciones asociadas
Programación de PLU codificación de precios y subsección
Para borrar un código de PLU, emplee la secuencia siguiente
Texto de PLU etiqueta de artículo 12 dígitos
Selección de PLU/subsección
Para la subsección o 1 para PLU
Nombres de dependiente 12 dígitos
Programación de texto
Formato de impresión de mensaje del membrete 3 tipos
Programación de otros elementos necesarios
Sistema de redondeo
Impresión en el recibo
PASO5 Registro Basico DE Ventas
Ejemplo de registro básico de ventas
Pulse la tecla spara visualizar el importe a cobrar
Registro de PLU
Corrección del último registro cancelación directa
Cancelación del registro numérico
PASO6 Correccion
Cancelación del subtotal
Page
Operación de teclas Informe de muestra
Informe de ventas completo
Consolidación periódica
Tabla de códigos de error
Otors Registros Basicos DE Ventas
Aviso de error
Informe adicional para Registro Basico DE Ventas
Cuando se emplea la tecla de registro de código de sección
Función de escape de error
Registros de artículos Registros de un solo artículo
Registros de sección
Registros de subsección PLU abierta
Registros repetidos
Registros de PLU/subsecciones
Registros de PLU
Registros de venta en metálico de un solo artículo Sics
Registros de multiplicación
Ejemplo de operación de teclas Impresión en el recibo
Visualización de los subtotales
Importe recibido en cheque
Ventas con importe recibido mixto
Ventas a crédito
Registre los artículos y pulse una tecla de crédito co b
Sistema IVA 1 automático y de impuestos 2 4 automático
Después de este cálculo debe finalizar la transacción
Cálculo porcentual para registros de artículos
Caracteristicas Opcionales
Registros de deducción
Cálculo porcentual para el subtotal
Registros e impresión de números de código de no suma
Registros de devolución
Deducción para registros de artículos
Aplicación de la tasa de cambio de moneda extranjera manual
Tratos de pagos auxiliares Cambio de divisas
Tasa de cambio 0,000000 a 999,999999
Registros con la tecla de secuencia automática tecla a
Sin ventas cambios
Registros de recibido a cuenta
Registros de pagos
Procedimiento para la programación
Antes DE LA Programacion
DC Código de carácter de doble tamaño
Tabla de códigos de caracteres alfanuméricos
Tasa para %, &y
Programación de teclas misceláneas
Importe para
De artículo/de artículo
Límite de la tasa de porcentaje para %y
Parámetros de función para %, &y
Signo +
Parámetros de función para
Impresión de pie del recibo sólo para X, Y, c, by a
Cuando se programe ro R, introduzca siempre 0 para a y B
Registro de importe recibido sólo para X, Y, c, by a
Se ha ajustado
Otras programaciones de texto
Símbolo de divisas 4 dígitos
Símbolo de moneda nacional 4 dígitos
Texto de función 12 dígitos
Texto del modo de instrucción 12 dígitos
Lista de textos de función
Número consecutivo
Número de caja registradora
Selección de función para teclas misceláneas
Programación 1 de selección de diversas funciones
Código de tarea Elemento Selección Registro
Formato de impresión de recibos
Formato de impresión
Estilo de impresión
Código de tarea Elemento Selección
Otras programaciones
Código de tarea Elemento Selección Registro
Impresión comprimida en registro diario
Co b
PGM
Tipo de registros de operación en el modo PGM
Impresión temporal de EJ durante la transacción
Acción cuando el área de memoria de EJ está llena
Impresión de datos en el informe Z EJ
Programación 2 de selección de diversas funciones
Modo de ahorro de energía
Procedimiento s
Densidad de la impresora térmica
Formato de impresión de mensajes de membrete
Programación de la tecla Auto Tecla de secuencia automática
Método de cálculo de cambio de divisas
Programación del Euro
Ajustes del sistema del Euro
Procedimiento
Nombre del informe Secuencia de teclas
Lectura de programas almacenados
Informe de programación
Impresiones de muestra
Informe de programación de PLU
Informe de programación Informe de programación de secciones
Modo DE Instruccion
Resumen de informes de lectura X y reposición Z
Lectura X Y Reposicion Z DE LOS Totales DE Ventas
Informe horario
Totales de ventas diarias
Informe de PLU por margen designado
Informe de dependiente individual
Para leer los 10 registros últimos
Impresión de muestra
Informe EJ de muestra
Para reponer todos los datos
Registros DE Anulacion
Recibo incorrecto Recibo cancelado
Procedimiento Ejemplo
Moneda Período
Funcion DE Migracion DEL Euro
Cómo se tratan las monedas en su caja registradora
Operación de modificación automática para el Euro
Estado 2 de Euro
Itemes
Comprobación del estado actual de Euro
Programación opcional para la introducción del Euro
Programación para la tecla de cambio de divisas
Precauciones al manejar el papel de registro papel térmico
En el caso de error de la impresora
En caso de corte de la alimentación
Precauciones al manejar la impresora y el papel de registro
Especificaciones del papel
Reemplazo de las pilas
Reemplazo del rollo de papel
Para reemplazar las pilas
Instalación del rollo de papel
Extracción del rollo de papel
Extracción del cajón
Extracción del papel atascado
Abertura manual del cajón
Especificaciones
En otros países fuera de la Unión Europea
Información sobre eliminación para usuarios particulares
Información sobre Eliminación para empresas usuarias
En la Unión Europea
Belangrijk
Introductie
Bedien de kassa nooit met natte handen
Deel 1 Gids Voor Snel Starten
Inhoudsopgave
Foutcodetabel
Invoeren VAN Eenvoudige Verkopen
Deel 2 Voor DE Winkelbediende
Alvorens TE Programmeren
Deel 3 Voor DE Manager
Dat u zich bezeert en wees derhalve voorzichtig
STAP1 Onderdelen EN Functies
Exterieur Vooraanzicht
Inktpatroon nodig
Toetsenbord Overzicht van toetsenbord Namen van toetsen
Functieschakelaar en functiesleutels
Ladeslot en sleutel
Symbolen voor de status van de kassa
Displays Winkelbediende-display
Klantdisplay Omhoog-klap type
Initialiseren van de kassa
STAP2 Voorbereiding Voor DE Kassa
Druk de printerafdekking naar voren en verwijder
Plaatsen van batterijen
Plaats het uiteinde van het papier
Plaatsen van een papierrol
Deel1 Gids Voor Snel Starten
Toetsbediening Afdruk
STAP3 HELP-FUNCTIE
Afdrukken van het help-menu
Afdrukken van begeleidingsmededelingen
Beschrijving van speciale toetsen
Alvorens te programmeren Procedure voor programmeren
STAP4 Programmeren VAN Basisfuncties
Afkortingen en termen
Met gebruik van de tekentoetsen op het toetsenbord
Belegeiding voor programmeren van tekst
Voor dubbel-formaat tekens heeft gekozen
Toetsbediening voorbeeld Afdruk
Taalkeuze
Programmeren van de datum en tijd Datum
Tijd
Programmeren van belastingvoet
Programmeren van belasting
Afdelingstatus
Programmeren van afdeling
Afdelingscode BTW/belastingstatus Teken
Limiet aantal cijfers
Voor-ingestelde prijs
Onderdeel Keuze Invoer
BTW/belasting status belastbaar 1 t/m 4/niet-belastbaar
Tekst voor afdeling artikelnaam 12 tekens
Instellen van unit-prijs en overeenkomende afdeling
Programmeren van PLU Price Look-Up en subafdeling
Tekst voor PLU artikelnaam 12 tekens
PLU/subafdeling keuze
Voor subafdeling of 1 voor PLU
Namen van winkelbediendes 12 tekens
Programmeren van tekst
Printformaat voor logo-mededeling 3 types
Programmeren van andere nodige onderdelen
Afrondsysteem
Bon
Voorbeeld voor invoeren van eenvoudige verkopen
Draai de functieschakelaar naar de REG stand
Toetsbediening voorbeeld Bediendedisplay
Toetsbediening voorbeeldBediendedisplayBon
Invoeren van PLU
Toetsbediening voorbeeld Bediendedisplay Bon
STAP6 Correcties
Annuleren van een ingevoerd cijfer
Corrigeren van de laatste invoer direct annuleren
Annuleren van subtotaal
Page
Toetsbediening Voorbeeld van overzicht
Volledig verkoopoverzicht
Toetsbediening
Periodiek overzicht
Foutcodetabel
Foutmelding
Extra informatie voor Invoeren VAN Eenvoudige Verkopen
Bij gebruik van de afdelingtoetsen voor afdeling 1 t/m
Invoeren van onderdelen Invoeren van enkele onderdelen
Invoeren van afdeling
Functie voor het verlaten bij fouten
Invoeren van PLU/subafdeling
Invoeren van herhalingen
Invoeren van contante verkoop van één artikel Sics
Invoer met vermenigvuldiging
Voltooien van een transactie Contante betaling of cheque
Tonen van subtotaal
Betaling met cheque
Verkoop met gemengde betaling
Verkoop op krediet
Voer de onderdelen in en druk op een krediettoets cof b
Automatisch BTW 1 en automatisch belasting 2-4 systeem
Berekenen van percentage van artikel
Extra Functies
Invoeren van korting
Berekenen van percentage van subtotaal
Invoeren en afdrukken van een niet-toevoegen codenummer
Invoeren van terugbetalingen
Aftrekken van ingevoerd artikel
Koers 0.000000 t/m
Andere betalingswijze en betalingen Buitenlands geld
Gebruik van een vooraf-ingestelde koers
Gebruik van een handmatig ingevoerde koers
Invoeren van automatische handelingen met de a toets
Invoeren van ontvangen-op-rekening
Invoeren van uitbetalingen
Geen verkoop wisselen
Alvorens TE Programmeren
Deel 3 Voor DE Manager
DC Code voor dubbel-formaat
Tabel met codes voor tekens, letters, cijfers en symbolen
Bedrag voor
Programmeren VAN Extra Functies
Programmeren van diverse toetsen
Waarde voor %, &en
Onderdeel % / Onderdeel
Limiet voor percentage voor %en
Functieparameters voor %, &en
+/- teken
Functieparameters voor
Afdrukken voetnoot alleen voor X, Y, c, ben a
1Onderdeel Keuze Invoer
Invoeren ontvangen bedrag alleen voor X, Y, c, ben a
Symbool voor buitenlandse valuta 4 tekens
Programmeren van overige tekst
Symbool voor nationale valuta 4 tekens
Tekst voor functies 12 tekens
Tekst voor trainingfunctie 12 tekens
Lijst met tekst voor functies
Programmeren van kassanummer en volgnummer
Programmeren VAN Geavanceerde Functies
Kassanummer
Functiekeuze voor diverse toetsen
Diverse Functies Programmeren
Taak-code Onderdeel Keuze Invoer
Bon printformaat
Printformaat
Drukstijl
Overige programmering
Taak-code Onderdeel Keuze Invoer
Gecomprimeerd afdrukken van overzicht
Noorwegen Betaling Absoluut Alleen
PGM functie bediening rapport
Tijdelijk afdrukken EJ tijdens transactie
Actie wanneer EJ geheugen vol is
Afdrukken data op EJ Z overzicht
Energiebesparingsfunctie
Dichtheid thermische printer
Printformaat voor afdrukken van logo
Specificatie voor training bediende
Wissen Transactie a a Invoer door toets Max keer
Methode voor geldwisselen
Programmering voor de Euro
Instellingen voor Euro systeem
Instellingen voor automatische EURO-modificatie
Toetsen voor het lezen van vastgelegde programma’s
Instellen van datum voor EURO-modificatie
Instellen van tijd voor EURO-modificatie
Lezen van vastgelegde programma’s
Programmeringsoverzicht
Voorbeeld van afdrukken
Programmeringsoverzicht PLU
Programmeringsoverzicht Programmeringsoverzicht afdeling
Trainingsfunctie
Beschrijving van overzichten voor lezen X en terugstellen Z
Lezen X EN Terugstellen Z VAN Verkooptotalen
Uuroverzicht
Totaal dagelijkse verkopen
PLU overzicht per bepaald bereik
Individuele bediende-overzicht
Terugstellen van de data
Afdrukken van overzichtsdata tijdens een transactie
Voorbeeld van afdruk
Voorbeeld van EJ overzicht
Foute bon
Overschrijven VAN Invoer
Fase
Functie Voor EURO-MODIFICATIE
Hoe worden de diverse valuta’s met uw kassa behandeld?
Automatische EURO-modificatie
Euro fase
Onderdelen
Zijn gebaseerd
Keuze invoer koers
Controleren van de huidige Euro fase
Programmeren voor de koers-toets
Koers
Voorzorgen voor het papier thermische papier
Onderhoud Voor Bediening
Bij een stroomonderbreking
Bij een printerfout
Specificaties papierrol
Vervangen van de batterijen
Vervangen van de papierrol
Vervangen van de batterijen
Plaatsen van de papierrol
Verwijderen van de papierrol
Reinigen van de printer afdrukkop / sensor / roller
Verwijderen van vastgelopen papier
Handmatig openen van de ladehouder
Technische Gegevens
De Europese Unie
Informatie over afvalverwijdering voor bedrijven
Andere landen buiten de Europese Unie
Geräuschpegel LpA 51,9 dB Gemessen nach EN ISO
Sharp Electronics Europe GmbH