Remote Parts
Description
qh |
|
|
|
|
qg |
|
|
|
|
| EJECT | INPUT | REC MODE `/1 | 1 |
|
|
|
| |
|
|
| PLAY MODE | 2 |
| N | X | x | |
|
|
| DISPLAY |
|
qd | . > z | 3 | ||
| m M | FADER MUSIC SYNC | 4 | |
qs |
| 5 | ||
MENU/NO | NAME EDIT/ | YES | ||
|
| SELECT | + | 6 |
qa | REPEAT | AyB | CLEAR LEVEL | |
–
9 AyB button (23)
Press to select Repeat
0 REPEAT button (23)
Press to play tracks repeatedly. |
| |
qa NAME EDIT/SELECT button (37) | Location | |
Press to add the name or change the name of a | ||
track or MD. | ||
qs MENU/NO button (15, 25, 28) | ||
| ||
Press to display “Edit Menu” or “Setup Menu.” | and | |
qd N button (13, 21) | ||
Function | ||
Press to start play or recording. | ||
X button (13, 21) | ||
Press to pause play or recording. Press again to | ||
resume play or recording. | of | |
x button (13, 21, 29) | ||
Parts | ||
Press to stop play, recording, or cancel the | ||
selected operation. | ||
./> buttons (13, 21, 22, 25, 28) |
| |
Press to locate tracks, select a menu item, or |
|
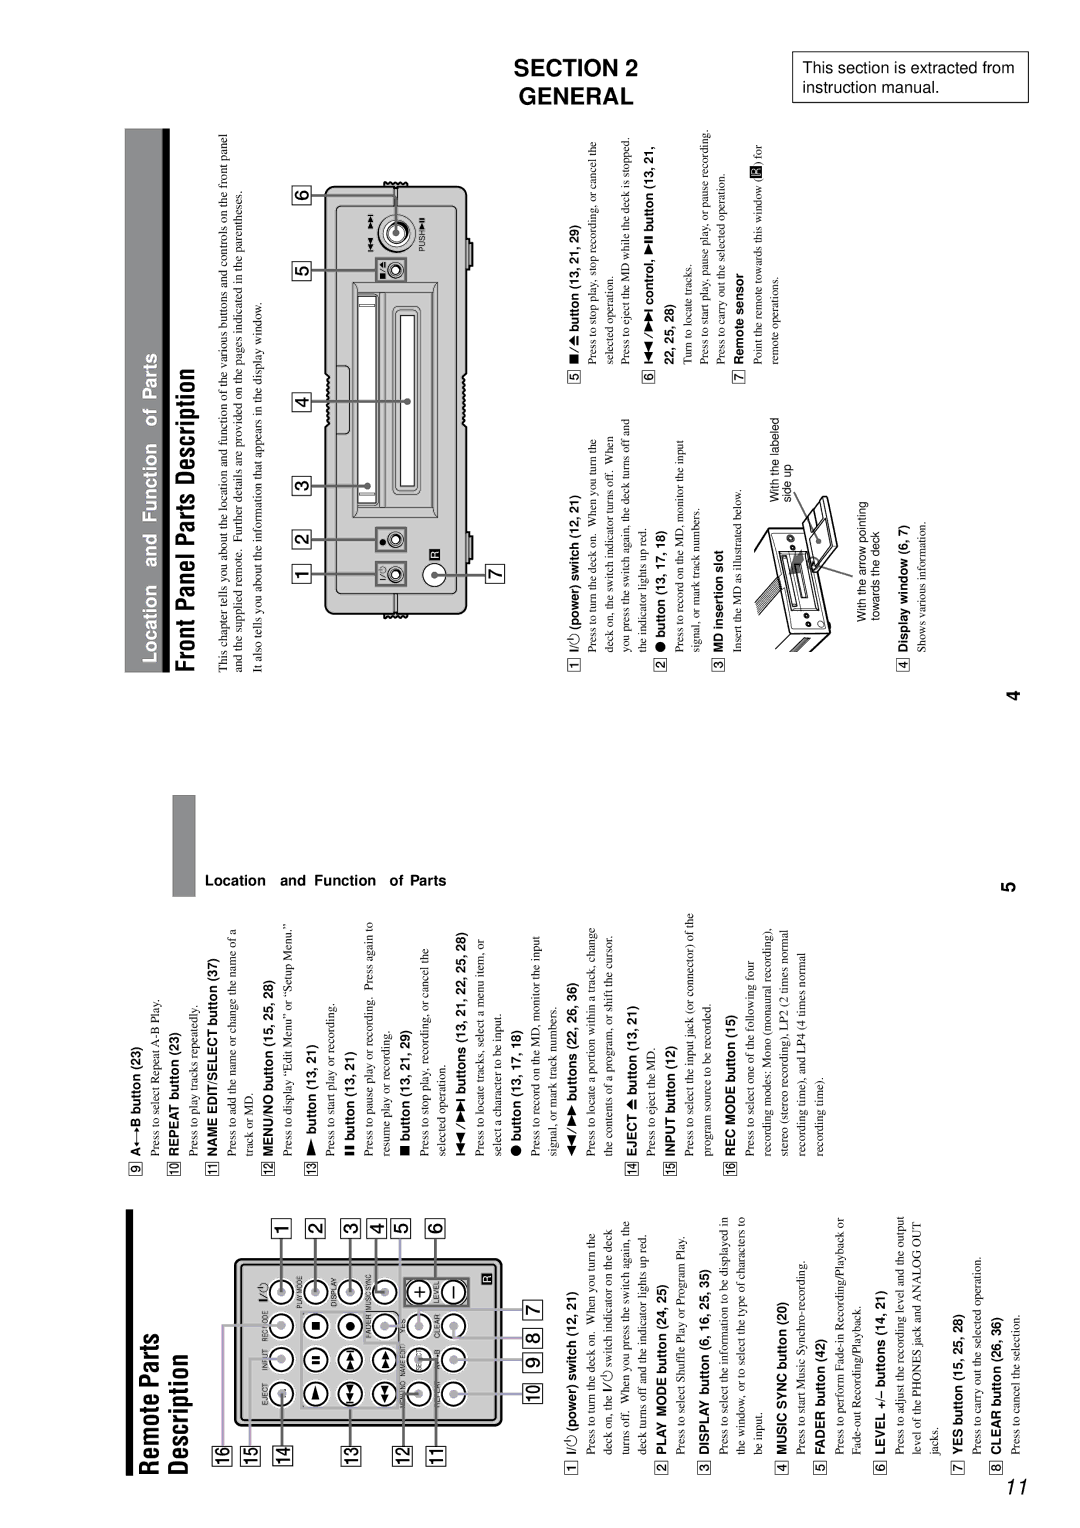
Location and Function of Parts
Front Panel Parts Description
This chapter tells you about the location and function of the various buttons and controls on the front panel and the supplied remote. Further details are provided on the pages indicated in the parentheses.
It also tells you about the information that appears in the display window.
1 2 | 3 | 4 | 5 | 6 |
|
|
|
| . > |
?/1 z |
|
| x/Z |
|
PUSHu
R
R
q; 98 7
1?/1 (power) switch (12, 21)
Press to turn the deck on. When you turn the deck on, the ?/1 switch indicator on the deck turns off. When you press the switch again, the deck turns off and the indicator lights up red.
2PLAY MODE button (24, 25)
Press to select Shuffle Play or Program Play.
3DISPLAY button (6, 16, 25, 35)
Press to select the information to be displayed in the window, or to select the type of characters to be input.
4MUSIC SYNC button (20)
Press to start Music
5FADER button (42)
Press to perform
6 LEVEL +/– buttons (14, 21)
Press to adjust the recording level and the output level of the PHONES jack and ANALOG OUT jacks.
7 YES button (15, 25, 28)
| Press to carry out the selected operation. | |
11 | 8 CLEAR button (26, 36) | |
Press to cancel the selection. | ||
|
select a character to be input. |
z button (13, 17, 18) |
Press to record on the MD, monitor the input |
signal, or mark track numbers. |
m/M buttons (22, 26, 36) |
Press to locate a portion within a track, change |
the contents of a program, or shift the cursor. |
qf EJECT Z button (13, 21) |
Press to eject the MD. |
qg INPUT button (12) |
Press to select the input jack (or connector) of the |
program source to be recorded. |
qh REC MODE button (15) |
Press to select one of the following four |
recording modes: Mono (monaural recording), |
stereo (stereo recording), LP2 (2 times normal |
recording time), and LP4 (4 times normal |
recording time). |
5
7
1?/1 (power) switch (12, 21)
Press to turn the deck on. When you turn the deck on, the switch indicator turns off. When you press the switch again, the deck turns off and the indicator lights up red.
2z button (13, 17, 18)
Press to record on the MD, monitor the input signal, or mark track numbers.
3MD insertion slot
Insert the MD as illustrated below.
With the labeled side up
With the arrow pointing towards the deck
4Display window (6, 7)
Shows various information.
4
5x/Z button (13, 21, 29)
Press to stop play, stop recording, or cancel the selected operation.
Press to eject the MD while the deck is stopped.
6./> control, u button (13, 21, 22, 25, 28)
Turn to locate tracks.
Press to start play, pause play, or pause recording. Press to carry out the selected operation.
7Remote sensor
Point the remote towards this window (![]() ) for remote operations.
) for remote operations.
GENERAL | SECTION 2 |
This section is extracted from instruction manual.