By Sony Corporation
800-711-181
For the active speaker system
For the tuner CD player
Table of Contents
Connecting Stereo
Setting up
Connecting Flat Cord
Connecting Right Speaker
Connecting Power
Connecting Aerials
To set up the AM loop aerial
To improve the reception
To correct the clock setting
Setting the Clock
Inserting the batteries
3,4
Playing a CD normal play
CD Player
To cancel shuffle play
To cancel the programme play
Playing Tracks in Random Order shuffle play
Playing Tracks in the Desired Order programme play
Repeating a single track in normal play mode only
Repeating all the tracks in any play mode
To cancel repeat play
Playing Tracks Repeatedly repeat play
When an FM programme is not received clearly
When the desired station is not tuned
Radio
Listening to Radio
Liteninig to Preset Radio Stations
Presetting Radio Stations
To erase a stored station
Playing a Tape
Tape Player
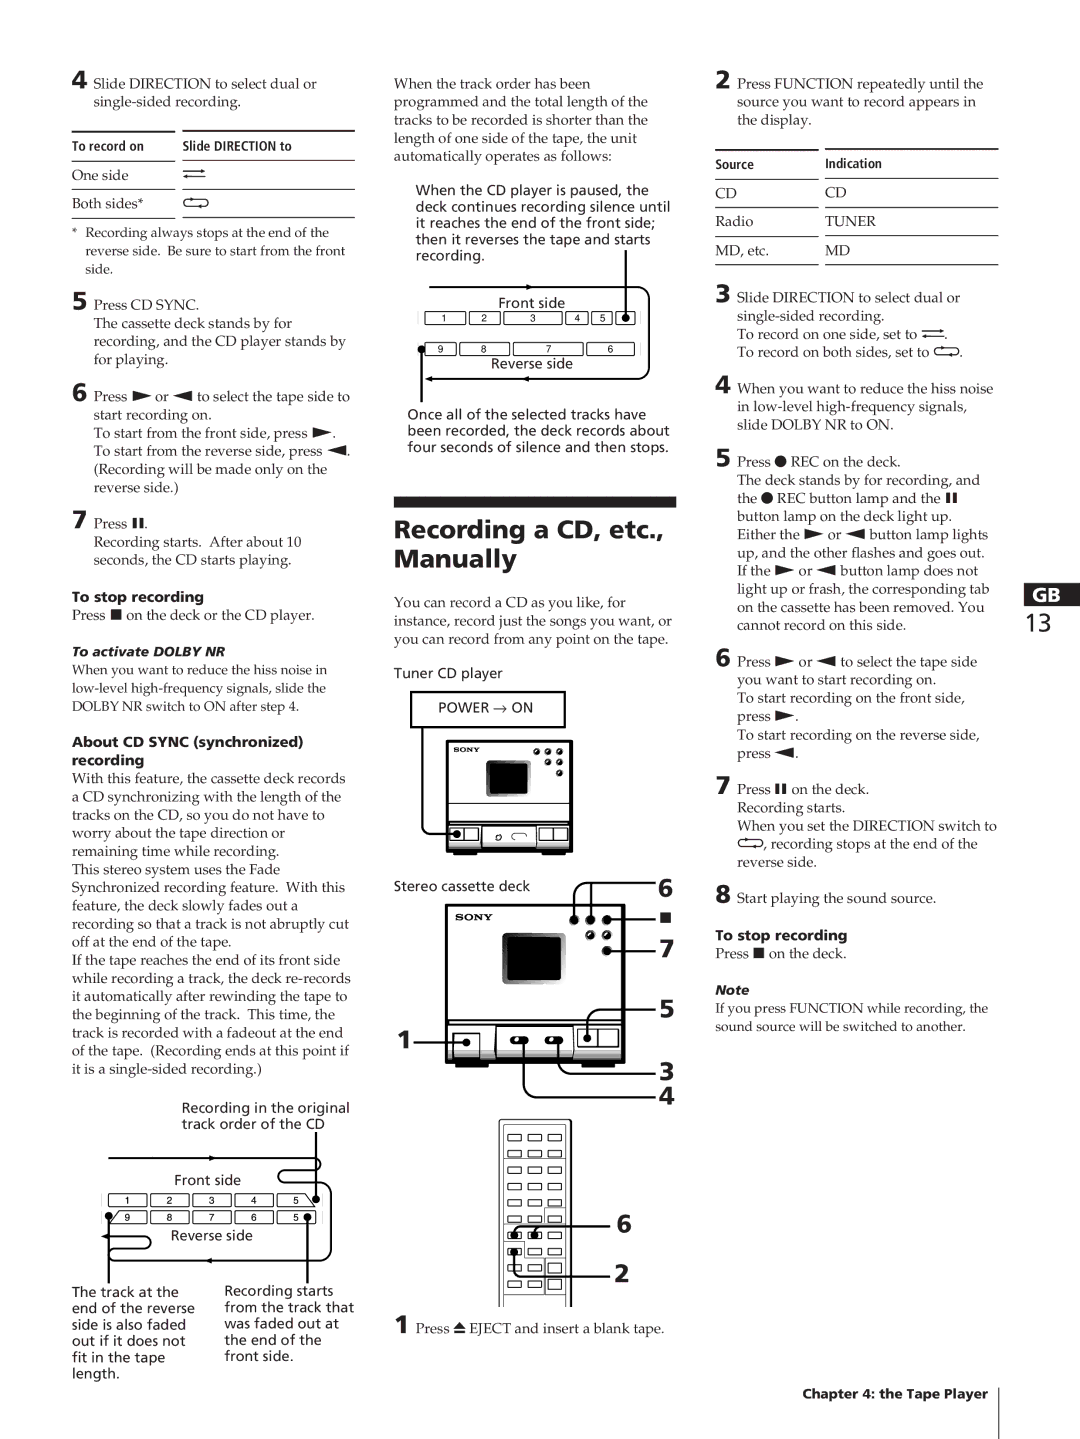
Recording a CD Automatically
Stereo cassette deck
To stop recording
Recording a CD, etc., Manually
About CD Sync synchronized recording
Recording in the original track order of the CD
Recording a CD in a Specified Track Order programme edit
To cancel programme edit
To start recording partway through a tape
Power → on Balance L/R
Adjusting Balance Speakers
To listen through the headphones
Reinforcing Bass Dbfb
Surround
Listening with the Surround Feature
To change the preset time while the sleep timer is on
To cancel the sleep timer
Falling Asleep to Music
Waking Up to Music
To cancel the timer
Timer-Recording Radio Programmes
To set the timer with the same items
To check the timer settings
Connecting an MD, DAT deck, etc
Connecting Optional Equipment
Connecting an External Aerial
Troubleshooting Guide
Precautions
General
CD Player
Specifications
Maintenance
Controls
Index to Parts
Front Panel
Rear Panel
Index
Display Window
Introduction
Bienvenue
Table des matières
Chapitre 1 Installation
Pour déconnecter le câble plat
Raccordement de la chaîne stéréo
Raccordement du câble audio
Blanc Rouge
Vers une prise d’alimentation secteur
Installation de l’antenne en cadre
Antenne filaire* fournie Antenne en cadre AM fournie
Pour améliorer la qualité de la réception
Réglage de l’horloge
Introduction des piles dans leur compartiment
Pour rectifier l’heure
Compact lecture
Lecture d’un disque
Normale
Pour annuler une lecture aléatoire
Pour vérifier le temps résiduel
Numéro de la plage
Temps de lecture total
Pour annuler une lecture programmée
Lecture des plages à plusieurs reprises lecture répétée
Pour modifier le programme mémorisé
Pour annuler une lecture répétée
Ecoute radiophonique
La radio
Pour améliorer la réception d’un émetteur AM MW et LW
Si la réception d’une émission FM est médiocre
Ecouter les stations de radio présélectionnées
Présélection des émetteurs de radiodiffusion
Informações suplementares
Informações suplementares
Informações suplementares
Informações suplementares
Réglage de la balance des hauts- parleurs
Réglage du son
Accentuation des graves Dbfb
Pour écouter à l’aide d’un casque d’écoute
Ecoute en tétraphonie
Extinction programmée
Timer Select Enter
Réveil en musique
Pour annuler une extinction programmée
Radiophoniques
Programmation de l’enregistrement d’émissions
Pour régler le programmateur avec les mêmes éléments
Raccordement des équipements en option
Pour écouter le son diffusé par l’équipement connecté
Connexion d’une antenne extérieure
Pour améliorer la réception FM
Pour améliorer la réception AM
Guide de dépannage
Précautions
Généralités
Lecteur de disques compacts
Télécommande
Lecteur de cassettes
Programmateur
Spécifications
Télécommande RM-ST1
Index des pièces et des commandes
Fenêtre d’affichage
Panneau frontal
AMS
Pour votre information
Acerca de este manual
¡Bienvenido
Capítulo 2 Reproductor de disco compacto
Indice
Conexión del systema estéreo
Instalación
Paso 1 Conexión del cable plano
Paso 2 Conexión del altavoz derecho
Paso 5 Conexión a la red eléctrica
Paso 4 Conexión de los cables de antena
Para mejorar la recepción
Instalación del cuadro de antena AM
Ajuste del reloj
Inserción de las pilas
Reajuste del reloj
Función AMS de búsqueda automática de música
Reproducción del CD normal
Función de búsqueda de un punto de un tema
Con la etiqueta hacia arriba
Para cancelar la reproducción programada
Para cancelar la reproducción aleatoria
Reproducción aleatoria de temas
Reproducción programada de pistas reproducción de programa
Para cancelar la reproducción repetida
Power → on Repeat
Reproducción repetida de pistas repetir reproducción
Para repetir un solo tema en modo de repetición normal
Cuando no se sintoniza una emisora
Audición de la radio
Para mejorar la recepción de emisiones AM MW y LW
Si la recepción de un programa FM no es nítida
Recepción de emisoras de radio memorizadas
Memorización de emisoras de radio
Para borrar una emisora de la memoria
Grabación automática de CD a cinta
Reproducción de cintas
Pletina para casete estéreo
Para detener la reproducción
Para detener la grabación
Grabación manual de CD, etc. a cinta
Grabación sincronizada CD Sync
Uso del interruptor Dolby NR
Para empezar a grabar en cualquier punto de la cinta
Cancelación de la edición de programa
Amplificación de graves Dbfb
Ajuste de balance de los altavoces
Para escuchar por los auriculares
Función de sonido periférico
Power → on Surround
OFF
Para cancelar la desconexión automática
Power → on Sleep
Desconexión Automática
Activación Automática
Grabación de programas de radio con el temporizador
Para cancelar el temporizador
Para ajustar el temporizador con los mismos elementos
Para comprobar la programación del temporizador
Conexión de pletinas MD, DAT, etc
Conexión de componentes opcionales
Conexión de antenas externas
Precauciones
Guía de solución de problemas
Reproductor de CD
Especificaciones
Mantenimiento
Componentes y
Indice de
Controles
Panel frontal
Indice
PRESET/MEMORY 10,11
Ventana de visualización
Panel posterior
Acerca deste manual
Bem-vindo
Capítulo 2 O leitor de CD
Índice
Ligar o sistema estéreo
Instalar
Ponto 1 Ligar o cabo de fita
Ponto 2 Ligar o altifalante do lado direito
Altifalante do lado esquerdo
Ponto 4 Ligar as antenas
Tomada de parede
Para melhorar a recepção
Acertar o relógio
Introduzir as pilhas
Enter
Para voltar a acertar o relógio
Reproduzir um CD reprodução normal
Leitor De CD
Para cancelar a reprodução de programa
Para cancelar a reprodução aleatória
Reproduzir faixas por ordem aleatória reprodução shuffle
Para verificar o tempo restante
Reproduzir faixas repetidamente reprodução repetitiva
Para cancelar a reprodução por repetição
Repetir todas as faixas em qualquer modo de reprodução
Repetir uma única faixa apenas no modo de reprodução normal
Ouvir o rádio
Rádio
Se a estação pretendida não for sintonizada
Para melhorar a recepção das transmissões AM MW e LW
Ouvir estações de rádio pré- programadas
Pré-programar estações de rádio
Para apagar uma estação memorizada
Gravar automaticamente um CD
Reproduzir uma cassete
Para parar a reprodução
Gravação CD Sync sincronizada
Gravar manualmente um CD, etc
Gravar a ordem original
Das faixas do CD
Para iniciar a gravação a meio da fita
Para cancelar a edição de programa
Ajuste do som
Para ouvir com os headphones
Ajustar o balanço dos altifalantes
Intensificar os graves Dbfb
Ouvir música com a função Surround
Adormecer ao som Acordar ao som da Da música Música
Para cancelar o temporizador do alarme
Gravação temporizada de programas de rádio
Para cancelar as programações do temporizador
Para programar o temporizador com os mesmos itens
Para verificar as programações do temporizador
Ligar um MD, deck DAT, etc
Ligar equipamento opcional
Ligar uma antena externa
Guia de detecção de avarias
Precauções
Geral
Leitor de CD
Especificações
Manutenção
Deck de cassetes
Telecomando
Painel frontal
Índice de peças e controlos
Painel posterior
Índice
Visor
Telecomando RM-ST1
Informações suplementares
Informações suplementares