42HP95 50HP95
OWNER’S MANUAL
Integrated High Definition Plasma Television
Compatible with the new Toshiba
Safety Precautions
NOTE TO CATV INSTALLERS
It Makes A Difference Where Your TV Stands
The Issue
Installation
Important Safety Instructions
Installation, Care, and Service
Service
Care cont. from previous column
FCC Declaration of Conformity Compliance Statement Part
Important notes about your Plasma TV
Contents
Overview of steps for installing, setting up, and
using your new TV
E 42/50HP95 *web
Using the memory card JPEG picture viewer/MP3 audio
TV Guide On Screen FAQs
E 42/50HP95 *web
Blocking TV programs and movies by rating V-Chip
Welcome to Toshiba
Features of your new TV
1 Introduction
Overview of steps for installing, setting up, and using your new TV
Chapter 1 Introduction
2 Connecting your TV
TV front and side panel controls and connections
TV back panel connections
Overview of cable types
Coaxial F-type cable
S-video cable
HDMI cable
Connecting a digital CableCARD
About the connection illustrations
You will need
To view encrypted digital channels
Connecting a VCR and antenna or Cable TV no Cable box
Connecting a camcorder
To view the antenna or Cable signal
To use the TV Guide On Screenª recording features
Connecting a VCR and Cable box
On Screenª recording features
To view basic and premium Cable channels
You will need
Connecting a VCR and satellite receiver
To view satellite programs using the component video connections
To use the TV Guide On Screenª recording features
You will need
Connecting a DVD player with S-video, a VCR, and a Cable box
To view basic channels and access the TVÕs features
To view premium Cable channels
To view the DVD player
Connecting a DVD player with ColorStream component video and a VCR
To view antenna or Cable channels
To record a TV program while watching a DVD
To use the TV Guide On Screenª recording features
Connecting two VCRs
To view VCR
To dub or edit from VCR 1 to VCR
To view the antenna or Cable signal
Connecting an HDMI or a DVI device to the HDMI input
To connect an HDMI device, you will need
To connect a DVI device, you will need
Chapter 2 Connecting your TV
Connecting a digital audio system
Connecting an analog audio system
To control the audio
You will need
TheaterNet on-screen device control
To connect the IR blaster cable
To control the devices
You will need
Connecting IEEE1394 video devices
Using analog-compatible IEEE1394 devices
Supported signals
Using TheaterNet on-screen device control
Connecting IEEE1394 video devices continued
Connecting an AVHD external hard drive or D-VHS digital recorder
When you connect a D-VHS or AVHD device to the TV
IEEE1394 device initialization
IEEE1394 device management
Important information regarding IEEE1394 device interconnection
To edit the IEEE1394 device information
Connecting IEEE1394 video devices continued
G-LINK connection
To connect to the G-LINK ª terminal
Connecting a personal computer PC
Signal names for mini D-sub 15 pin connector
3 Using the remote control
Learning about the remote control
Learning about the remote control continued
Remote control effctive range
Installing the remote control batteries
Using the remote control MODE button to control your other devices
To install the remote control batteries
Device mode control after programming
Page up/down
Remote Control functional key chart
Chapter 3 Using the remote control
Remote Control functional key chart continued
Chapter 3 Using the remote control
Programming the remote control to operate your other devices
Device code setup
4. If the device responds to the remote control
If the device does not respond to the remote control
To reset the volume controls to the original device mode
Using the volume lock feature
Operational feature reset
Multi-brand remote control device codes
Chapter 3 Using the remote control
VCRs/PVRs
VCRs/PVRs cont
Multi-brand remote control device codes continued
Chapter 3 Using the remote control
CD players
Receivers
4 Menu layout and navigation
Main menu layout
Setup / Installation menu layout
Navigating the menu system
Press MENU to open the menu system
To close a menu instantly, press EXIT
5 TV Guide On Screen setup
Setting up the TV Guide On Screen system
Configuring the location of your TV
To set up the TV Guide On Screenª system
Continued on next page
Setting up the TV Guide On Screen system continued
For additional details, see page
Setting up the TV Guide On Screen system continued
Setting up the TV Guide On Screen system continued
Turning off the TV Guide On Screen automatic display feature
TV Guide On Screen Reminder
6 Setting up your TV
Configuring the antenna input
To configure the ANT 1 and ANT 2 input sources
Selecting the menu language
To program channels automatically
Programming channels into the TV’s channel memory
Programming channels automatically
To save your new settings
To revert to your original settings
Programming channels into the TV’s channel memory continued
Manually adding and deleting channels in the channel memory
Programming your favorite channels
To clear your favorite channel lists
To add and delete channels in the Favorite Channels sets
list
Setting up and using TheaterNet on-screen device control
Setting up TheaterNet
To set up TheaterNet device control
To remove a device from TheaterNet
Setting up and using TheaterNet on-screen device control continued
Using the TheaterNet control icons
To select the deviceÕs control icons directly
To close the on-screen control icons
TheaterNet IR device codes
Chapter 6 Setting up your TV
Amplifiers
Cable boxes
TheaterNet IR device codes continued
Chapter 6 Setting up your TV
Video accessory HDTV decoder
Receivers
Chapter 6 Setting up your TV
TheaterNet IR device codes continued
VCRs cont
VCRs cont
Setting the time and date
Setting the HDMI audio mode
Setting the AVHD device skip time
To select the HDMI audio mode
Viewing the digital signal meter
To view the digital signal meter
Viewing the CableCARD menu
To view the CableCARD ª menu
Restore Factory Defaults
To close the screen and return to the Installation menu
To restore all settings and channels to their factory default values
To cancel the reset
To open the TV Guide On Screenª system
simultaneously
7 Using the TV Guide On Screen interactive program guide
Setting up the TV Guide On Screen system
TV Guide On Screen remote control functions
Navigating the TV Guide On Screen system
Chapter 7 Using the TV Guide On Screen interactive program guide
Note Helpful information about each Service appears in the Info Box
Navigating the TV Guide On Screen system continued
Video Window
Panel Menus
To lock/unlock the Video Window
Navigating the TV Guide On Screen system continued
Info Box
TV Guide On Screen Icons
Episode Options panel menu
TV Guide On Screen Services
LISTINGS screen
TV Guide On Screen Services continued
SEARCH screen
Example Category search
Chapter 7 Using the TV Guide On Screen interactive program guide
SEARCH screen continued
Example Keyword search
To edit or delete a keyword
TV Guide On Screen Services continued
RECORDINGS screen
To choose the way recordings are displayed
To view a recording, you can do one of the following
TV Guide On Screen Services continued
TV Guide On Screen Services continued
Record features
SCHEDULE screen
Record features continued
Record conflict
Record icons
Recording notification banner
Remind features
TV Guide On Screen Services continued
2 Manually set a show Reminder
1 Set a show Reminder from a panel menu
Remind features continued
Reminder notification banner
Remind conflict
Remind icons
SETUP screen
Change system settings
Change channel display
TV Guide On Screen Services continued
TV Guide On Screen Services continued
SETUP screen continued
Change default options
To select the video input source to view
8 Using the TV’s features
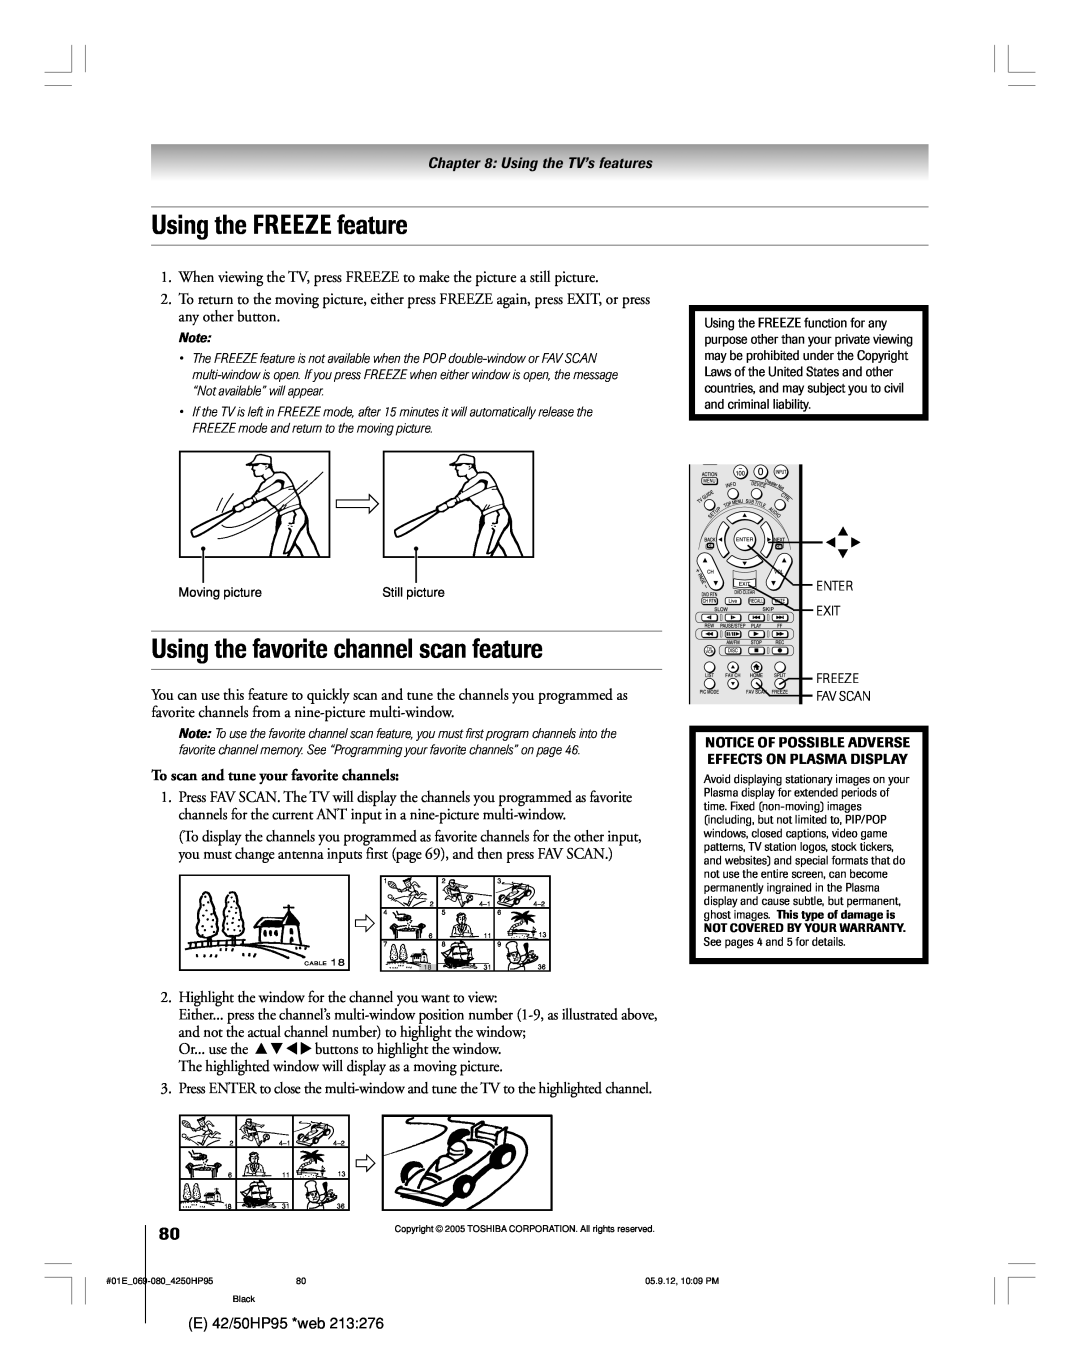
Selecting the video input source to view
default label
Labeling the video input sources
Input labeling example
To label the video input sources
Tuning channels
Using the Channel Browser
To toggle between Browse mode and Select mode
To tune to a channel in Browse mode
Tuning channels continued
Using the Channel Browser continued
Setting a channel as the “Home” channel for an input
To set a channel as Home using the remote control
Tuning your favorite channels
Tuning to the next programmed channel
Switching between two channels using Channel Return
Switching between two channels using SurfLock
Selecting the picture size
Natural picture size
To select the picture size
Chapter 8 Using the TV’s features
Selecting the picture size continued
Using the auto aspect ratio feature
To set the scroll settings
To turn on the auto aspect ratio feature
To turn off the auto aspect ratio feature
To set the Cinema Mode to Video
Selecting the cinema mode 480i signals only
To set the Cinema Mode to Film
Using the POP features
Using the POP double-window feature
To display a program in the POP window
To close the POP window and tune to the highlighted window
Using the POP features continued
Switching the speaker audio main or POP
POP double-window aspect ratio
Chapter 8 Using the TV’s features
To scan and tune your favorite channels
Using the FREEZE feature
Using the favorite channel scan feature
Adjusting the picture
Selecting the picture mode
Adjusting the picture quality
To select the picture mode
Adjusting the picture continued
Using CableClear /DNR digital noise reduction
Selecting the color temperature
To select the color temperature
Using MPEG noise reduction
Using dynamic contrast
To select the MPEG noise reduction level
To select dynamic contrast preferences
Using the closed caption mode
Advanced closed captions
To view captions or text
To customize the closed captions
Using the closed caption mode continued
Digital closed captions
To select digital closed captions
Chapter 8 Using the TV’s features
Adjusting the audio
Using the digital audio selector
Muting the sound
Selecting stereo/SAP broadcasts
Adjusting the audio continued
Adjusting the audio quality
Using the StableSound feature
To adjust the audio quality
Using the SRS WOW surround sound feature
To adjust the WOWª settings
Turning off the built-in speakers
Selecting the optical audio output format
Using the memory card JPEG picture viewer/MP3 audio player
Memory card specifications
Chapter 8 Using the TV’s features
Maximum displayable JPEG image resolution 6000x4000 pixels
Using the memory card JPEG picture viewer/MP3 audio player continued
Using the JPEG picture viewer
To view digital photos on your TV
During the slide show
Using the MP3 audio player
Using the JPEG picture viewer continued
To set the slide show interval
To close the picture viewer
Using the MP3 audio player continued
To start the MP3 audio player when a memory card is already inserted
Memory card care and handling
To close the MP3 audio player
Setting the On/Off Timer
Setting the sleep timer
To set the On/Off Timer
To turn off the On/Off Timer
Using the PC setting feature
Using the Long Life feature
To set the PC setting
¥ Clock Phase
Using the Long Life feature continued
Gray Level
White
Reverse
Understanding the auto power off feature
Understanding the last mode memory feature
Displaying TV setting information on-screen using RECALL
To display TV setting information on-screen
9 Using the Locks menu
Entering the PIN code
If you cannot remember your PIN code
Changing your PIN code
Blocking TV programs and movies by rating V-Chip
To block and unblock TV programs and movies
Chapter 9 Using the Locks menu
Independent rating system for broadcasters
Blocking channels
Unlocking programs temporarily
Locking video inputs
To block channels
Using the GameTimer
Using the panel lock feature
To set the GameTimerª
To cancel the GameTimerª
10 Troubleshooting
General troubleshooting
Black box on screen Poor color or no color POP problems
E 42/50HP95 *web
E 42/50HP95 *web
General troubleshooting continued
Chapter 10 Troubleshooting
General troubleshooting continued
Chapter 10 Troubleshooting
¥ If you use the TVÕs remote control to start recording, you will not be able to change inputs page
E 42/50HP95 *web
Chapter 10 Troubleshooting
TV Guide On Screen FAQs
SETUP
TV Guide On Screen FAQs continued
Chapter 10 Troubleshooting
TV Guide On Screen FAQs continued
Chapter 10 Troubleshooting
Specifications
11 Appendix
NOTE This model complies with the specifications listed below
Designs and specifications are subject to change without notice
Limited United States Warranty
for Plasma Televisions
Chapter 11 Appendix
E 42/50HP95 *web
Limited Canada Warranty
for Plasma Televisions
Chapter 11 Appendix
E 42/50HP95 *web
OpenSSL 0.9.7d Copyright 1998-2000 the OpenSSL Project. All Rights reserved. Redistribution and use in source and binary forms, with or without modification, are permitted provided that the following conditions are met
Chapter 11 Appendix
E 42/50HP95 *web
Chapter 11 Appendix
E 42/50HP95 *web
Copyright 2005 TOSHIBA CORPORATION. All rights reserved
#01E107-1114250HP95
Index
E F G H I J
Channel programming
E 42/50HP95 *web
Index continued
TOSHIBA AMERICA CONSUMER PRODUCTS, L.L.C
TOSHIBA AMERICA CONSUMER PRODUCTS, L.L.C
PRINTED IN USA