| Step 3 | Recording | |
| There are two different recording methods: Direct Recording | ||
| |||
Started | and Timer Recording. Timer recording is classified as record- | ||
ing type : Once, Daily or Weekly or recording mode : XP | |||
| |||
| (high quality mode), SP (standard quality mode), LP (long | ||
ettingG | recording mode), and EP (extended mode) according to the | ||
recording mode. |
| ||
|
| ||
|
|
| |
Step 4 | Playing |
You can select the title you want to play in a displayed menu and then immediately start playback.
A DVD consists of sections, called titles, and sub sections, called chapters.
During recording, a title is created between two points where you start and stop recording,
Step 6 | Finalizing & Playing on | |
other DVD components | ||
|
To play your DVD on other DVD components, finalizing may be necessary. First, finish all editing and recording opera- tions, then finalize the disc.
When using a DVD-RW disc in VR Mode
Although finalizing is generally unnecessary when playing the disc on a VR Mode compatible component, a finalized disc should be used for playback on that type of component.
When using a DVD-RW disc in Video Mode
The disc should be finalized first to enable playback on any- thing compatible other than this recorder. No more editing or recording can be made on the disc once it has been final- ized.
To enable recording on the disc again, Disc should be unfinalized.
When using a DVD-R disc
You should finalize the disc to play it a compatible compo- nent other than this recorder. You cannot edit or record on the disc once it has been finalized.
Description
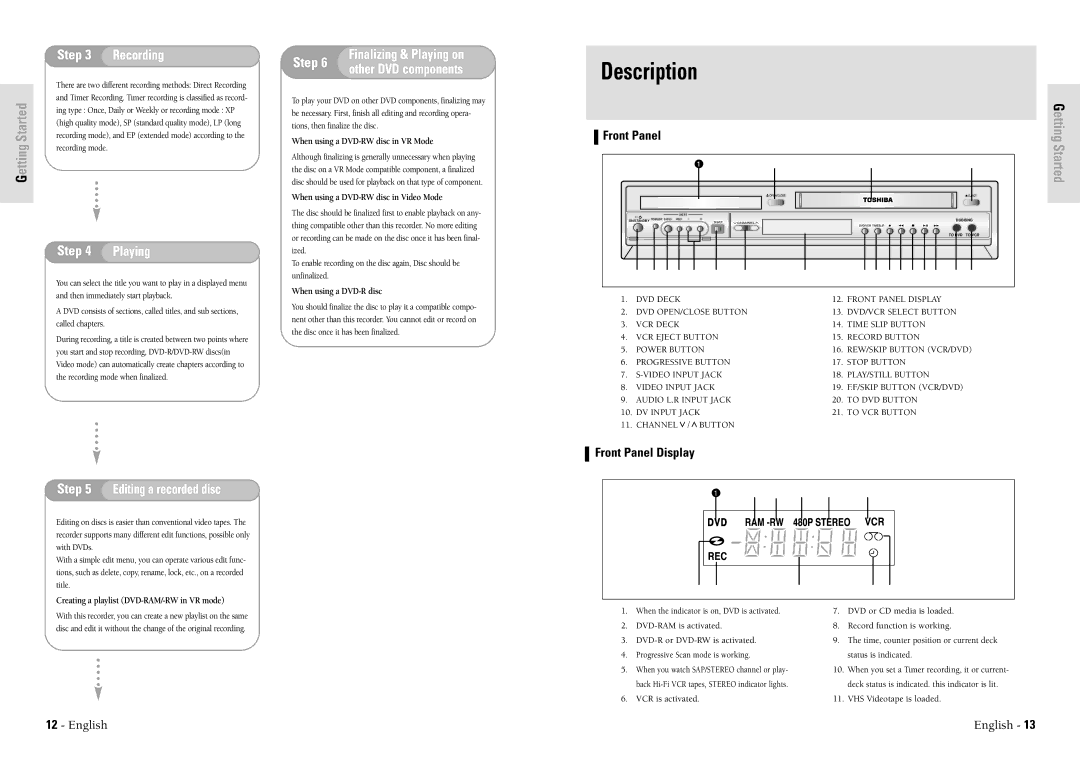
Front Panel |
|
|
|
|
|
|
|
|
|
|
|
|
|
|
|
|
|
|
|
|
|
|
|
|
| Getting | |||||
|
|
|
|
|
|
|
|
|
|
|
|
|
|
|
|
|
|
|
|
|
|
|
|
|
|
|
|
|
|
| Started |
1 | 2 |
| 3 | 4 |
|
| |||||||||||||||||||||||||
|
|
|
|
|
|
|
|
|
|
|
|
|
|
|
|
|
|
|
|
|
|
|
|
|
|
|
|
|
|
|
|
|
|
|
|
|
|
|
|
|
|
|
|
|
|
|
|
|
|
|
|
|
|
|
|
|
|
|
|
|
|
|
|
|
|
|
|
|
|
|
|
|
|
|
|
|
|
|
|
|
|
|
|
|
|
|
|
|
|
|
|
|
|
|
|
|
|
|
|
|
|
|
|
|
|
|
|
|
|
|
|
|
|
|
|
|
|
|
|
|
|
|
|
|
|
|
|
|
|
|
|
|
|
|
|
|
|
|
|
|
|
|
|
|
|
|
|
|
|
|
|
|
|
|
|
|
|
|
|
I / | DUBBING |
ON/STANDBY | |
| TO DVD TO VCR |
|
| 5 | 6 | 7 | 8 | 9 | 10 | 11 | 12 | 13 | 14 | 15 | 16 | 17 | 18 | 19 | 20 | 21 |
|
|
|
|
|
|
|
|
|
| |||||||||
|
|
|
|
|
|
|
|
|
| |||||||||
1. | DVD DECK |
|
|
| 12. | FRONT PANEL DISPLAY |
|
| ||||||||||
| 2. | DVD OPEN/CLOSE BUTTON | 13. | DVD/VCR SELECT BUTTON |
| |||||||||||||
| 3. | VCR DECK |
|
|
| 14. | TIME SLIP BUTTON |
|
|
| ||||||||
| 4. | VCR EJECT BUTTON |
| 15. | RECORD BUTTON |
|
|
|
| |||||||||
| 5. | POWER BUTTON |
| 16. | REW/SKIP BUTTON (VCR/DVD) | |||||||||||||
| 6. | PROGRESSIVE BUTTON |
| 17. | STOP BUTTON |
|
|
|
|
| ||||||||
| 7. |
| 18. | PLAY/STILL BUTTON |
|
|
| |||||||||||
| 8. | VIDEO INPUT JACK |
| 19. | F.F/SKIP BUTTON (VCR/DVD) |
| ||||||||||||
| 9. | AUDIO L.R INPUT JACK |
| 20. | TO DVD BUTTON |
|
|
|
| |||||||||
| 10. | DV INPUT JACK |
| 21. | TO VCR BUTTON |
|
|
|
| |||||||||
| 11. | CHANNEL | / | BUTTON |
|
|
|
|
|
|
|
|
|
|
| |||
|
|
|
|
|
|
|
|
|
|
|
|
|
|
|
|
|
|
|
Front Panel Display
Step 5 Editing a recorded disc
Editing on discs is easier than conventional video tapes. The recorder supports many different edit functions, possible only with DVDs.
With a simple edit menu, you can operate various edit func- tions, such as delete, copy, rename, lock, etc., on a recorded title.
Creating a playlist (DVD-RAM/-RW in VR mode)
With this recorder, you can create a new playlist on the same
disc and edit it without the change of the original recording.
| 1 | 2 | 3 | 4 | 5 | 6 |
|
|
|
| ||||||
|
|
|
|
|
|
|
|
|
|
|
|
|
|
|
|
|
|
|
|
|
|
|
|
|
|
|
|
|
|
|
|
|
|
|
|
|
|
|
|
|
|
|
|
|
|
|
|
|
|
|
|
|
|
|
|
|
|
|
|
|
|
|
|
|
|
|
|
|
|
|
|
|
|
|
|
|
|
|
|
|
|
|
|
|
|
|
|
|
|
|
|
|
|
|
|
|
|
|
|
|
|
|
|
|
|
|
|
|
|
|
|
|
|
|
|
|
|
|
|
|
|
|
|
|
|
|
|
|
|
|
|
|
|
|
|
| 7 | 8 | 9 | 10 | 11 |
|
|
|
| ||
1. | When the indicator is on, DVD is activated. | 7. | DVD or CD media is loaded. | ||
2. | 8. | Record function is working. | |||
3. | 9. | The time, counter position or current deck | |||
4. | Progressive Scan mode is working. |
| status is indicated. | ||
5. | When you watch SAP/STEREO channel or play- | 10. | When you set a Timer recording, it or current- | ||
| back |
| deck status is indicated. this indicator is lit. | ||
6. | VCR is activated. |
| 11. | VHS Videotape is loaded. | |
12 - English | English - 13 |