MA-1450-1 Series
Page
OPERATOR’S Guide
Page
Table of Contents
Registering Procedure and Print Format
Other Income Department ENTRY, Other Income PLU Entry
Selective Itemizer SI Status Modification
Food Stampable Total READ, Food Stamp Tendering
Paper Roll Replacement and Other Maintenance Operations
To OUR Customers
To OUR Customers
Unpacking
Unpacking
Appearance and Nomenclature
Appearance and Nomenclature
Mode Lock and Mode Selector Keys
Mode Lock
Mode Selector Keys
Mode Lock and Mode Selector Keys
Display
Amount
Display
Operator Display Front Display
Numeric Display
Triangular Lamps
Status Lamps
Outline of Preparation Procedure Before Operating the ECR
Outline of Preparation Procedure Before Operating the ECR
REG
SET MGR
Installing the RECEIPT/JOURNAL Roll
Installing the Receipt Roll
Turn the Mode Lock to the REG position with power on
MGR REG
Outline of Preparation Procedure Before Operating the ECR
Installing the Journal Roll
Setting the Ribbon Cassette
Cashier Signing or Cashier KEY Operations
Code Entry Method
Sign-OFF Mode Changes With Signing Operations
When Signed-ON or Signed-IN
When Signed-OUT
When Signed-OFF
Cashier KEY Method Hardware Option
Push-stay Cashier Locks and Keys
PUSH-ON
PUSH-AND-LOCK
Training Mode Start and END
Training-ON receipt is issued
Cashier KEY Method CLK Keys
Condition
Entries in Training Mode
Salesperson Open Receipt Issue
Keyboard Layout
Keyboard Layout
BTL RTN
PR Open Open
Pick UP BAL Code Open SI 1/M, SI 1/TL
Salesperson Receipt CPN GST/M
Functions of Each KEY
PR Open
LC Open
@/FOR
VND
Txbl
AT/TL
CHK Check
TND Tend
SI1/M SI2/M TX/M
TX1/M TX4/M
Sales
Person RPT
Registering Procedure and Print Format
Registering Procedure and Print Format
Condition Setting to Start Transaction Entries
Mode Lock Insert the REG key and set it to the REG position
Table of Contents
RECEIPT-ISSUE/NON-ISSUE Selection
NO-SALE
LOG/RECEIPT
Loan
Department Entry
Price PLU Preset-Code Key of Preset-PLU
Preset-PLU Code PLU
Gasoline Entry
PLU Entry
Preset Dept Same Dept or RPT
Quantity @/FOR Preset Dept
Repeat Entry
Quantity Extension Multiplication for DEPTs/PLUs
Quantity @/FOR Price PLU Preset-Code Key of Open-PLU
Preset-Dept Code DP#
PLU
Purchased Q’ty @/FOR Split-Price Type PLU Code PLU
10-8
Whole Package Price PLU Preset-code Key
HI-CONE PLUs
To enter Whole Package Quantity all the items packed
Operation Examples of HI-CONE PLUs
MIX & Match M & M Function of SPLIT-PRICE PLUs
Operation Examples of Mix & Match Functions
Length @/FOR Width @/FOR Preset Dept
Triple Multiplication
Length @/FOR Width @/FOR
Unit Price PLU Preset-Code Key of Open-PLU
Unit Price PLU Preset-Code Key of Preset-PLU
SINGLE-ITEM Department or SINGLE-ITEM PLU Entry
Other Income Department ENTRY, Other Income PLU Entry
SUB-LINK Department Entry
SUB-LINK PLU Entry
Returned Merchandise
RTN Mdse
Bottle Return
Dollar Discount
@/FOR Unit Amount BTL RTN
Amount Doll Disc ST for discount from the sale total
Percent DISCOUNT, Percent Charge
Store Coupon
Vendor Coupon
STR CPN
Item Correct
Void
ALL Void
Item Corr
NON-ADD Number Print
Listing Capacity Open
Allowed any time during a sale or transaction
Number #
Selective Itemizer SI Status Modification
TAX Status or Food Stamp Status Modification
Irregular Tax Amount to be Added TAX Receipt Print Format
Txbl TL
Taxable Total Read and Subtotal Print
Selective Itemizer SI Total Read
TAX Calculation and Print
Or Txbl TL
TAX Exemption
Food Stampable Total READ, Food Stamp Tendering
Sale Finalization by Media Keys
MULTI-TENDERING
Txbl TL
CHK TND
Split Tendering
Check & Cash
Company Code Card No. Chg ... Check & Credit Card
Chg ... Check, Cash, & Charge
Sale Paid in Foreign Currencies
CUR1
Amount Tendered Foreign Currency
NO-SALE Exchange from Foreign Currency to Domestic Currency
NO-SALE Exchange from Domestic Currency to Foreign Currency
RECEIVED-ON-ACCOUNT
PAID-OUT
Amount to be paid out PO
Hold & Recall
HOLD/RECALL
Receipt POST-ISSUE
Sale is finalized Receipt Issue
Post-issue Receipt
Charge Posting Previous Balance Manual Entry Type
Operation Contents KEY Operation
Txbl ST Chg
PB+
Dept
Charge Posting Customer File Type Check Track Memory Option
New Customer File Code Code Open
Txbl TL Chg
Repeatable if necessary
Display Pick UP BAL
498 R/A
1000 AT/TL
Function KEY Entry
Validation Print
00 DP1 ST AT/TL Function key
Validate
Endorsement Print
Receipt Print
Validation Print
Remote Slip Printer hardware option Operation
Endorsement Print Sample
Program Options Relating to Remote Slip Control
Invoice Print Format
Charge Posting Sale File Print Format PB Manual Entry Type
10-35
When a Power Failure Occurs
Outside a
Sale
During a
Journal and Receipt PAPER-END Detector
Journal and Receipt PAPER-END Detector
ECR Printer Motor Lock Detector
ECR Printer Motor Lock Detector
Remote Slip Printer Motor Lock Detector
Remote Slip Printer Motor Lock Detector
Printer Guide Open Detector
Printer Guide Open Detector
Paper Roll Replacement and Other Maintenance Operations
Paper Roll Replacement and Other Maintenance Operations
Replacing the Receipt Roll
Load new paper roll as described in Chapter 15-1
Replacing the Journal Roll
Replacing the Ribbon Cassette
Replenishing INK to the Store Name Stamp
Manual Drawer Releasing
Removing the Drawer
Unlock the cover using the key, and lift the front end 15-6
CDC Cash Drawer Cover Option Lock
Locking
Unlocking
Specifications
Specifications
MANAGER’S Guide
Table of Contents
Customer File Code Check Track NO. and Name Setting
Foreign Currency Exchange Rate Setting
Daily Operation Flow
Daily Operation Flow
CASHIER’S Operations
MANAGER’S Operations or Assistance
Manager Intervention
Items Programmed to Require Manager Interventions
Manager Intervention
Doll Disc
VND CPN
STR CPN BTL RTN
RTN Mdse Void
Other Operations Requiring Manager Interventions
Function Keys Amount Limit Read
Negative Amount KEY Amount Limit Read
MANAGER’S OWN Operations in MGR Mode
MANAGER’S OWN Operations in MGR Mode
Pick UP Operation
Or VND CPN
Enforced SIGN-OFF of a Cashier Code Entry Method
LOG/RECEIPT or LOG
Cashier Code and Name Read
Operations in Mode
Ordinary Operations in Mode
Operations in Mode
Operation and Receipt Sample
Entries of the purchased items*** Txbl TL Chg
Receipt AT Purchase
Receipt AT Return
Prohibitive Operations in Mode
NO-SALE NS
NO-SALE Cashing of Cheque or Other NON-CASH Medias
Read X and Reset Z Reports
Read X and Reset Z Reports
Daily Reports
Then 4 # AT/TL
AT/TL to end
11 AT/TL
13 AT/TL
24 AT/TL
GT Reports -- to be taken on weekly or monthly basis
Then 204 # AT/TL
206 AT/TL
208 AT/TL
Combination Reports
General Notes on Report Takings
Report Name Available Reports
GTX GTZ
Financial Read or Reset Daily or GT
Read Report Relevant Reset Report
Reset Report Format Sample
Financial Read or Reset
Installed
Cashier Read or Reset Daily or GT
Credit Card Company Sales Read or Reset Daily or GT
Read only Mode Lock X, enter 12, depress AT/TL
Reset Report Sample
All Salespersons
Read only Mode Lock X, enter 9, depress AT/TL
Department Group Read Daily or GT
Daily Hourly Range Read or Reset
Department Read or Reset
Mode Lock X for read Z for reset Enter 10, depress
Individual Department Read Daily or GT
All Department Read or Reset Daily or GT
Department Data ↓
PLU PLU Sales Data Read or Reset
Zone PLU Read or Reset Daily or GT
Individual PLU Read Daily or GT
Prints data in order from lower to larger numbered PLU Code
All Files with balance remaining Read
Zone Files Read
Individual Files Read
Zero-balance Files Read
PLU Group Sales Read or Reset Daily or GT
PLU Group
⎯⎯⎯⎯→
Programming Operations
Programming Operations
Submode No
Basic Key Functions
Keyboard Variations in Programming operations
AT/TL Used to end the entire program Submode sequence
Character Entries
Character Setting Operations
Character Code Entry Method
Character Code Standard Characters Column Code Row
407 # 502 # 415 # 505 # 500 #
Direct Character Entry Method
All Double-sized Declaration
Sftlock Omato AT/TL
Space
Mode Lock SET
Condition Required for Programming Operations
Line No. ST
Character Entries
Rubber Stamp
405 # E 403 # C
Cashier Code and Name Programming Submode
Programming
Condition Operation
CLK key
Depress AT/TL to end this submode
Deletion
Item Corr Cashier Code NS AT/TL or
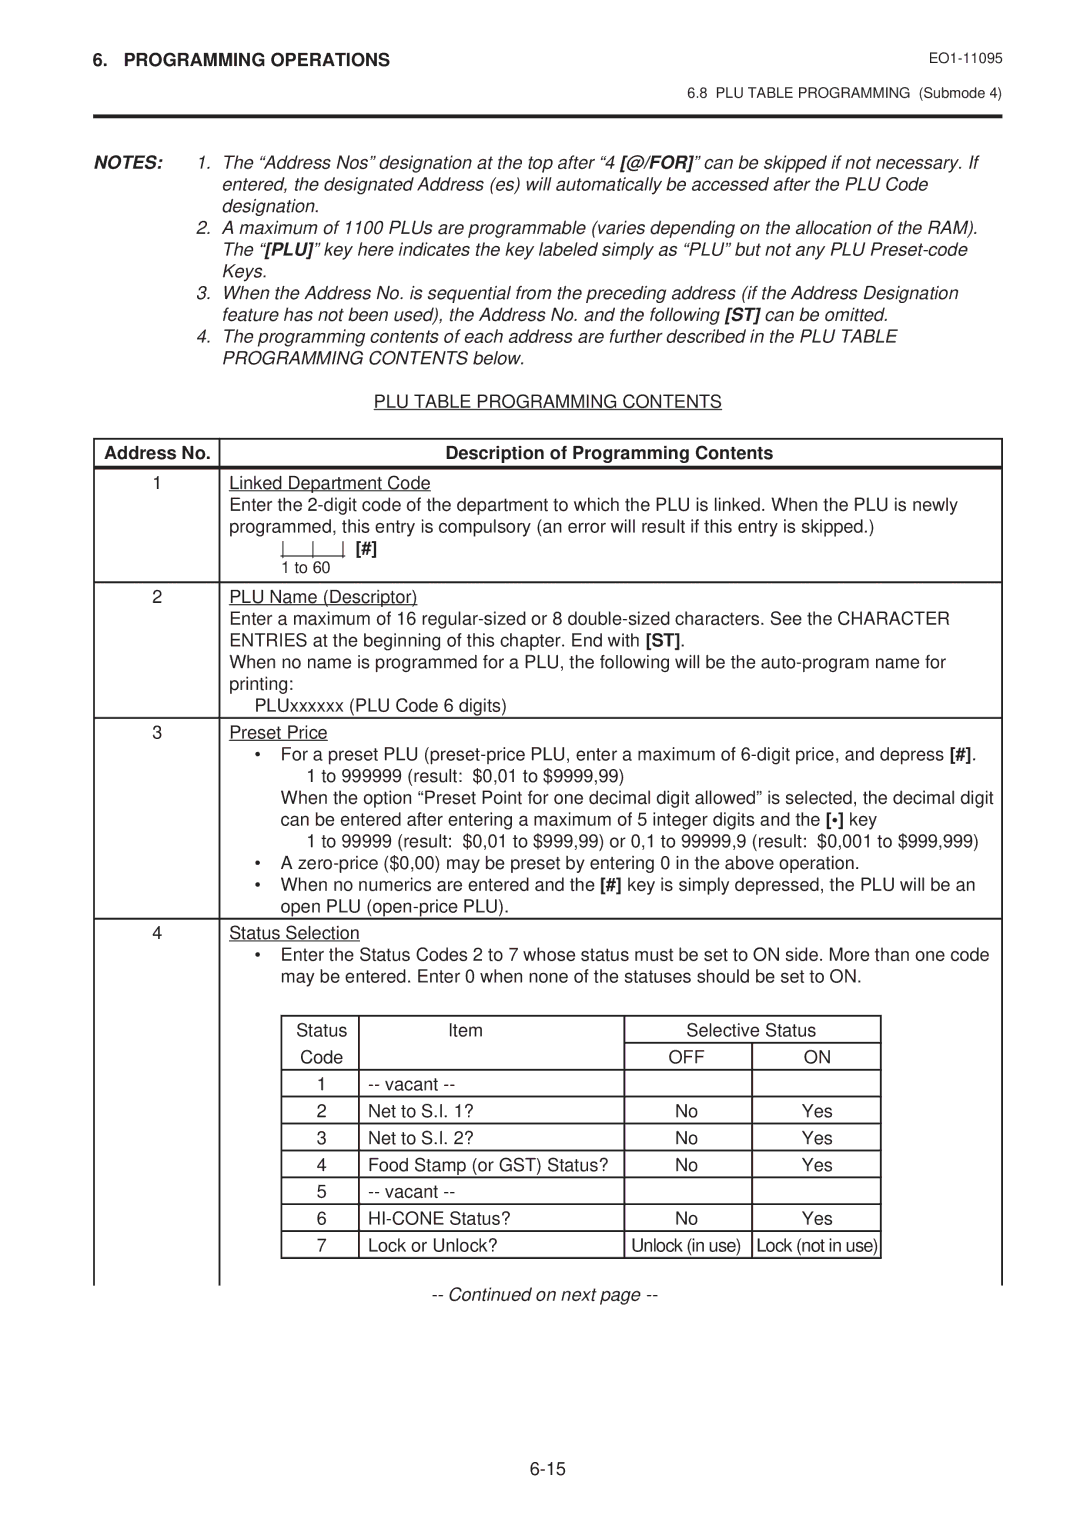
PLU Table Programming Submode
Programming or Changing
Address No Description of Programming Contents
Address No Description of Programming Contents
HEAD-LINK PLU SUB-LINK PLU
Remarks
Programming Operations
Additional Notes
Ex. To program the following PLUs
90601 PLU
10 ST
# Link-PLU Table No
101301 PLU
To delete a PLU with sales data of not zero After PLU Reset
Individual PLU Deletion
@/FOR Item Corr PLU Code PLU or
All PLU Deletion
After PLU Reset
PLU Programmed Data Copying
Any time outside a sale except the following case
Time Setting or Adjustment Submode
Date Setting or Adjustment Submode
Hour Minute
Day-of-Week Code Month
Amount Limit Setting for Function Keys Submode
CHK TND
11 ST
12 ST
Customer File Code Check Track NO. and Name Setting Submode
Deletion of Individual Customer File Codes
Deletion of All Customer File Codes
Void AT/TL
Code Name James Haily Helen Reed
Name James Haily
ST Customer File Code 408 # 405 # 412 #
405 # 414 # # 502 # 405 # 405 # 404 # ST
Salesperson Code and Name Programming Submode
20 @/FOR
ST AT/TL
Code Name
LINK-PLU Table Programming Submode
20 @/FOR Item Corr Salesperson Code ST or
Item Corr 3 ST AT/TL
25 @/FOR
PLU PRESET-CODE KEY Setting Submode
Deletion of Link-PLU Tables
ST 101301 PLU AT/TL
25 @/FOR Item Corr Link-PLU Table No. ST or
27 @/FOR
50321
Required key
50322
136 139 105 111 118 125
137 140 100 112 119 126
138 141 101 106 113 120 127
142 102 107 114 121
Negative Amount KEY Limit Amount Setting Submode
35 @/FOR
KEY Code and KEY Table
35 @/FOR ST 1000 #
Department Preset Price Setting or Changing
New Preset Price Dept
Using the DP# Key Dept Code DP# New Preset Price #
By the second operation pattern 13 DP# 140 # 14 DP# 210 #
Setting or Changing Preset Price
155 #
65 #
20 %+ and %- Preset Rate Setting
Preset Rate %+ For Percent Charge Preset Rate
PLU 6 ST 125 # AT/TL
Preset Rate Setting for Selective Itemizers SI1 and SI2
SI1/TL or SI/TL
SI2/TL
ST1/TL
Selective Itemizer Functions and Applications
Receipt/Journal Print
Foreign Currency Exchange Rate Setting
Foreign Currency Exchange Rate Calculation
CUR
Domestic
Resetting a Foreign Currency Rate Once Set
After Financial Daily Reset
TAX Table Programming
Max.amount non-taxable TX1/M Max.amount for 1¢ tax levied
TX1/M
Max.amount for 2¢ tax levied
TX1/M ST TAX Rate AT/TL
Ex TAX 2 Combination of NON-CYCLIC Breaks and % Rate
TX2/M 29 TX2/M 59 TX2/M 84 TX2/M 112 TX2/M
GST Rate Setting
STORE/REGISTER NO. Setting
TX3/M
12 GST/M
STORE/REGISTER NO. Setting
Verification of Programmed Data
Verification of Programmed Data
1 AT/TL
0 AT/TL
TAX Calculation Test
Enter any amount
Depress Txbl TL