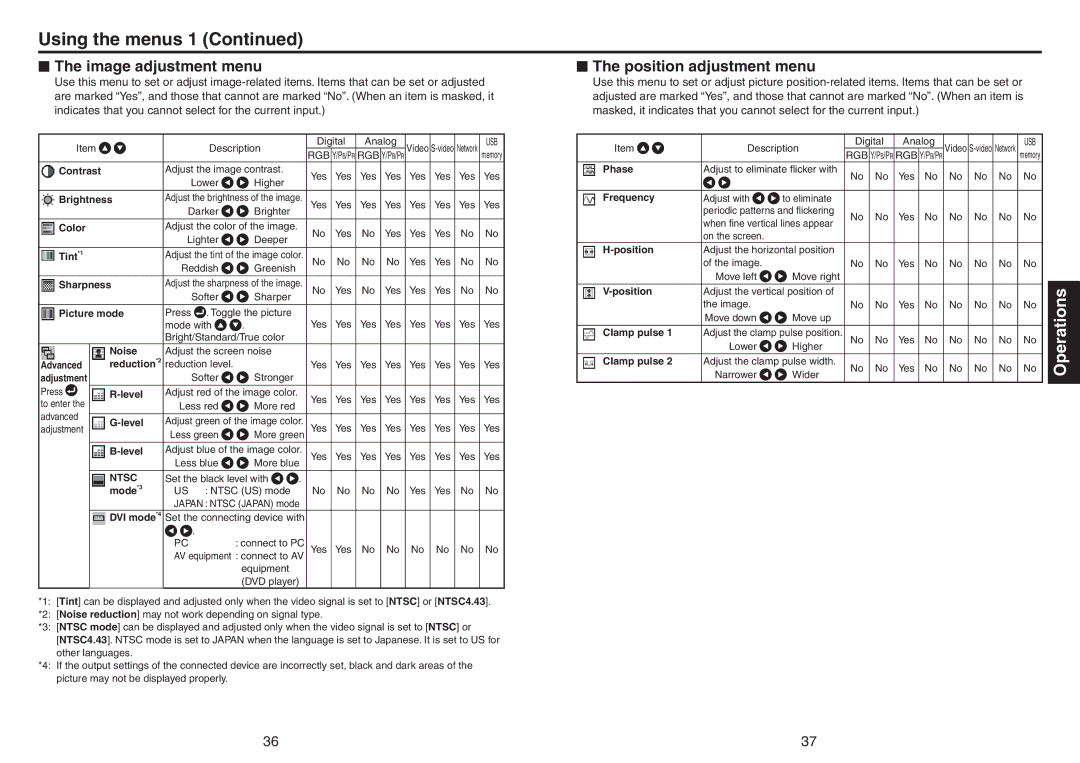
Using the menus 1 (Continued)
■The image adjustment menu
Use this menu to set or adjust
Item |
|
| Description |
| Digital | Analog | Video | Network | USB | |||||
|
|
| RGB Y/PB/PR RGB Y/PB/PR | memory | ||||||||||
Contrast |
| Adjust the image contrast. |
| Yes | Yes | Yes | Yes | Yes | Yes | Yes | Yes | |||
|
| Lower | Higher |
| ||||||||||
|
|
|
|
|
|
|
|
|
|
| ||||
Brightness | Adjust the brightness of the image. | Yes | Yes | Yes | Yes | Yes | Yes | Yes | Yes | |||||
|
| Darker | Brighter |
| ||||||||||
|
|
|
|
|
|
|
|
|
|
| ||||
Color |
| Adjust the color of the image. |
| No | Yes | No | Yes | Yes | Yes | No | No | |||
|
| Lighter | Deeper |
| ||||||||||
|
|
|
|
|
|
|
|
|
|
| ||||
Tint*1 |
| Adjust the tint of the image color. | No | No | No | No | Yes | Yes | No | No | ||||
|
| Reddish | Greenish |
| ||||||||||
|
|
|
|
|
|
|
|
|
|
| ||||
Sharpness | Adjust the sharpness of the image. | No | Yes | No | Yes | Yes | Yes | No | No | |||||
|
|
| Softer | Sharper |
| |||||||||
|
|
|
|
|
|
|
|
|
|
|
| |||
Picture mode | Press | . Toggle the picture |
| Yes | Yes | Yes | Yes | Yes | Yes | Yes | Yes | |||
|
| mode with | . |
| ||||||||||
|
| Bright/Standard/True color |
|
|
|
|
|
|
|
|
| |||
| Noise | Adjust the screen noise |
|
|
|
|
|
|
|
|
| |||
Advanced | reduction*2 | reduction level. |
|
| Yes | Yes | Yes | Yes | Yes | Yes | Yes | Yes | ||
adjustment |
|
| Softer | Stronger |
|
|
|
|
|
|
|
|
| |
Press | Adjust red of the image color. |
| Yes | Yes | Yes | Yes | Yes | Yes | Yes | Yes | ||||
to enter the |
| Less red | More red |
| ||||||||||
|
|
|
|
|
|
|
|
|
| |||||
advanced | Adjust green of the image color. | Yes | Yes | Yes | Yes | Yes | Yes | Yes | Yes | |||||
adjustment | ||||||||||||||
| Less green | More green | ||||||||||||
| Adjust blue of the image color. | Yes | Yes | Yes | Yes | Yes | Yes | Yes | Yes | |||||
|
| Less blue | More blue | |||||||||||
|
|
|
|
|
|
|
|
|
| |||||
| NTSC | Set the black level with | . |
|
|
|
|
|
|
|
| |||
| mode*3 | US | : NTSC (US) mode |
| No | No | No | No | Yes | Yes | No | No | ||
|
| JAPAN : NTSC (JAPAN) mode |
|
|
|
|
|
|
|
| ||||
| DVI mode*4 Set the connecting device with |
|
|
|
|
|
|
|
| |||||
|
|
| . |
|
|
|
|
|
|
|
|
|
| |
|
| PC |
| : connect to PC | Yes | Yes | No | No | No | No | No | No | ||
|
| AV equipment : connect to AV | ||||||||||||
equipment (DVD player)
*1: [Tint] can be displayed and adjusted only when the video signal is set to [NTSC] or [NTSC4.43].
*2: [Noise reduction] may not work depending on signal type.
*3: [NTSC mode] can be displayed and adjusted only when the video signal is set to [NTSC] or [NTSC4.43]. NTSC mode is set to JAPAN when the language is set to Japanese. It is set to US for other languages.
*4: If the output settings of the connected device are incorrectly set, black and dark areas of the picture may not be displayed properly.
■The position adjustment menu
Use this menu to set or adjust picture
Item | Description | Digital | Analog | Video | Network | USB | ||||
RGB | Y/PB/PR | RGB | Y/PB/PR | memory | ||||||
Phase | Adjust to eliminate flicker with | No | No | Yes | No | No | No | No | No | |
|
|
| ||||||||
|
|
|
|
|
|
|
|
|
|
|
Frequency | Adjust with | to eliminate |
|
|
|
|
|
|
|
|
| periodic patterns and flickering | No | No | Yes | No | No | No | No | No | |
| when fine vertical lines appear | |||||||||
|
|
|
|
|
|
|
|
| ||
| on the screen. |
|
|
|
|
|
|
|
|
|
Adjust the horizontal position |
|
|
|
|
|
|
|
| ||
| of the image. |
| No | No | Yes | No | No | No | No | No |
| Move left | Move right |
|
|
|
|
|
|
|
|
Adjust the vertical position of |
|
|
|
|
|
|
|
| ||
| the image. |
| No | No | Yes | No | No | No | No | No |
| Move down | Move up |
|
|
|
|
|
|
|
|
Clamp pulse 1 | Adjust the clamp pulse position. | No | No | Yes | No | No | No | No | No | |
| Lower | Higher |
|
|
|
|
|
|
|
|
Clamp pulse 2 | Adjust the clamp pulse width. | No | No | Yes | No | No | No | No | No | |
| Narrower | Wider | ||||||||
|
|
|
|
|
|
|
|
| ||
Operations
36 | 37 |