VL SERIES STEAMER - SERVICE PROCEDURES AND ADJUSTMENTS

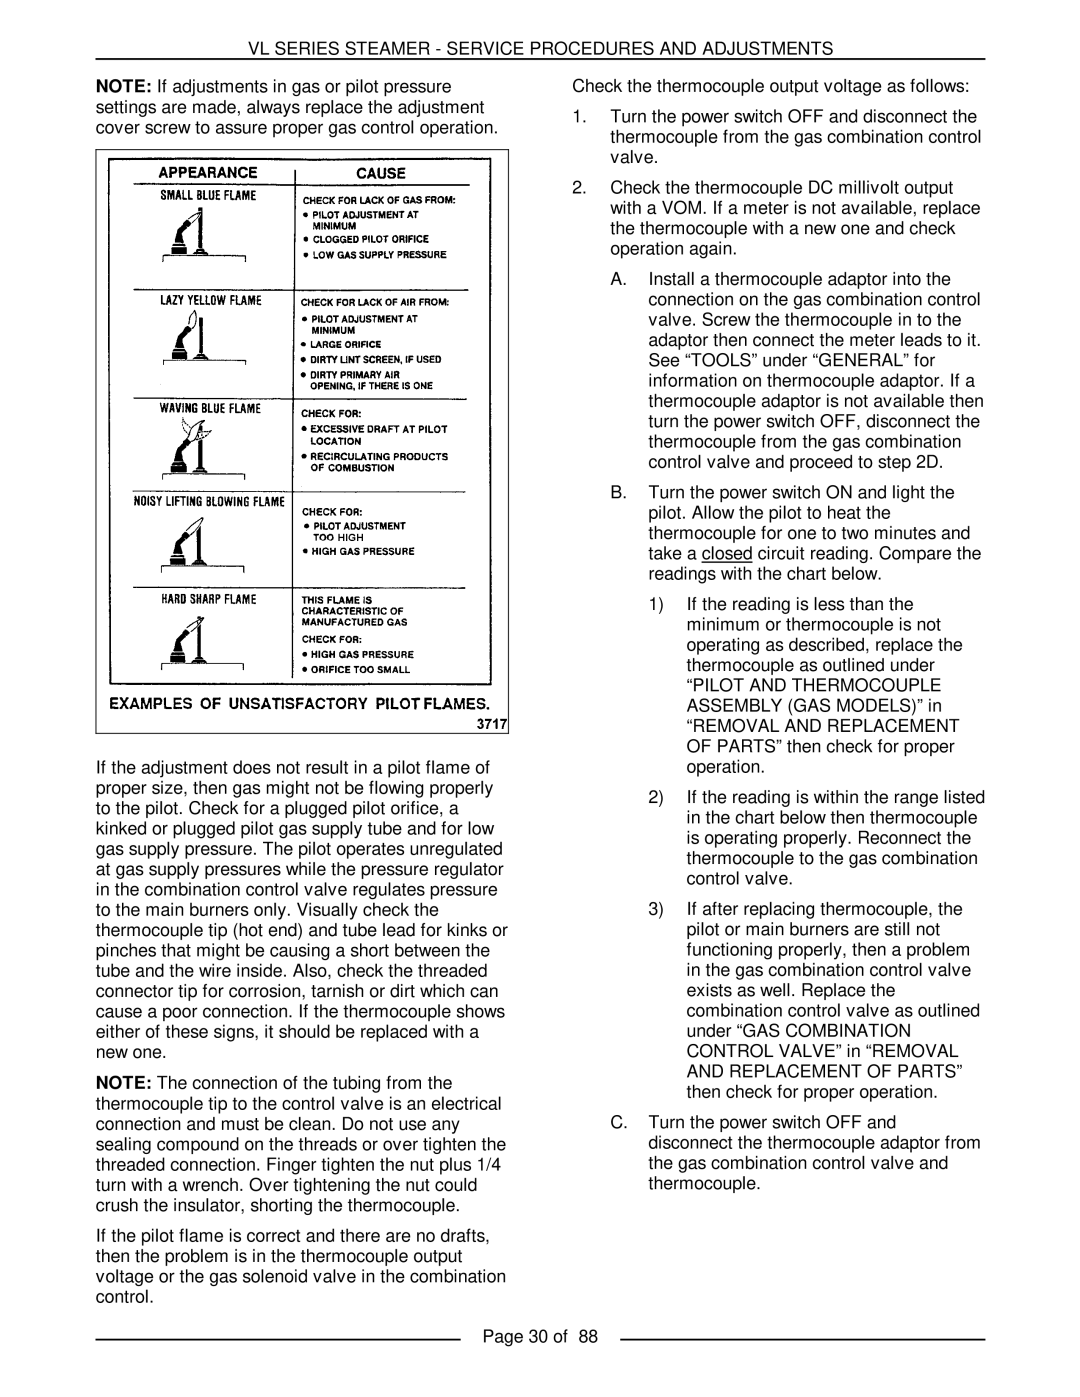
NOTE: If adjustments in gas or pilot pressure settings are made, always replace the adjustment cover screw to assure proper gas control operation.

If the adjustment does not result in a pilot flame of proper size, then gas might not be flowing properly to the pilot. Check for a plugged pilot orifice, a kinked or plugged pilot gas supply tube and for low gas supply pressure. The pilot operates unregulated at gas supply pressures while the pressure regulator in the combination control valve regulates pressure to the main burners only. Visually check the thermocouple tip (hot end) and tube lead for kinks or pinches that might be causing a short between the tube and the wire inside. Also, check the threaded connector tip for corrosion, tarnish or dirt which can cause a poor connection. If the thermocouple shows either of these signs, it should be replaced with a new one.

NOTE: The connection of the tubing from the thermocouple tip to the control valve is an electrical connection and must be clean. Do not use any sealing compound on the threads or over tighten the threaded connection. Finger tighten the nut plus 1/4 turn with a wrench. Over tightening the nut could crush the insulator, shorting the thermocouple.

If the pilot flame is correct and there are no drafts, then the problem is in the thermocouple output voltage or the gas solenoid valve in the combination control.

Check the thermocouple output voltage as follows:

1.Turn the power switch OFF and disconnect the thermocouple from the gas combination control valve.

2.Check the thermocouple DC millivolt output with a VOM. If a meter is not available, replace the thermocouple with a new one and check operation again.

A.Install a thermocouple adaptor into the connection on the gas combination control valve. Screw the thermocouple in to the adaptor then connect the meter leads to it. See “TOOLS” under “GENERAL” for information on thermocouple adaptor. If a thermocouple adaptor is not available then turn the power switch OFF, disconnect the thermocouple from the gas combination control valve and proceed to step 2D.

B.Turn the power switch ON and light the pilot. Allow the pilot to heat the thermocouple for one to two minutes and take a closed circuit reading. Compare the readings with the chart below.

1)If the reading is less than the minimum or thermocouple is not operating as described, replace the thermocouple as outlined under

“PILOT AND THERMOCOUPLE ASSEMBLY (GAS MODELS)” in

“REMOVAL AND REPLACEMENT OF PARTS” then check for proper operation.

2)If the reading is within the range listed in the chart below then thermocouple is operating properly. Reconnect the thermocouple to the gas combination control valve.

3)If after replacing thermocouple, the pilot or main burners are still not functioning properly, then a problem in the gas combination control valve exists as well. Replace the combination control valve as outlined under “GAS COMBINATION CONTROL VALVE” in “REMOVAL AND REPLACEMENT OF PARTS” then check for proper operation.

C.Turn the power switch OFF and disconnect the thermocouple adaptor from the gas combination control valve and thermocouple.

Page 30 of 88

Page 30
Image 30
Vulcan-Hart VL3GPS, VL3GMS, VL2GMS, VL3GAS, VL2GAS, VL2GSS, VL3GSS, VL2GPS VL Series Steamer Service Procedures and Adjustments

VL2GPS, VL3GPS, VL3GSS, VL2GSS, VL2GAS specifications

Vulcan-Hart is well-known in the commercial cooking equipment industry, providing durable and efficient products that cater to the needs of restaurants and foodservice operations. Their line of griddles, namely the VL3GAS, VL3GPS, VL3GMS, VL2GAS, and VL2GPS, showcases their commitment to high-quality performance and innovative cooking technologies.

The Vulcan-Hart VL3GAS is a gas griddle, featuring a robust stainless steel construction that ensures longevity and resilience in a bustling kitchen environment. It offers a smooth, hot cooking surface that allows for optimal heat retention and distribution, ensuring that food cooks evenly. With a 3/4-inch thick steel plate, it provides excellent thermal conductivity, making it ideal for high-volume cooking. This model is designed with easy-to-use controls, which makes it convenient for chefs to operate.

The VL3GPS model is a gas-powered griddle that comes equipped with a patented grease management system, which aids in maintaining a cleaner cooking environment. This system helps to separate grease from food and minimizes flare-ups, enhancing safety during cooking. Additionally, the griddle features a temperature control that allows chefs to set precise cooking temperatures, ensuring consistent results.

Moving to the VL3GMS, this model introduces increased versatility with its combination of gas and optional electric features. It’s tailored for establishments that require flexibility in their cooking strategies. The VL3GMS is also designed with a spacious cooking surface, making it suitable for preparing a wide array of dishes simultaneously.

The VL2GAS is a two-burner gas griddle that is specifically tailored for smaller kitchen operations or those with limited space. Its compact design does not compromise on performance, still providing a durable cooking surface and reliable temperature control. This model is ideal for smaller cafes or food trucks where space is at a premium.

Lastly, the VL2GPS complements the VL2GAS with its grease management system. This enhances hygiene and ensures that cooking remains efficient and safe. Both VL2 models offer easy startup and shutdown procedures, making them user-friendly for chefs working in fast-paced environments.

Overall, the Vulcan-Hart VL series griddles combine quality construction, innovative technology, and efficient design. Whether it’s the three-burner or two-burner options, these griddles meet the demands of commercial kitchens, providing reliable cooking solutions that serve the dynamic needs of the foodservice industry.