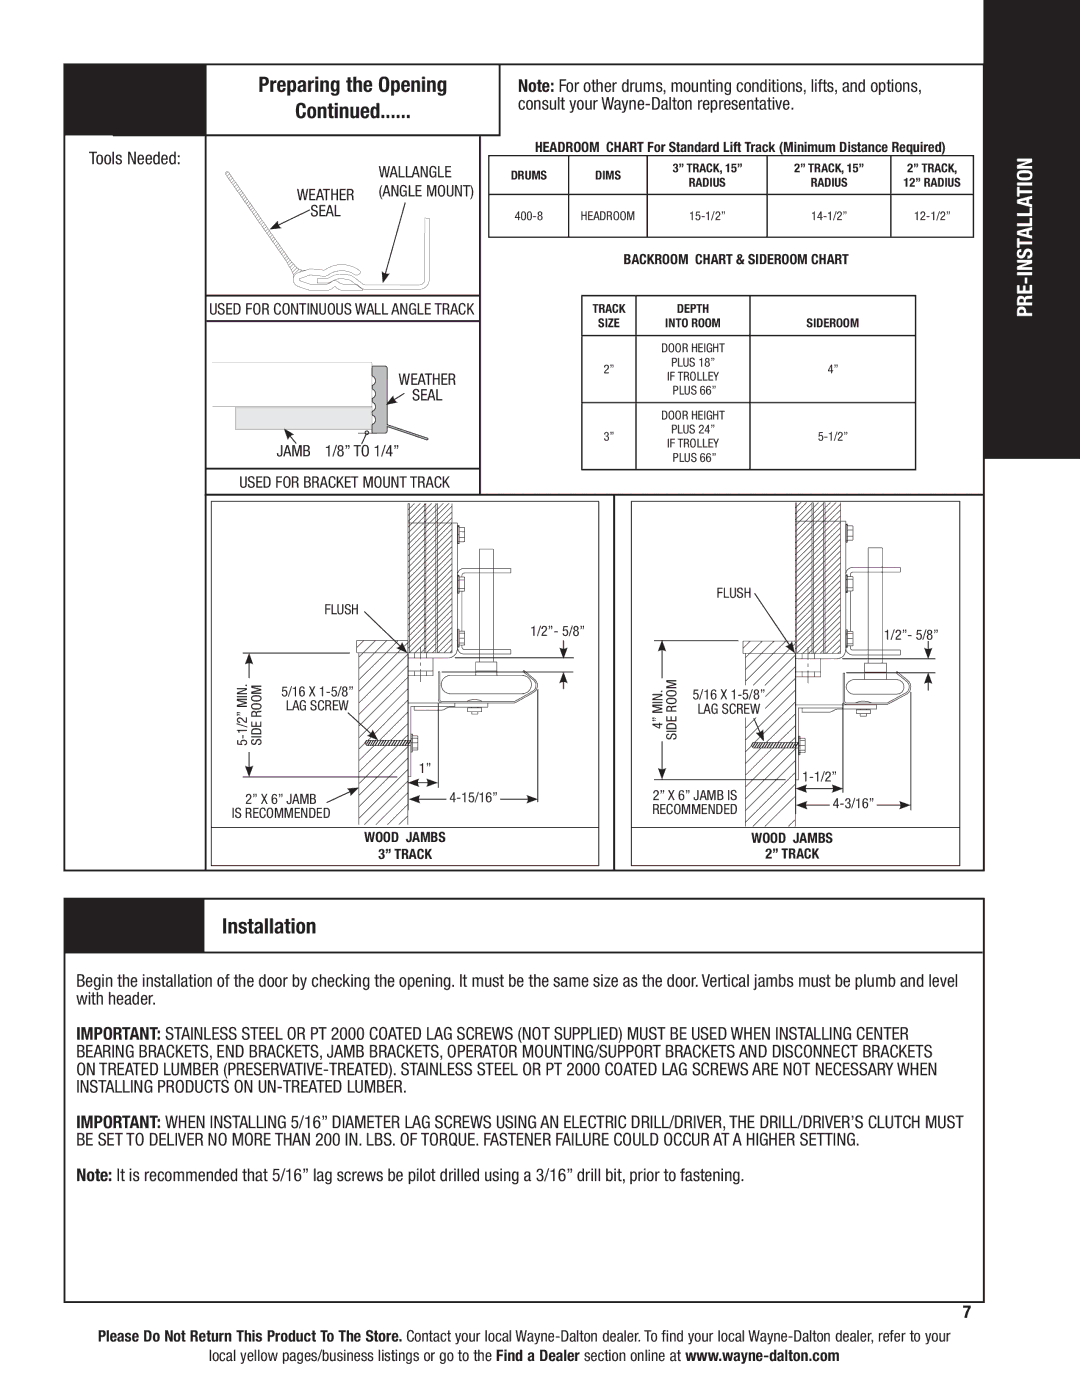
| Preparing the Opening | Note: For other drums, mounting conditions, lifts, and options, | |||||
| Continued | consult your |
| ||||
Tools Needed: |
| HEADROOM CHART For Standard Lift Track (Minimum Distance Required) | |||||
Wallangle | DRUMS | DIMS | 3” TRACK, 15” | 2” TRACK, 15” | 2” TRACK, | ||
| |||||||
| weather (angle mount) |
|
| RADIUS | RADIUS | 12” RADIUS | |
|
|
|
|
|
| ||
| seal | HEADROOM | |||||
|
|
| BACKROOM CHART & SIDEROOM CHART |
| |||
| Used for Continuous wall angle track |
| TRACK | DEPTH |
|
| |
|
|
| SIZE | INTO ROOM | SIDEROOM |
| |
|
|
|
| DOOR HEIGHT |
|
| |
|
|
| 2” | PLUS 18” | 4” |
| |
| weather |
| IF TROLLEY |
| |||
|
|
|
|
| |||
| seal |
|
| PLUS 66” |
|
| |
|
|
|
| DOOR HEIGHT |
|
| |
|
|
| 3” | PLUS 24” |
| ||
| jamb 1/8” to 1/4” |
| IF TROLLEY |
| |||
|
|
|
|
| |||
|
|
| PLUS 66” |
|
| ||
|
|
|
|
|
| ||
Used for bracket mount track
|
|
|
|
|
|
|
|
|
|
|
|
|
|
|
|
|
|
|
|
|
|
|
|
|
|
|
|
|
|
|
|
|
|
|
|
|
|
|
|
|
|
|
|
|
|
|
|
|
|
|
|
|
|
|
|
|
|
|
|
|
|
|
|
|
|
|
|
|
|
| FLUSH |
|
|
|
|
|
|
|
|
|
|
|
|
| |
|
|
|
|
|
| FLUSH |
|
|
|
|
|
|
|
|
|
|
|
|
|
|
|
|
|
|
|
|
|
|
|
|
|
|
|
|
|
|
|
|
|
|
| |
|
|
|
|
|
|
|
|
|
|
|
|
|
|
|
|
| 1/2”- 5/8” |
|
|
|
|
|
|
|
|
|
|
|
|
|
|
|
| 1/2”- 5/8” |
| |||||||
|
|
|
|
|
|
|
|
|
|
|
|
|
|
|
|
|
|
|
|
|
|
|
|
|
|
|
|
|
|
|
|
|
|
|
|
|
|
|
|
|
| |
|
|
|
|
|
|
|
|
|
|
|
|
|
|
|
|
|
|
|
|
|
|
|
|
|
|
|
|
|
|
|
|
|
|
|
|
|
|
|
|
|
|
|
|
|
|
|
|
|
|
|
|
|
|
|
|
|
|
|
|
|
|
|
|
|
|
|
|
|
|
|
|
|
|
|
|
|
|
|
|
|
|
|
|
|
|
|
|
| 5/16 X |
|
|
|
|
|
|
|
|
|
|
|
|
|
|
|
| MIN.4” ROOMSIDE |
|
|
|
|
|
|
|
|
|
|
|
|
|
|
|
| ||||||
|
|
|
|
|
|
|
|
|
|
|
|
|
|
|
|
|
|
|
|
|
|
|
|
|
| 5/16 X |
|
|
|
|
|
|
|
|
|
|
|
|
| |||
|
|
|
|
|
| LAG SCREW |
|
| 1” |
|
|
|
|
|
|
|
|
|
|
|
|
|
|
|
| LAG SCREW |
|
|
|
|
|
|
|
| ||||||||
|
|
|
|
|
|
|
|
|
|
|
|
|
|
|
|
|
|
|
|
|
|
|
|
|
|
|
|
|
|
|
| |||||||||||
|
|
|
|
|
|
|
|
|
|
|
|
|
|
|
|
|
|
|
|
|
|
|
|
|
|
|
|
|
|
|
|
|
|
|
| |||||||
|
|
|
|
|
|
|
|
|
|
|
|
|
|
|
|
|
|
|
|
|
|
|
|
|
|
|
|
|
|
|
|
|
|
|
| |||||||
|
|
|
|
|
|
|
|
|
|
|
|
|
|
|
|
|
|
|
|
|
|
|
|
|
|
|
|
|
|
|
| |||||||||||
|
|
|
|
|
|
|
|
|
|
|
|
|
|
|
|
|
|
|
|
|
|
|
|
| ||||||||||||||||||
|
|
|
|
|
|
|
|
|
|
|
|
|
|
|
|
|
|
|
|
|
|
|
|
|
|
|
|
|
|
|
|
|
|
|
|
|
| |||||
|
|
|
| 2” X 6” JAMB |
|
|
|
|
|
|
|
|
|
|
|
|
|
|
|
| 2” X 6” JAMB IS |
| ||||||||||||||||||||
|
|
|
|
|
|
|
|
|
|
|
|
|
|
|
|
|
|
|
|
|
|
|
|
|
|
|
|
|
| |||||||||||||
|
|
|
|
|
|
|
|
|
|
|
|
|
|
|
|
|
|
|
|
|
|
|
|
|
|
|
|
| ||||||||||||||
|
|
|
|
|
|
|
|
|
|
| ||||||||||||||||||||||||||||||||
|
| IS RECOMMENDED |
|
|
|
|
|
|
|
|
|
|
|
|
|
|
|
| RECOMMENDED |
|
|
|
|
|
|
|
|
| ||||||||||||||
|
|
|
|
|
|
|
|
|
|
|
|
|
|
|
|
|
|
|
|
|
|
|
|
|
|
|
|
|
|
| ||||||||||||
|
|
|
|
|
|
|
|
|
|
|
|
|
|
|
|
|
|
|
|
|
|
|
|
|
|
|
|
|
|
| ||||||||||||
|
|
|
|
|
|
|
| WOOD JAMBS |
|
|
|
|
|
|
|
| WOOD JAMBS |
| ||||||||||||||||||||||||
|
|
|
|
|
|
|
| 3” TRACK |
|
|
|
|
|
|
|
|
| 2” TRACK |
| |||||||||||||||||||||||
|
|
|
|
|
|
|
|
|
|
|
|
|
|
|
|
|
|
|
|
|
|
|
|
|
|
|
|
|
|
|
|
|
|
|
|
|
|
|
|
|
|
|
|
|
|
|
|
|
|
|
|
|
|
|
|
|
|
|
|
|
|
|
|
|
|
|
|
|
|
|
|
|
|
|
|
|
|
|
|
|
|
|
|
|
|
Installation
Begin the installation of the door by checking the opening. It must be the same size as the door. Vertical jambs must be plumb and level with header.
Important: STAINLESS STEEL OR PT 2000 COATED LAG SCREWS (NOT SUPPLIED) MUST be USED When INSTALLING CENTER bearing brackets, END brackets, jamb brackets, OPERATOR MOUNTING/SUPPORT brackets AND DISCONNECT brackets ON TREATED Lumber
Important: when installing 5/16” diameter lag screws using an electric drill/driver, the drill/driver’s clutch must be set to deliver no more than 200 In. lbs. Of torque. Fastener failure could occur at a higher setting.
Note: It is recommended that 5/16” lag screws be pilot drilled using a 3/16” drill bit, prior to fastening.
7
PRE-INSTALLATION
Please Do Not Return This Product To The Store. Contact your local
local yellow pages/business listings or go to the Find a Dealer section online at