Hinges Continued...
Tools Needed: | screws, as shown. |
|
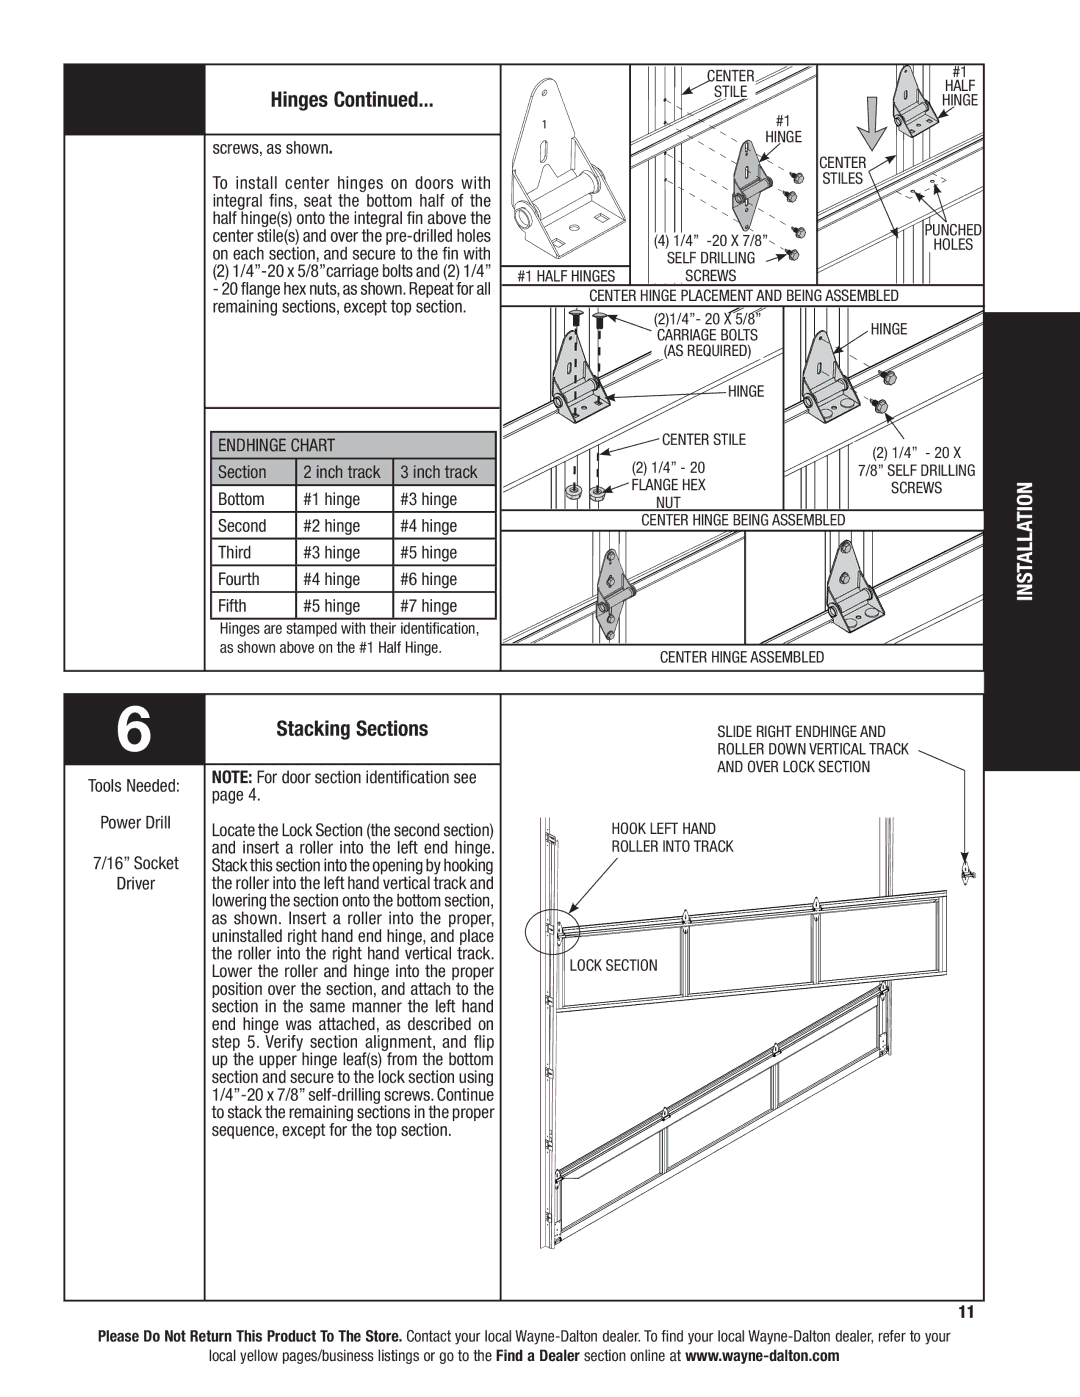
To install center hinges on doors with integral fins, seat the bottom half of the half hinge(s) onto the integral fin above the center stile(s) and over the
(2) |
#1 Half hinges
center
![]() stile
stile
#1
hinge
(4) 1/4” ![]() self drilling
self drilling ![]()
![]()
screws
#1
Half
hinge
center
stiles
Punched
Holes
- 20 flange hex nuts, as shown. Repeat for all |
remaining sections, except top section. |
ENDHINGE CHART
Section | 2 inch track | 3 inch track |
Bottom | #1 hinge | #3 hinge |
Second | #2 hinge | #4 hinge |
Third | #3 hinge | #5 hinge |
Fourth | #4 hinge | #6 hinge |
Fifth | #5 hinge | #7 hinge |
Hinges are stamped with their identification, as shown above on the #1 Half Hinge.
center hinge placement and being assembled
(2)1/4”- 20 x 5/8” | hinge | |
Carriage Bolts | ||
| ||
(as required) |
| |
hinge |
| |
center stile | (2) 1/4” - 20 x | |
(2) 1/4” - 20 | ||
7/8” self drilling | ||
flange hex | screws | |
nut |
| |
center hinge being assembled |
|
center hinge assembled
INSTALLATION
6 | Stacking Sections | |
| ||
Tools Needed: | NOTE: For door section identification see | |
page 4. | ||
| ||
Power Drill | Locate the Lock Section (the second section) | |
| ||
7/16” Socket | and insert a roller into the left end hinge. | |
Stack this section into the opening by hooking | ||
Driver | the roller into the left hand vertical track and | |
| lowering the section onto the bottom section, | |
| as shown. Insert a roller into the proper, | |
| uninstalled right hand end hinge, and place | |
| the roller into the right hand vertical track. | |
| Lower the roller and hinge into the proper | |
| position over the section, and attach to the | |
| section in the same manner the left hand | |
| end hinge was attached, as described on | |
| step 5. Verify section alignment, and flip | |
| up the upper hinge leaf(s) from the bottom | |
| section and secure to the lock section using | |
| ||
| to stack the remaining sections in the proper | |
| sequence, except for the top section. |
Slide right endhinge and roller down vertical track and over lock section
Hook Left hand roller into track
Lock section
11
Please Do Not Return This Product To The Store. Contact your local
local yellow pages/business listings or go to the Find a Dealer section online at
