21

Cable Adjustment


Tools Needed:

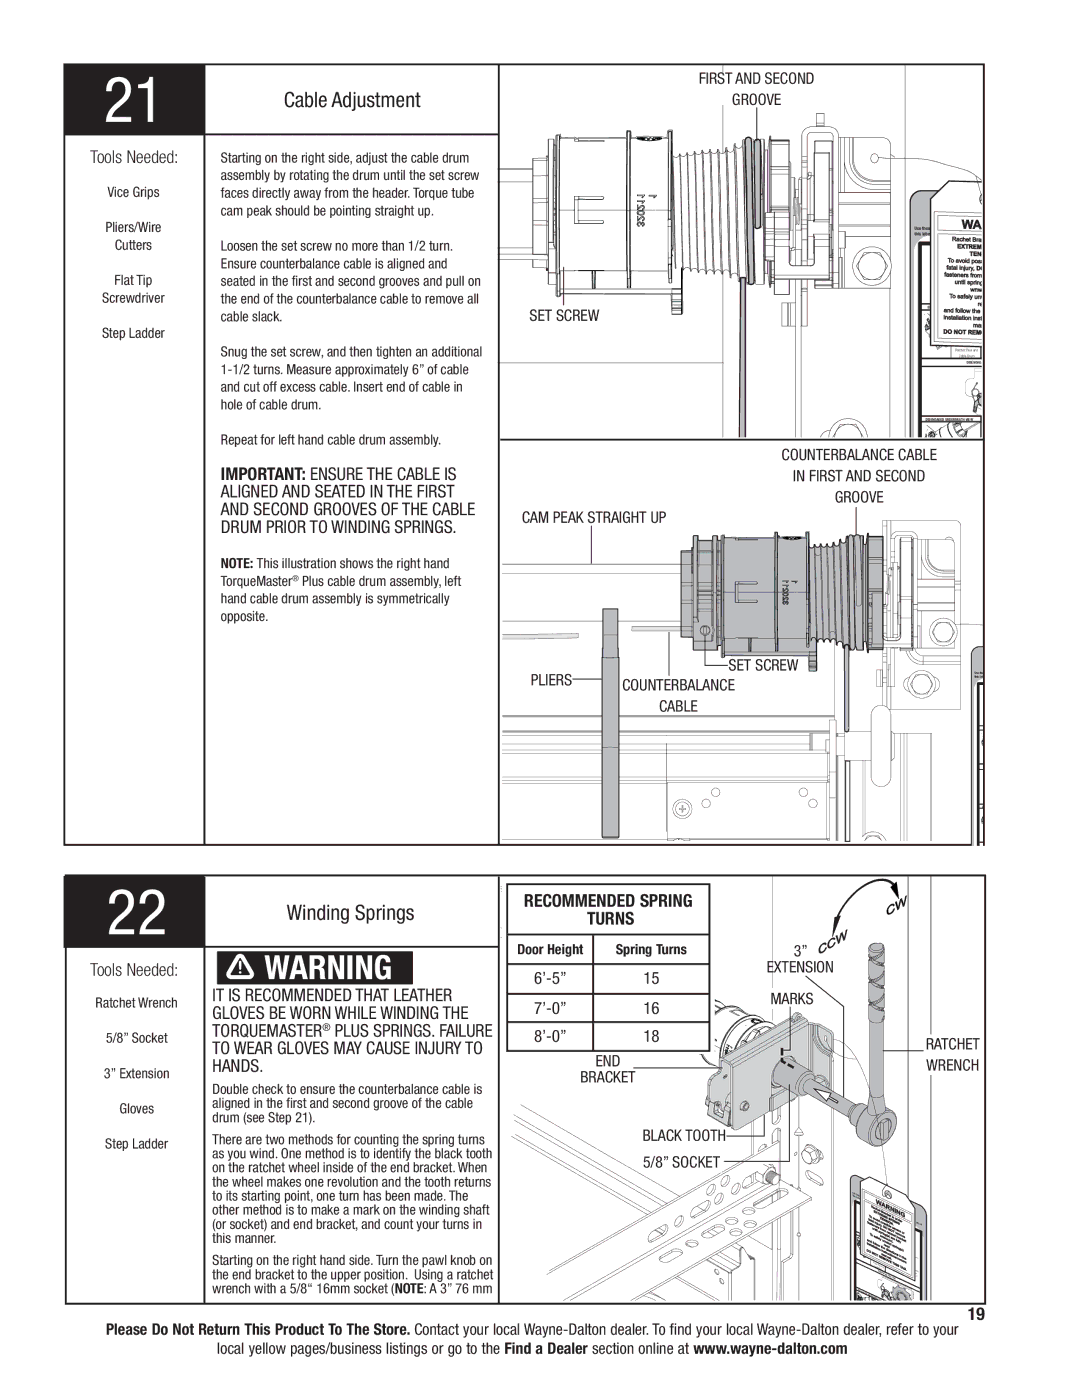
Starting on the right side, adjust the cable drum


assembly by rotating the drum until the set screw

Vice Grips

faces directly away from the header. Torque tube


cam peak should be pointing straight up.

Pliers/Wire


Cutters

Loosen the set screw no more than 1/2 turn.


Ensure counterbalance cable is aligned and

Flat Tip

seated in the first and second grooves and pull on

Screwdriver

the end of the counterbalance cable to remove all


cable slack.

Step Ladder


Snug the set screw, and then tighten an additional


1-1/2 turns. Measure approximately 6” of cable


and cut off excess cable. Insert end of cable in


hole of cable drum.


Repeat for left hand cable drum assembly.


IMPORTANT: ENSURE THE CABLE IS


ALIGNED AND SEATED IN THE FIRST


AND SECOND GROOVES OF THE CABLE


DRUM PRIOR TO WINDING SPRINGS.


NOTE: This illustration shows the right hand


TorqueMaster® Plus cable drum assembly, left


hand cable drum assembly is symmetrically


opposite.


232


Winding Springs


Tools Needed:


WARNING

Ratchet Wrench

IT IS RECOMMENDED THAT LEATHER

GLOVES BE WORN WHILE WINDING THE


5/8” Socket

TORQUEMASTER® PLUS SPRINGS. FAILURE

TO WEAR GLOVES MAY CAUSE INJURY TO


3” Extension

HANDS.

Double check to ensure the counterbalance cable is


Gloves

aligned in the first and second groove of the cable

drum (see Step 21).


Step Ladder

There are two methods for counting the spring turns

as you wind. One method is to identify the black tooth


on the ratchet wheel inside of the end bracket. When


the wheel makes one revolution and the tooth returns


to its starting point, one turn has been made. The


other method is to make a mark on the winding shaft


(or socket) and end bracket, and count your turns in


this manner.


Starting on the right hand side. Turn the pawl knob on


the end bracket to the upper position. Using a ratchet


wrench with a 5/8“ 16mm socket (NOTE: A 3” 76 mm


FIRST AND SECOND


GROOVE


Use these

WA


this label

Rachet Bra


EXTREM


TEN


To avoid poss


fatal injury, DO


fasteners from


until spring


wnw


To safely un


re

SET SCREW

and follow the

installation inst

ma


DO NOT REM


Ratchet Pawl and


Cable Drum


DISENGAG


DISENGAGED UNDERNEATH VIEW


COUNTERBALANCE CABLE


IN FIRST AND SECOND


GROOVE


CAM PEAK STRAIGHT UP


PLIERS

SET SCREW

Use the

COUNTERBALANCE

this lab


CABLE


D

RECOMMENDED SPRING


TURNS


Door Height

Spring Turns

3”

6’-5”


15

EXTENSION


7’-0”


16

MARKS


8’-0”


18

RATCHET


END


WRENCH

BRACKET


BLACK TOOTH 5/8” SOCKET

Use t


thislhese


abel


WA


R


achet

Br


EX

TR


To


ack


a


TE

E S

PR

u

nder


fatal void


NS


fasteninjuryp,ossibION. ING


side of


ers

D

le

sev


fro

O N

ere or


untilsp

m ratOT


To sa


wringn (s)chetremob

ve


and


fely


wo


are


rack

et


fol


unwund.

fully


ind

sp


insta


low


rea

d

ring


DO

llati


the


(s)


on ins direc


NOT


m tructi tionsin

the


No

space

RE anual.ons/ow

Drum


MOVE T


ne

rs


Ratchet

b

HIS


Cable

Pawl


TA


Drumand


G.

Ratchet


DI

SENGAGED SIDE


Drum


VIEW


ent

DI


SENGAGED U


NDER

NEATH


VIEW


19

Please Do Not Return This Product To The Store. Contact your local Wayne-Dalton dealer. To find your local Wayne-Dalton dealer, refer to your

local yellow pages/business listings or go to the Find a Dealer section online at www.wayne-dalton.com

Page 19
Image 19
Wayne-Dalton 9300 installation instructions Cable Adjustment, Winding Springs, Hands, Recommended Spring Turns

9300 specifications

The Wayne-Dalton 9300 is a high-quality insulated steel garage door renowned for its durability, energy efficiency, and aesthetic appeal. Designed to meet a range of residential needs, the 9300 series combines performance with style, making it a popular choice among homeowners.

One of the standout features of the Wayne-Dalton 9300 is its construction. The door consists of a robust, 2-inch thick panel that is filled with high-density polystyrene insulation. This insulation not only provides excellent thermal performance but also contributes to the door's overall strength. With an R-value of up to 13.4, the 9300 series helps maintain a comfortable temperature in the garage while reducing energy costs for heating or cooling adjacent spaces.

In terms of design flexibility, the Wayne-Dalton 9300 is available in a variety of colors and finishes, allowing homeowners to match their garage doors to their home’s exterior. The door is constructed using steel that is pre-painted and baked with a tough finish to resist fading, chipping, and denting. Homeowners can choose from various contemporary and traditional styles, ensuring a perfect fit for any architectural design.

The Wayne-Dalton 9300 also incorporates advanced technology, such as the TorqueMaster® lifting system. This innovative system provides a torsion spring lift that is safely contained within the door's structure, reducing the risk of injury and ensuring smooth operation. Additionally, the 9300 series comes equipped with high-quality weather seals that protect against wind, rain, and snow, enhancing the door’s performance in various weather conditions.

Moreover, the 9300 series emphasizes safety features, including pinch-resistant design, which helps to prevent fingers from getting caught during operation. The doors also utilize high-performance rollers and sturdy hardware to ensure reliable, quiet, and long-lasting operation.

In summary, the Wayne-Dalton 9300 is an excellent choice for those seeking a durable, energy-efficient, and stylish garage door. With its advanced insulation technology, variety of design options, innovative lifting system, and emphasis on safety, the 9300 series stands out as a top contender in the market for residential garage doors. It offers homeowners peace of mind while enhancing the overall curb appeal of their property.