5 | Installing Q.I. Jamb Brackets |
|
|
|
|
| |
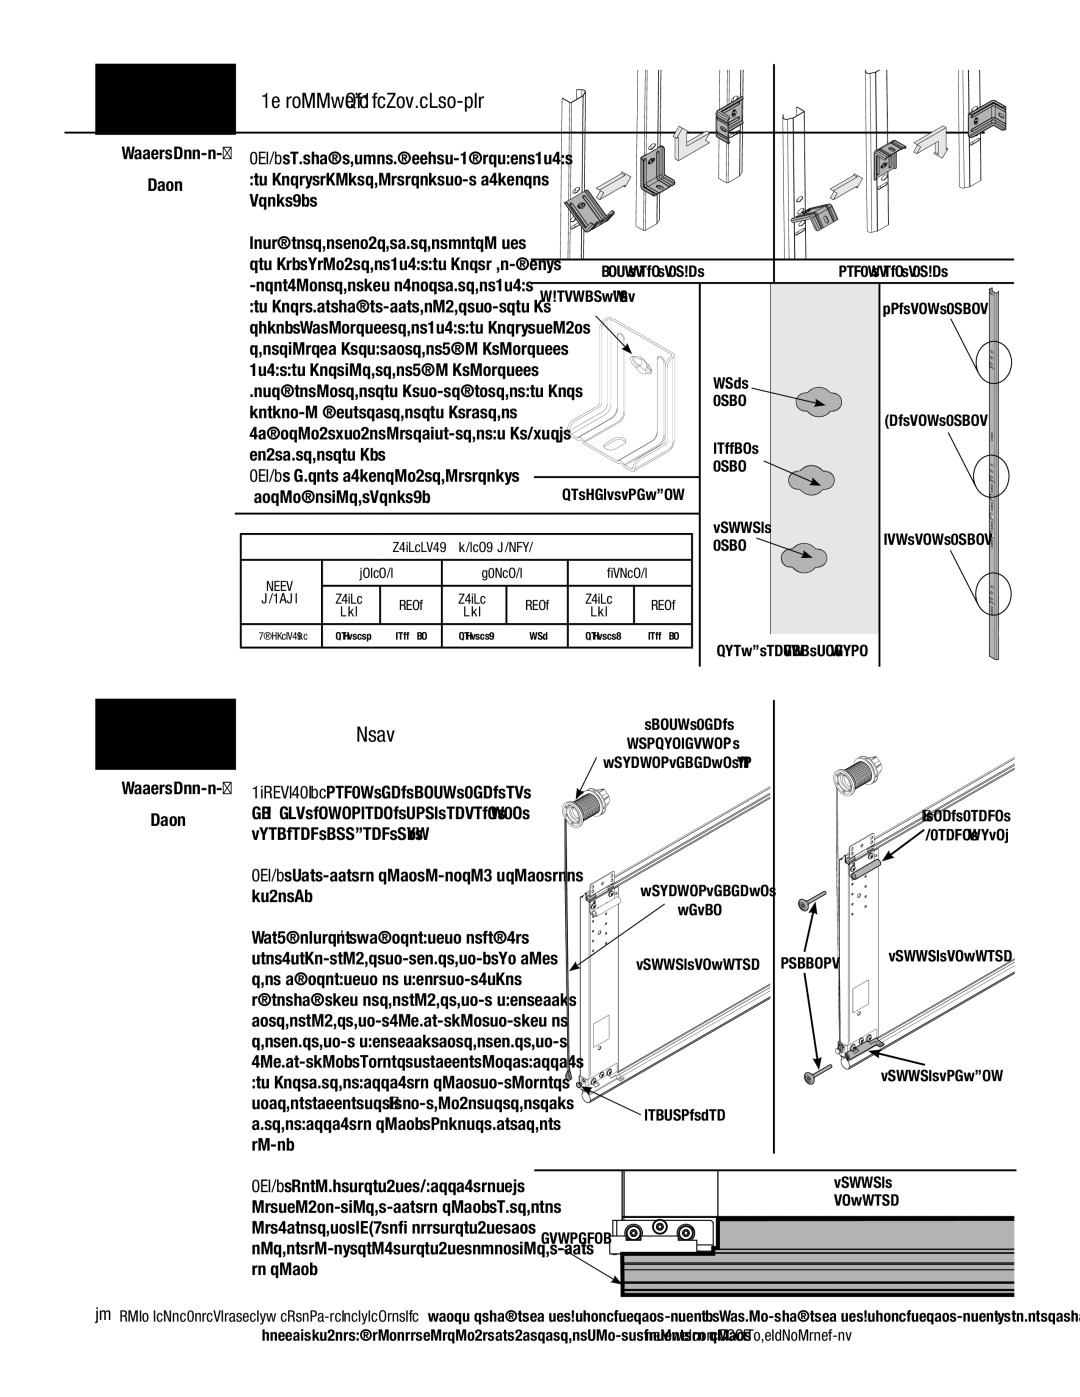
Tools Needed: | NOTE: If you have fully adjustable jamb |
|
|
None | brackets, skip this step and complete |
|
|
Step 6. |
|
| |
|
|
| |
| Measure the length of the vertical |
|
|
| tracks. Using the jamb bracket schedule, | left side shown | right side shown |
| determine the placement of the jamb | ||
| twistlock tab |
| |
| brackets for your door height and track | 3rd SET HOLES | |
|
| ||
| type. To install the jamb brackets, align |
|
|
| the twistlock tab on the quick install |
|
|
| jamb bracket with the quick install |
| Top |
| feature in the track and turn the bracket |
| |
|
| hole | |
| perpendicular to the track so the |
| |
|
| 2nd SET HOLES | |
| mounting flange is toward the back (flat) |
| |
|
| Middle | |
| leg of the track. |
| |
|
| hole | |
| NOTE: After completing this step, |
| |
| QI jamb bracket |
| |
| continue with Step 6. |
|
|
|
|
|
|
|
| Bottom | 1st SET HOLES | |
|
|
| JAMB BRACKET SCHEDULE |
| hole | ||||
|
|
|
|
|
| ||||
| DOOR | 1ST SET | 2ND SET | 3RD SET |
|
| |||
| JAMB |
| JAMB |
| JAMB |
|
|
| |
| HEIGHT | POS. | POS. | POS. |
|
| |||
|
| BKT | BKT | BKT |
|
| |||
|
|
|
|
|
|
| |||
| 8’0” TRACK | QIJB - 3 | MIDDLE | QIJB - 6 | TOP | QIJB - 7 | MIDDLE |
|
|
|
|
|
|
|
|
| quick install feature |
| |
6 |
| Drums |
|
|
| Left hand |
|
| |
|
|
|
| TORQUEMASTER® |
|
| |||
|
|
|
|
| counterbalance DRUM |
|
| ||
Tools Needed: | IMPORTANT: Right and left hand is |
|
|
|
|
| |||
None | always determined from inside the |
|
|
|
| #1 end hinge | |||
| building looking out. |
|
|
|
|
| (hinge tube) | ||
| NOTE: For door section identification see |
|
| Counterbalance |
|
| |||
| page 4. |
|
|
|
|
|
|
| |
|
|
|
|
|
|
| cable |
|
|
| TorqueMaster® Counterbalance Drums |
|
|
|
| BOTTOM SECTION | |||
| are marked right and left hand. Uncoil |
|
| BOTTOM SECTION | rollers | ||||
| the counterbalance cables and make |
|
|
| |||||
|
|
|
|
|
| ||||
| sure you place the right hand cable loop |
|
|
|
|
| |||
| on the right hand milford pin and place |
|
|
|
|
| |||
| the left hand cable loop on the left hand |
|
|
|
|
| |||
| milford pin. Insert a roller into bottom |
|
|
| bottom bracket | ||||
| bracket of the bottom section and insert |
|
|
| |||||
|
|
|
|
|
| ||||
| another roller at #1 end hinge at the top |
|
| MILFORD PIN |
|
| |||
| of the bottom section. Repeat for other |
|
|
|
| ||||
|
|
|
|
|
| ||||
| side. |
|
|
|
|
|
|
|
|
| NOTE: Verify astragal (bottom seal) |
|
|
| BOTTOM |
| |||
| is aligned with door section. If there |
|
|
| SECTION |
| |||
|
|
|
|
|
| ||||
| is more than 1/2” excess astragal on | astragel |
|
|
| ||||
| either side, trim astragal even with door |
|
|
| |||||
|
|
|
|
|
| ||||
| section. |
|
|
|
|
|
|
|
|
14Please Do Not Return This Product To The Store. Contact your local
yellow pages business listings or go to the Find a Dealer section online at