INSTALLATION (continued)

FILTERS INSTALLATION

1.FILTER PACK: Ships installed in the hood. If the FILTER PACK is not in position, the CHECK FILTERS indicator will light.

If the FILTER PACK becomes clogged, the REPLACE FILTER PACK indicator will glow.

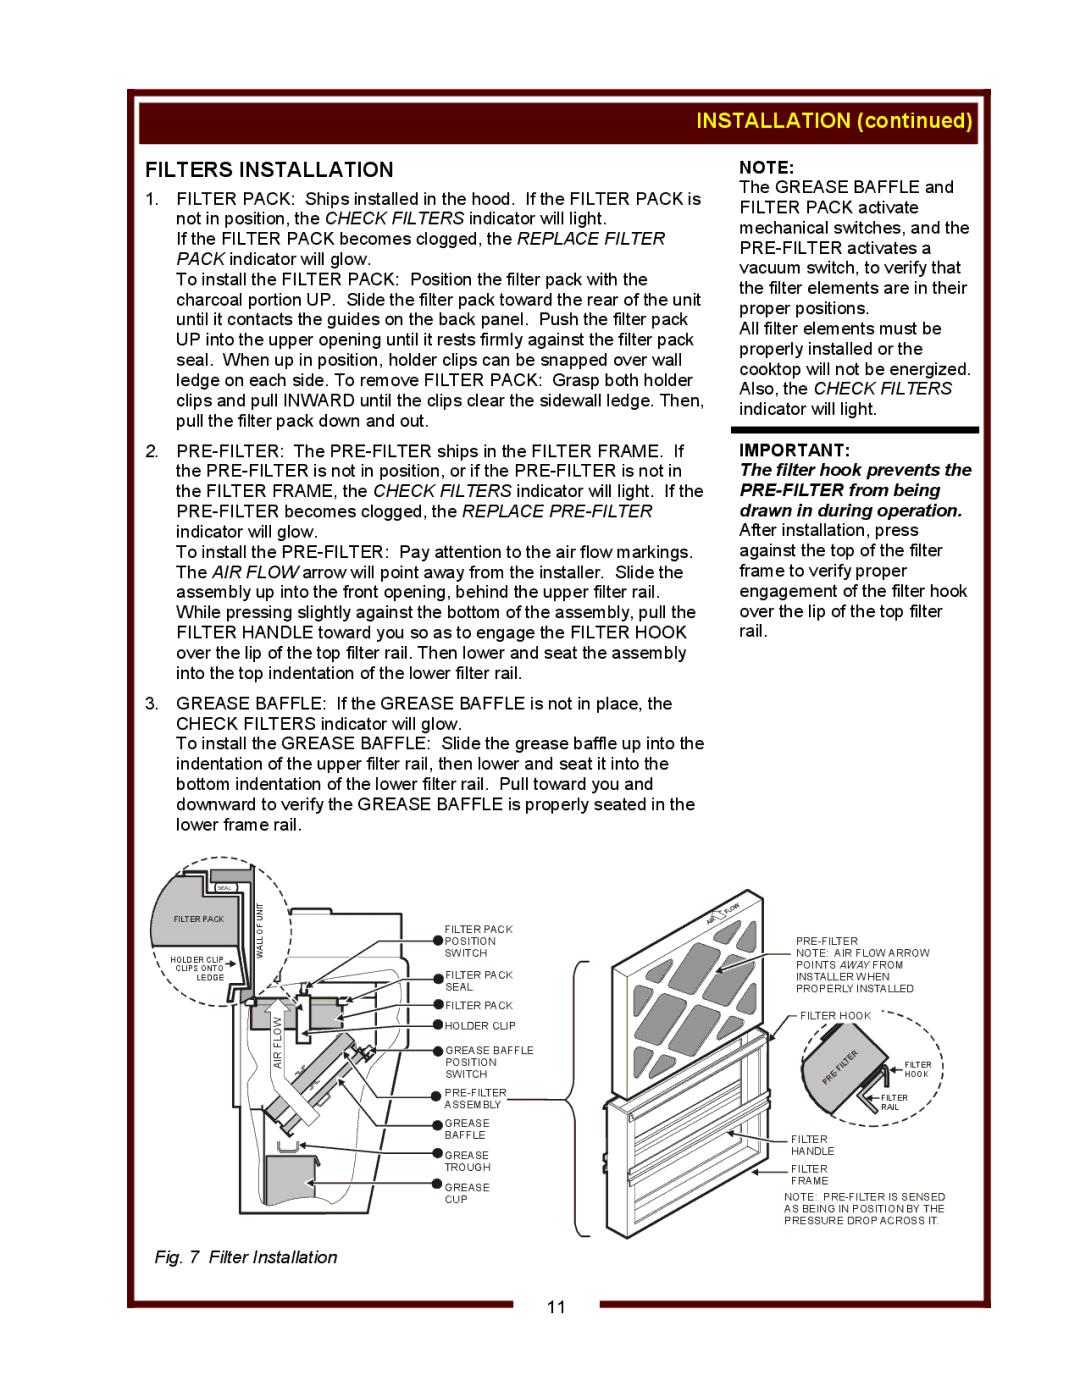
To install the FILTER PACK: Position the filter pack with the charcoal portion UP. Slide the filter pack toward the rear of the unit until it contacts the guides on the back panel. Push the filter pack UP into the upper opening until it rests firmly against the filter pack seal. When up in position, holder clips can be snapped over wall ledge on each side. To remove FILTER PACK: Grasp both holder clips and pull INWARD until the clips clear the sidewall ledge. Then, pull the filter pack down and out.

2.PRE-FILTER: The PRE-FILTER ships in the FILTER FRAME. If the PRE-FILTER is not in position, or if the PRE-FILTER is not in the FILTER FRAME, the CHECK FILTERS indicator will light. If the PRE-FILTER becomes clogged, the REPLACE PRE-FILTERindicator will glow.

To install the PRE-FILTER: Pay attention to the air flow markings. The AIR FLOW arrow will point away from the installer. Slide the assembly up into the front opening, behind the upper filter rail.

While pressing slightly against the bottom of the assembly, pull the FILTER HANDLE toward you so as to engage the FILTER HOOK over the lip of the top filter rail. Then lower and seat the assembly into the top indentation of the lower filter rail.

3.GREASE BAFFLE: If the GREASE BAFFLE is not in place, the CHECK FILTERS indicator will glow.

To install the GREASE BAFFLE: Slide the grease baffle up into the indentation of the upper filter rail, then lower and seat it into the bottom indentation of the lower filter rail. Pull toward you and downward to verify the GREASE BAFFLE is properly seated in the lower frame rail.

NOTE:

The GREASE BAFFLE and FILTER PACK activate mechanical switches, and the PRE-FILTER activates a vacuum switch, to verify that the filter elements are in their proper positions.

All filter elements must be properly installed or the cooktop will not be energized. Also, the CHECK FILTERS indicator will light.

IMPORTANT:

The filter hook prevents the PRE-FILTER from being drawn in during operation. After installation, press against the top of the filter frame to verify proper engagement of the filter hook over the lip of the top filter rail.

SEAL

FILTER PACK

HOLDER CLIP CLIPS ONTO LEDGE

OFUNIT

FILTER PACK

WALL

POSITION

SWITCH


FILTER PACK


SEAL

FLOW

FILTER PACK

HOLDER CLIP


AIR

GREASE BAFFLE

POSITION


SWITCH


PRE-FILTER


ASSEMBLY


GREASE


BAFFLE


GREASE


TROUGH


GREASE


CUP

PRE-FILTER

NOTE: AIR FLOW ARROW

POINTS AWAY FROM INSTALLER WHEN PROPERLY INSTALLED

FILTER HOOK


R


E


T


FILTER

IL


-F


HOOK

E


R


P


FILTER

RAIL

FILTER HANDLE

FILTER FRAME

NOTE: PRE-FILTER IS SENSED

AS BEING IN POSITION BY THE

PRESSURE DROP ACROSS IT.

Fig. 7 Filter Installation

11

Page 13
Image 13
Wells WVF-886 operation manual Filters Installation, Filter Installation

WVF-886 specifications

The Wells WVF-886 is a cutting-edge commercial water heater designed to meet the demanding needs of various applications, including restaurants, hotels, and large-scale facilities. This robust unit stands out in the market due to its advanced features, energy efficiency, and durability.

One of the primary characteristics of the WVF-886 is its high-capacity storage system, which ensures a steady supply of hot water even during peak usage times. With a substantial tank size, it can support multiple fixtures simultaneously without compromising performance. The system employs advanced insulation technology to retain heat and minimize energy loss, thus enhancing overall efficiency.

The heater is equipped with a powerful burner system that utilizes direct venting technology. This design enhances combustion efficiency and ensures safe operation by expelling harmful gases outside the building. The WVF-886 features a user-friendly digital display that allows operators to monitor and adjust settings easily, improving convenience and functionality.

Another significant feature of the Wells WVF-886 is its innovative temperature control system. The unit is designed with built-in safety mechanisms that prevent overheating, ensuring not only reliable operation but also adherence to safety regulations. The adjustable thermostat allows for precise temperature settings, tailored to specific operational requirements.

In terms of technology, the WVF-886 integrates smart diagnostics. This system provides real-time feedback on unit performance and alerts operators to any potential issues, reducing downtime and maintenance costs. The unit also supports compatibility with various building management systems, facilitating seamless integration into existing infrastructures.

The Wells WVF-886 is built with high-quality materials for enhanced longevity. Its stainless steel construction is resistant to corrosion, making it ideal for high-demand environments. Furthermore, the unit is designed with easy access for maintenance, allowing technicians to perform routine checks and repairs with efficiency.

Overall, the Wells WVF-886 represents a reliable solution for consistent hot water delivery while prioritizing energy efficiency and safety. Its impressive features and technological advancements make it a top choice for businesses looking to optimize operations without compromising on performance. With this unit, operators can rest assured of meeting their hot water needs effectively and efficiently.