Buck Stove
MODEL NON-CATALYTICUNIT
MODEL NON-CAT
Page
TABLE OF CONTENTS
READ THIS FIRST IMPORTANT INSTRUCTIONS
INSTALLATION, OPERATION, AND
MAINTENANCE INSTRUCTIONS MODEL
INTRODUCTION
SECTION
MODEL
MASONRY INSERT INSTALLATION
SECTION
Floor Protection
MASONRY INSERT INSTALLATION OPTIONS
POSSIBLE TOOLS NEEDED FOR INSTALLATION
INSTALLATION PREPARATION
FRONT OF STOVE UNIT WITH INSULATION OR HIGH
AIRTIGHT INSU LATED CLEAN OUT REMOVE DAMPER
OR WIRE IT OPEN
STARTER PIPE SEAL TRIM PANELS AND UNDER
FIGURE 3 MOUNTING TRIM PANELS
POSITIONING THE HEATER
POSITIONING
MOUNTING THE TRIM PANELS
FINAL CHECK
Page
SECTION PRE-FABINSERT INSTALLATION
Chimney
PREPARING THE STOVE FOR INSTALLATION
Floor Protection
1. Convert specification to R-value
CHIMNEY
HOW TO LOCATE CHIMNEY EXIT, AND INSTALL
Residential Installation
PREPARING THE ROOM HEATER LOCATION
Model 21 minimum clearance to combustibles
NOTE For minimum clearances See Page 17, Figure
HOW TO LOCATE CHIMNEY EXIT, AND INSTALL
Residential Installation
Model 21 minimum clearance to combustibles
NOTE For minimum clearances See Page 19, Figure
Residential and Mobile Home Installation
HOW TO LOCATE CHIMNEY EXIT, AND INSTALL
Without close clearance shield and pipe shield
Model 21 minimum clearance to combustibles
any listed 2100 UL 103 HT. TYPE Chimney
D. Vertical Wall Exit using 6 DVL Close Clearance Pipe, and Elbow, and any Listed 2100 UL HT chimney and Listed 2100 UL HT T-Boxassembly
HOW TO LOCATE CHIMNEY EXIT, AND INSTALL
Residential and Mobile Home Installation
Model 21 minimum clearance to combustibles
Listed 2100 UL HT T-Boxassembly
NOTE For minimum clearances See Page 23, Figure
HOW TO LOCATE CHIMNEY EXIT, AND INSTALL
Residential and Mobile Home Installation
Model 21 minimum clearance to combustibles
any listed 2100 UL 103 HT. TYPE Chimney
NOTE For minimum clearances See Page 25, Figure
HOW TO LOCATE CHIMNEY EXIT, AND INSTALL
Residential and Mobile Home Installation
Listed 2100 UL HT T-Boxassembly
OUT SIDE AIR INSTALLATION
Page
FINAL CHECK
Chimney
SECTION ALCOVE INSTALLATION AND CLEARANCES
PREPARING THE STOVE FOR INSTALLATION
Floor Protection
1. Convert specification to R-value
HOW TO LOCATE CHIMNEY EXIT, AND INSTALL
Alcove Installation
Model 21 minimum clearance to combustibles
ALCOVE INSTALLATION AND CLEARANCES
any listed 2100 UL 103 HT. TYPE Chimney
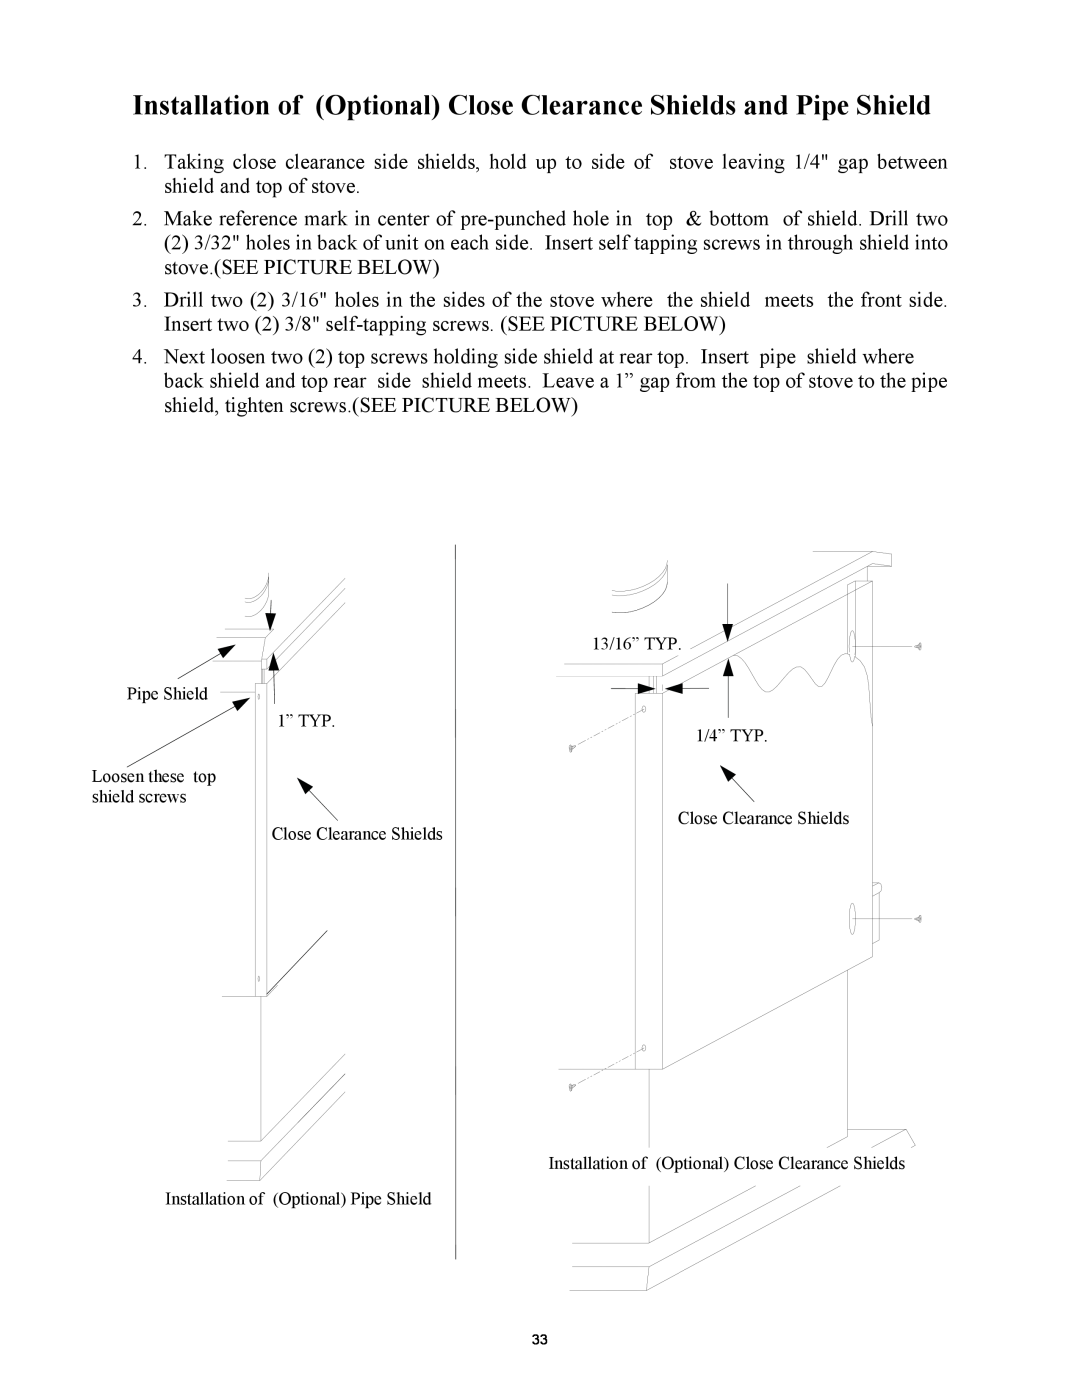
13/16” TYP 1” TYP 1/4” TYP
Installation of Optional Close Clearance Shields
Installation of Optional Pipe Shield
Pipe Shield Loosen these top shield screws
FINAL CHECK
SECTION WOOD HEATER SAFETY
BUILDING A FIRE
SECTION OPERATION
POSSIBLE CAUSE
SECTION TROUBLESHOOTING
PROBLEM
SOLUTION
POSSIBLE CAUSE
PROBLEM
SOLUTION
PRODUCTS COVERED
WARRANTY TIME PERIODS
PROCEDURE
NEW BUCK CORPORATION NBC
OTHER RIGHTS
CONDITIONS AND EXCLUSIONS

 Close Clearance Shields Close Clearance Shields