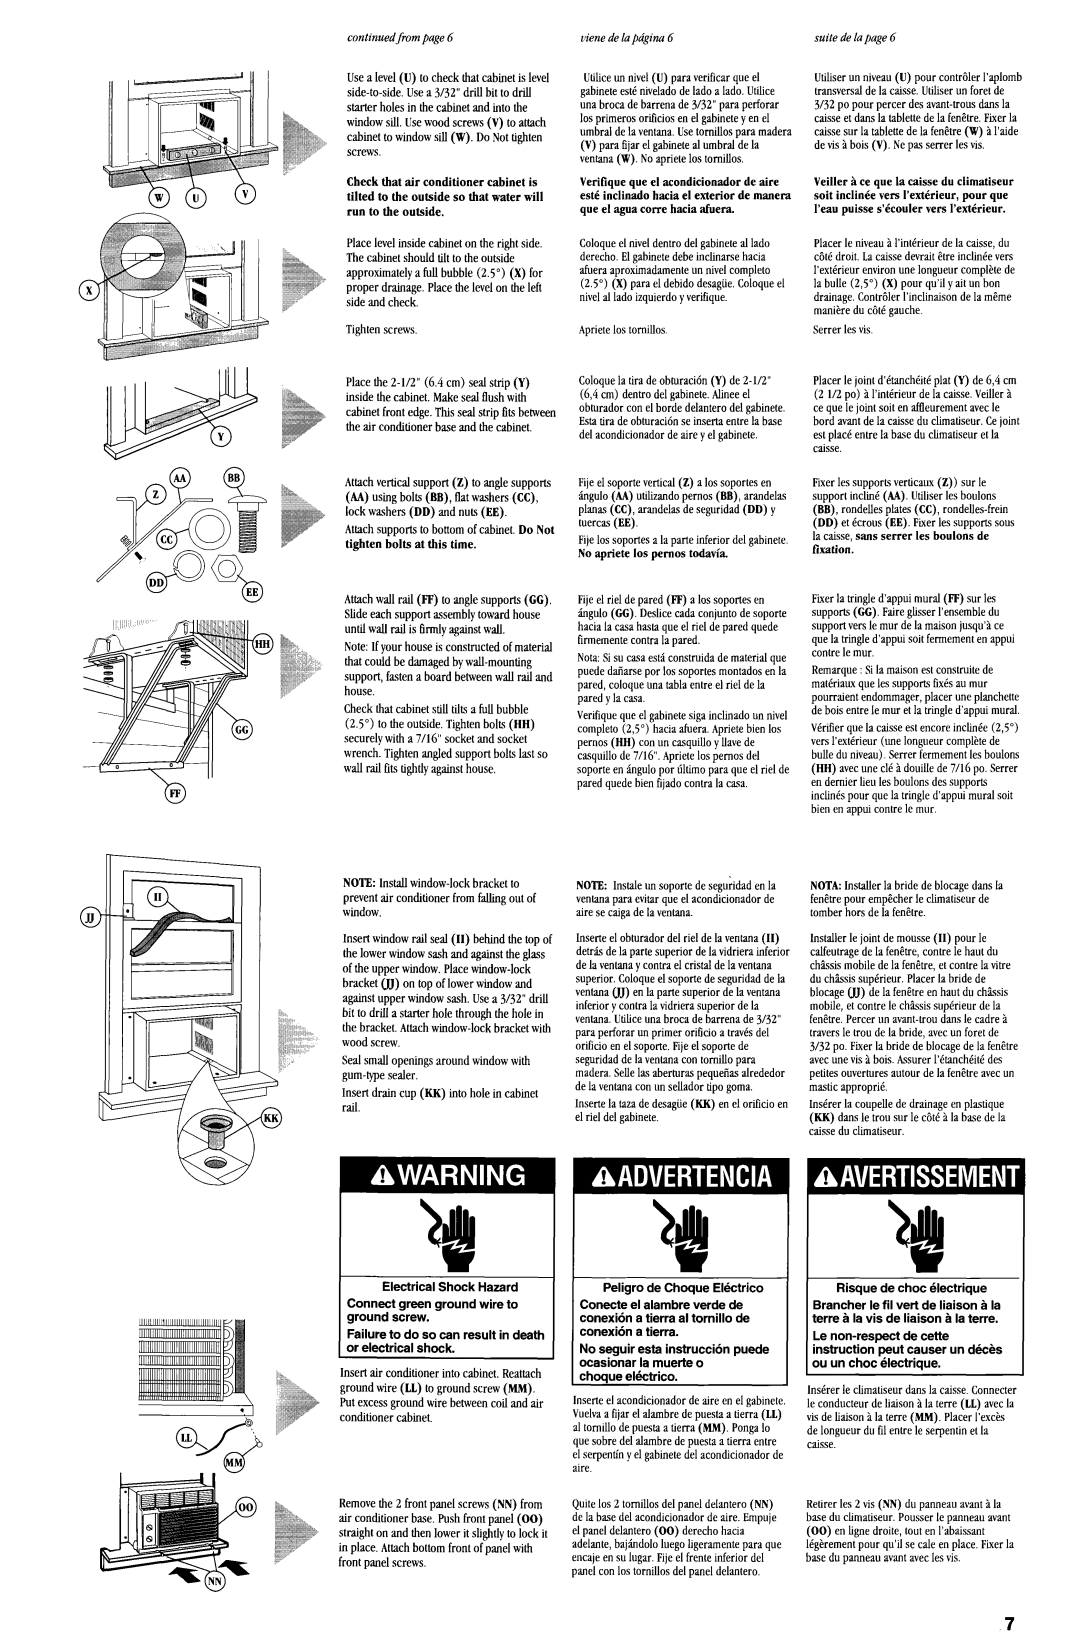
Usea level(U) to checkthatcabinetis level side-to-sideUse.a 3/32” drill bit to drill starterholesin thecabinetandinto the window sill. Usewoodscrews(V) to attach cabinetto window sill (W).Do Nottighten screws.
Check that air conditioner cabinet is tilted to the outside so that water will run to the outside.
PlacelevelInsidecabineton the right side. Thecabinetshouldtilt to theoutside approximatelya full bubble(2.5”) (X) for proper drainage.Placethelevelon theleft sideandcheck.
Tightenscrews
Placethe2-W’ (6.4 cm) sealstrip (Y) inside thecabinet.Makesealflushwith cabinetfront edge.This sealstrip fits between theair conditionerbaseandthecabinet.
Attachverticalsupport(Z) to anglesupports (AA) usingbolts(BB), flat washers(CC), lock washers(DD) andnuts(EE).
Attachsupportsto bottomof cabinet.Do Not tighten bolts at this time.
Attachwall rail (FF) to anglesupports(CC). Slideeachsupportassemblytowardhouse until wall rail is tirmly againstwall.
Note:If your houseis constructedof material thatcould bedamagedbywall-mounting support,fastena boardbetweenwall rail and house.
Checkthatcabinetstill tilts a full bubble (2.5”) to theoutside.Tightenbolts(HH) securelywith a 7/16” socketandsocket wrench.Tightenangledsupportboltsltit so wall rail fits tightlyagainsthouse.
NOTE:Install window-lockbracketto preventair conditionerfrom falling out of
cJJwindow.
Insertwindow rail seal(II) behindthetop of thelower window sashandagainsttheglass of theupperwindow. Placewindow-lock bracketUJ) on topof lower window and againstupperwindow sash.Usea 3132”drill bit to drill a starterhole throughtheholein thebracket.Attachwindow-lockbracketwith woodscrew.
Sealsmallopeningsaroundwindowwith gum-typesealer.
Insert drain cup (KK) into hole in cabinet rail.
Electrical Shock Hazard
Connect green ground wire to ground screw.
Failure to do so can result in death or electrical shock.
Insertair conditionerinto cabinet.Reattach groundwire (LL) to groundscrew(MM). Putexcessgroundwire betweencoil andair conditionercabinet.
Removethe 2 front panelscrews(NN) from air conditionerbase.Pushfront panel(00) straighton andthenlower it slightlyto lock it in place.Attachbottomfront of panelwith front panelscrews.
Utiliceunnivel(U) paraverificarqueel gabineteesteniveladodeladoalado.Utilice unabrocadebarrenade3/32”paraperforar 10sprimerosorticios enel gabinetey enel umbra1delaventanaUse.tomillosparamadera
(V)paraSjarel gabineteal umbraldela ventana(W). Noapriete10stomillos.
Verifique que el acondicionador de aire esti inclinado hacia el exterior de manera que el aguacorre hacia afuera.
Coloqueel niveldentrodelgabineteal lado derechoEl.gabinetedebeinclinarsehacia afueraaproximadamenteun nivelcomplete (2.5”) (X) parael debidodesagiieColoque.el nivelal ladoizquierdoy verifique.
Apriete10stomillos
Coloquela tira deobturaci6n(Y) de2-W (6,4cm) dentrode1gabineteAlinee.el obturadorconel bordedelanterode1gabinete. Estatira deobturaci6nseinsertaentrela base delacondicionadordeairey el gabinete.
Fijeel soportevertical(Z) a10ssoportesen tigulo (AA) utilizandopernos(BB),arandelas planas(CC),arandelasdeseguridad(DD) y tuercas(EE)
Fije10ssoportesala parteinferior de1gabinete. No apriete 10spernos todavia.
Fijeel riel depared(FF) a10ssoportesen ;ingulo(Cc). Deslicecadaconjuntodesoporte haciala casahashqueel riel deparedquede fumementecontrala pared.
Nota:Sisucasaesdconstruidadematerialque puededafiarsepor 10ssoportesmontadosenla pared,coloqueunatablaentreel riel dela paredy la casa.
Verifiquequeel gabinetesigainclinadounnivel complete(2,5”) haciaafuera.Aprietebien10s pernos(HH) conun casquilloy lIavede casquillode7/16”.Apriete10spemosdel soporteengngulopor ljltimo paraqueel riel de paredquedebienfijadocontrala casa.
NOTE: Instaleunsoportedeseguiidadenla ventanaparaevitarqueel acondicionadorde airesecaigadela ventana.
Inserteel obturadordelriel dela ventana(II) detrb dela partesuperiordela vidrierainferior dela venlanay contrael cristaldela ventana superior.Coloqueel soportedeseguridaddela ventanaUJ) enla partesuperiordela ventana inferiorycontrala vidrierasuperiordela ventanaUtilice.unabrocadebarrenade3/32” paraperforarun primerorificio a travCsdel orificio enel soporteFije.el soportede seguridaddelaventanacontomillo para maderaSelle.lasaberturaspequefiasalrededor dela ventanaconunselladortipogoma.
Insertela tazadedesagiie(KK) enel orificio en el riel delgabinete.
Peligro de Choque Elr2ctrico
Conecte el alambre Verde de conexi6n a tierra al tornillo de conexidn a tierra.
No seguir esta instruccibn puede ocasionar la muette 0
choaue el&rico.
Inserteel acondicionadordeaireenel gabinete. VuelvaaBjarel alambredepuestaa tierra(LL) al tomillo depuestaatierra(MM). Pongalo quesobredelalambredepuestaatierraentre el serpentinyel gabinetedelacondicionadorde aire.
Quite10s2 tomillosdelpaneldelantero(NN) dela basede1acondicionadordeaire.Empuje el paneldelantero(00) derechohacia adelante,baj;indololuegoligeramenteparaque encajeensulugar.Fijeel frenleinferior del panelcon10stornillosdelpaneldelantero.
Wiser un niveau(U) pour contrslerI’aplomb transversaldela caisseUtiliser.unforetde 3/32popour perter desavant-trousdansla caisseetdansla tablettedela fen&e. Fixerla caissesurla tablettedela fen&tre(W) hl’aide devisgbois(V). Nepasserrerlesvis.
Veiller Bce que la caissedu climatiseur soit inclinCe vers I’extCrieur, pour que l’eau puisse s’Ccoulervers I’extCrieur.
Placerle niveaual’intbrieur dela caisse,du cBtCdroit. Lacaissedevrait&e inclineevers I’extCrieurenvironunelongueurcompl$tede la bulle (2,5”) (X) pourqu’il yait un bon drainageContrBler.I’inclinaisondela m@me man&e du c8tCgauche.
Serrerlesvis
Placerle joint d’Ctanch&tCplat (Y) de6,4cm (2 I/2 po) a 1’intCrieurdela caisseVeiller.?t cequele joint soitenaftleurementavecle bordavantdela caissedu climatiseurCe.joint estplacCentrela basedu climatiseuretla caisse.
Fixerlessupportsverticaux(Z)) surle supportinclinC(AA). Utiliserlesboulons (BB), rondellesplates(CC),rondelles-frein
(DD)etCcrous(BE).Fixerlessupportssous la caisse,sansserrer les boulons de fixation.
Fixerla tringled’appuimural(FF)surles suppor&(GG).FaireglisserI’ensembledu supportversle murdela maisonjusqu’gce quela tringled’appuisoitfermementenappui contrele mur.
Remarque:Sila maisones1construitede matkriauxquelessupportsfixesaumur pourraientendommager,placeruneplanchette deboisentrele mur etla tringled’appuimural.
Wrifier quela caisseestencoreinclinke(2,5”) versI’extCrieur(unelongueurcompktede bulledu niveau).Serrerfermementlesboulons
(HH)avecuneclC?tdouilledei’/16 po.Serrer endemierlieu lesboulonsdessupports inch&s pourquela tringled’appuimuralsoit bienenappuicontrele mur.
NOTA:Installerla bridedeblocagedansla fedtre pour empCcherle climatiseurde tomberhorsdela fen&tre.
Installerle joint demousse(II) pourle calfeutragedela fen&e, contrele hautdu chbsis mobiledela fen&tre,etcontrela vitre du chbsis supCrieurPlacer.la bridede blocageUJ) dela fen&e enhautdu chksis mobile,etcontrele chbsis supCrieurdela fen&e. Perterun avant-troudansle cadrea traversle trou dela bride,avecun foretde 3/32po.Fixerla bridedeblocagedela fenCtre avecunevisPbois.AssurerI’&nchCitCdes petitesouverturesautourdela fen&e avecun masticappropriC.
InsCrerla coupellededrainageenplastique
(KK)dansle trou surle c8tCBla basedela caissedu climatiseur.
t Risque de choc Blectrique
Brancher le fil vert de liaison g la terre b la vis de liaison &Ila terre.
Le non-respect de cette instruction peut causer un d&z&s ou un choc blectrique.
InsCrerle climatiseurdansla caisseConnecter. le conducteurdeliaisonala terre(LL) avecla visdeliaisongla terre(MM). PlacerI’exds delongueurdufil entrele serpentinetla caisse.
Retirerles2 vis (NN) dupanneauavanthla basedu climatiseur.Pousserle panneauavant
(00)enlignedroite,toutenI’abaissant ICgkrementpour qu’il setale enplace.Fixerla basedupanneauavantaveclesvis.

