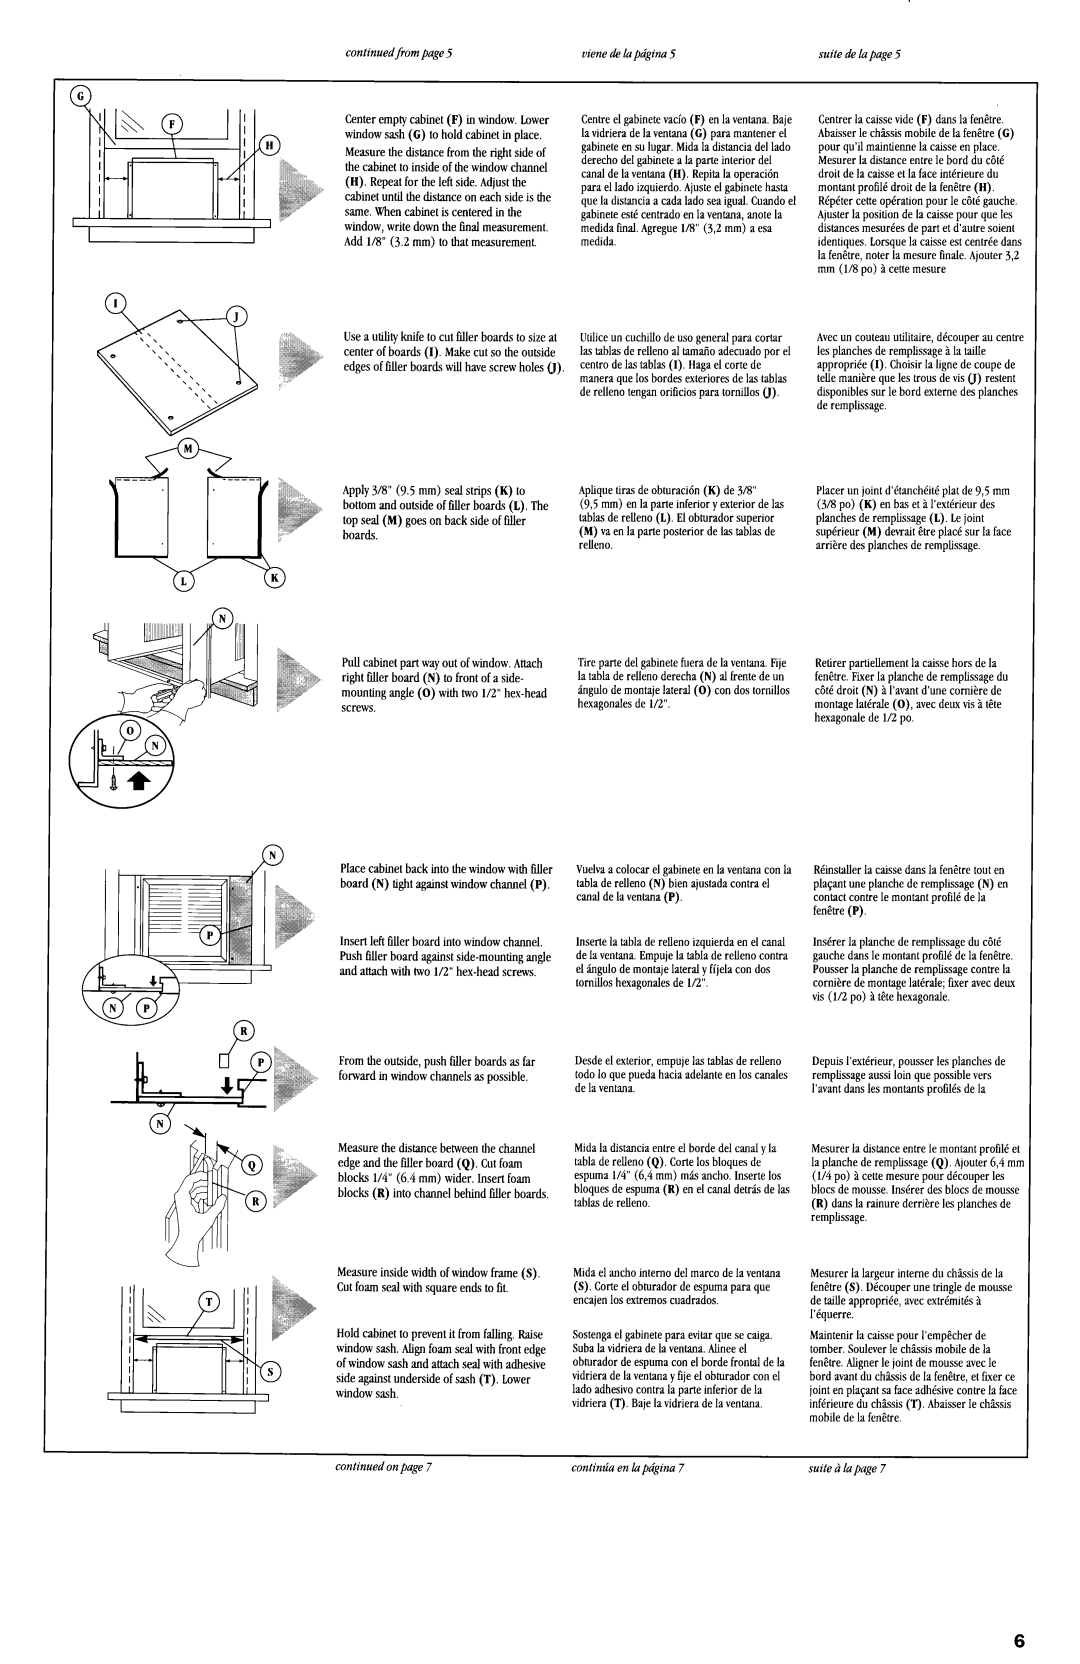
Centeremptycabinet(F) in window.Lower window sash(G) to hold cabinetin place. Measurethedistancefrom the right sideof thecabinetto insideof thewindow channel (II). Repeatfor theleft side.Adjustthe cabinetuntil thedistanceon eachsideis the same.Whencabinetis centeredin the window,write downthefinal measurement. Add l/8” (3.2 mm) to thatmeasurement.
Usea utility knife to cut filler boardsto sizeat centerof boards(I). Makecut so theoutside edgesof filler boardswill havescrewholes0)
Apply318" (9.5 mm) sealstrips(K) to bottomandoutsideof filler boards(I,). The top seal(M) goeson backsideof filler boards.
Pull cabinetpartwayout of window.Attach right filler board(N) to front of a side- mountingangle(0) with two l/2” hex-head screws.
Placecabinetbackinto thewindowwith filler board(N) tight againstwindow channel(P),
Insertleft tiller boardinto window channel. Pushtiler boardagainstside-mountingangle andattachwith two I/2” hex-headscrews.
Fromtheoutside,pushfiller boardsasfar forwardin window channelsaspossible.
Measurethedistancebetweenthechannel edgeandtheEillerboard(Q). Cutfoam blocks l/4" (6.4 mm) wider. Insert foam blocks(R) into channelbehindfiller boards.
Measureinsidewidth of windowframe(S). Cutfoamsealwith squareendsto fit.
Hold cabinetto preventit from falling. Raise window sash.Alignfoamsealwith front edge of window sashandattachsealwith adhesive sideagainstundersideof sash(T). Lower window sash.
continued on page 7
Centreel gabinetevacio(F) enla ventanaBaje. la vidrieradelaventana(C) paramantenerel gabineteensulugar.Midala distanciadellado derechode1gabinetela parteinterior de1 canaldelaventana(II). Repitala operacidn parael ladoizquierdo.Ajusteel gabinetehasta quela distanciaa cadaladoseaigual.Cuandoel gabineleestecentradoenla ventana,anotela medidaAnal.Agreguel/8” ($2 mm) aesa medida.
Utiliceun cuchillodeusogeneralparacortar lastablasderellenoal tamaiioadecuadopor el centrodelastablas(I). Hagael torte de maneraque10sbordesexterioresdelastablas derellenotenganorificiosparatornillos0).
Apliquetirasdeobturaci6n(K) de3/8”
(9,5mm)enla parteinferiory exteriordelas tablasderelleno(L). El obturadorsuperior
(M)vaenla parteposteriordelastablasde relleno.
Tirepartede1gabinetefueradela ventanaFije. la tabladerellenoderecha(N) al frentedeun ;ingulodemontajelateral(0) condostornillos hexagonalesdeI/2”.
Vuelvaacolocarel gabineteenla ventanaconla tabladerelleno(N) bienajustadacontrael canaldela ventana(P).
lnsertela tabladerellenoizquierdaenel canal dela ventanaEmpuje.la tabladerellenocontra el tigulo demontajelateraly ffjelacondos tomilloshexagonalesdel/2”.
Desdeel exterior,empujelastablasderelleno todolo quepuedahaciaadelanteen10scanales delaventana.
Midala distanciaentreel bordede1canalyla tabladerelleno(Q), Corte10sbloquesde espumaI/4” (6,4mm)mb ancho.Inserte10s bloquesdeespuma(R) enel canaldetrb delas tablasderelleno.
Midael anchointemodelmarcodela ventana
(S). Carteel obturadordeespumaparaque encajen10sextremoscuadrados.
Sostengael gabineteparaevitarquesecaiga. Subala vidrieradela ventanaAlinee.el obturadordeespumaconel bordefrontaldela vidrieradela ventanayfije el obturadorconel ladoadhesivocontrala parteinferior dela vidriera(T). Bajela vidrieradela ventana.
contimia en la pdgina 7
Centrerla caissevide(F) dansla Fen&tre. Abaisserle chbsis mobiledela fen&tre(C) pour qu’il maintiennela caisseenplace.
Mesurerla distanceentrele borddu cat6 droit dela caisseetla faceintCrieuredu montantprofilCdroit dela fenttre(II). RCpCtercetteopkrationpour le ciW gauche. Ajuslerla positiondela caissepour queles distancesmesurCesdepartetd’autresoient identiques.Lorsquela caisseestcentreedans la fenbre,noterla mesurefinale.Ajouter$2 mm (l/8 po) a cettemesure
Avecun couteauutilitaire, decouperaucentrc lesplanchesderemplissage?tla taille appropriee(I). Choisirla lignedecoupede tellemanigrequelestrousdevis 0) restent disponiblessurle bordexternedesplanches deremplissage.
Placerun joint d’Ctanch&Cplatde9,5mm (3/8 po) (K) enhasetgI’exthieur des planchesderemplissage(L). Lejoint superieur(M) devrait&treplacCsurla face arriilre desplanchesderemplissage.
Retirerpartiellementla caissehorsdela fen&e. Fixerla planchederemplissagedu c6tCdroit (N) ?tI’avantd’unecomigrede montageIatCrale(0), avecdeuxvis?tt@te hexagonalede I/2 po.
RCinstallerla caissedansla fen@tretouten plaqantuneplanchederemplissage(N) en contactcontrele montantprofilCdela fenCtre(P).
InsCrerla planchederemplissagedu cati gauchedausle montantproI% dela fen&tre. Pousserla planchederemplissagecontrela cornicredemontagelatkrale;fixer avecdeux vis (l/2 po) a t&tehexagonale.
DepuisI’extkrieur,pousserlesplanchesde remplissageaussiloin quepossiblevers I’avantdanslesmontantsprotXs dela
Mesurerla distanceentrele montantprofilCet la planchederemplissage(Q). Ajouter6,4mrr (l/4 po) gcettemesurepour decouperles blocsdemousseInsCrer.desblocsdemousse
(R)dansla rainurederrierelesplanchesde remplissage.
Mesurerla largeurintemedu chbsis dela fen&tre(S). DCcouperunetringledemousse detailleapproprike,avecextrCmitCsa I’Cquerre.
Maintenirla caissepour l’emp&cherde tomber.Souleverle chbsis mobiledela fen&e. Alignerle joint demousseavecle bordavantdu chbsis dela fenCtre,etfixer ce joint enpla$antsafaceadhesivecontrela face infkrieuredu ch&+sis(T). Abaisserle chbsis mobiledela fen&tre.
suited lapage 7