Table SAW with Riving Knife
Inventory Differences
Important Changes to Assembly
Blade Requirements
Blade Installation
Blade Size Requirements
Guard
Blade Guard
Spreader
Location to secure blade guard Screw
Installing Blade Guard & Spreader
To remove the pawls, do these steps
Anti-Kickback Pawls
When Not to Use the Blade Guard
When to Use the Blade Guard
When to Use the Riving Knife
Installing Riving Knife
When Not to Use the Riving Knife
Riving Knife
Checking Alignment
Spreader or Riving Knife Alignment
Tools Needed
Adjusting Bent Spreader/Riving Knife
Adjusting Alignment
Possible Tools Needed
Follow Checking Alignment, Steps 1-4, on
D3697-Standard Zero-Clearance Insert
Optional Table Insert
Description
New Parts
=\�FjVain�BVXcZh�VcY�Iddah
Page
Contents
Woodstock Technical Support
Introduction
Introduction
Introduction
Controls and Features
Standard Safety Instructions
Safety
Always Lock Mobile Bases if Used Before Operating Machinery
Additional Safety for Table Saws
Below are tips to avoid the most common causes of kickback
Preventing Kickback
Protecting Yourself from Kickback
Do not stand directly behind Blade when making a cut
Common Terms
W1761 Electrical Specifications
W1761 220V Single-Phase Operation
Extension Cords
W1762 440V 3-Phase Operation
W1762 220V 3-Phase Operation
Phase Converter
Electrical Specifications
Unpacking
Items Needed for Set Up
Description Qty
Immediately discard all Plastic bags and pack
Machine Inventory
Inventory
Fence Inventory
Box Inventory Figure
Extension Table Inventory
Fence Rail Inventory
Machine Placement
Cleaning Machine
Extension Table
To install the front and rear rails, do these steps
Leveling main extension table Support Leg Hex Nut Foot
Support leg fastened to main Extension table
Saw Blade
To install the blade, do these steps
Arbor
To change the arbor, do these steps
To install the blade guard, do these steps
To install and adjust the table insert, do these steps
Table Insert
Blade Guard & Splitter
Splitter
To install the riving knife, do these steps
To install the switch, do these steps
ON/OFF Switch
To install the miter gauge, do these steps
Miter Gauge
Recommended adjustment checklist
Recommended Adjustments
Dust Collection
Recommended CFM at Dust Port
To test run the machine, do these steps
Test Run
Basic Controls
General
Ripping blade features see Figure
Disabling On/Off Switch
Crosscut blade features see Figure
Blade Selection
Laminate blade features see Figure
Combination blade features see Figure
Dado Blades see Figure
Non-Through Through Cuts
Workpiece Inspection
Non-Through Cuts
Through Cuts
Typical ripping operation
Ripping
Crosscutting
To make a crosscut using the miter gauge, do these steps
Blade Tilt & Bevel Cuts
Miter Cuts
To perform a miter cut, do these steps
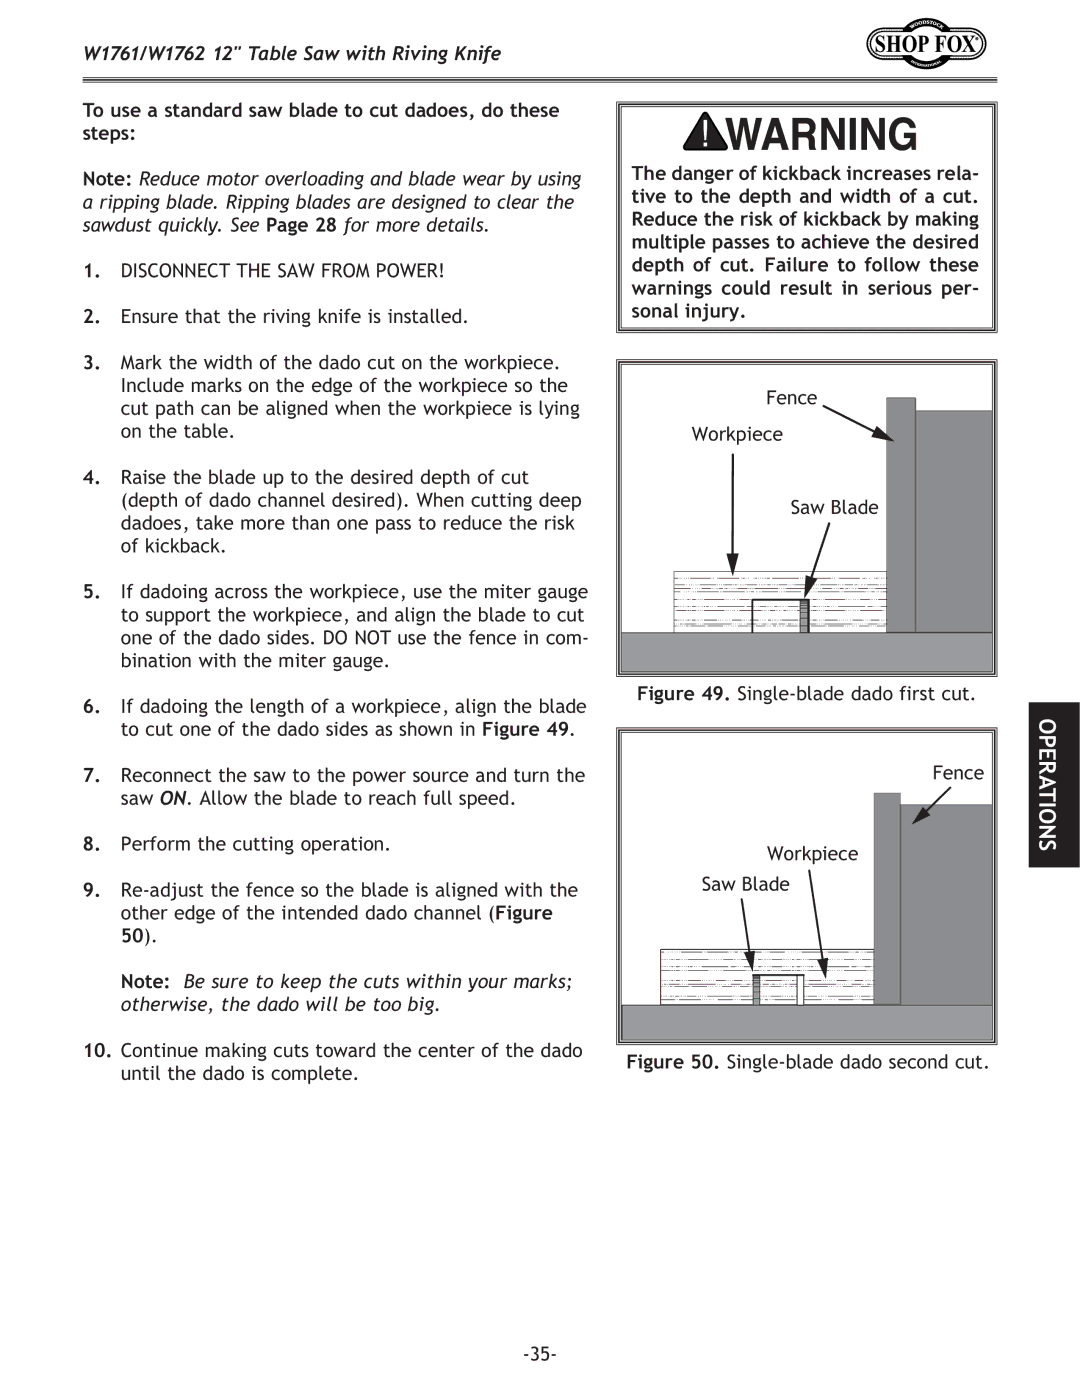
To use a stacked or wobble dado blade, do these steps
Dado Cutting
Disconnect the SAW from Power
To cut rabbets with the dado blade, do these steps
Rabbet Cutting
First cut to create a rabbet With a standard blade
To cut rabbets with the standard blade, do these steps
Resaw Barrier
Resawing
To build the auxiliary fence, do these steps
Auxiliary Fence
To perform resawing operations, do these steps
Resawing Operations
Table Saw Accessories
D3585 Bore General Purpose D3586 Fine Finishing D3587 100
Operations
Lubrication
Cleaning
Daily Check
Weekly Check
Motor & Electrical
Troubleshooting
W1761/W1762 12 Table Saw with Riving Knife
Operations
To remove the flat belt, do these steps
Replacing Flat Belt
Deflect it no more than 1⁄8
To install the new belt, do these steps
To set the 90 stop bolt, do these steps
Blade Tilt Stops
To set the 45 stop bolt, do these steps
Digital Readout
To adjust the tilt indicator arrow, do these steps
To set the digital readout, do these steps
Miter Slot to Blade Parallelism
Example of adjusting blade to Miter slot
Blade Alignment
To adjust the blade by moving the table, do these steps
Square and Height
Adjusting Fence
Clamping Pressure and Parallelism
Miter gauge diagram
W1761 magnetic switch
Switch
See Figure
W1761 Wiring Diagram
W1762 Electrical Components
W1762 magnetic switch prewired to 220V, 3-phase
W1762 Wiring Diagram 220V, 3-Phase
W1762 Wiring Diagram 440V, 3-Phase
Parts
Blade Guard Assembly Blade Guard Assembly Parts List
Fence Assembly Fence Assembly Parts List
Miter Gauge Assembly Miter Gauge Parts List
Main Table, Motor & Cabinet
Motoraccesscover
Main Table, Motor & Cabinet Parts List
Mitergaugemountingbracket
Extension Table Assembly Extension Table Parts List
Label Placement
Warranty
Page
Page
Comments
Warranty Registration
BOX BELLINGHAM, WA