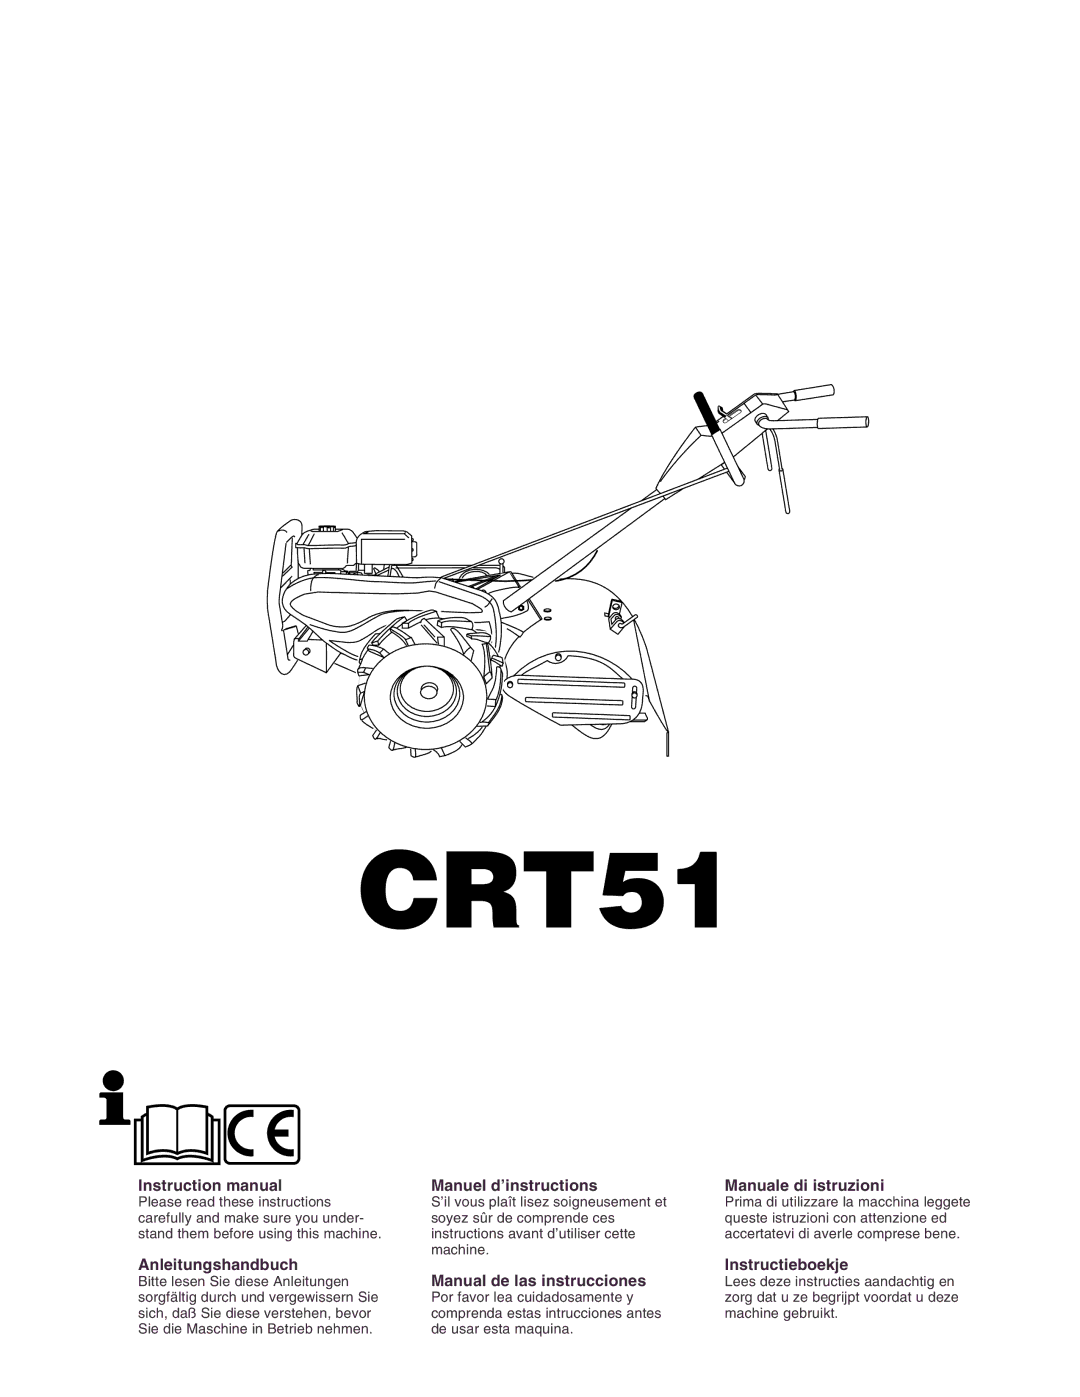
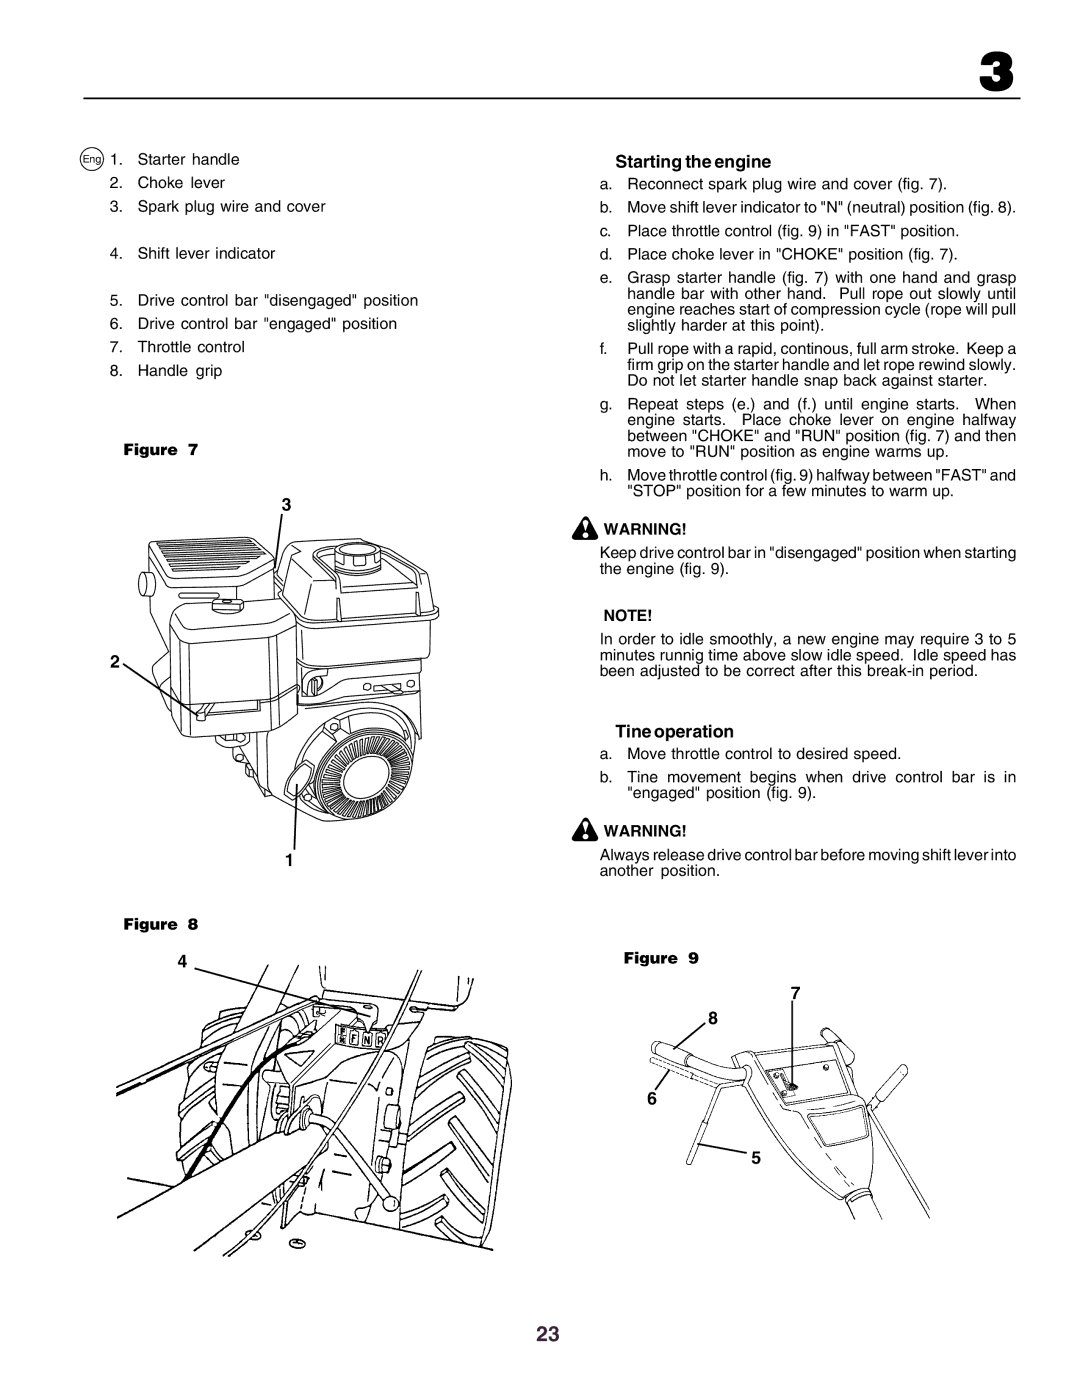
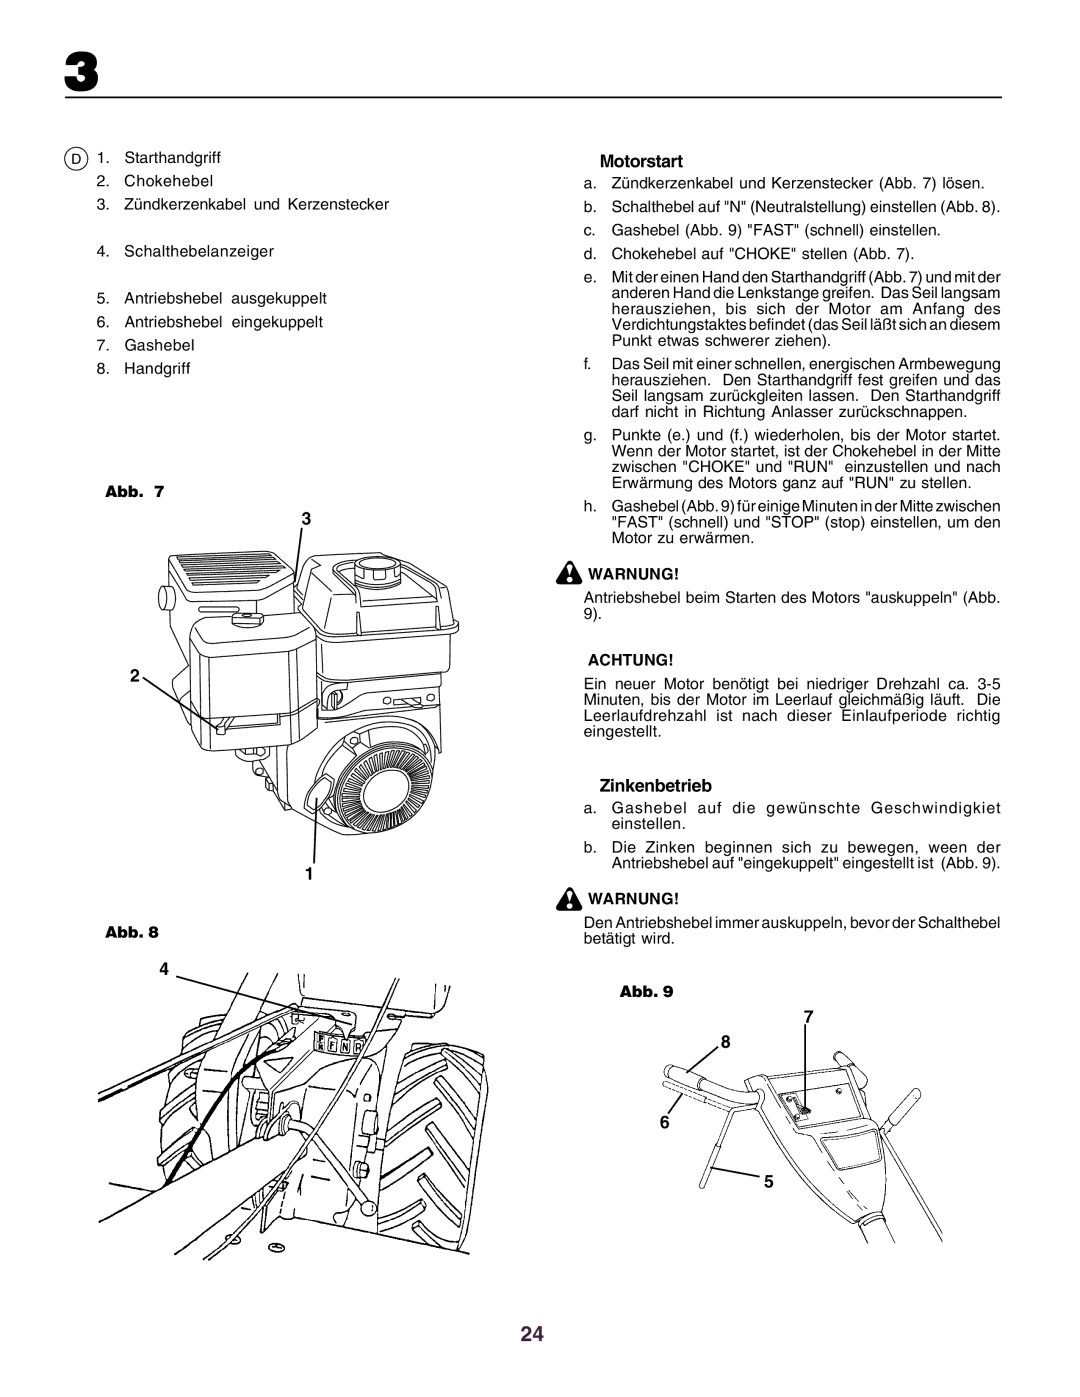
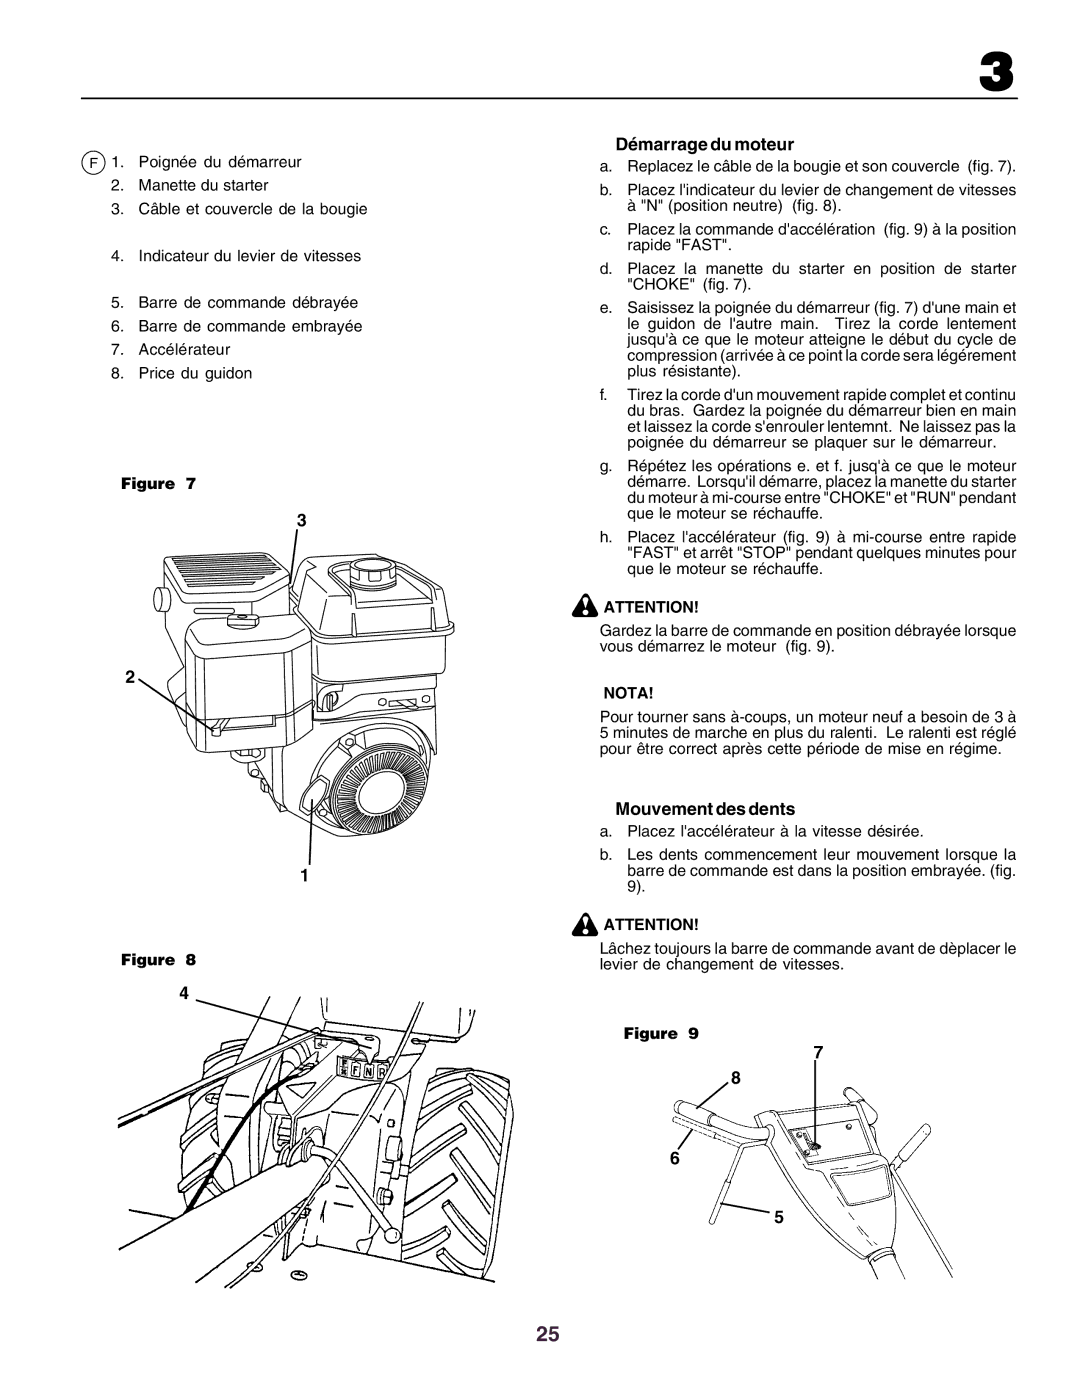
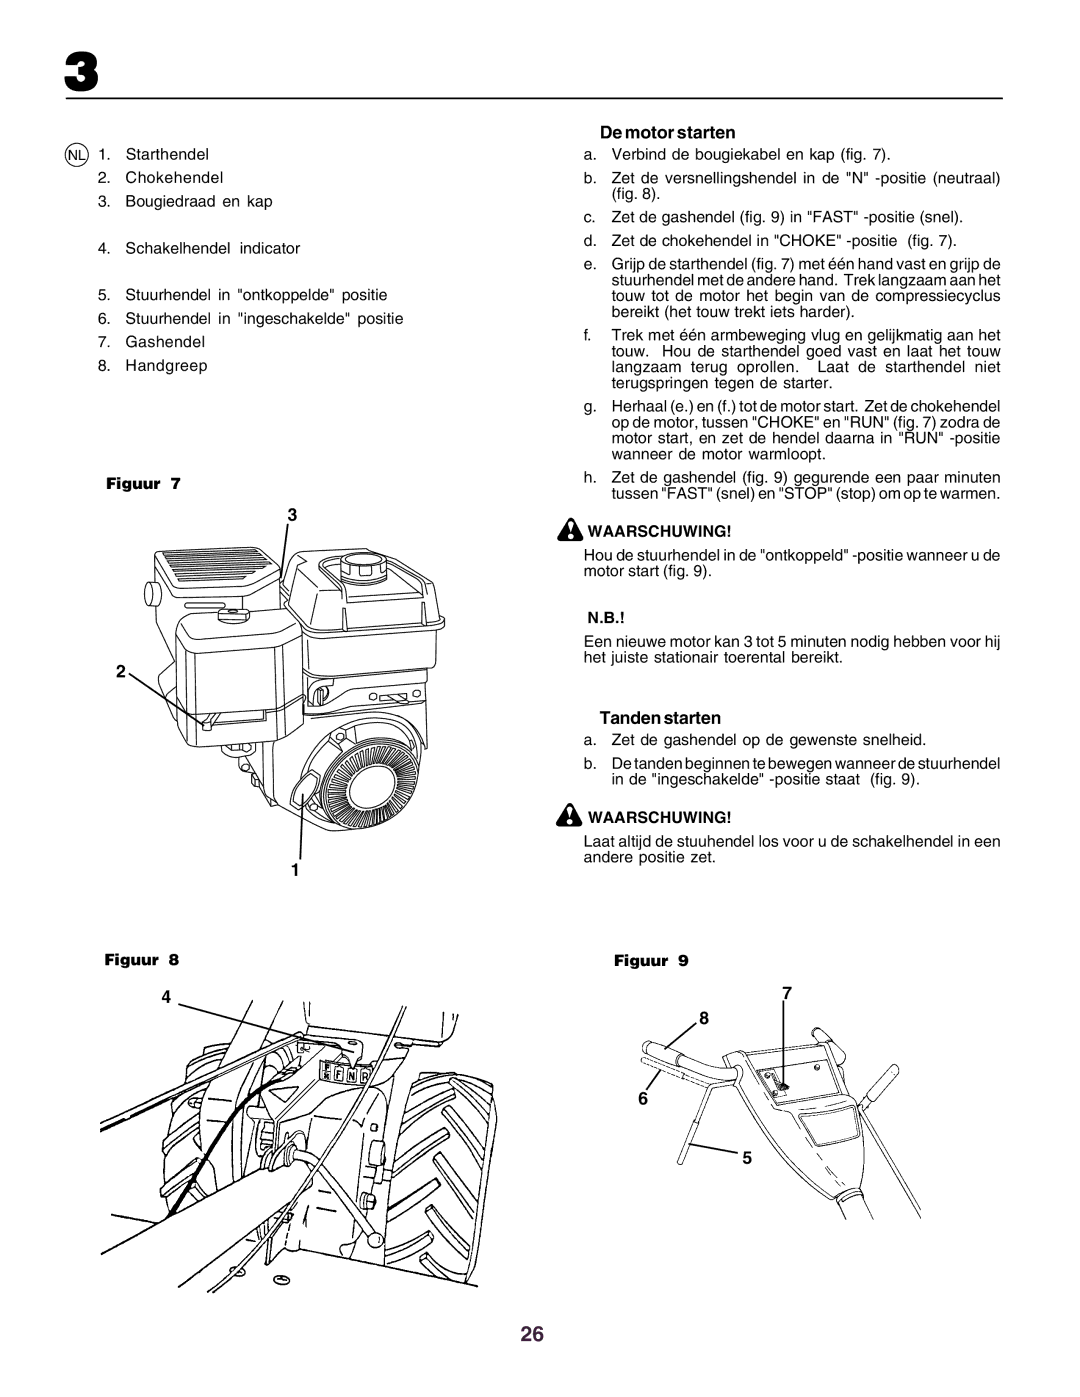
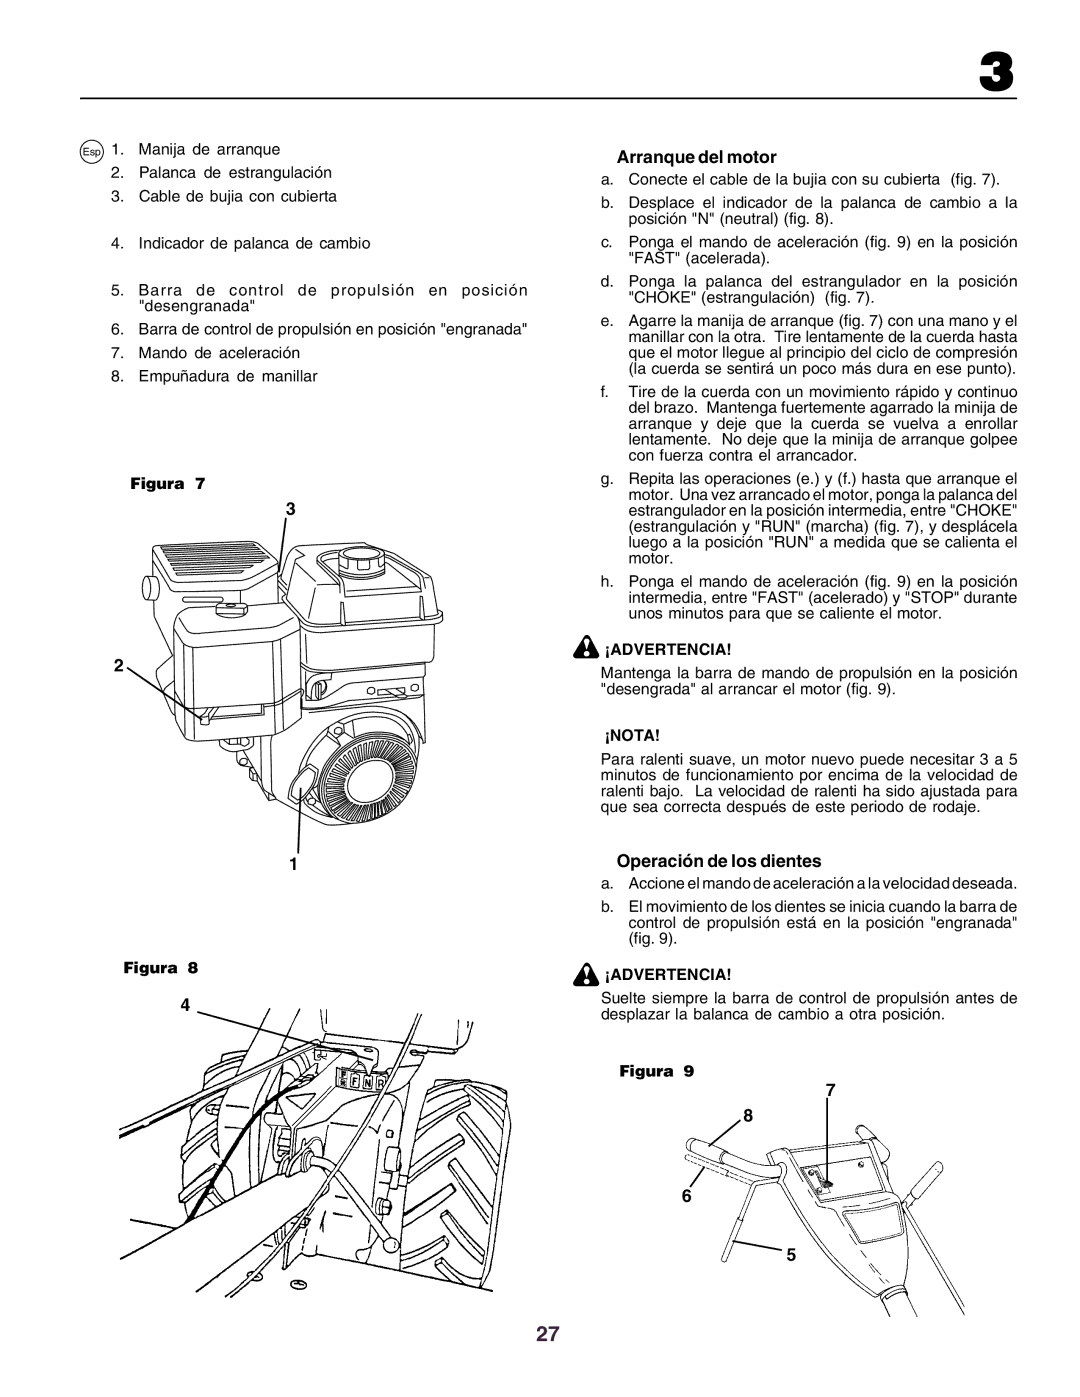
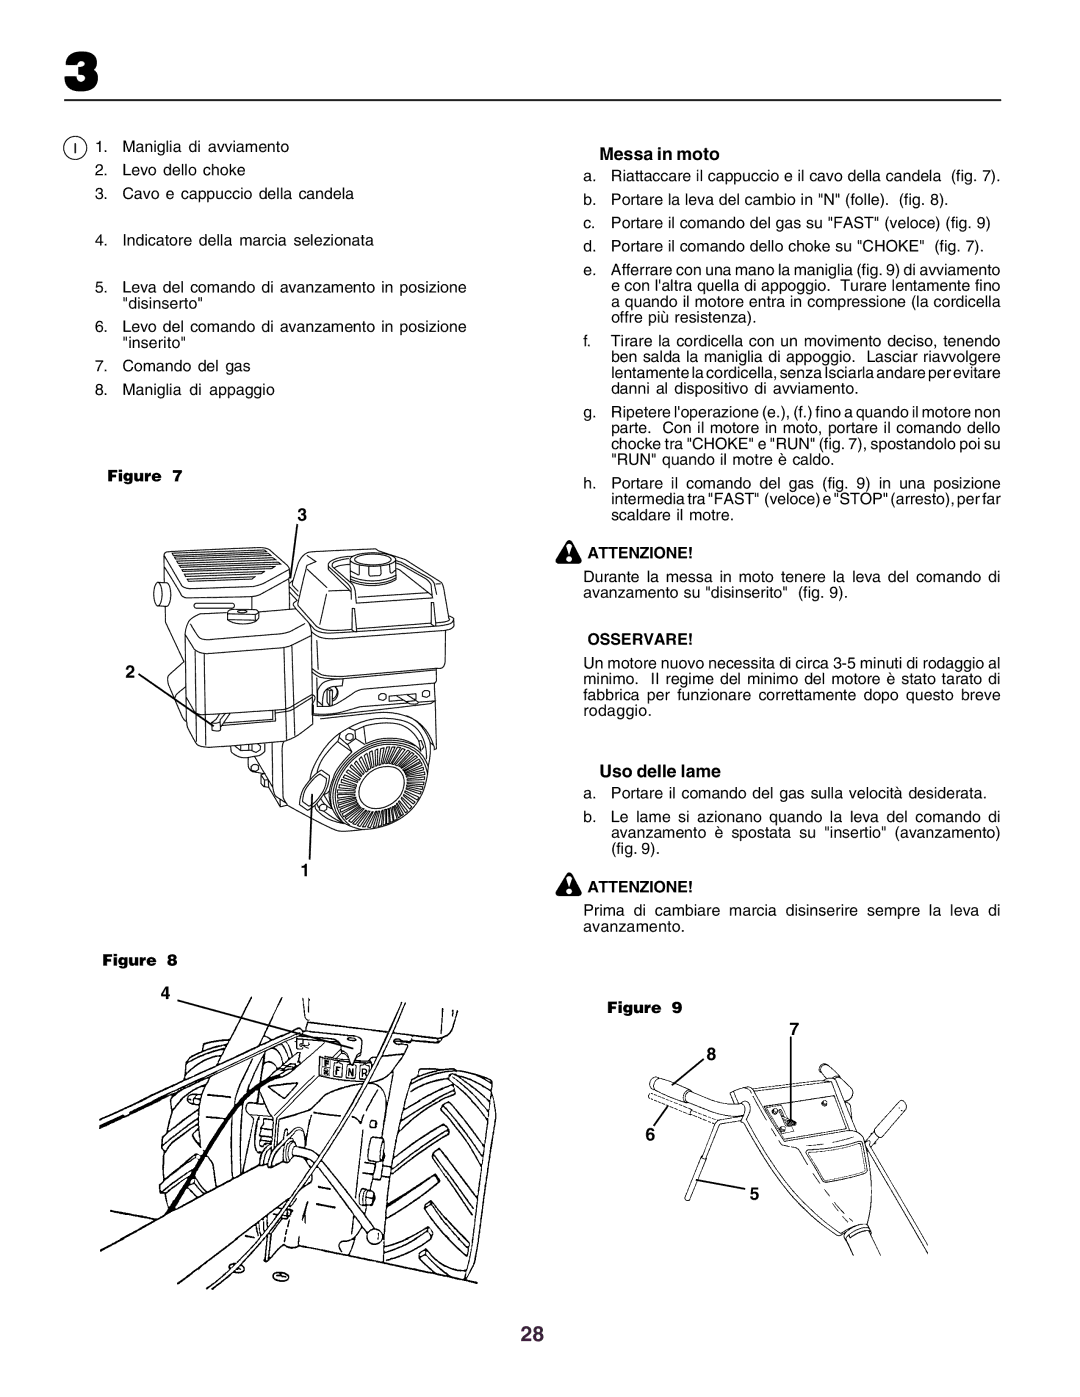
Husqvarna crt51 instruction manual Handvat monteren, Figuur

Page 13

2

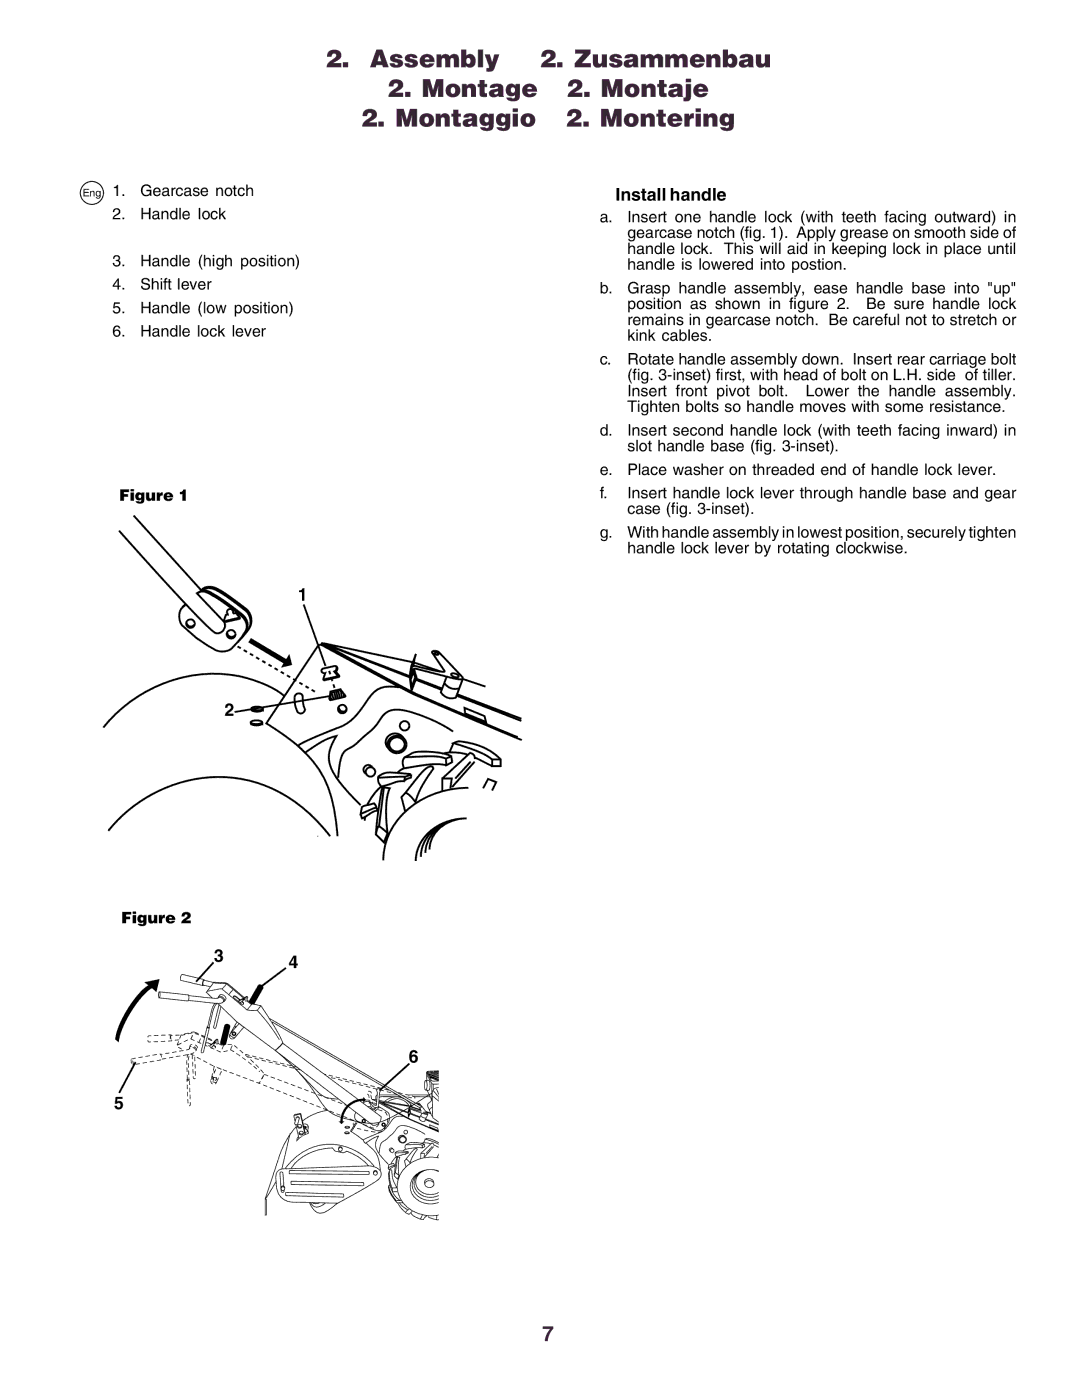
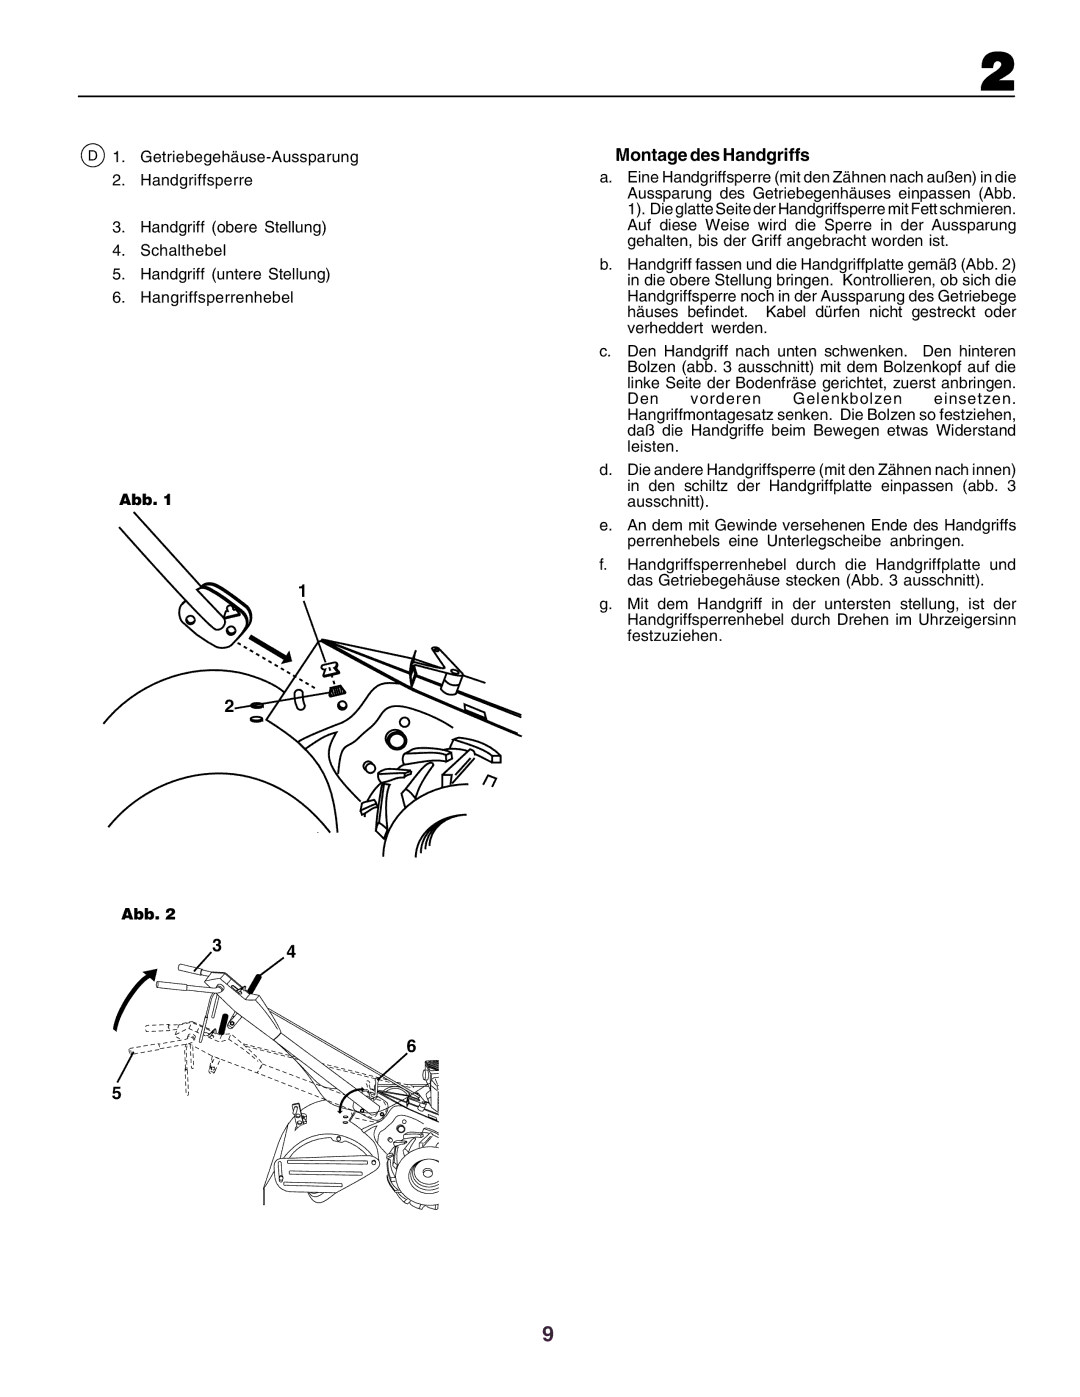
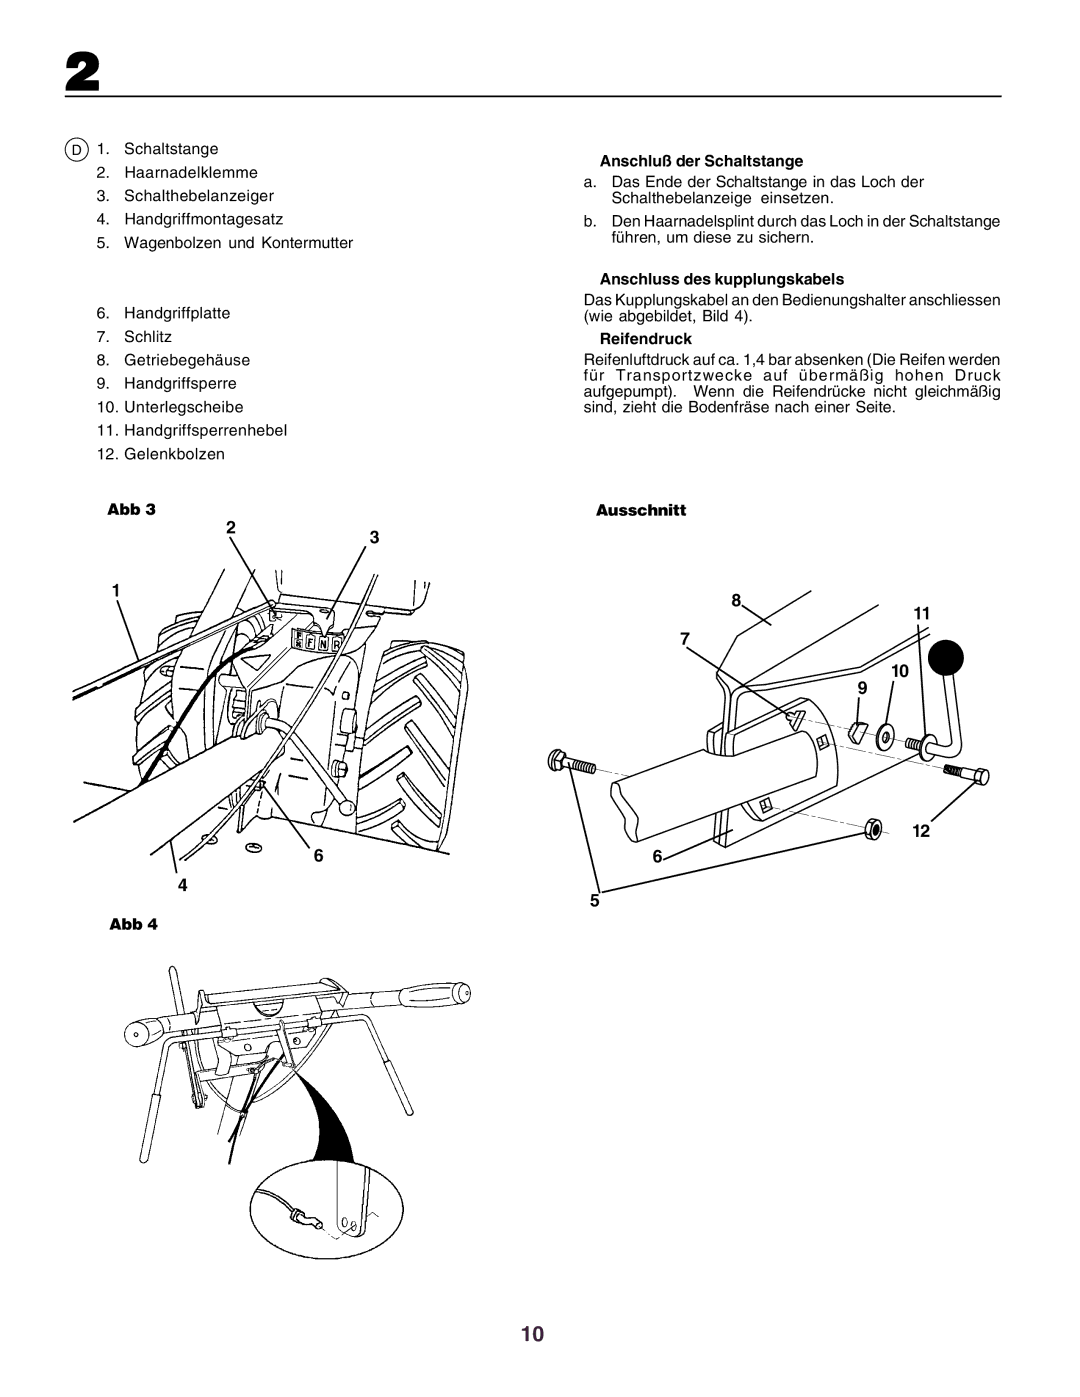
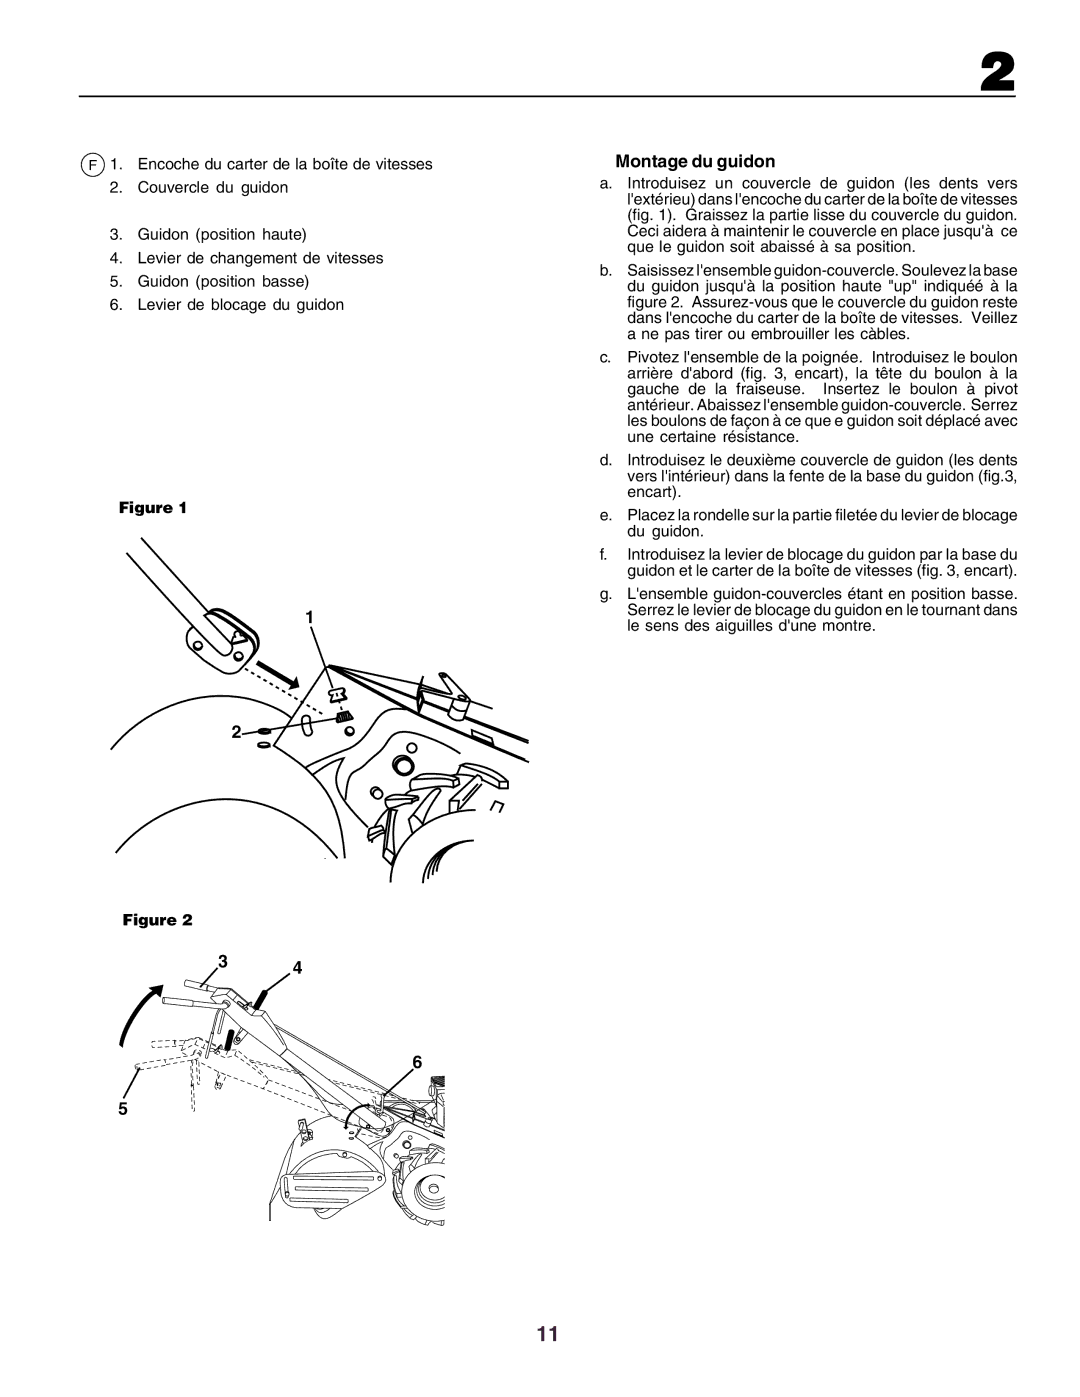
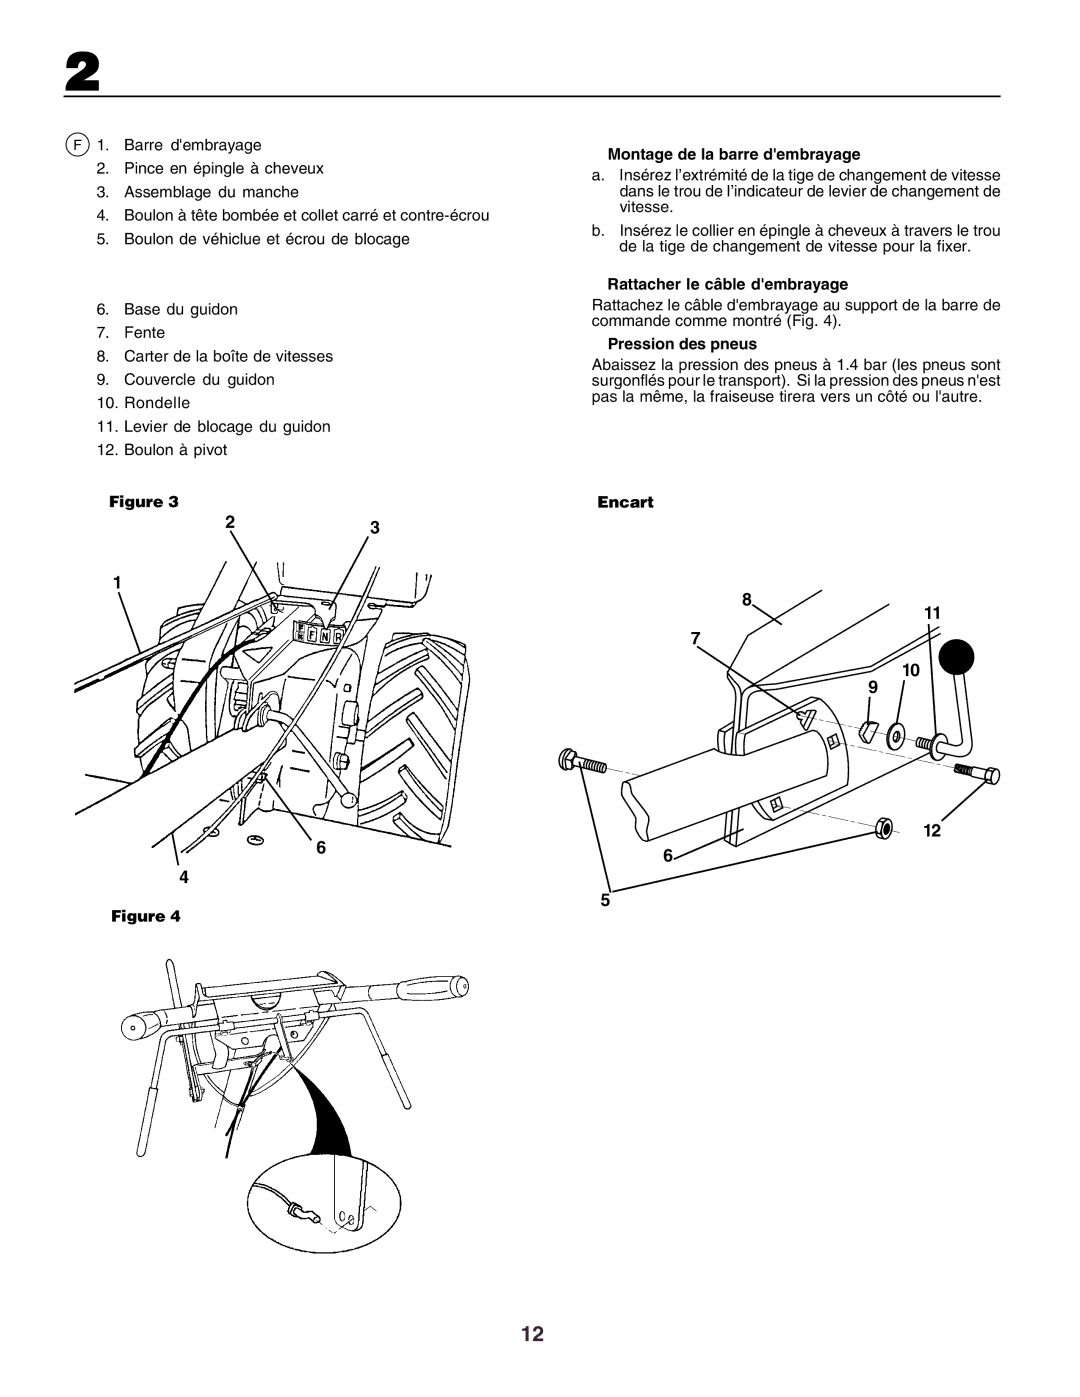
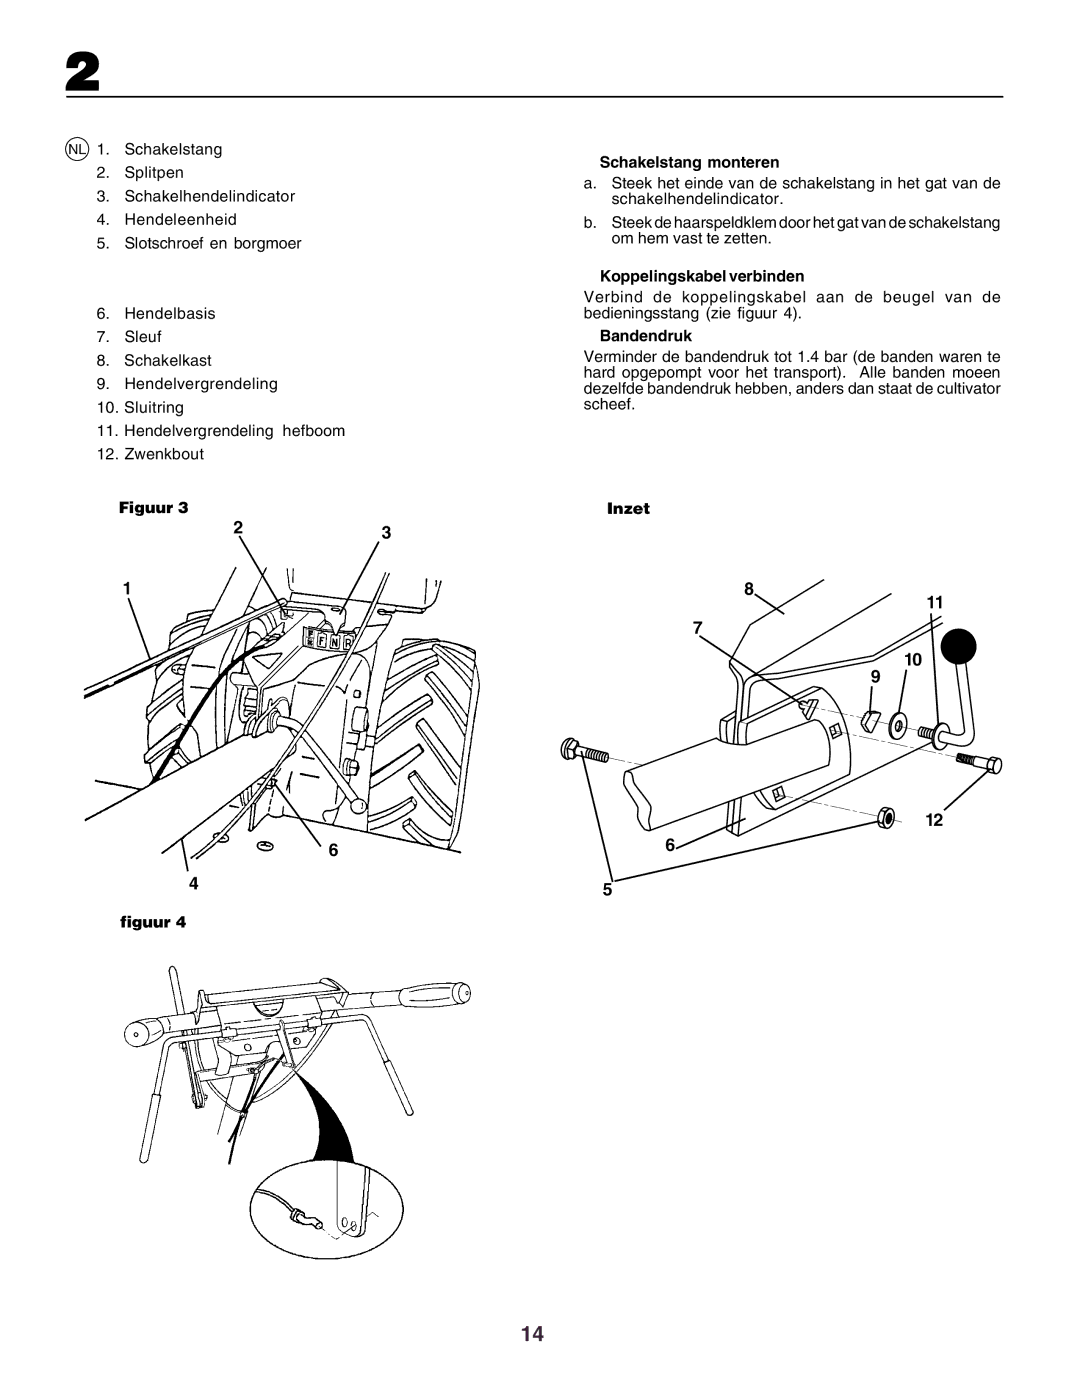
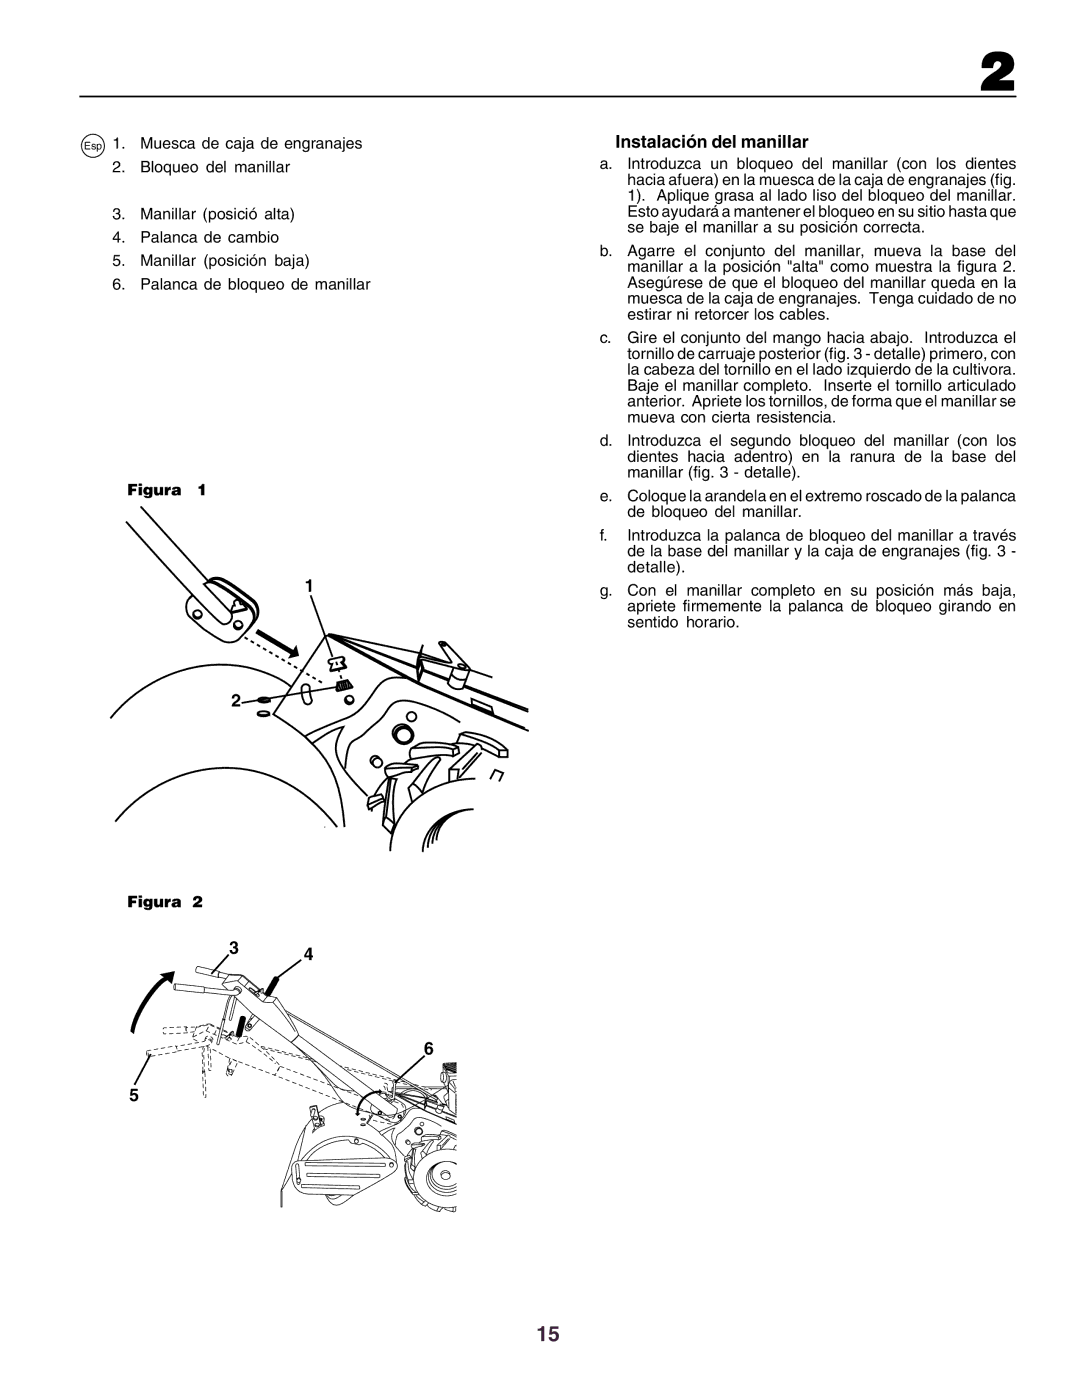
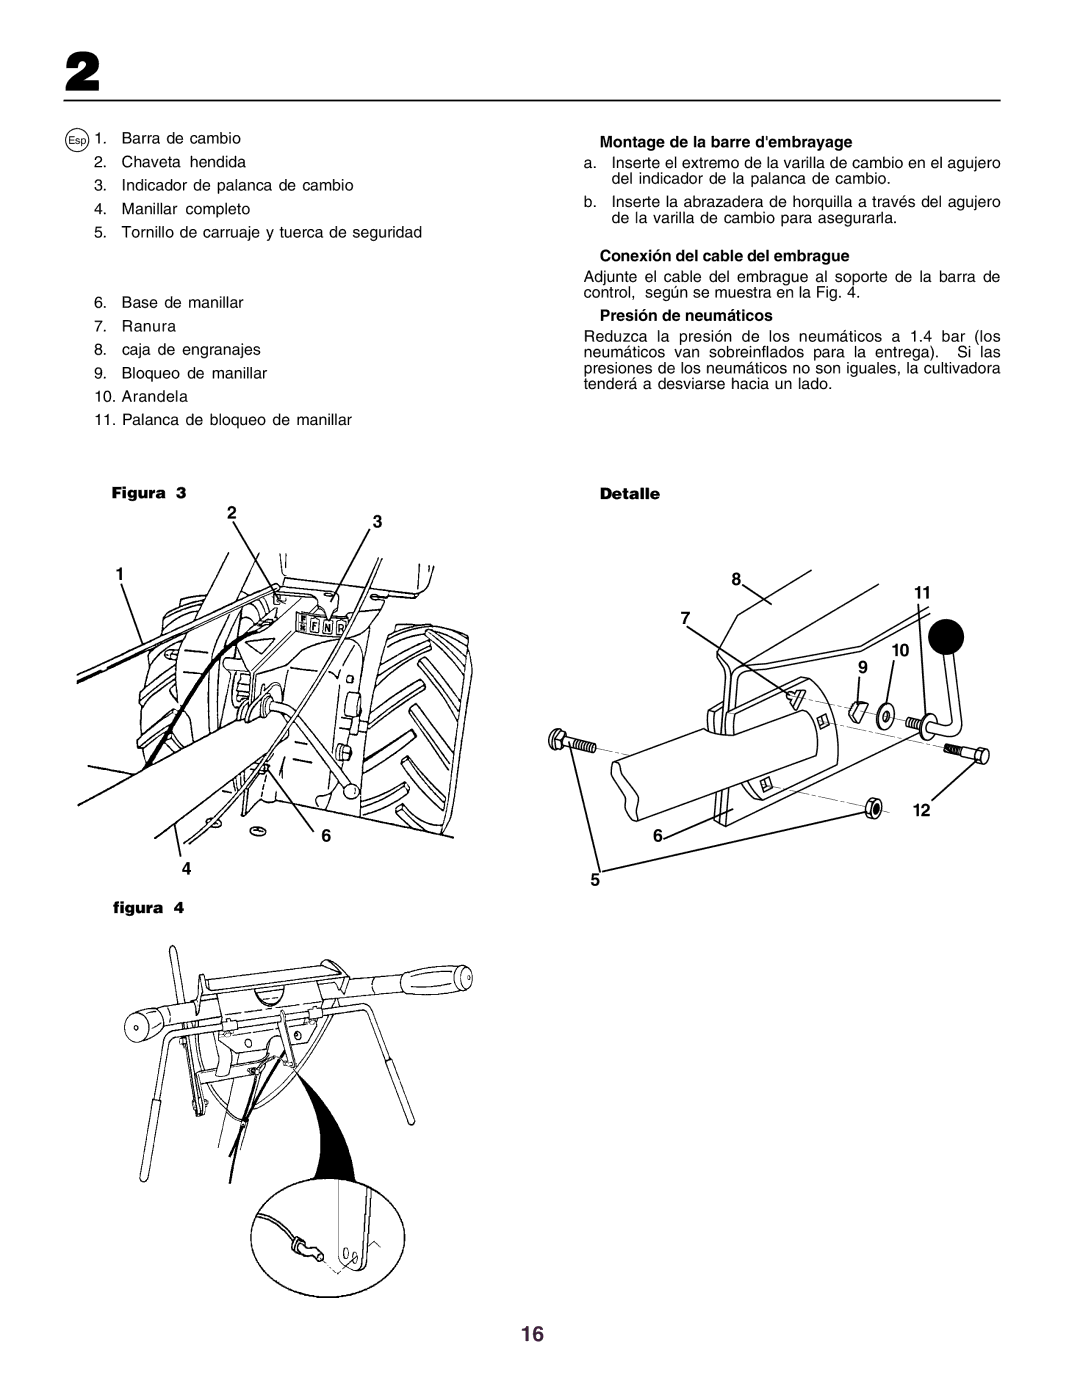
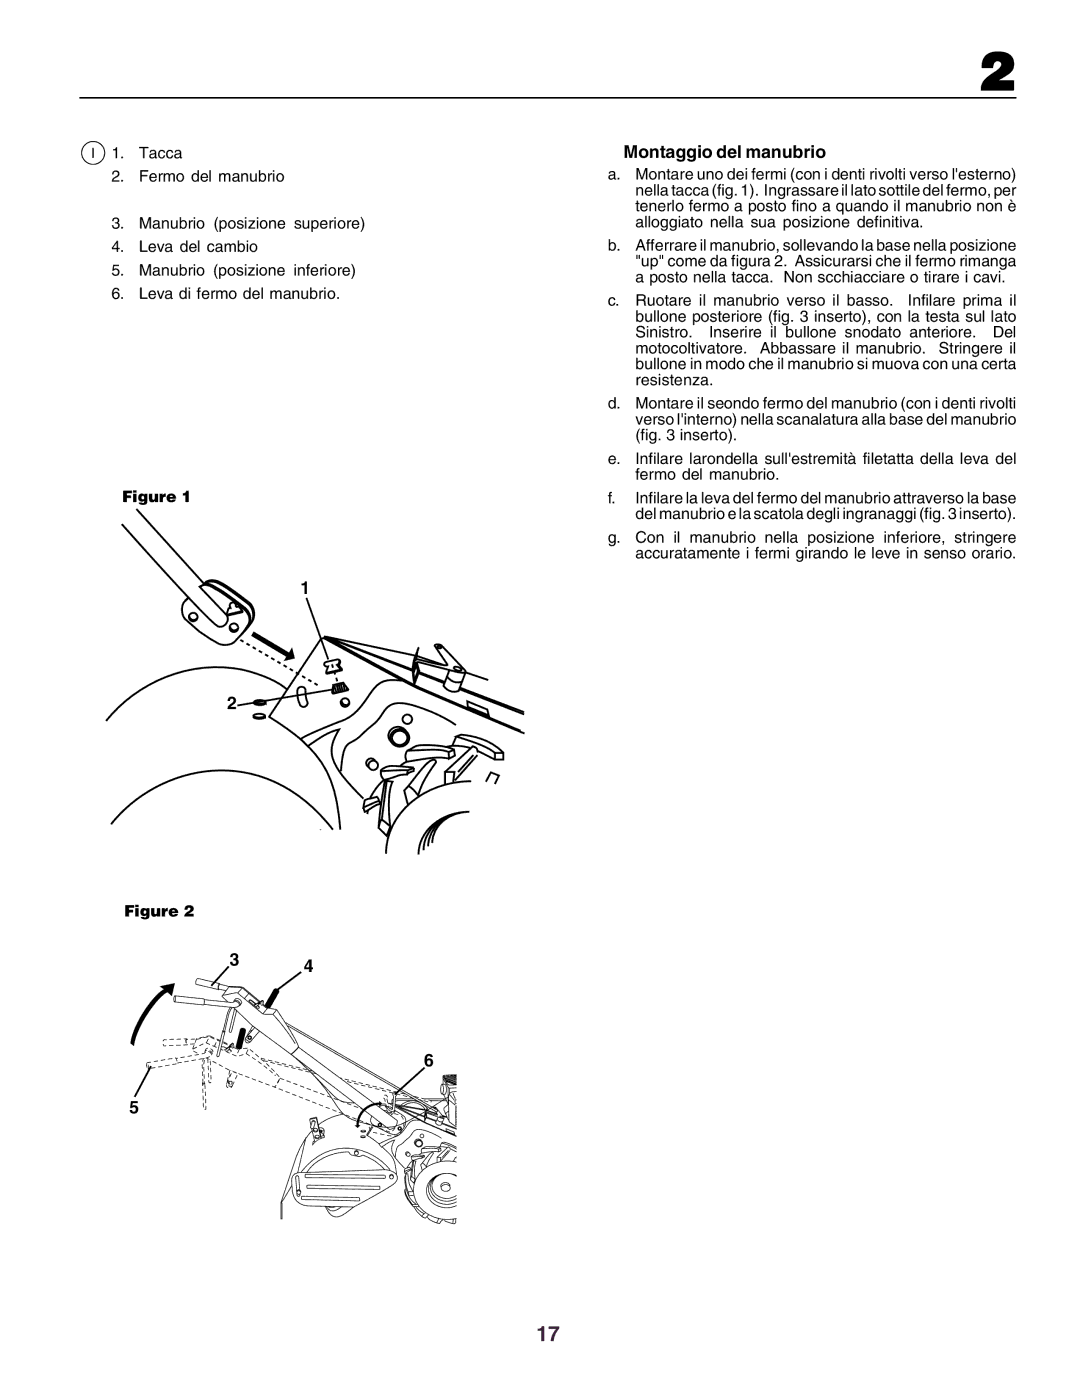
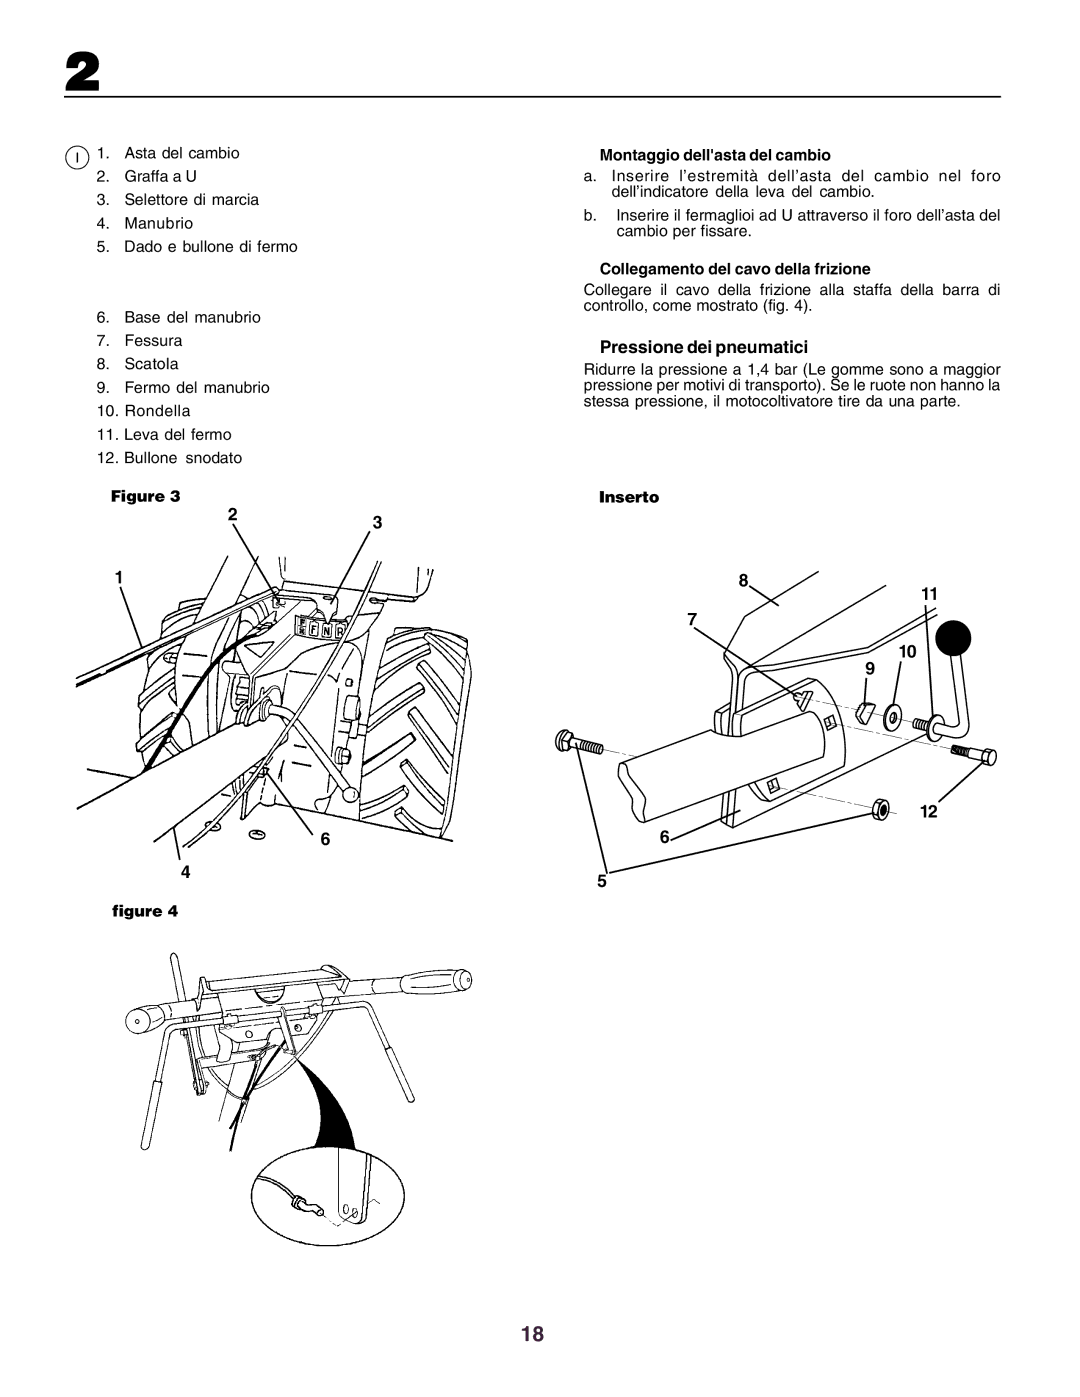
NL 1. Schakelkastsleuf

2.Hendelvergrendeling

3.Hendel (hoge positie)

4.Schakelhendel

5.Hendel (lage positie)

6.Hendelvergrendelingarm

Figuur 1

1

2

Figuur 2

3 4

6

5

Handvat monteren

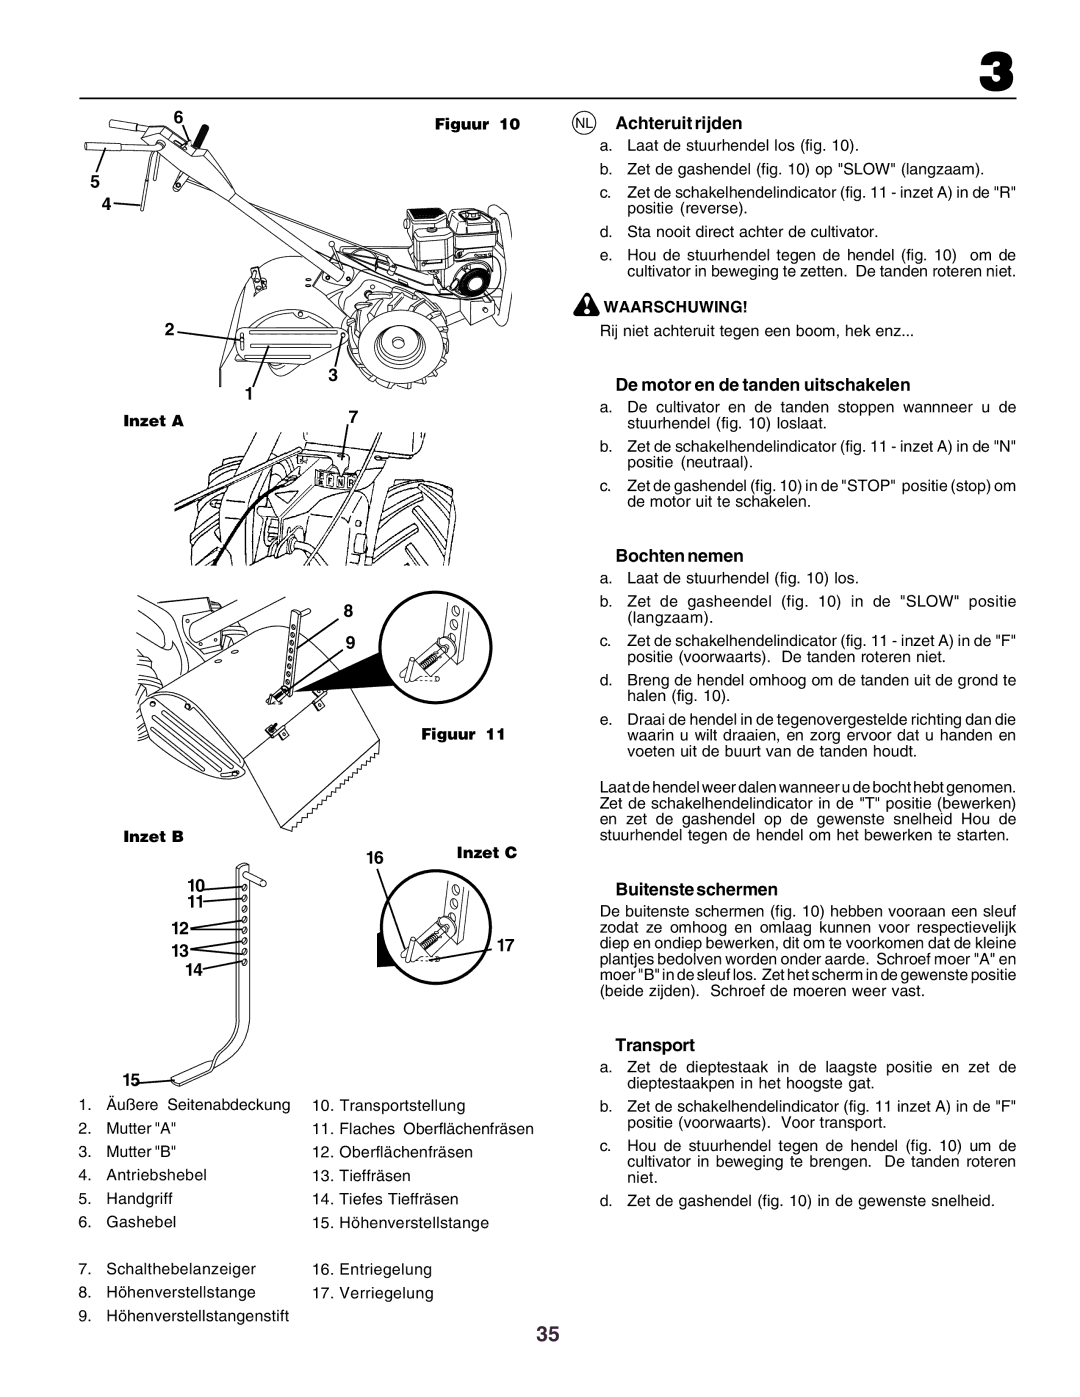
a.Monteer de eerste hendelvergrendeling (met de tanden naar buiten wijzend) in de sleuf in de schakelkast (fig. 1). Breng vet aan op de galdde kant van de hendelvergrendeling. Dit helpt om de vergrendeling op zijn plaats te houden tot de hendel in de juiste positie zit.

b.Neem de hendeleenheid, en breng de basis in de "up"- positie zoals getoond op figuur 2. Zorg ervoor dat de hendelvergrendeling in de sleuf in de schakelkast blijft zitten. Zorg ervoor dat u geen kabels uitrekt of kinkt.

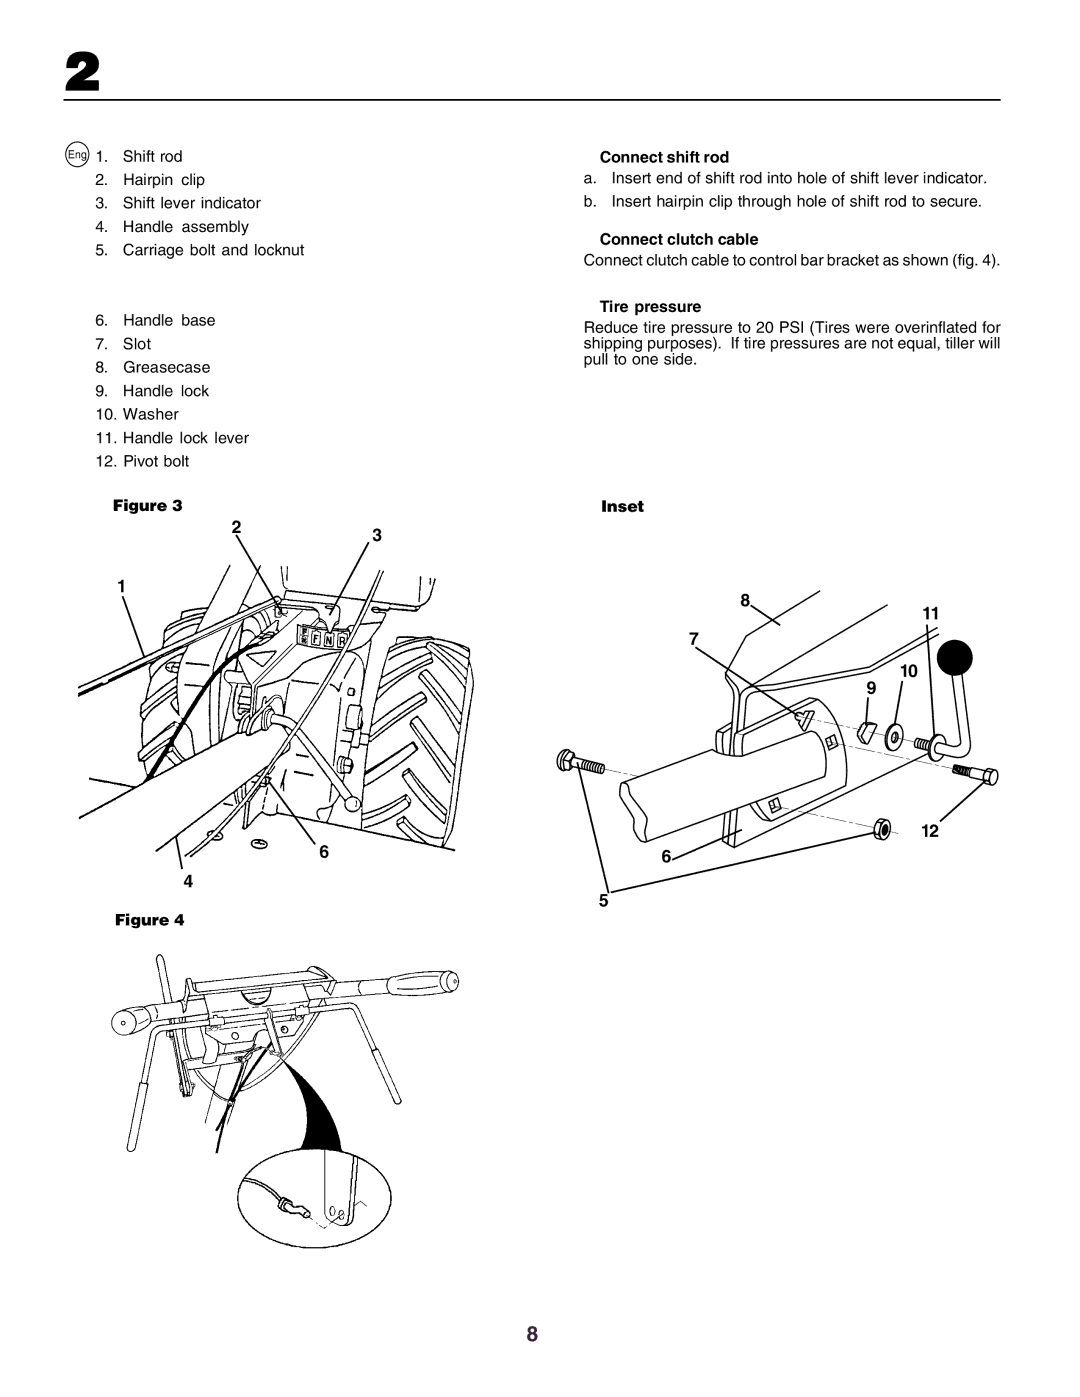
c.Draai de hendeleenheid naar beneden. Monteer eerst de achterste slotschroef (fig. 3 - inzet) met de schroefkop aan de linkerkant van de cultivator. Monteer de voorste zwenkbout. Laat de hendeleenheid zakken. Schroef de schroeven vast zodat de hendel bij het bewegen enige weerstand biedt.

d.Monteer de tweede hendelvergrendeling (met de tanden naar binnen wijzend) in de sleuf in de basis van de hendel (fig. 3 - inzet).

e.Monteer de sluitring op het getapte uiteinde van de hendelvergrendeling.

f.Steek de hendelvergrendelingarm door de basis van de hendel en de schakelkast (fig. 3 - inzet).

g.Zorg ervoor dat de hendeleenheid in de laagste positie staat en schroef de hendelvergrendelingarm goed vast door met de klok mee te draaien.

13

Image 13
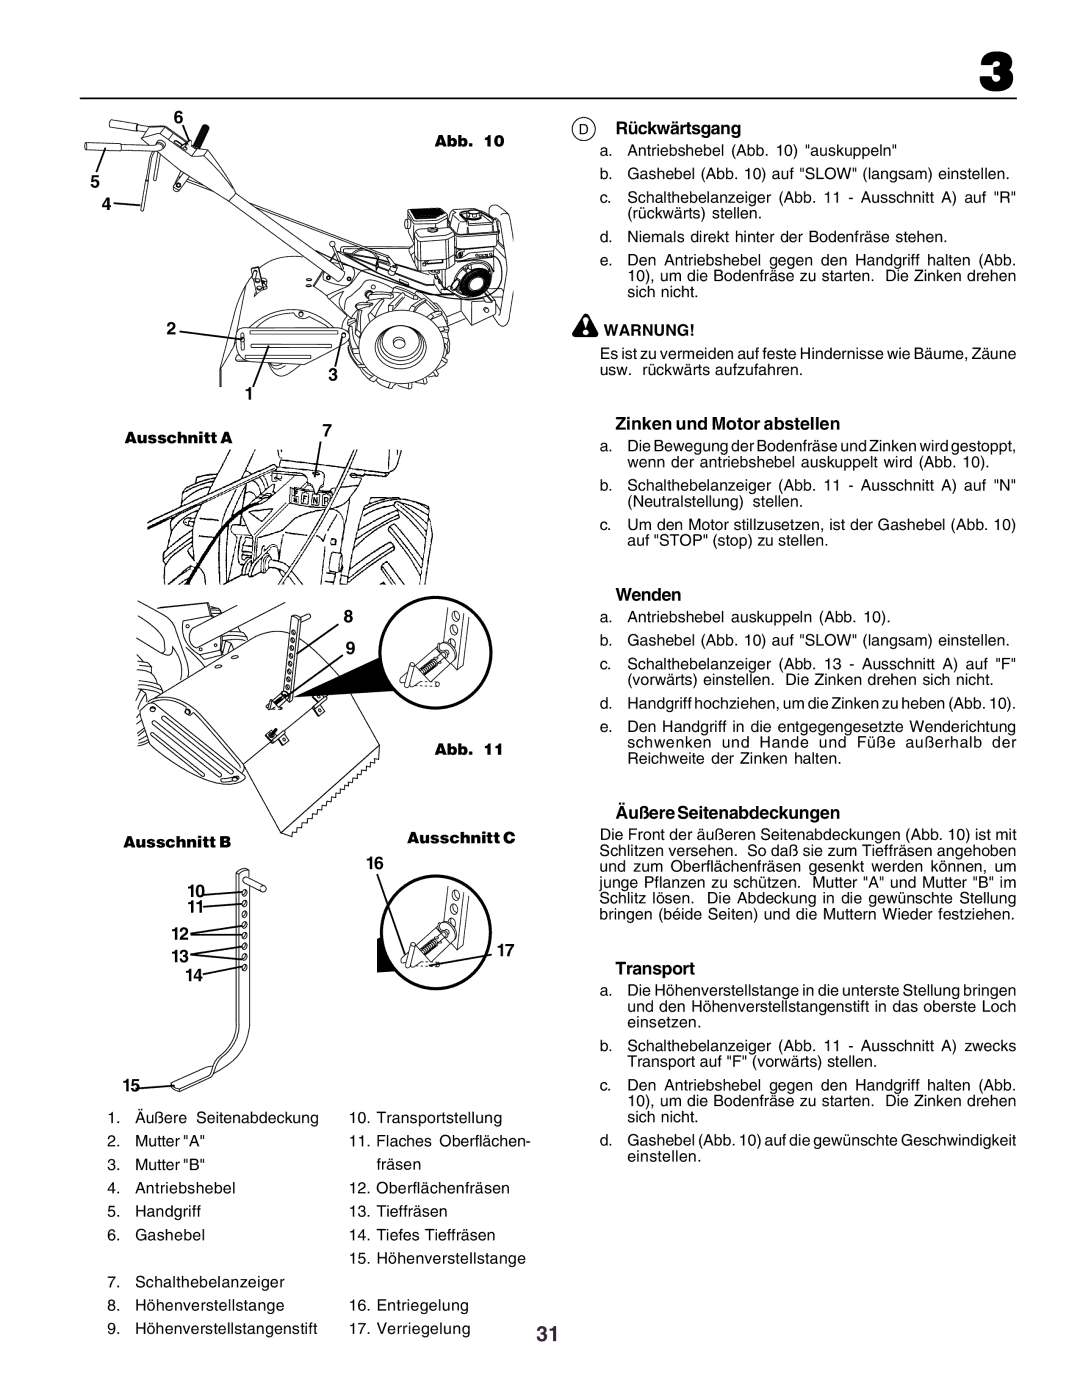
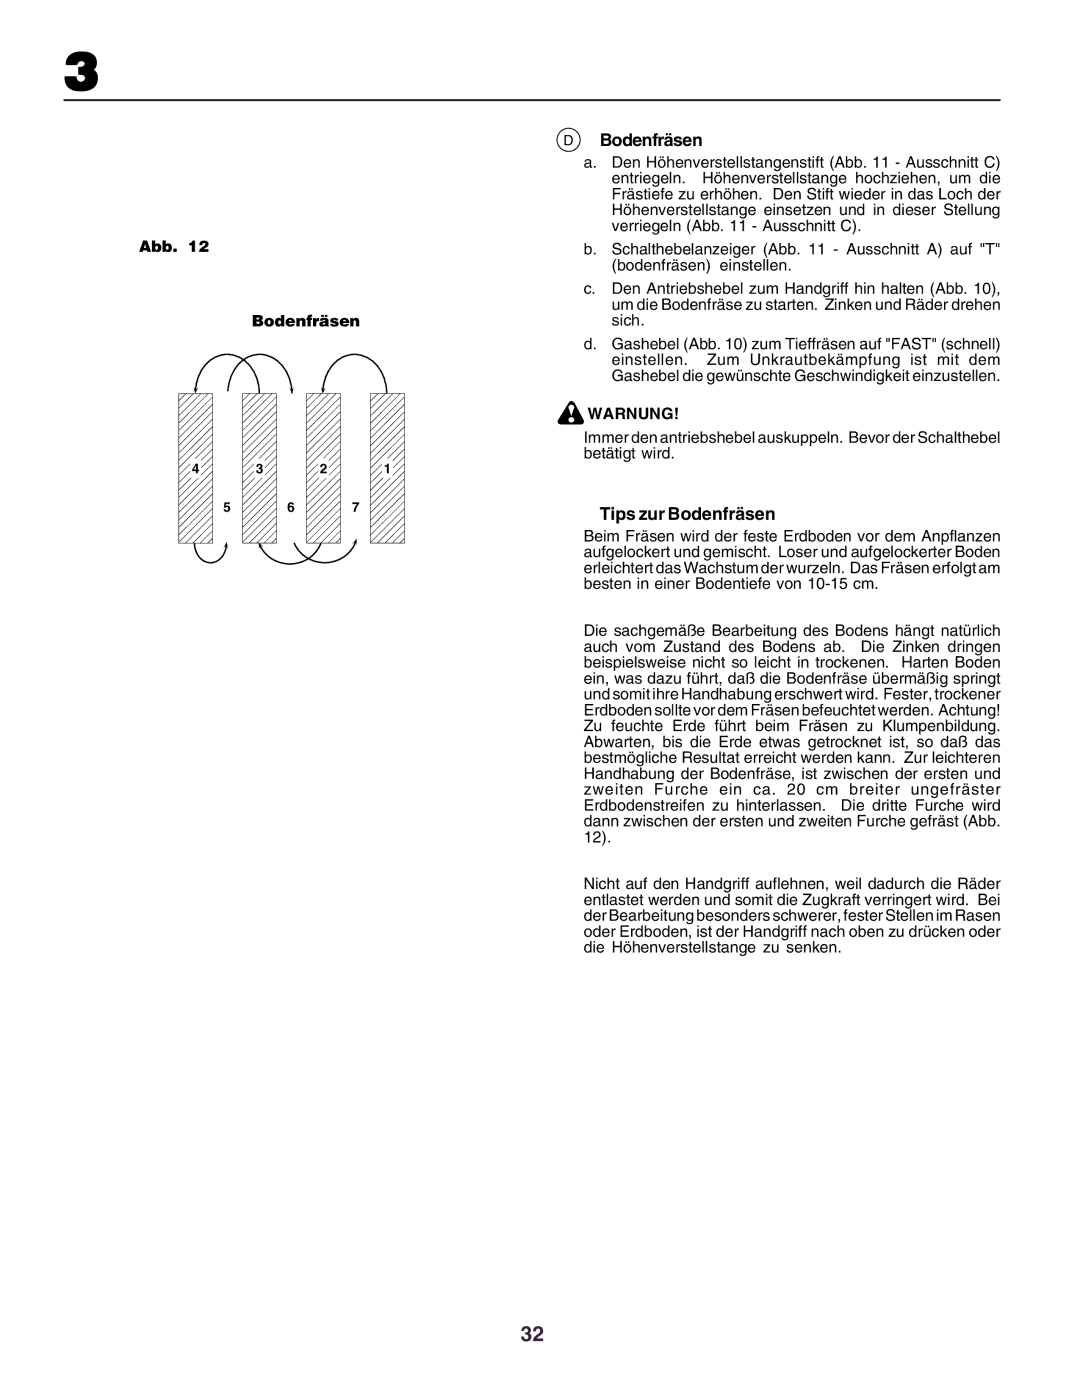
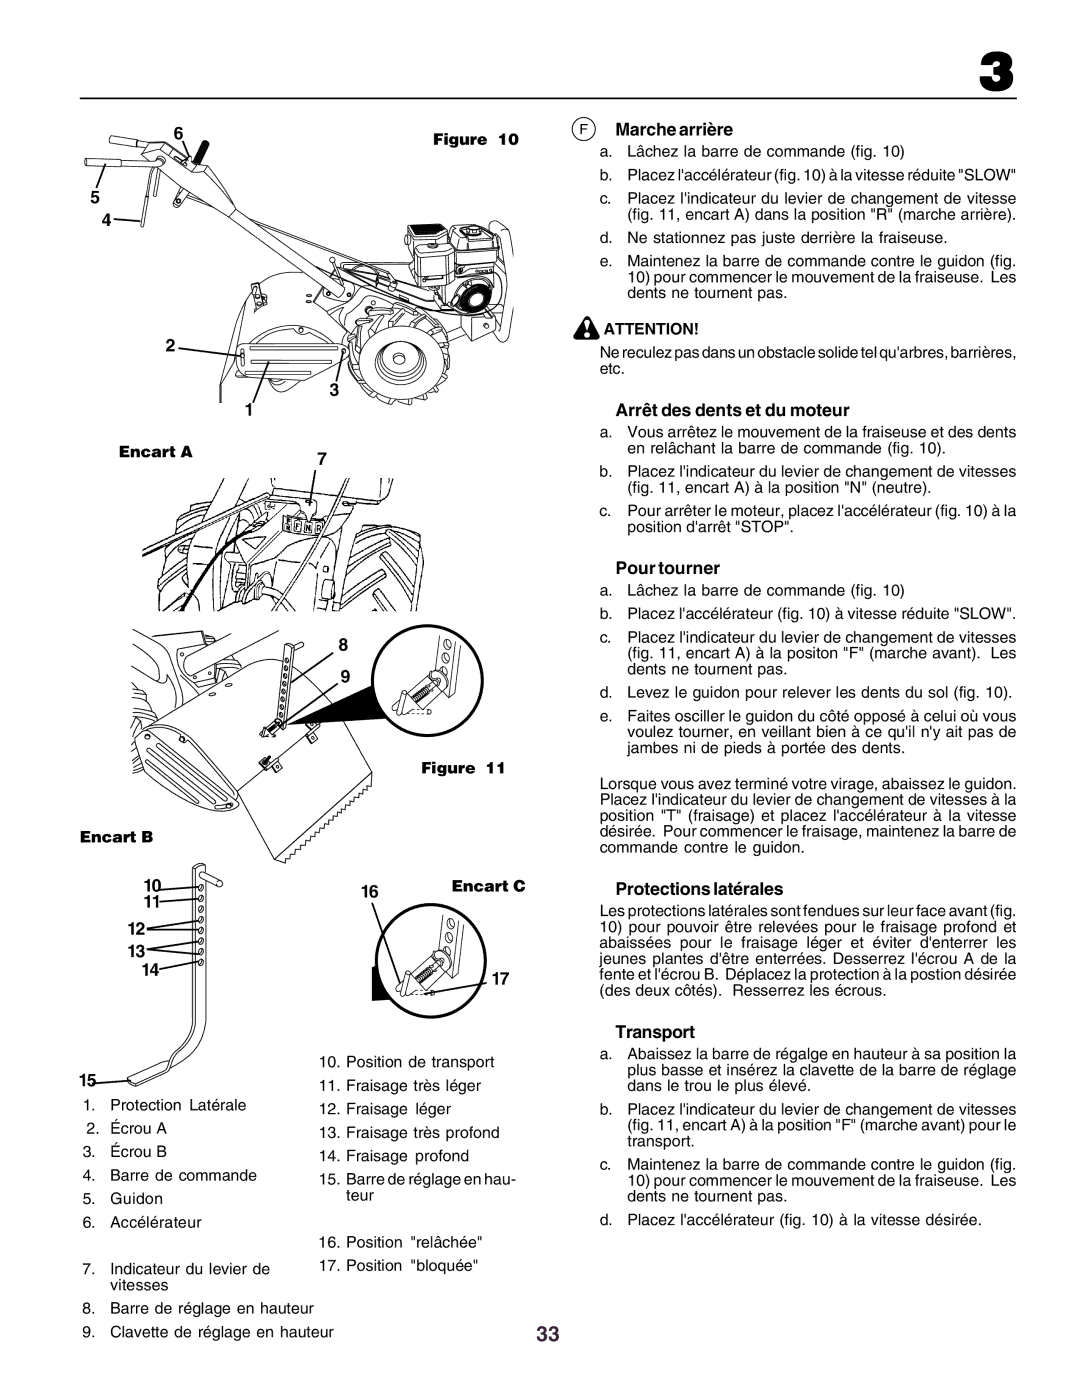
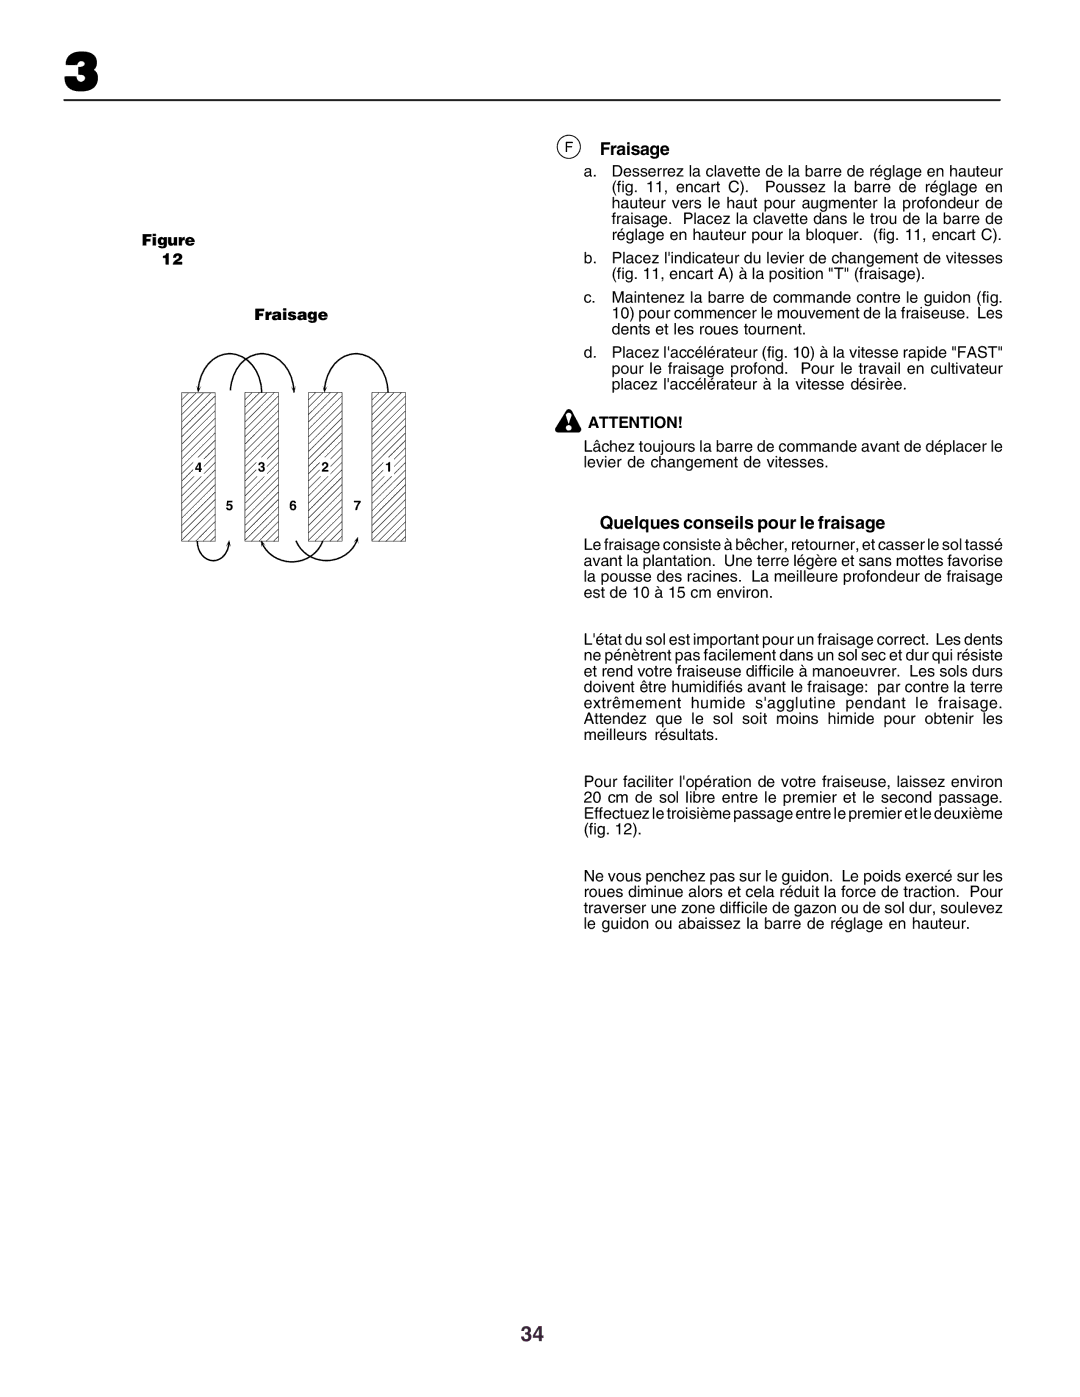
Contents CRT51 Page Training Schulung Maintenance and StoragePreparation OperationPréparation FormationFonctionnement Entretien ET EntreposageEsp 1. Reglas DE Seguridad Tilling Forward Neutral Reverse Fast Slow Install handle Connect clutch cable Connect shift rodTire pressure InsetAbb Montage des HandgriffsAnschluss des kupplungskabels Anschluß der SchaltstangeReifendruck Abb AusschnittMontage du guidon Rattacher le câble dembrayage Montage de la barre dembrayagePression des pneus EncartFiguur Handvat monterenKoppelingskabel verbinden Figuur Schakelstang monterenBandendruk InzetFigura Instalación del manillarPresión de neumáticos Conexión del cable del embragueDetalle Montaggio del manubrio Montaggio dellasta del cambio Pressione dei pneumaticiCollegamento del cavo della frizione InsertoPage Fill fuel tank Check engine oil levelÖlstand im Motor Kontrollieren Kraftstofftank auffüllenRemplissage du réservoir dessence Vérifiez le niveau dhuile du moteurControleer het motoroliepeil Brandstoftank vullenLlene el depósito de gasolina Control del nivel de aceite del motorControllare il livello dellolio Rifornimento di carburanteTine operation Starting the engineZinkenbetrieb MotorstartWarnung Mouvement des dents Démarrage du moteurTanden starten De motor startenWaarschuwing ¡ADVERTENCIA Arranque del motorUso delle lame Messa in motoAttenzione Stopping tines and engine Eng ReverseTurning Outer side shieldsTilling hints Eng TillingTilling Zinken und Motor abstellen RückwärtsgangWenden Äußere SeitenabdeckungenTips zur Bodenfräsen BodenfräsenAbb Bodenfräsen Arrêt des dents et du moteur Marche arrièrePour tourner Protections latéralesQuelques conseils pour le fraisage FraisageFraisage De motor en de tanden uitschakelen NL Achteruit rijdenBochten nemen Buitenste schermenBewerkingstips NL BewerkenFiguur Bewerken Pare de dientes y motor Esp Marcha atrásGiro TransporteConsejos para el laboreo Esp LaboreoArresto delle lame e del motore RetromarciaCurve Dischi salvapiantaConsigli di lavorazione AraturaAratura Unkrautbekämpfung Eng CultivatingCultivateur NL WiedenTransmission Engine maitenanceFinish Wartung des MotorsAufbewahrung Eng StorageNL Opslaan RangementRimessaggio Esp AlmacenamientoLubrication chart Maintenance scheduleSchmierplan WartungsplanPlan de graissage Schema dentretienNLSmeerschema OnderhoudsschemaEsp Hojo de lubricación Schema di lubrificazione Schema manutenzionePosition handle Ground drive belt adjustmentEinstellung des Antriebsriemens Einstellen des HandgriffsWichtig Réglage de la courroie de transmission au sol Position du guidonAfstellen hoofdaandrijfriem Positie hendelBelangrijk Ajuste de correa de propulsión en tierra Posición de manillar¡IMPORTANTE Messa a punto della cinghia di trasmissione Posizione del manubrioImportante Tine replacement Ground drive belt replacementCounter tine RotationAuswechseln der Zinken Auswechseln des antriebsriemensAbb Zinkendrehung im Changement des dents Remplacement de la courroie de transmission au solVeu de larrière de la fraiseuse Tand vervangen Vervangen ahoofdaandrijfriemFiguur Tegengestelde Richting draaiende Tand Reemplazo de dientes Reemplazo de la correa de propulsión en tierraSostituzione delle lame Sostituzione della cinghia di trasmissioneRotazione delal lama in opposizione Engine overheats Engine misses or lacks powerSoil balls up or clumps Startet nicht oder started schwerMotor oververhit Le moteur chauffeDe aarde vormt balletjes of kluiten La terre sagglutine sur les dentsEl motor falla o tiene poca potencia AvviamentoMotor sobrecalentado Il motore perde potenzaTechinische Daten Eng Technical DataLocalización DE Averías Esp Especificaciones TecnicasPage Page Page Rev 11.10.00 TR

crt51 specifications

The Husqvarna CRT51 is a sophisticated piece of garden equipment designed for both professional landscapers and enthusiastic homeowners looking for an efficient solution for lawn care and maintenance. This robust and versatile machine excels in cutting, mulching, and maintaining grass, ensuring a well-manicured lawn with minimal effort.

One of the standout features of the CRT51 is its high-quality cutting deck. The deck is constructed robustly to withstand the rigors of regular use while providing optimal cutting performance. Its adjustable cutting height offers versatility, allowing users to customize their lawn care according to seasonal changes and personal preferences. This unique adaptability ensures a professional finish every time, regardless of the lawn type or condition.

The CRT51 is engineered with advanced technology that enhances its performance. One notable innovation is the patented blade system, which ensures clean cuts while optimizing energy efficiency. This system not only prolongs the life of the blades but also minimizes the need for frequent maintenance, making it an ideal choice for those who love spending time in their gardens rather than constantly repairing their tools.

Ergonomics is a significant focus in the design of the Husqvarna CRT51. The machine features an adjustable handle, ensuring that users of all heights can operate it comfortably. Its lightweight frame and well-placed center of gravity help in maneuverability, making navigating tight corners and small spaces effortless. This ergonomic approach contributes to reduced fatigue during longer mowing sessions, allowing users to complete their tasks with ease.

Additional features include a user-friendly control panel that enables easy adjustments to speed and cutting height. This convenience means that even novice users can operate the CRT51 efficiently, while experienced users can maximize its potential with precision settings.

Durability is a key characteristic of the CRT51. Built with high-quality materials, it is designed to withstand harsh outdoor conditions without compromising its performance. This means that users can rely on the Husqvarna CRT51 for years, making it a worthwhile investment for maintenance and care of their lawns.

In summary, the Husqvarna CRT51 stands out as an exemplary option for lawn care, combining robust cutting capabilities, advanced technology, ergonomic design, and durability. Whether for professional landscaping or home lawn maintenance, this machine delivers exceptional results, ensuring that your outdoor space remains pristine and inviting. With its impressive features and user-friendly design, the CRT51 is sure to fulfill the needs of any gardener or landscaper.