Lexmark 350d manual Maintaining the printer

Page 38

Maintaining the printer

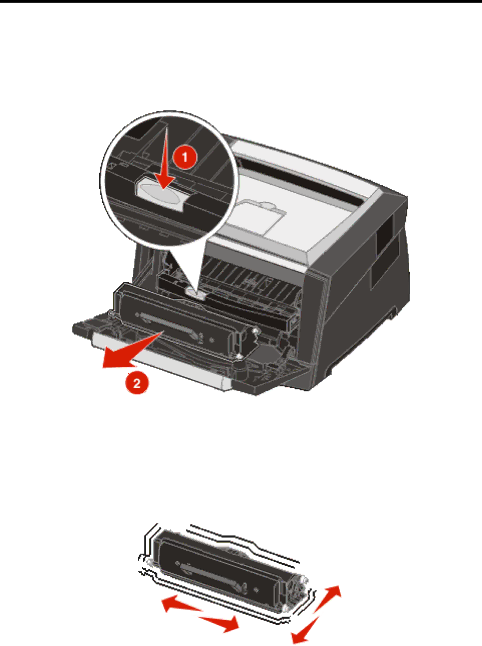
3Remove the toner cartridge.

a Press the release button on the base of the print cartridge assembly. b Grasp the handle, pulling up and out to remove the toner cartridge.

4Unpack the new toner cartridge.

Note: You can use the packing material from the new toner cartridge to ship the old toner cartridge back to Lexmark for recycling. For more information, see Recycling Lexmark products on page42.

5Firmly shake the toner cartridge in all directions to distribute the toner.

Ordering supplies

38

Image 38
Contents E350d and E352dn EditionJune Contents Contents Learning about the printer Printer overviewLearning about the printer PostScript Menu Understanding the control panel Status Indicates Button or control panel itemFunction Understanding print media guidelines What types of print media can be loaded?Paper Paper characteristicsSelecting print media Understanding print media guidelinesUnacceptable paper SmoothnessUnderstanding print media guidelines Selecting paper Selecting preprinted forms and letterheadSelecting transparencies TransparenciesUnderstanding print media guidelines Printing on letterhead Envelopes LabelsStoring print media Card stockAvoiding jams Printing Loading the 250-sheet trayPrinting Printing Extending the tray for legal-size or folio-size paper Printing Attaching the dust cover Loading the manual feeder Linking trays Sending a job to printCanceling a job from a computer running Windows Canceling a print jobCanceling a job from the printer control panel Canceling a job from the taskbarCanceling a job from a Macintosh computer running Mac OS Printing the menu settingsCanceling a job from a Macintosh computer Printing a network setup Printing a font sample listInstalling options Accessing the system boardInstalling options Installing options Adding a memory card Adding a flash memory card Installing an optional 250-sheet drawer or 550-sheet drawer Recognizing installed options Click File à Properties Click the Install Options tabConserving supplies Maintaining the printerStoring supplies Ordering suppliesAverage cartridge yield Maintaining the printerPart number Description Ordering a toner cartridge Changing a toner cartridgeMaintaining the printer Photoconductor kit end-of-life Ordering a photoconductor kitChanging a photoconductor kit Maintaining the printer Machine voltage Maintenance kitRecycling Lexmark products Part numbersUnderstanding jam messages Clearing jamsIdentifying jams MessageClearing a jam Clearing jamsClearing jams Clearing jams Clearing jams Clearing a jam in the manual feeder Clearing jams Checking an unresponsive printer TroubleshootingOnline customer support Calling for service Lexmark Status Messenger UtilitySymptom Solving printing problemsTroubleshooting SolutionTurning on Reduced Curl mode Action Solving option problemsOption Problem Solving service message issuesSolving paper feed problems Symptom Cause SolutionSolving print quality problems Entire page is white Streaks appear on Printing is too dark Problem Action Values Menu selectionPurpose Driver optionCleaning the printhead lens Close the front door Turn the printer on Enabling control panel menus Administrative supportDisabling control panel menus Setting security using the Embedded Web Server EWS Restoring factory default settingsSelecting printer operating mode Administrative supportSetting the system password Using the secure Embedded Web ServerLocking the control panel menus Conventions Electronic emission notices Industry Canada compliance statementEuropean Community EC directives conformity Noise emission levels Product energy consumptionStatement of Limited Warranty for Lexmark E350d and E352dn Laser noticeLimited warranty service Additional rights Index NumericsIndex