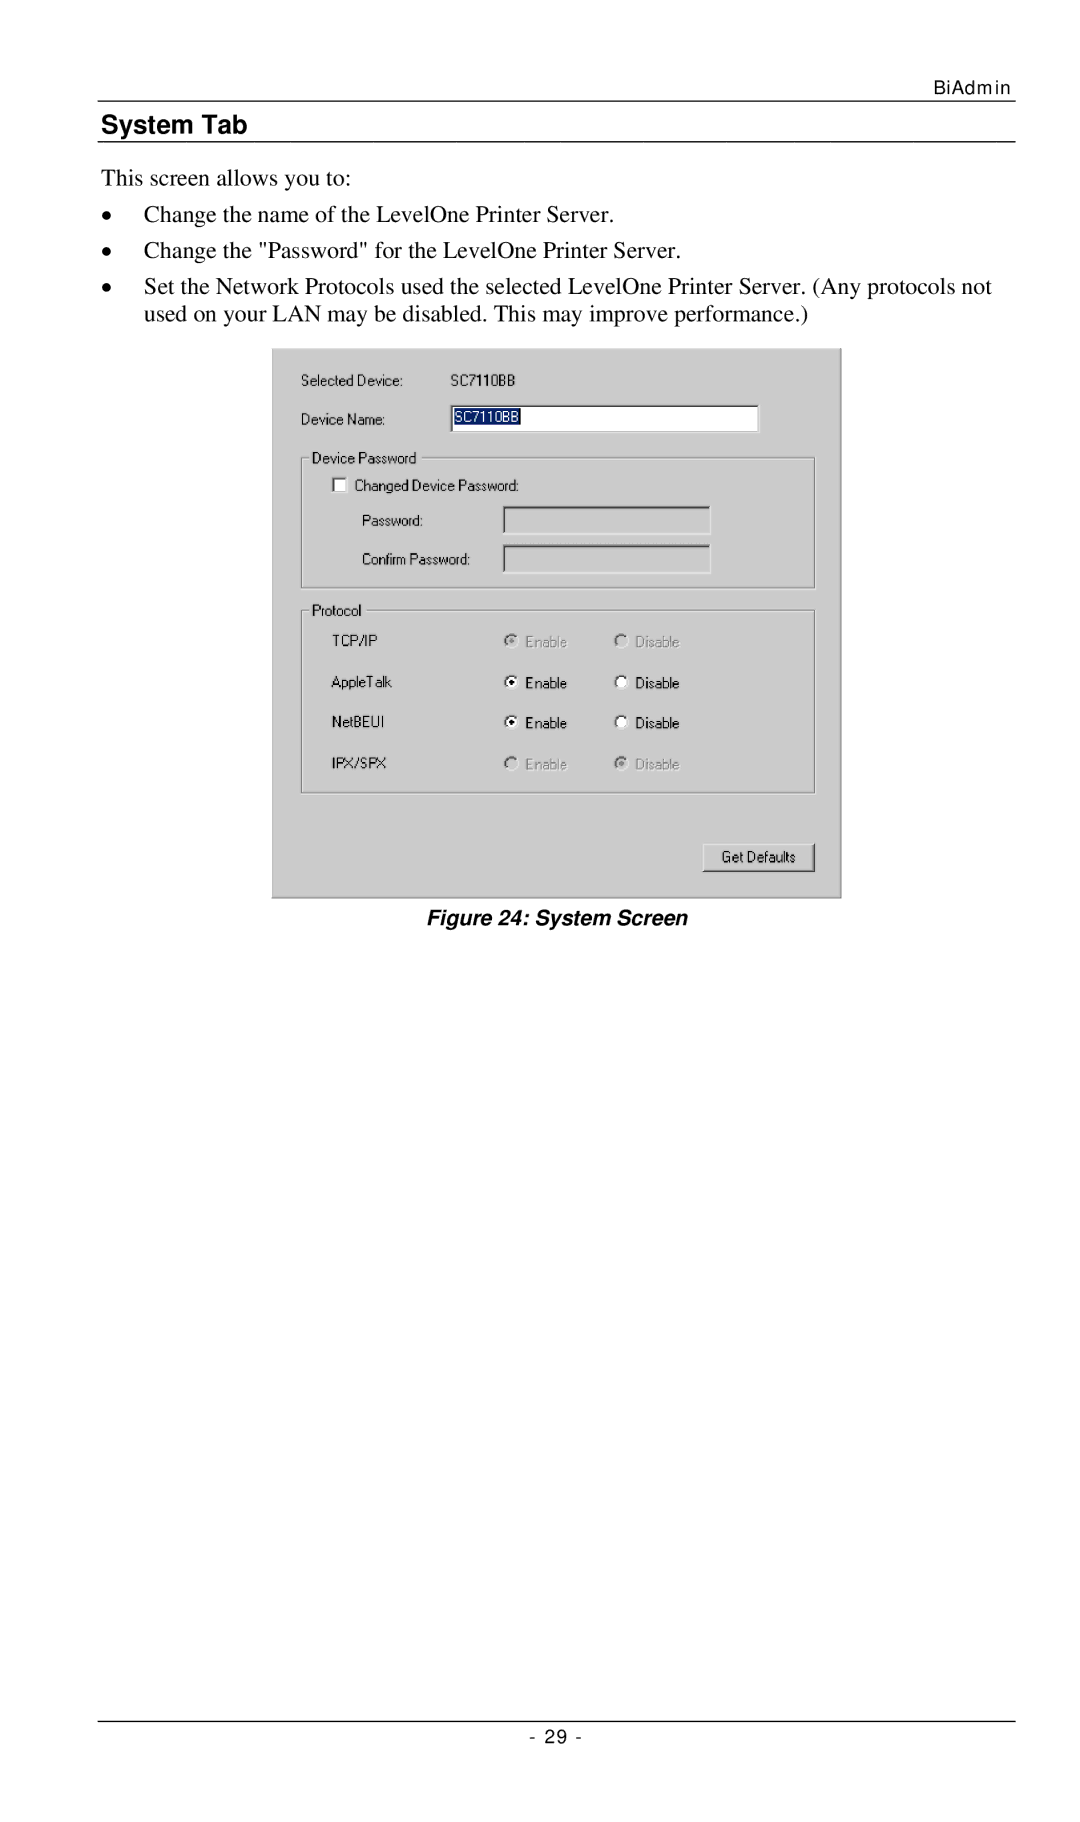
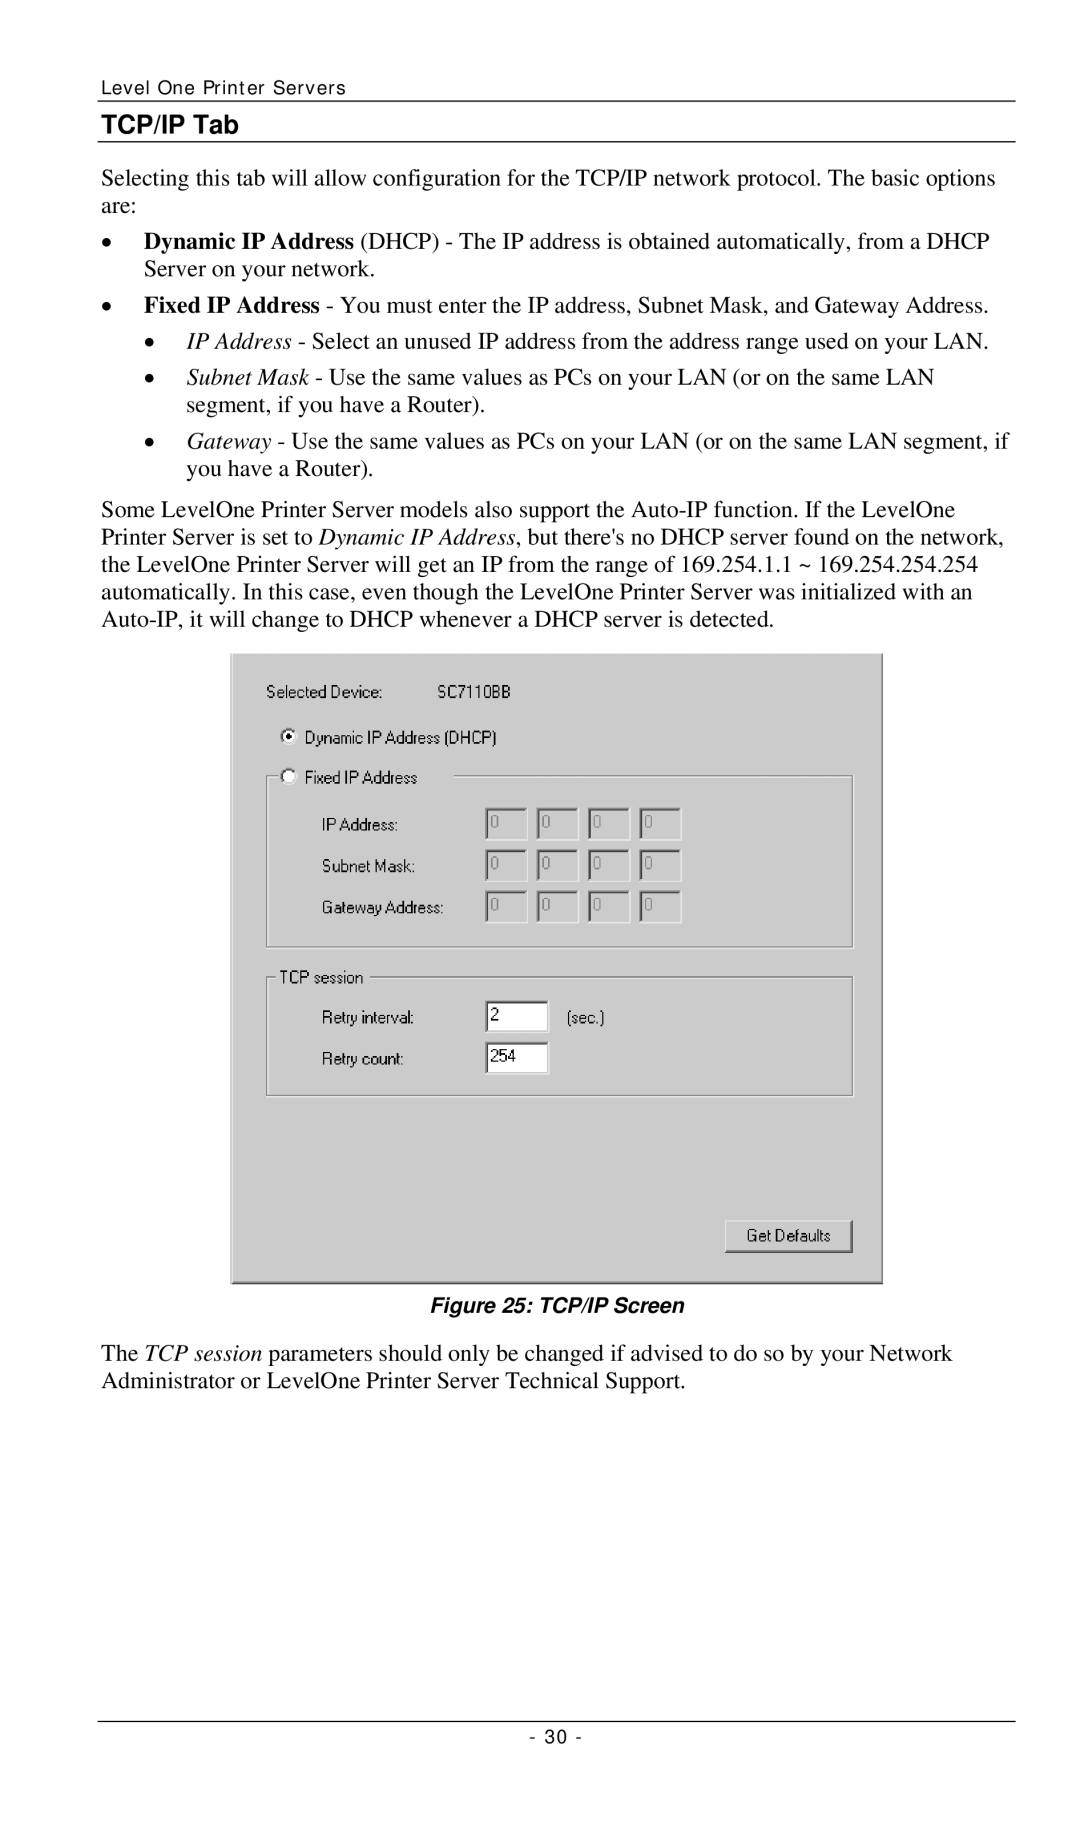
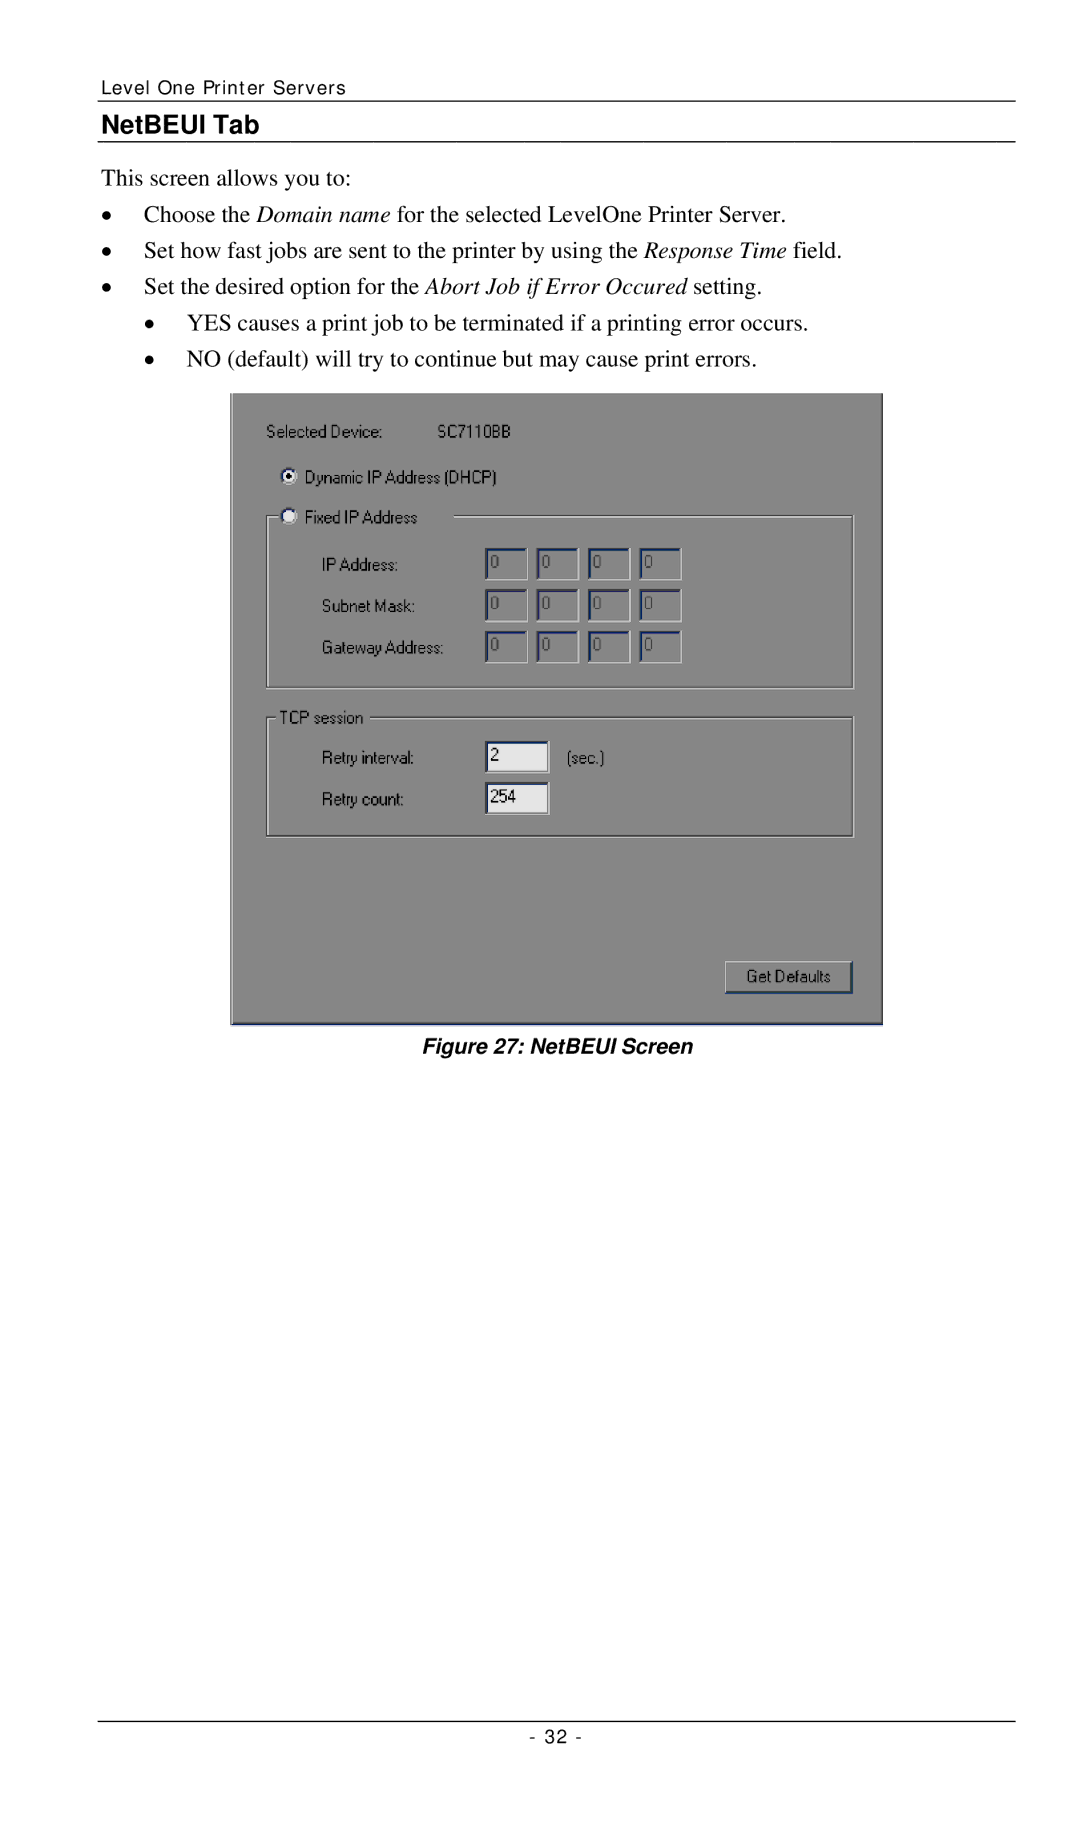
LevelOne FPS-3002USB, FPS-2112, FPS-3001TXU manual Management, Configure Printer Port

Page 20

Client Setup

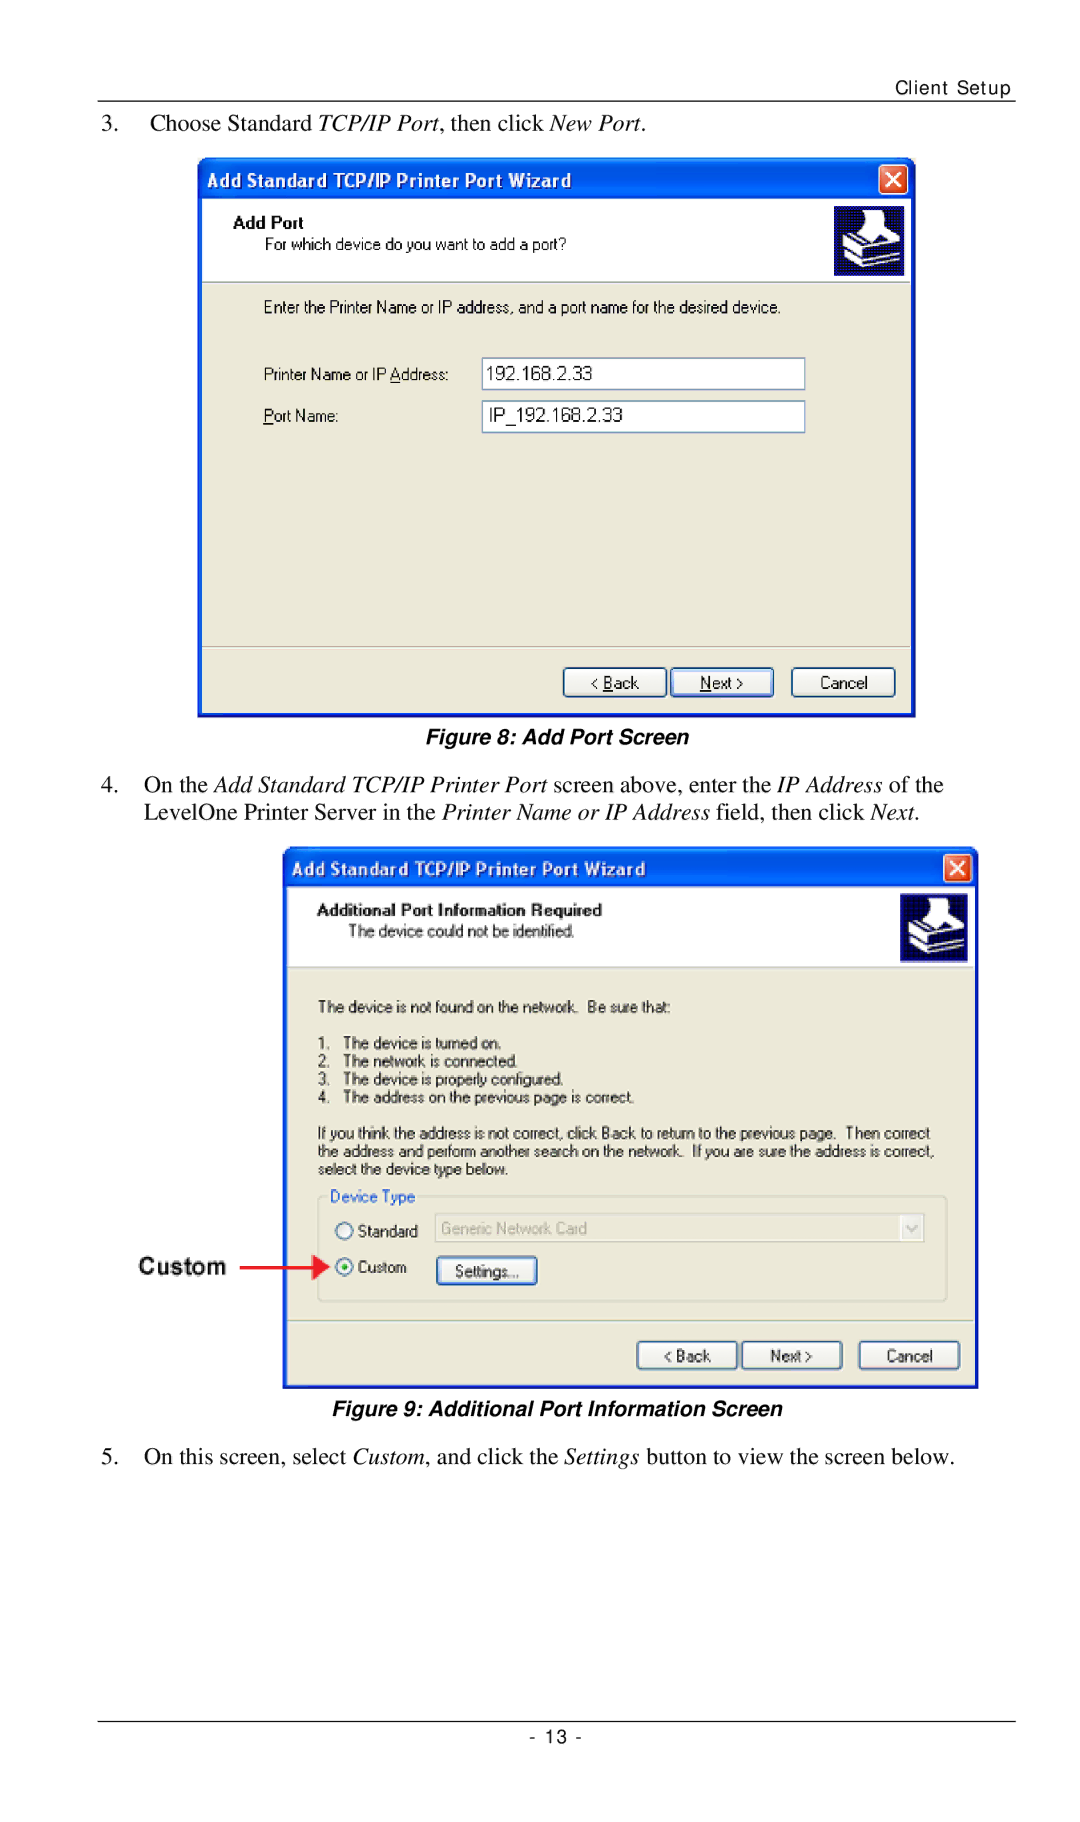
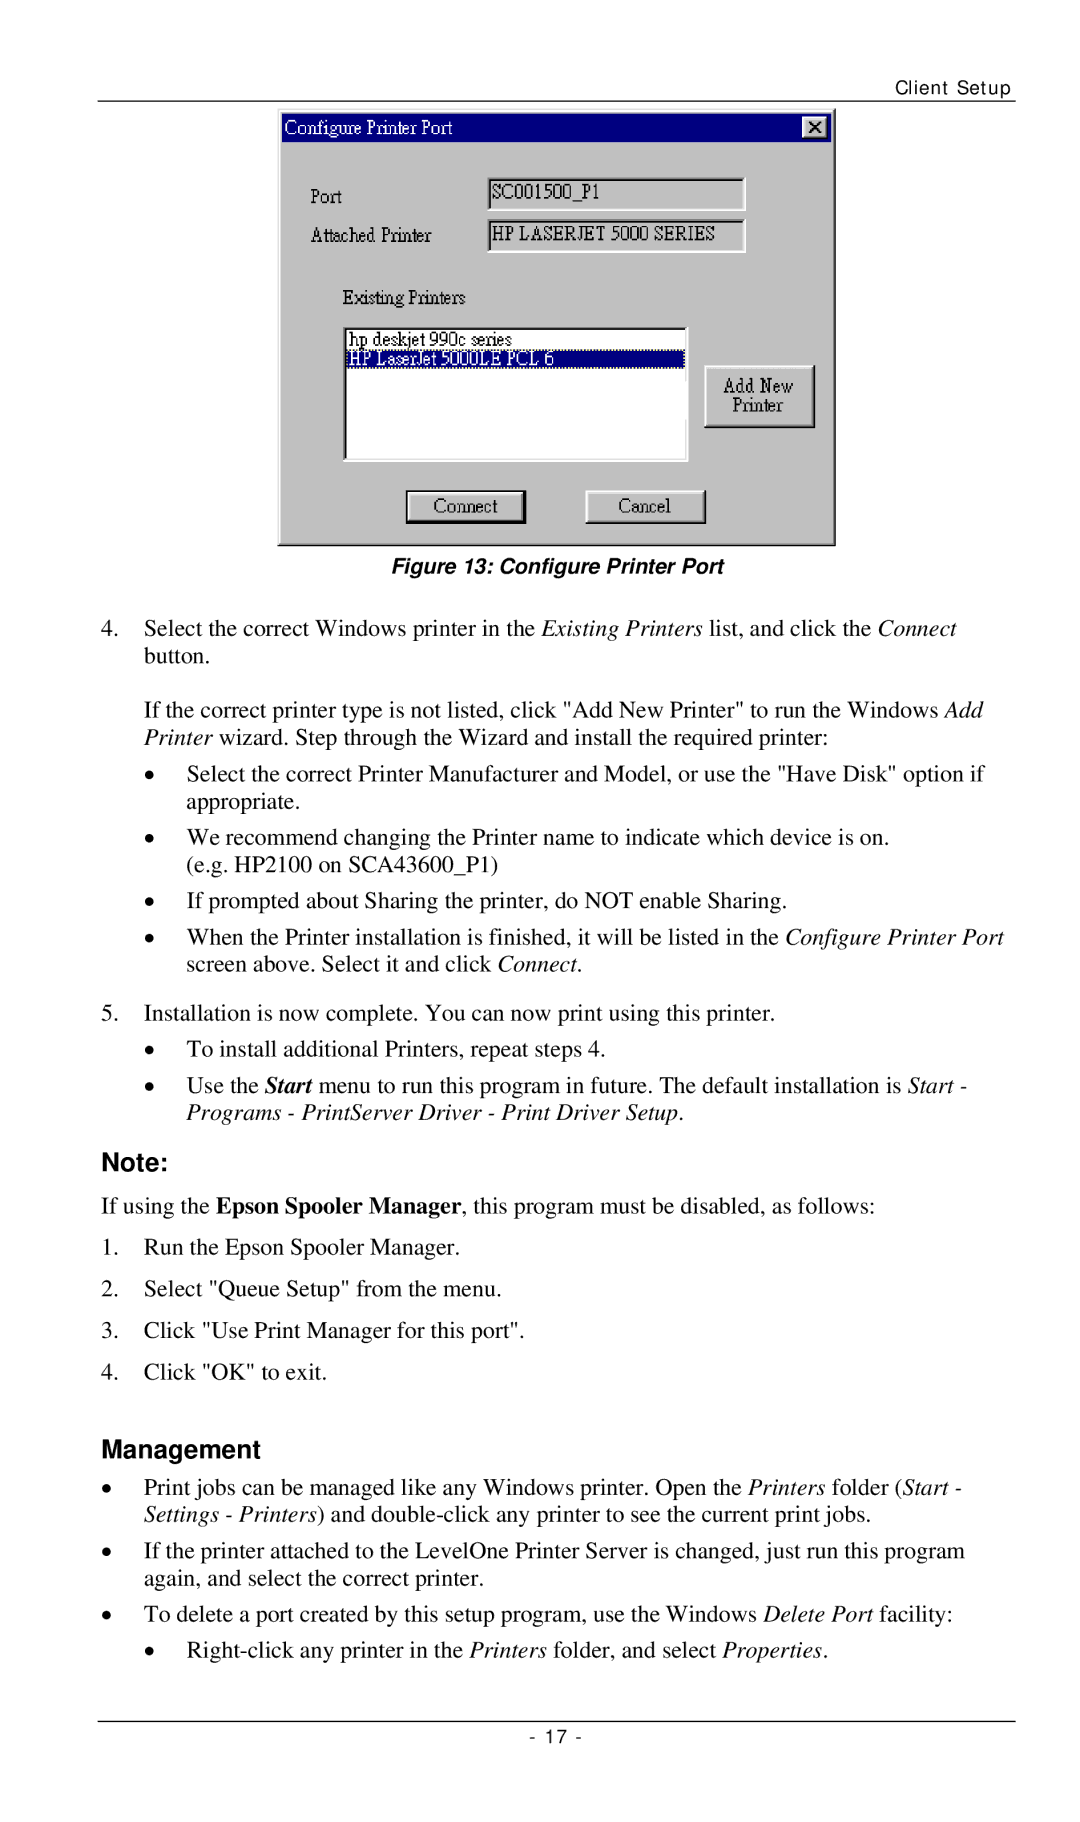
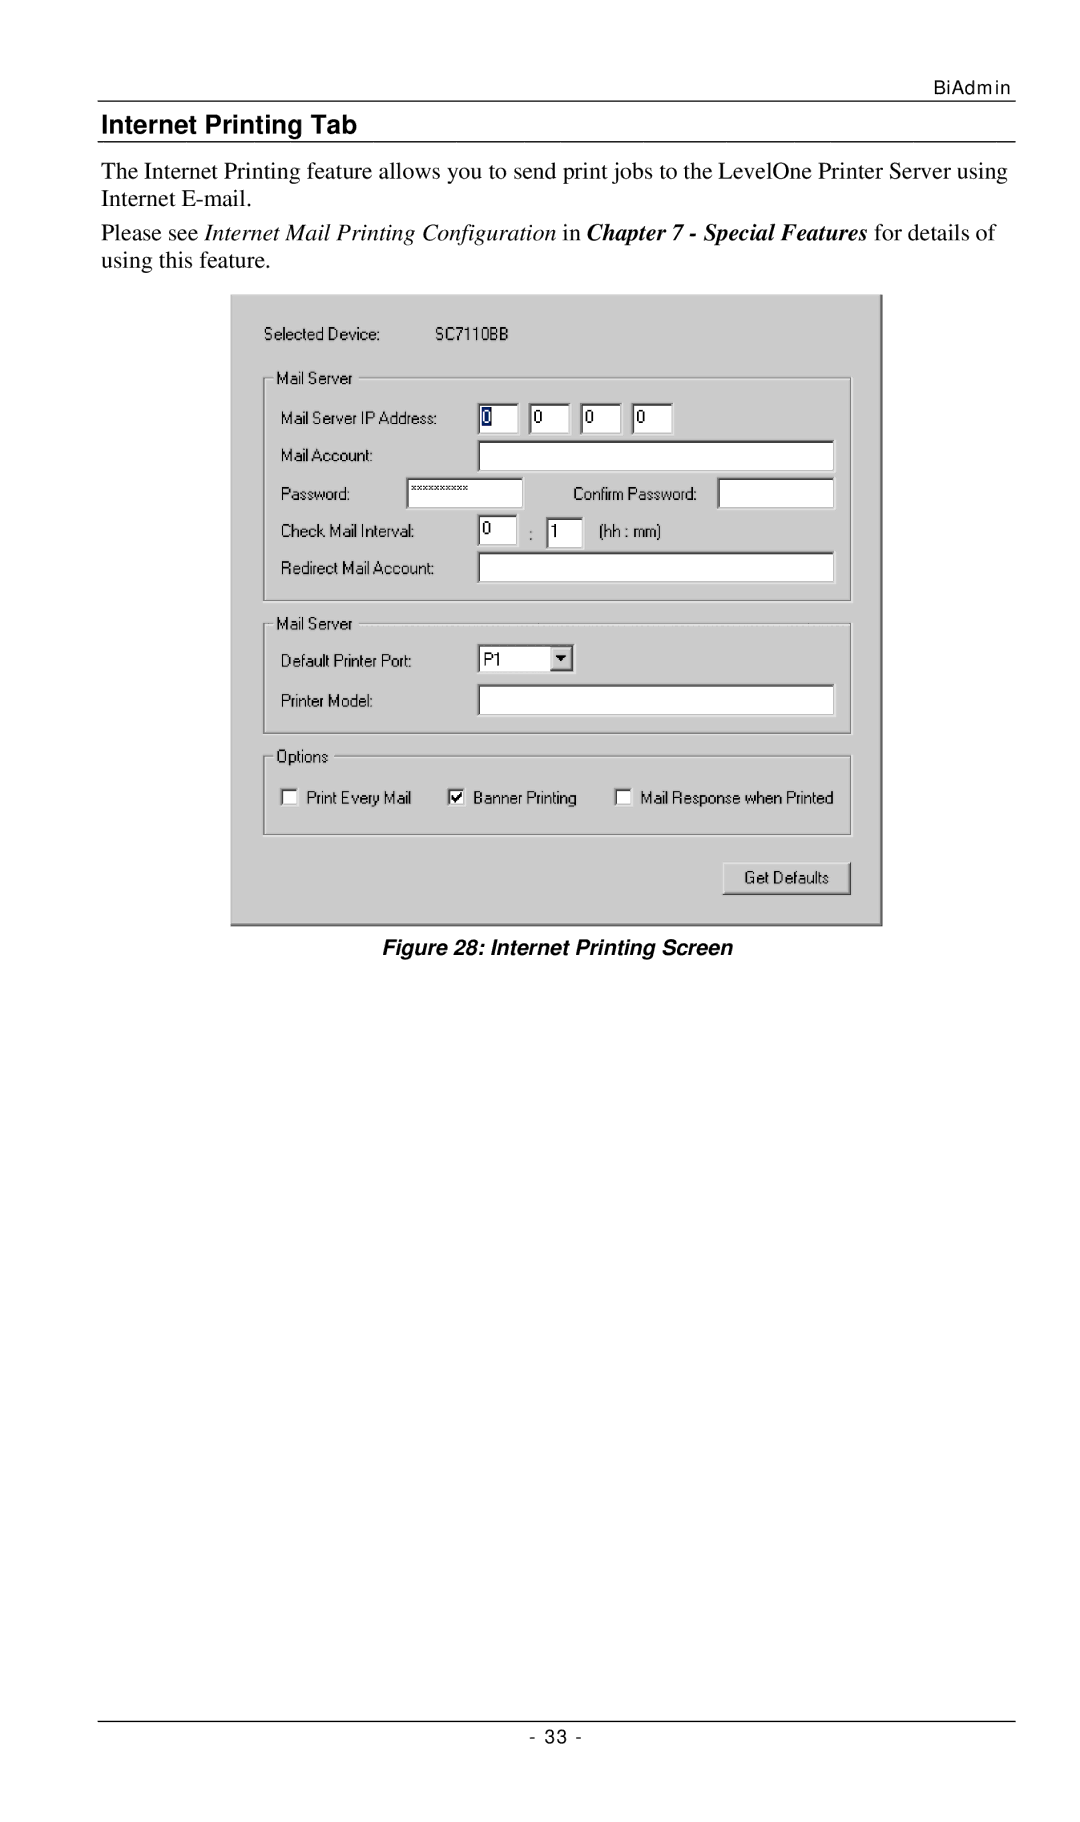
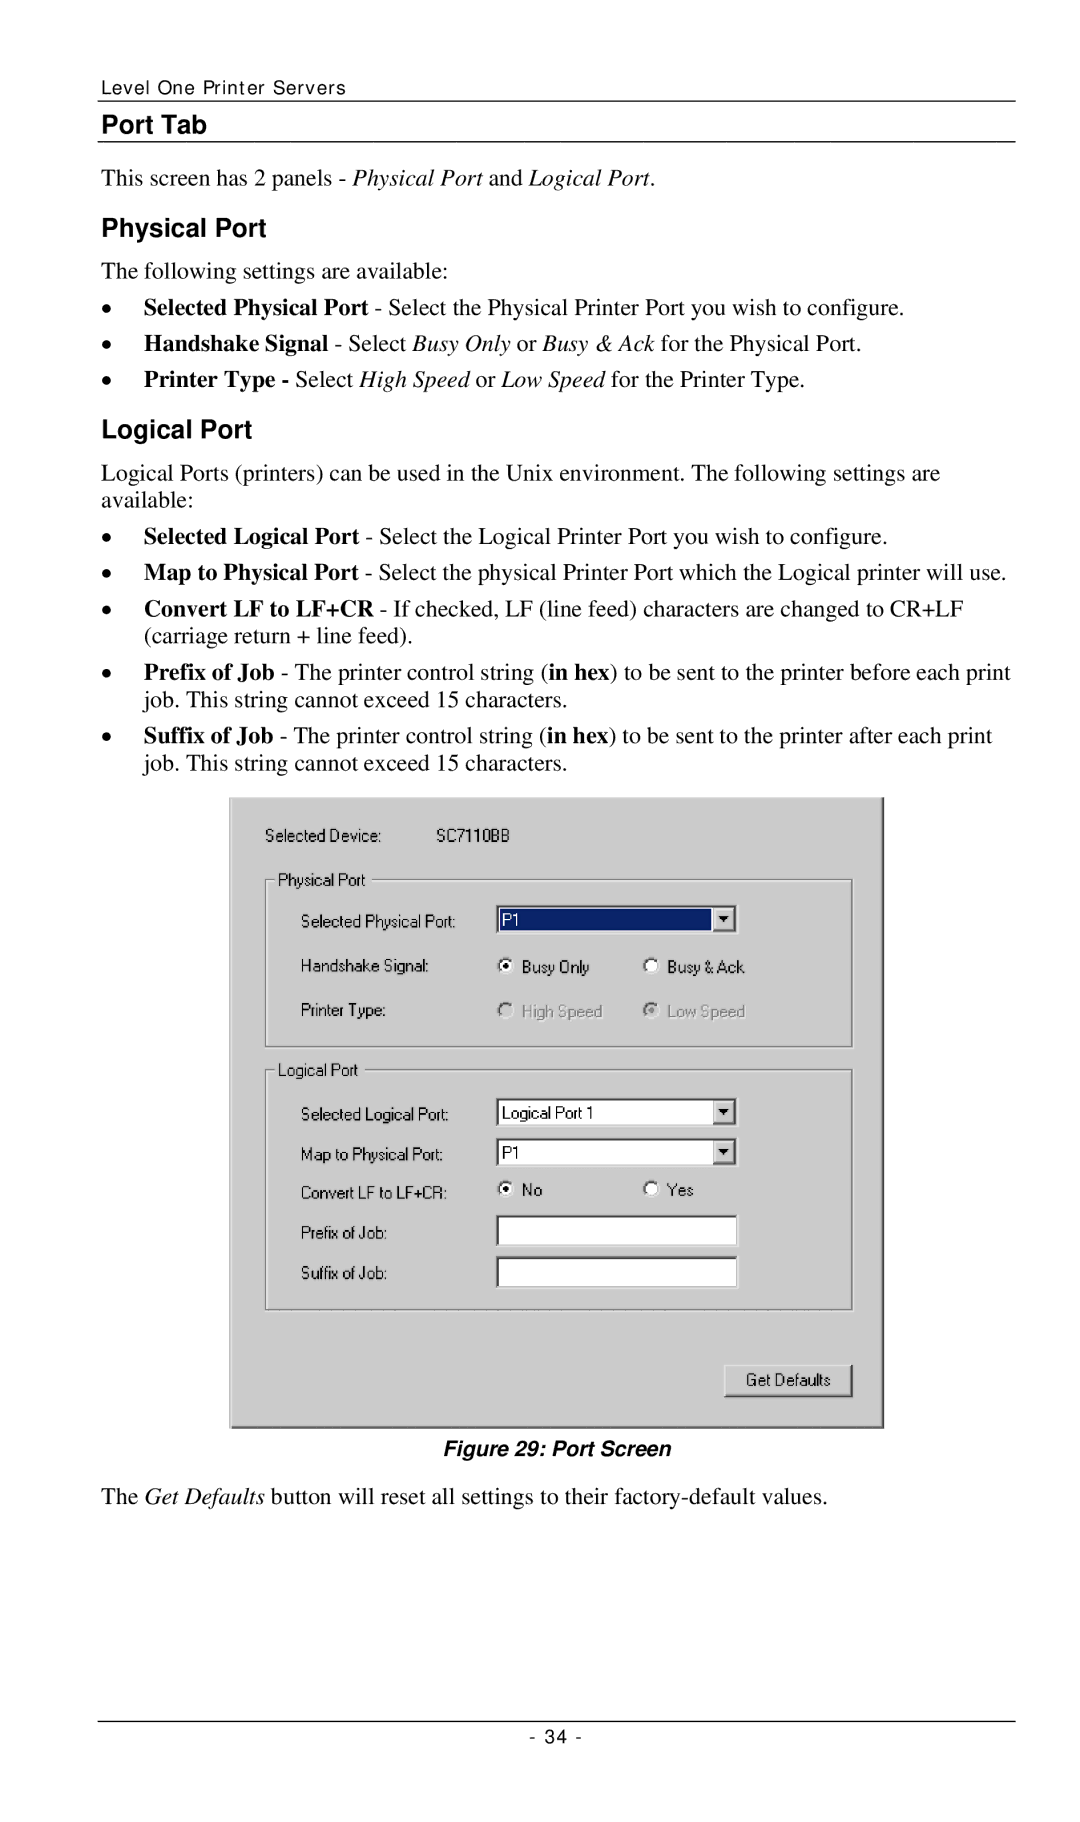
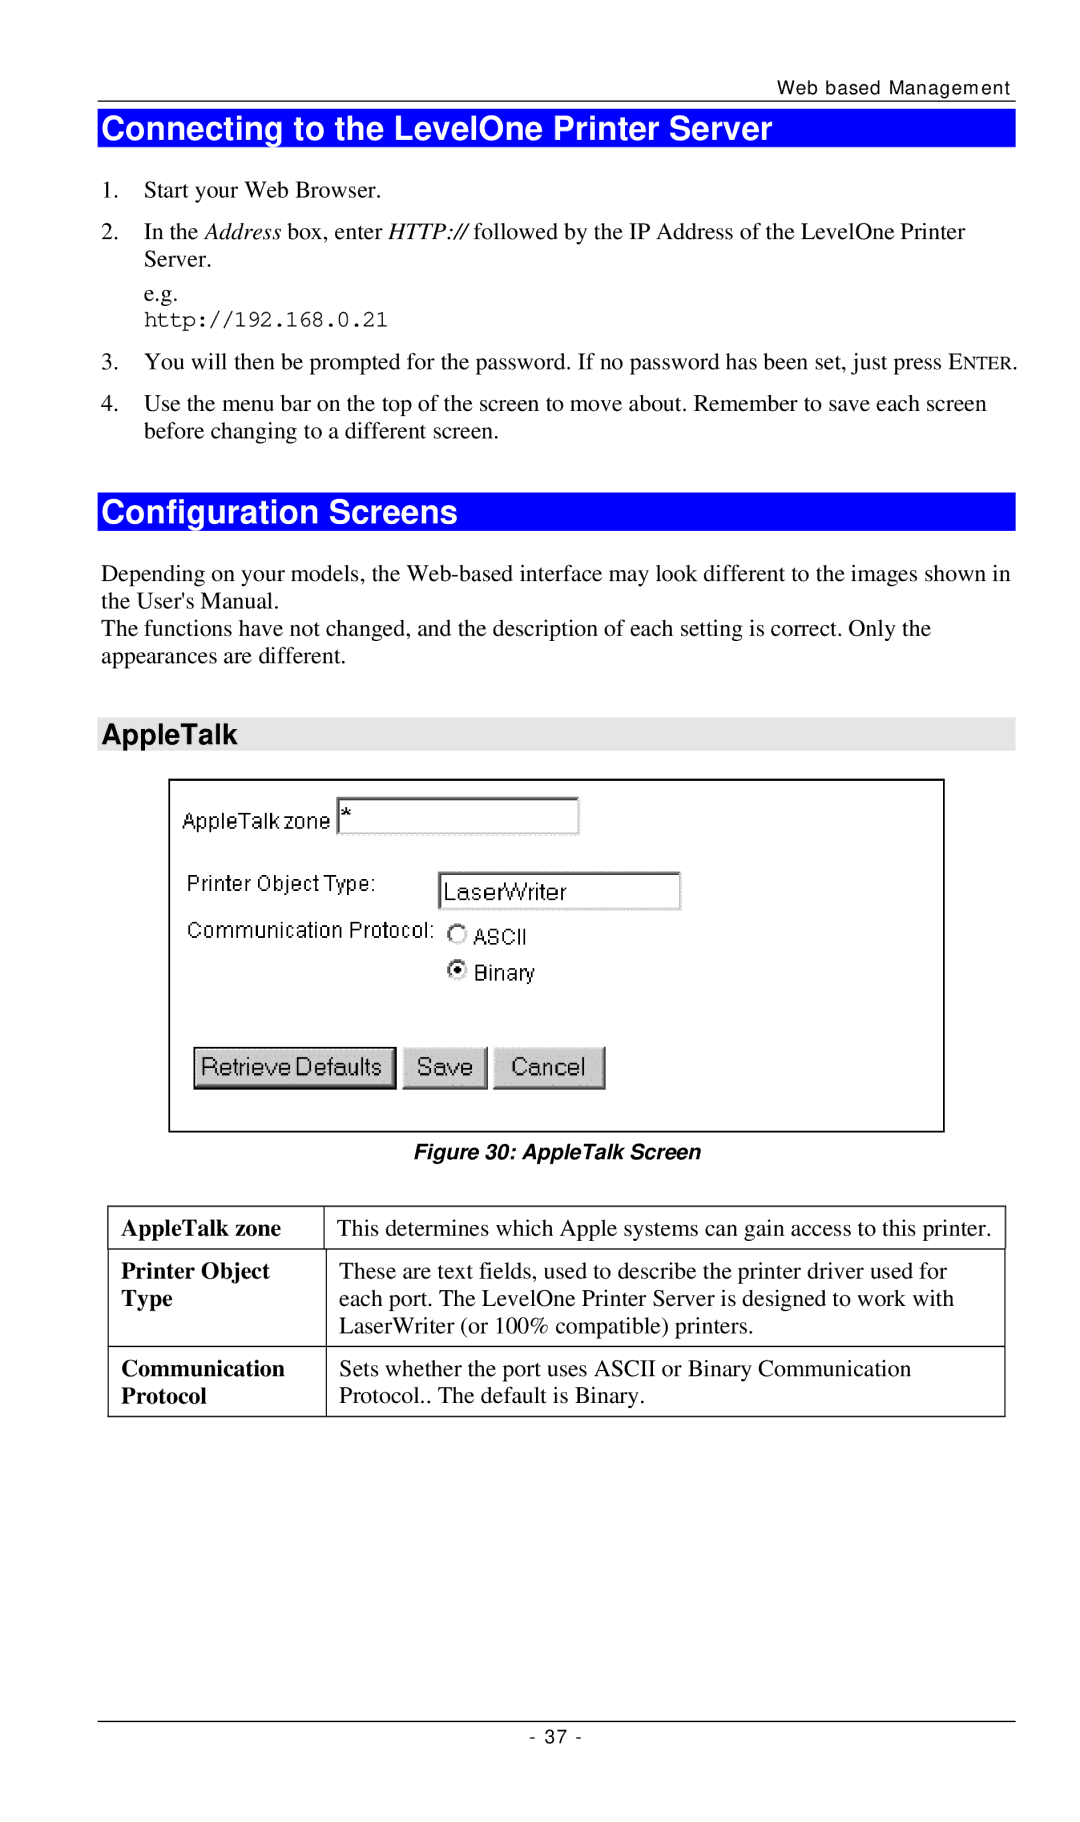
Figure 13: Configure Printer Port

4.Select the correct Windows printer in the Existing Printers list, and click the Connect button.

If the correct printer type is not listed, click "Add New Printer" to run the Windows Add Printer wizard. Step through the Wizard and install the required printer:

Select the correct Printer Manufacturer and Model, or use the "Have Disk" option if appropriate.

We recommend changing the Printer name to indicate which device is on. (e.g. HP2100 on SCA43600_P1)

If prompted about Sharing the printer, do NOT enable Sharing.

When the Printer installation is finished, it will be listed in the Configure Printer Port screen above. Select it and click Connect.

5.Installation is now complete. You can now print using this printer.

To install additional Printers, repeat steps 4.

Use the Start menu to run this program in future. The default installation is Start - Programs - PrintServer Driver - Print Driver Setup.

Note:

If using the Epson Spooler Manager, this program must be disabled, as follows:

1.Run the Epson Spooler Manager.

2.Select "Queue Setup" from the menu.

3.Click "Use Print Manager for this port".

4.Click "OK" to exit.

Management

Print jobs can be managed like any Windows printer. Open the Printers folder (Start - Settings - Printers) and double-click any printer to see the current print jobs.

If the printer attached to the LevelOne Printer Server is changed, just run this program again, and select the correct printer.

To delete a port created by this setup program, use the Windows Delete Port facility:

Right-click any printer in the Printers folder, and select Properties.

- 17 -

Image 20
Contents Level One Print Servers Table of Contents Appendix a Specifications Appendix B Windows Server ConfigurationAppendix C Unix Systems Appendix D NetWareFeatures IntroductionSafety Instructions Package ContentsLED Indicators Power Green Status Orange DescriptionModels FPS-3001TXU 100BaseT Direct AttachPower Green Status Red Description FPS-3002USBGreen Red FPS-2112Status Description To generate a Diagnostic print out Diagnostic Push Buttonfor FPS-3001TXU and FPS-3002USBTo restore the factory default settings LAN Installation ProcedureConfiguration Using the Windows WizardProcedure OverviewIf the desired LevelOne Printer Server is not listed LevelOne Printer Server ScreenWhich printing method should I use? Client PC ConfigurationPrinting Methods Network Configuration Checking your Network Protocols WindowsWindows 2000/XP Setup Windows Peer-to-peer PrintingChoose Standard TCP/IP Port, then click New Port Ensure the LPR Byte Counting Enabled setting is Enabled Windows 9x/ME Setup PTP Printer Port SetupPrint Port Setup Peer-to-peer Printing If your LevelOne Printer Server is not listedConfigure Printer Port ManagementAdvanced Port Options PortBanner Retry IntervalWindows SMB Printing Network NeighborhoodCapture Settings Windows 98/ME Printing from MS-DOS ProgramsCapture Settings Windows 2000/XP Login as Administrator Open the command prompt windowWhen prompted for Network Path or Queue Name Windows with Server-based Print QueuesAppleTalk Setup Advanced Setup and ManagementMacintosh AppleTalk Software RequirementsLPR printing Setup Macintosh OSBiAdmin Management Utility InstallationRequirements OperationPrinter Status Device ListIcons Device Status Configuration UpgradeWizard RefreshConfiguration Diagnostics menuMenus Main MenuSystem Tab System ScreenTCP/IP Tab TCP/IP ScreenAppleTalk Tab AppleTalk ScreenNetBEUI Tab NetBEUI ScreenInternet Printing Tab Internet Printing ScreenLogical Port Port TabPhysical Port NetWare Tab Web-Based Management PreparationAppleTalk Connecting to the LevelOne Printer ServerConfiguration Screens Abort Job if Error NetBEUIDomain Name Response TimeConnection NetWare GeneralSnmp Simple Network Management Protocol Management StationsConfigure Server Other ScreensServer Status Printer PortsLogical Printers Internet PrintingInternet Printing Protocol IPP Special FeaturesIPP Server Configuration IPP Client Setup Windows 98/ME Installing from the CD-ROMInstalling using IPPCLIENT.EXE IPP Client ConfigurationChanging the IPP Port Settings Select Printer for IPP PortIPP Client Setup Windows 2000/XP Port 2 if existsUsing IPP Printers Internet Mail Printing System RequirementsMail Server Internet LevelOne Printer ServerInternet Mail Printing Configuration Installation User Software User SoftwarePort Name Remote PrinterUsing the new Port Checking the Printer DriverPrinting through the Internet InterNet Printing ProgressTroubleshooting Hardware & LAN ProblemsProblem No All the LevelOne Printer Servers LEDs are off If using 10/100BaseT, check the HubProblem No Why do I get an incorrect printout? Problem No My document didnt print to the right printerProblem No My file doesnt print with the correct fonts Problem No My EPS file doesnt print with the correct fontsLevel One Printer Servers To remove an existing printer port installation Windows PrintingLevel One Printer Servers Problem No Problem No My old printer cannot print or prints garbage Then select File Properties DetailsUnix Troubleshooting LevelOne Printer Server device is not recognizedSpecifications Environmental SpecificationsFCC Statement CE StandardsParallel Port Pin Assignments ACKFPS-3002USB FPS-3002USBFPS-2112 FPS-21123001TXU 3002USB Feature TableSpecifications Windows Server Configuration Windows NT4.0 ServerAdding TCP/IP Printing Support Adding a TCP/IP Remote PrinterWindows 2000/2003 Server Windows 2000 MessageUnix Systems LevelOne Printer Server IP Address ConfigurationOther LevelOne Printer Server Configuration Field Entry LPD PrintingLPD on IBM AIX Procedure Action Sample CommandLPD on System Adding Remote PrintersLPD on Linux Field DataLPD on BSD Printing using LPD Creating an Ndps Manager Object NetWareNetWare Creating an Ndps Printer Agent At the Identification page, click the Printer Agent ListConfigure Port Handler Frame Type Operation ModeNetWare 3 NetWare Print Server Mode NetWare Remote Printer ModeDevice Name Print ServerUsing BiAdmin with Client PreparationPrint Server Mode Bindery ButtonsIf you have multiple File Servers NetWare Configuration Button BinderyQuickset Button Bindery If you have a single File Server File ServerPrinter OperatorPrinter Button Select Printer Port BinderyAssigning Printer Queues Required Assign Queues BinderyTo Assign Users to Queues Required To assign operators to Queues OptionalPassword NetWare Password Bindery PS ModePrint Server Mode NDS NameNetWare Configuration Button NDS Quickset Button NDSSelect Printer Port NDS Assign Users to Queue NDS PS mode To assign operators to the Print Queue OptionalPassword NDS NetWare Password NDS PS Mode