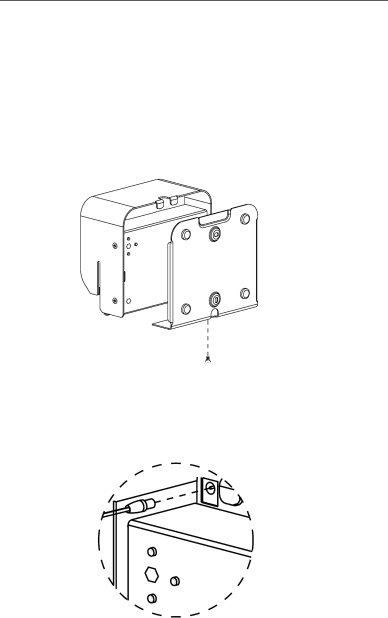
Lathem 800P manual Setup, Remove the Back-Plate

Page 9

800P TruAlign Time Recorder User Guide

Setup

To set up your 800Ptime recorder, follow these next steps:

Remove the Back-Plate

Separate the back-plate from the time recorder by removing the Philips head screw. Retain the Philips head screw for later.

Connect the AC Power

Plug the AC adapter into the time recorder and then plug the wall adapter into the AC outlet.

NOTE: The time recorder has an internal battery that will retain the programming if the time recorder is unplugged from AC power.

Page 10

Image 9
Contents TruAlign Time Recorder Disclaimer Table of Contents Introduction FeaturesAbout this Manual Optional AccessoriesRecommended Installation Tools Packing ContentsStep Quick Easy Setup Wall MountTime=U.S. Eastern Time Daylight Savings=On Quick Easy Setup Table Top MountRemove the Back-Plate SetupProgramming the 800P AM 1 1 0 PM0 1 0 Page Function Settings Selections Factory Settings Press the or button until the display shows ‘10’ Step Press the or button until the display shows ‘09’ Page Press the or button until the display shows ‘24’ 10 1 10 2 Press the or button until the display shows ‘2’ 12 E 12 F Page 14 n 14 y Page Wall Mount Wall Front View Using the Time RecorderAppendix a Changing the Print Intensity How to change the print intensity on the timecardAppendix B Calibrating the TruAlign Function How to calibrate the TruAlign functionCAL 800P TruAlign Time Recorder User Guide Appendix C Testing the Print Head Appendix D Changing the dates for Daylight Savings Appendix E Disable Daylight Savings Correction Frequently Asked Questions Specifications Minutes to 1/100s of Hour Warranty Specifications