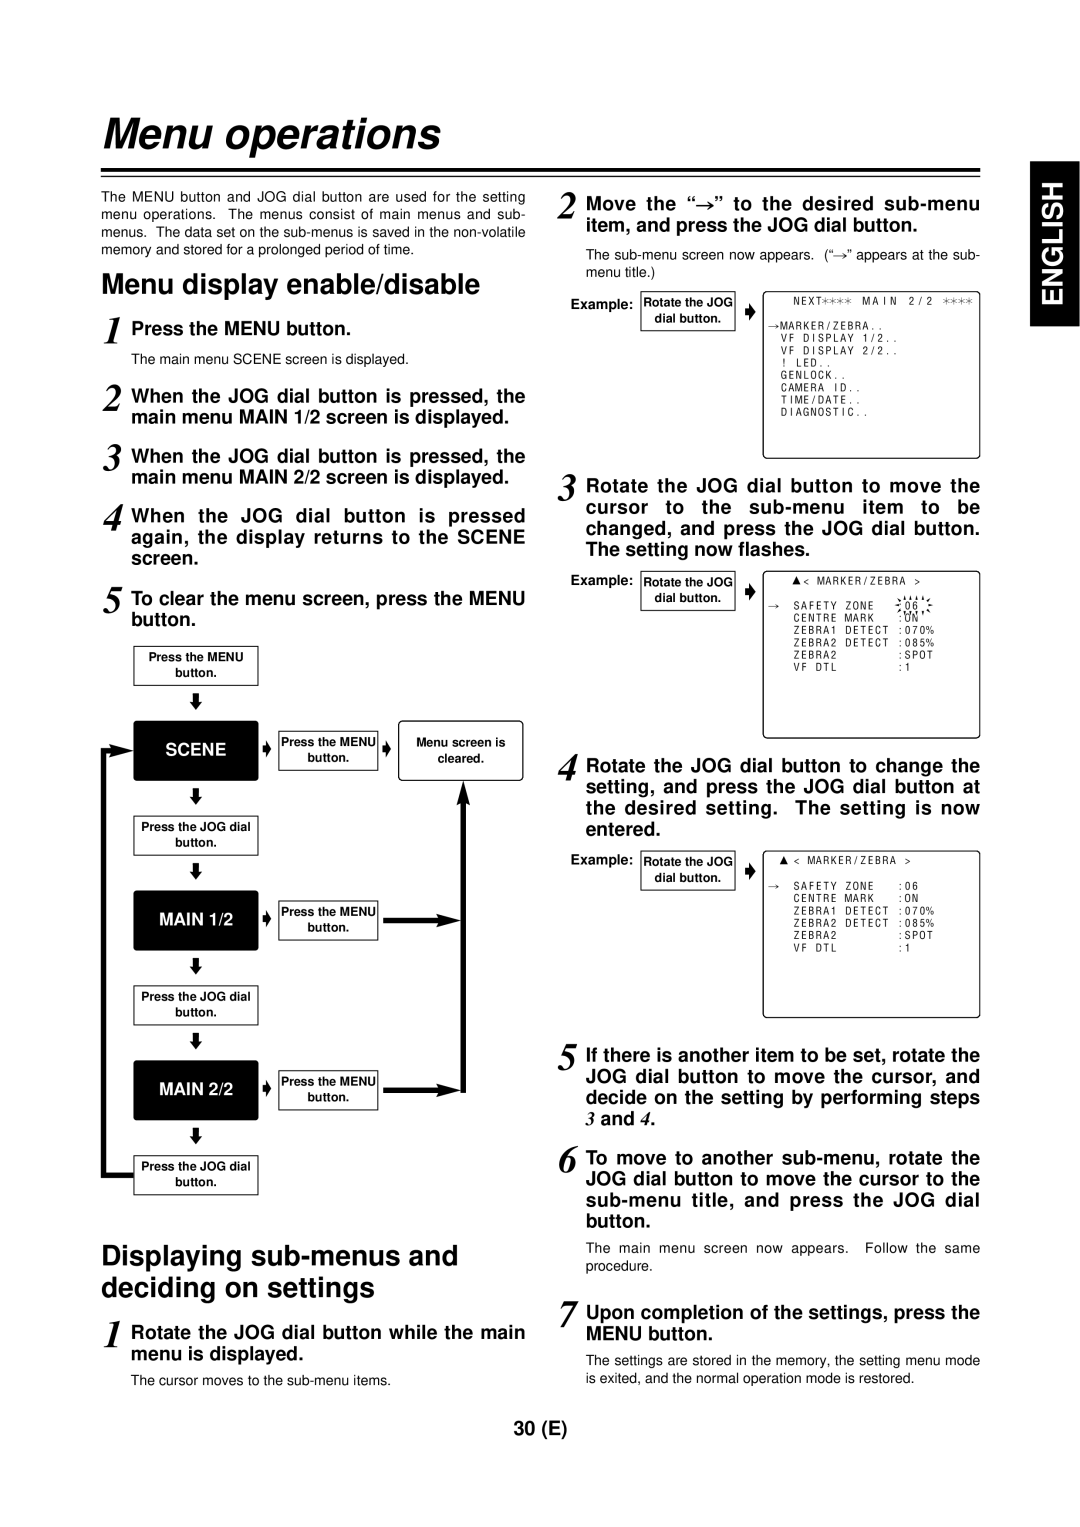
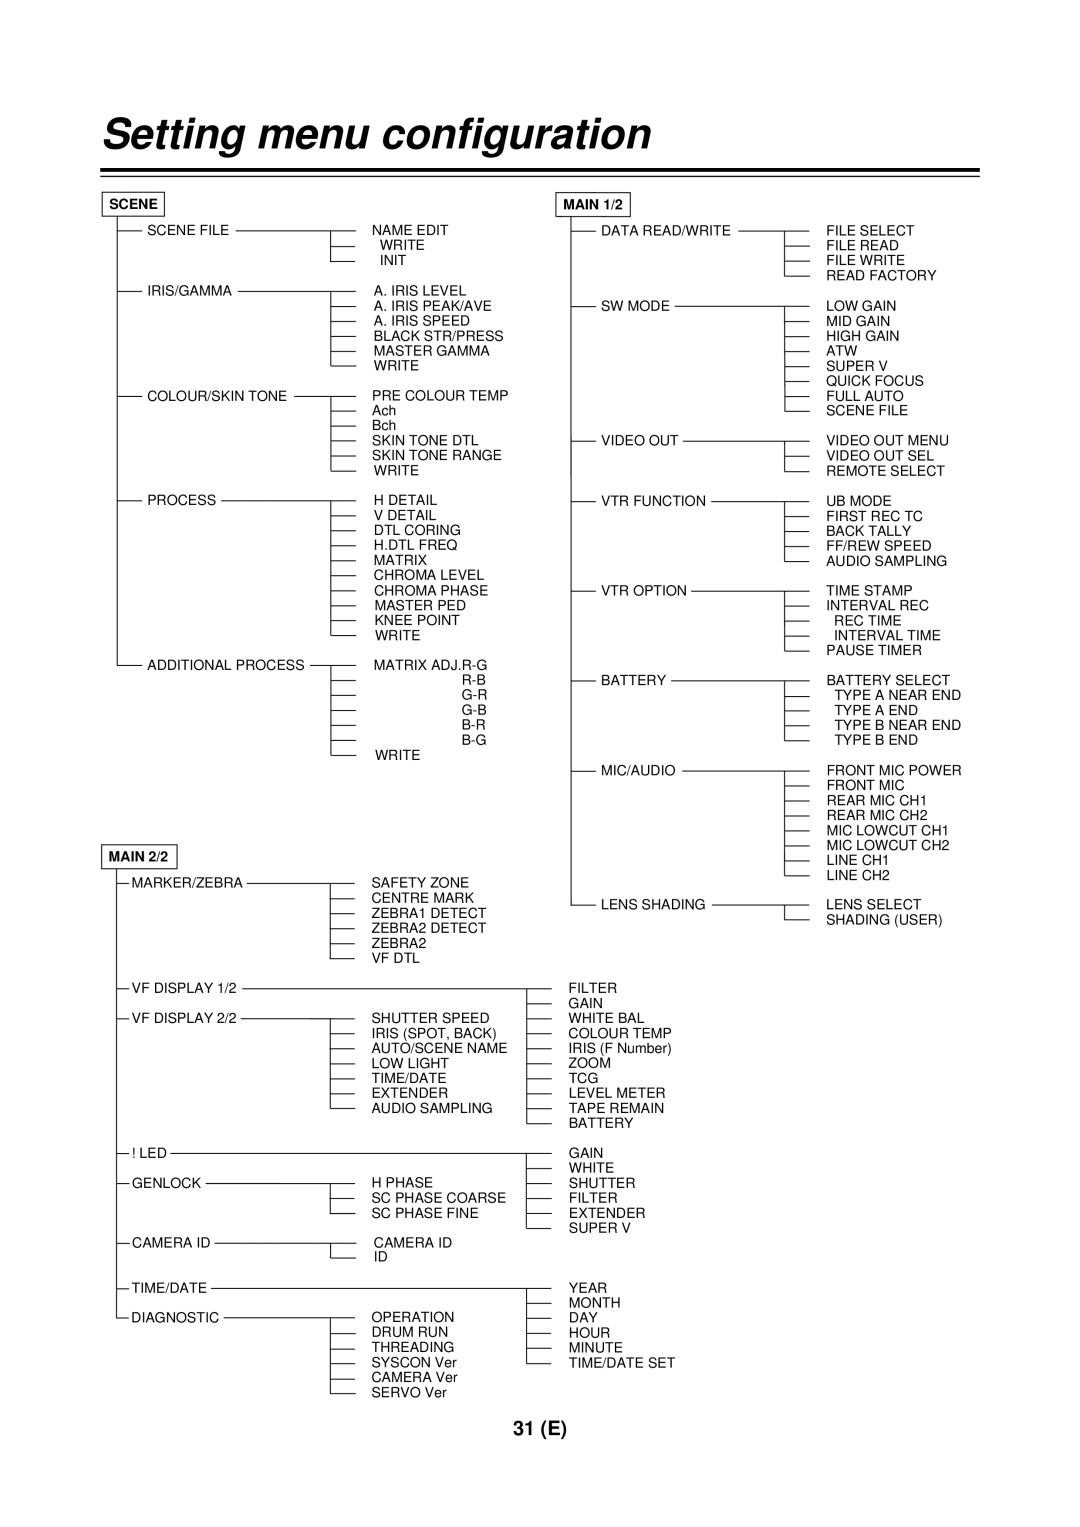
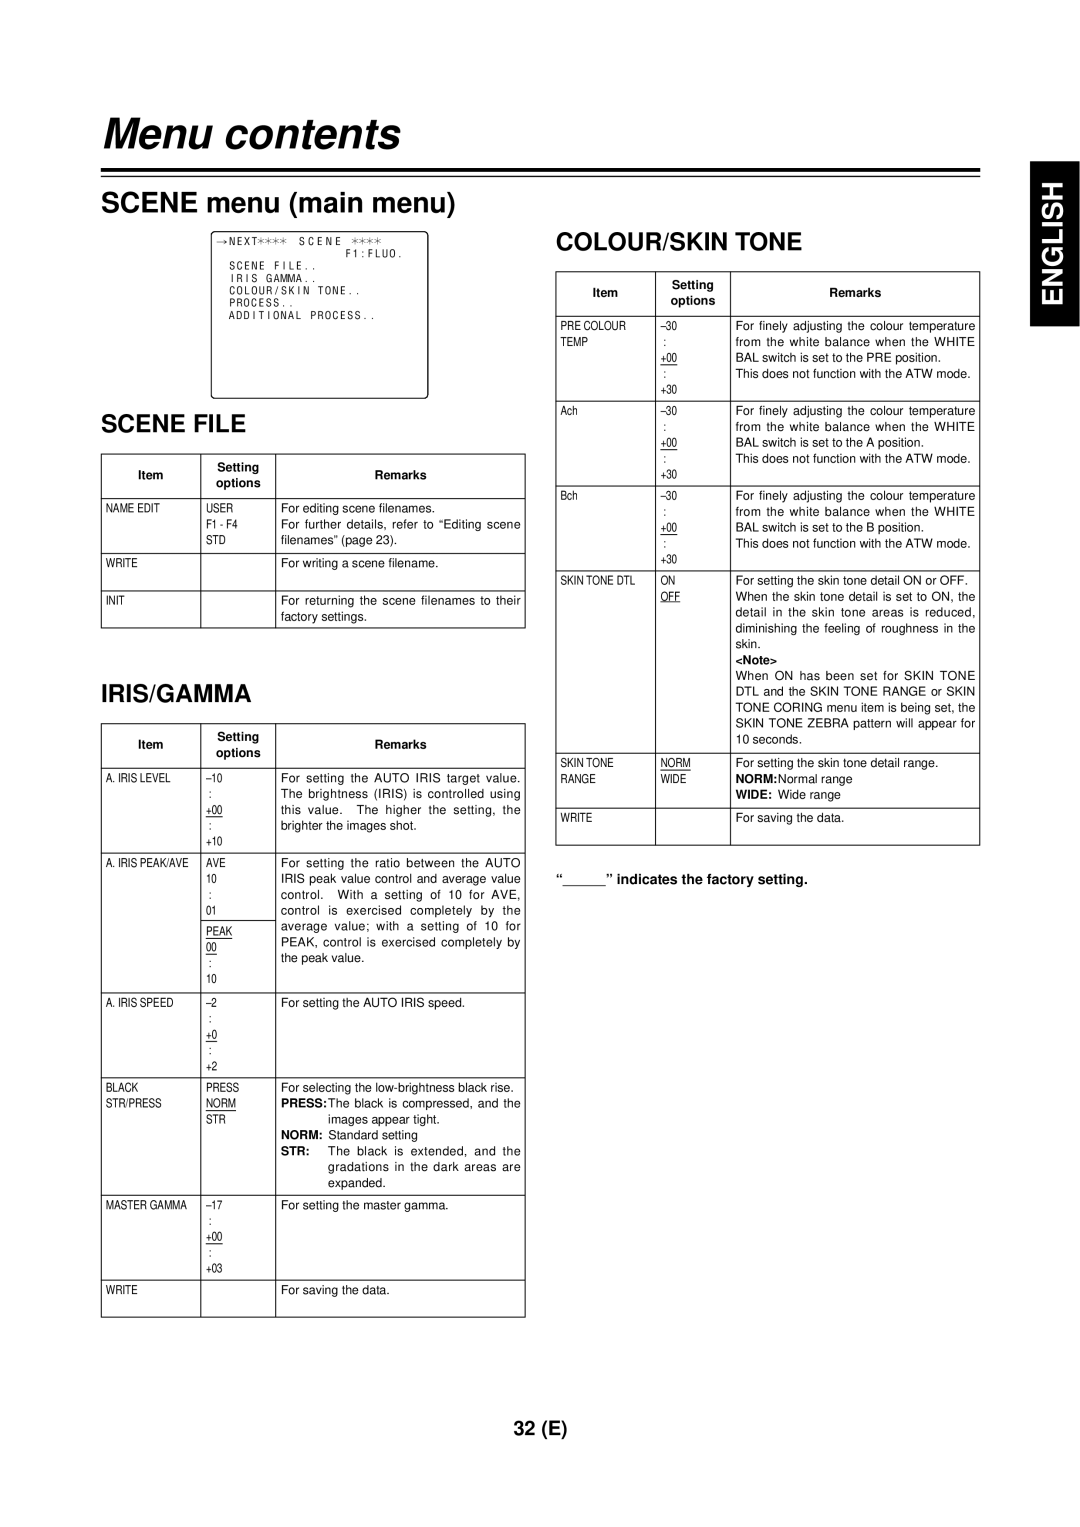
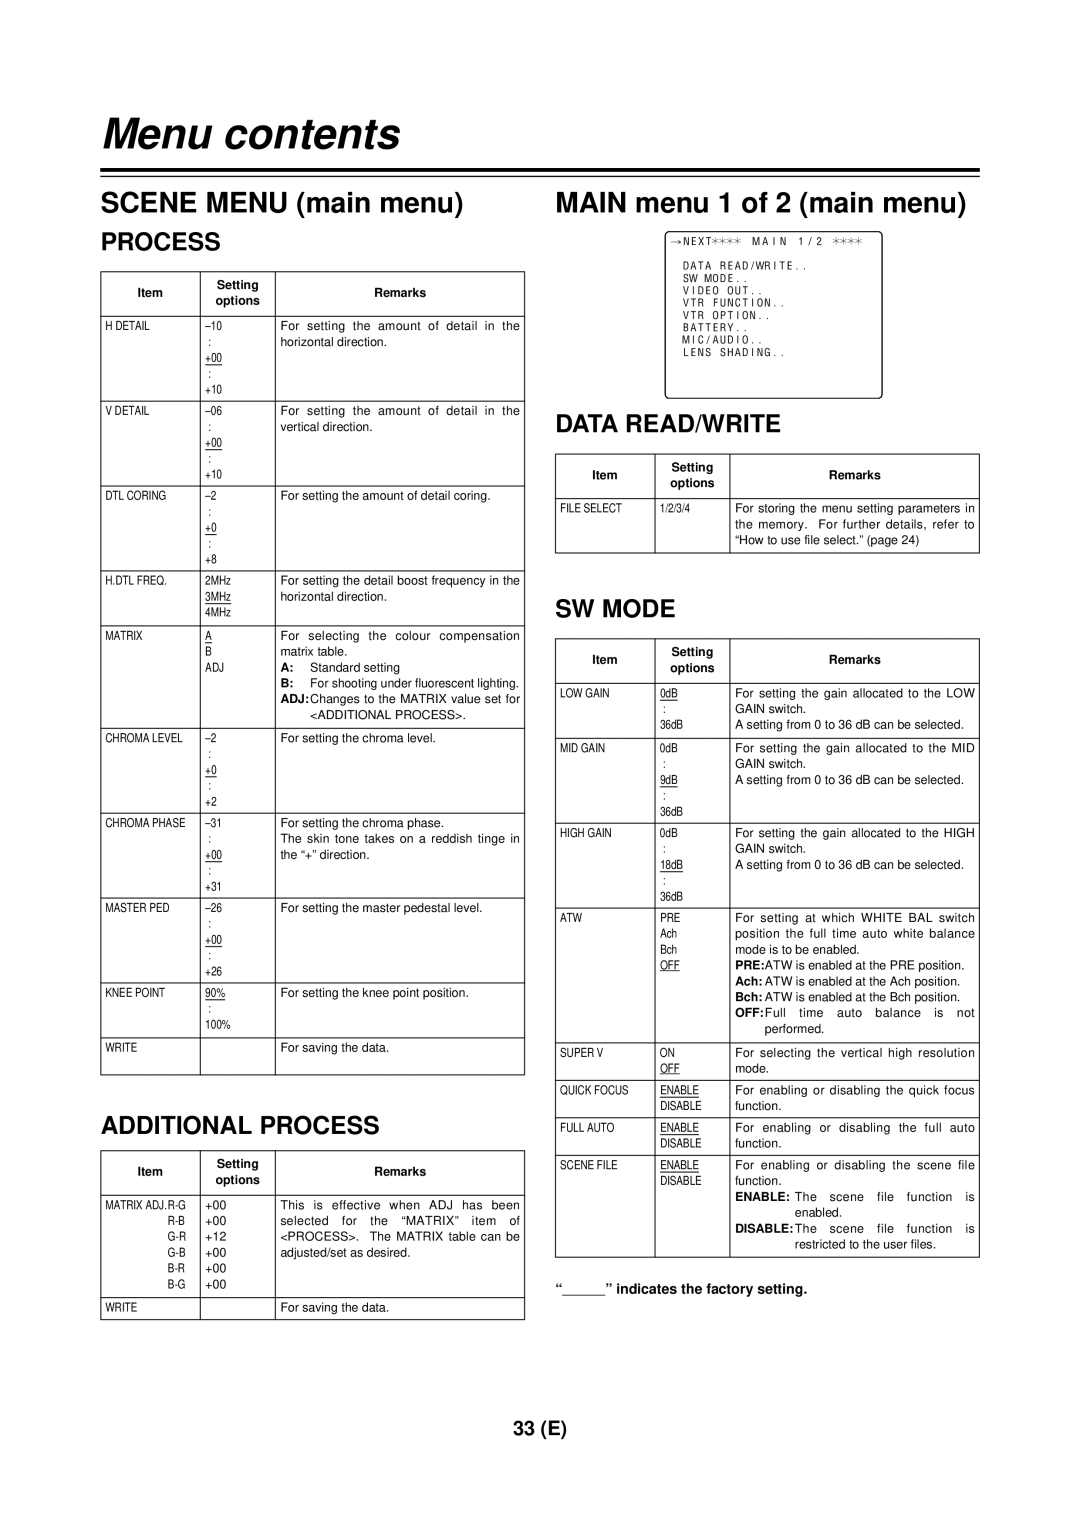
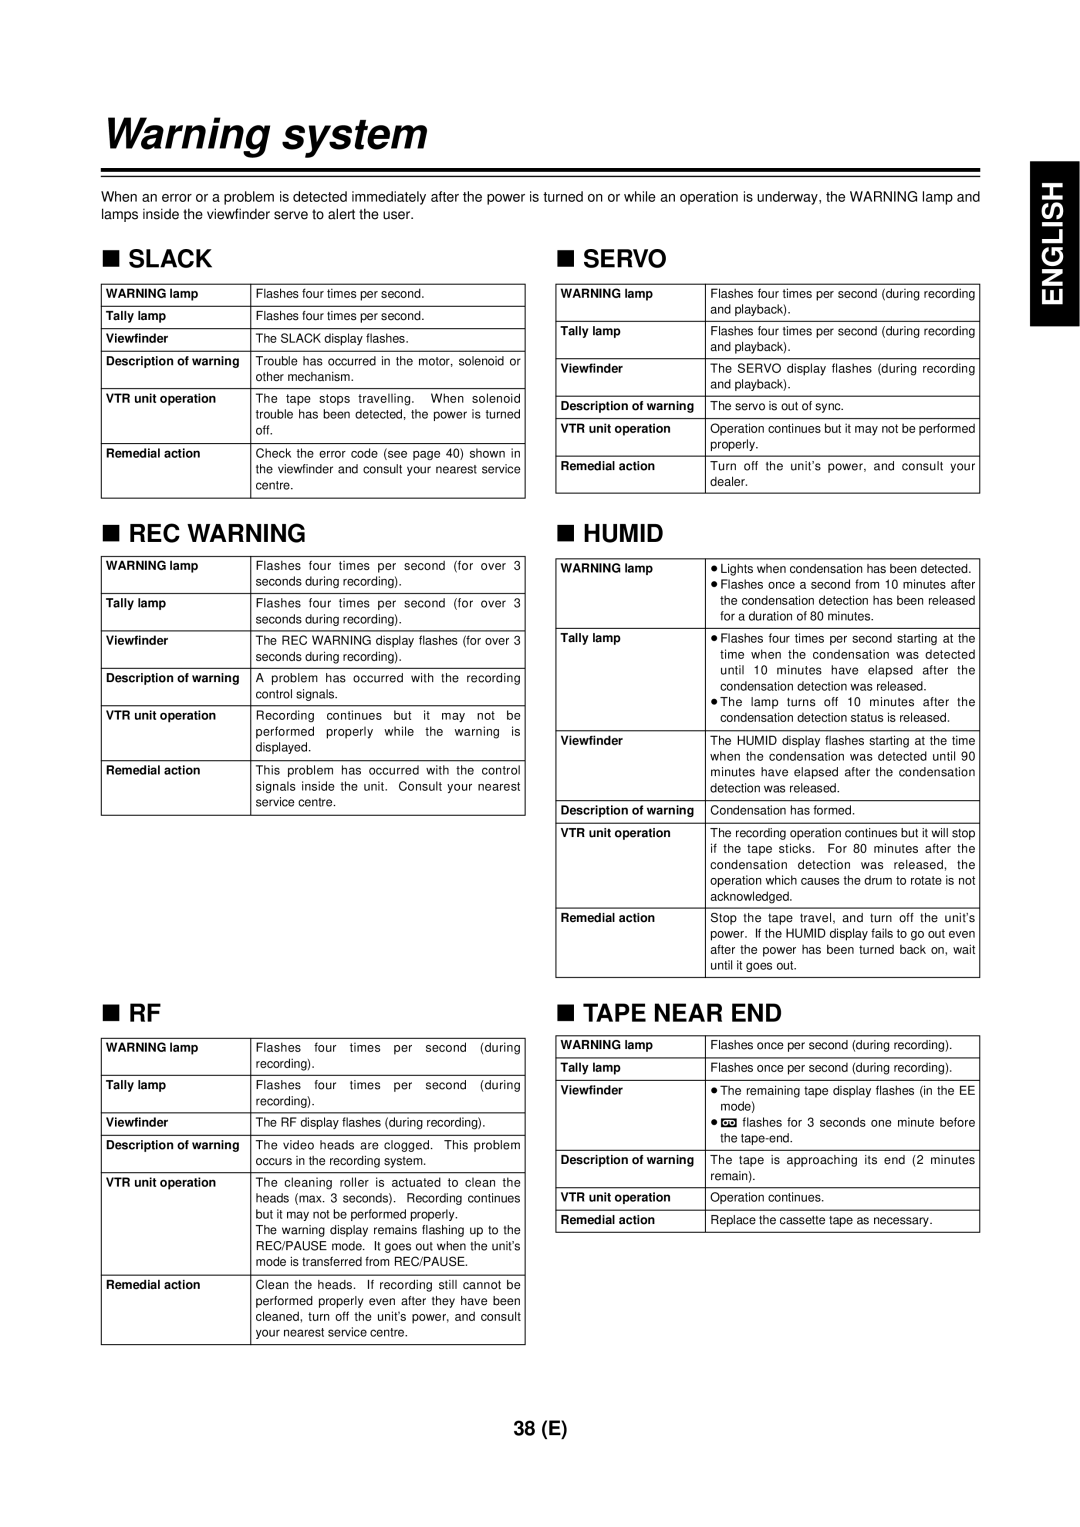
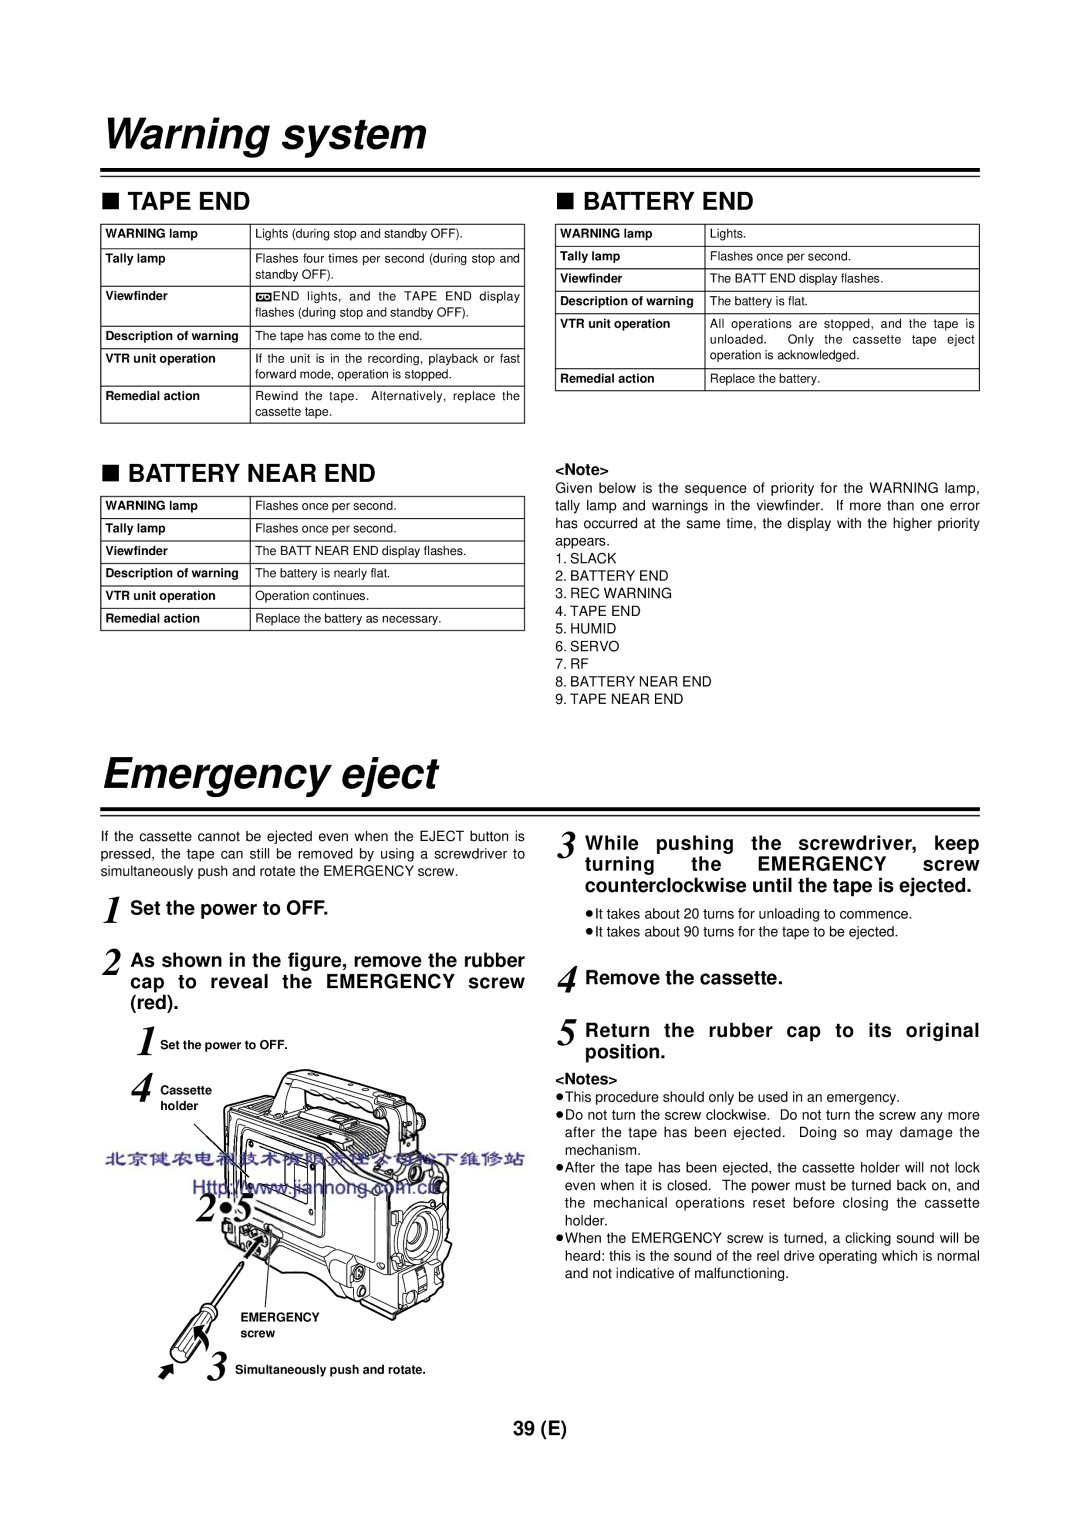
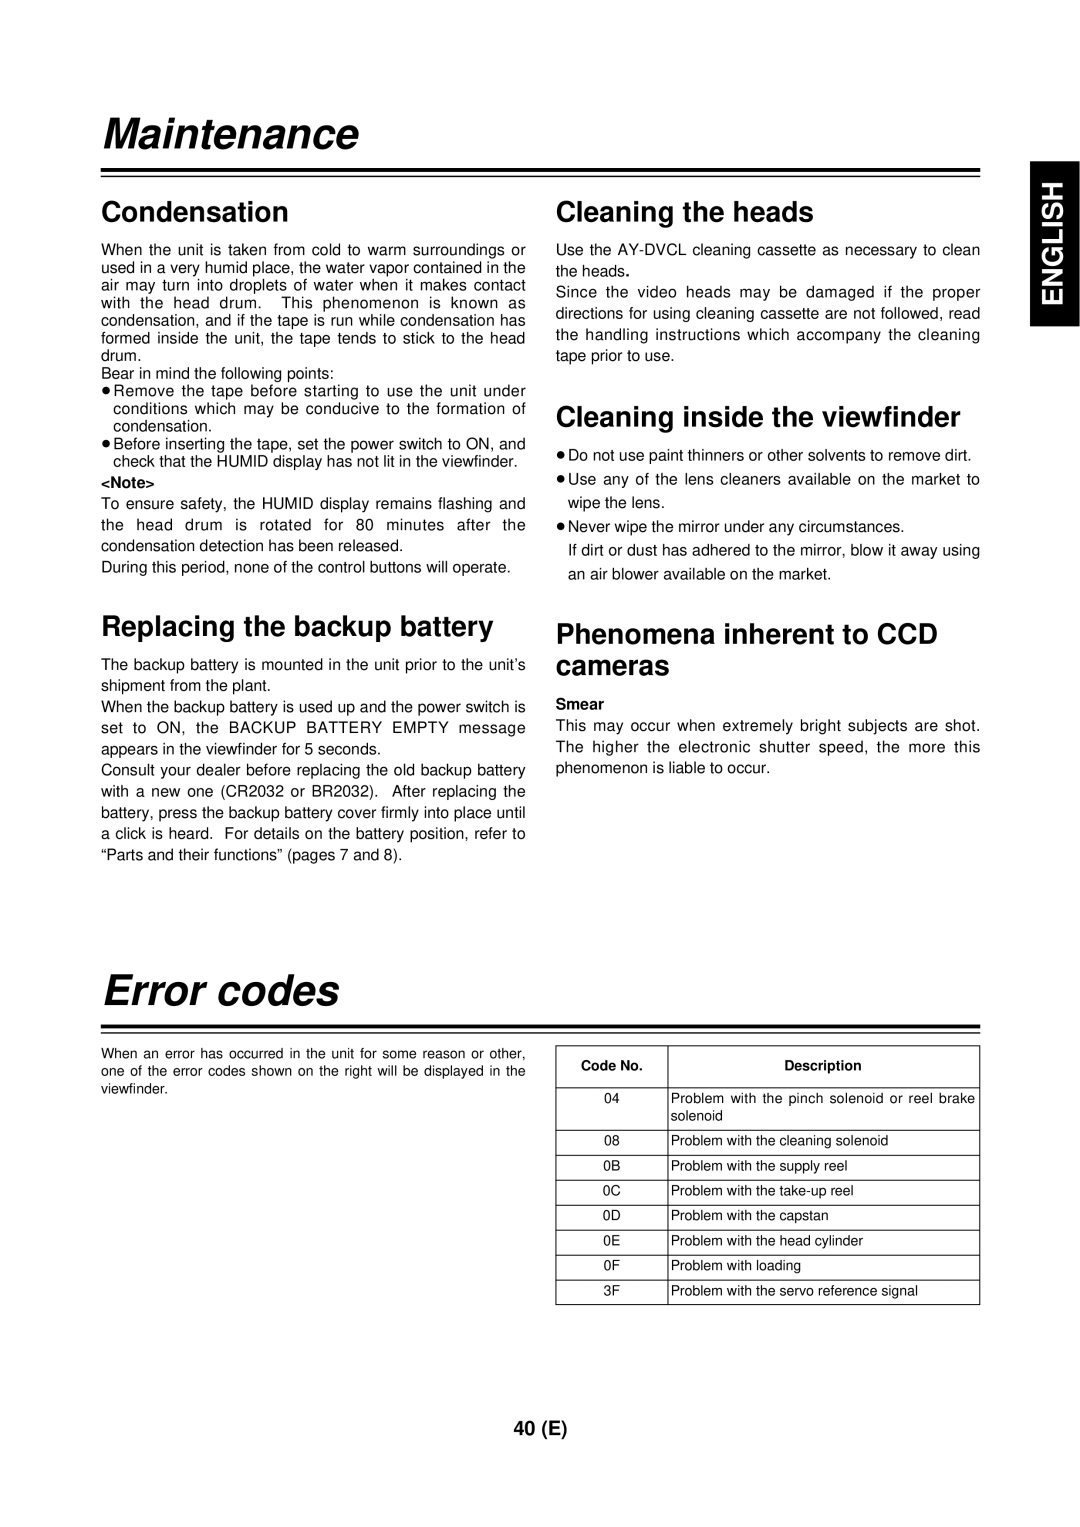
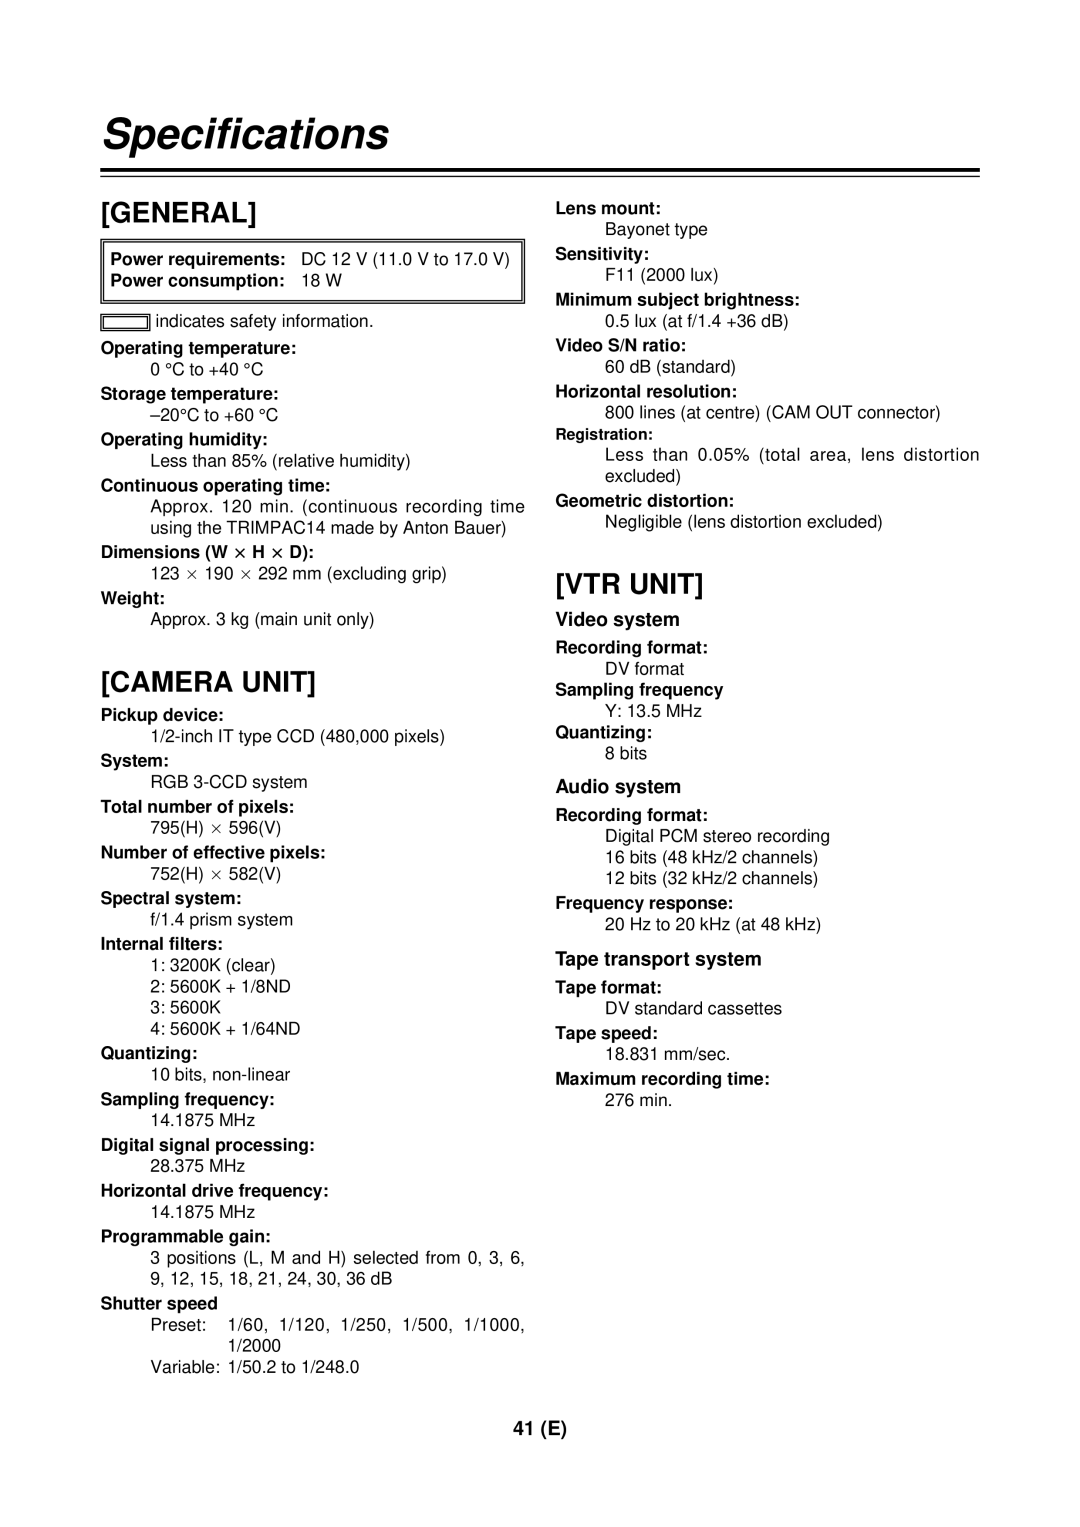
Panasonic AG-DVC 200E manual Using the unit with external components, Using the unit as a player

Page 30

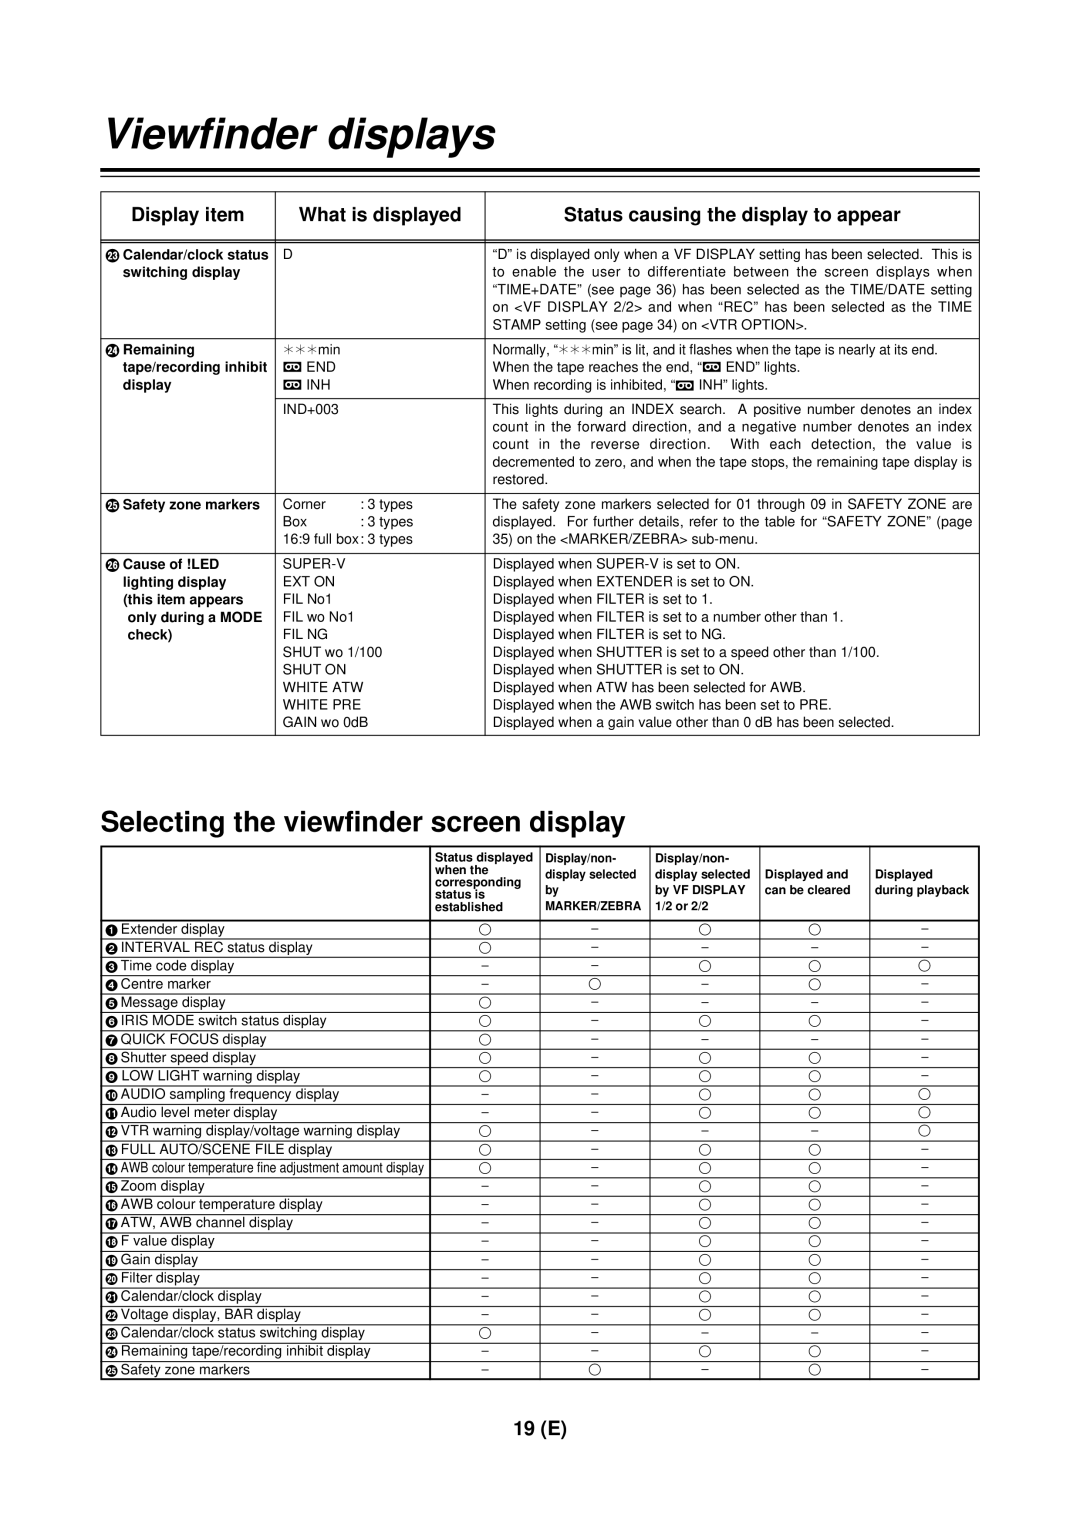
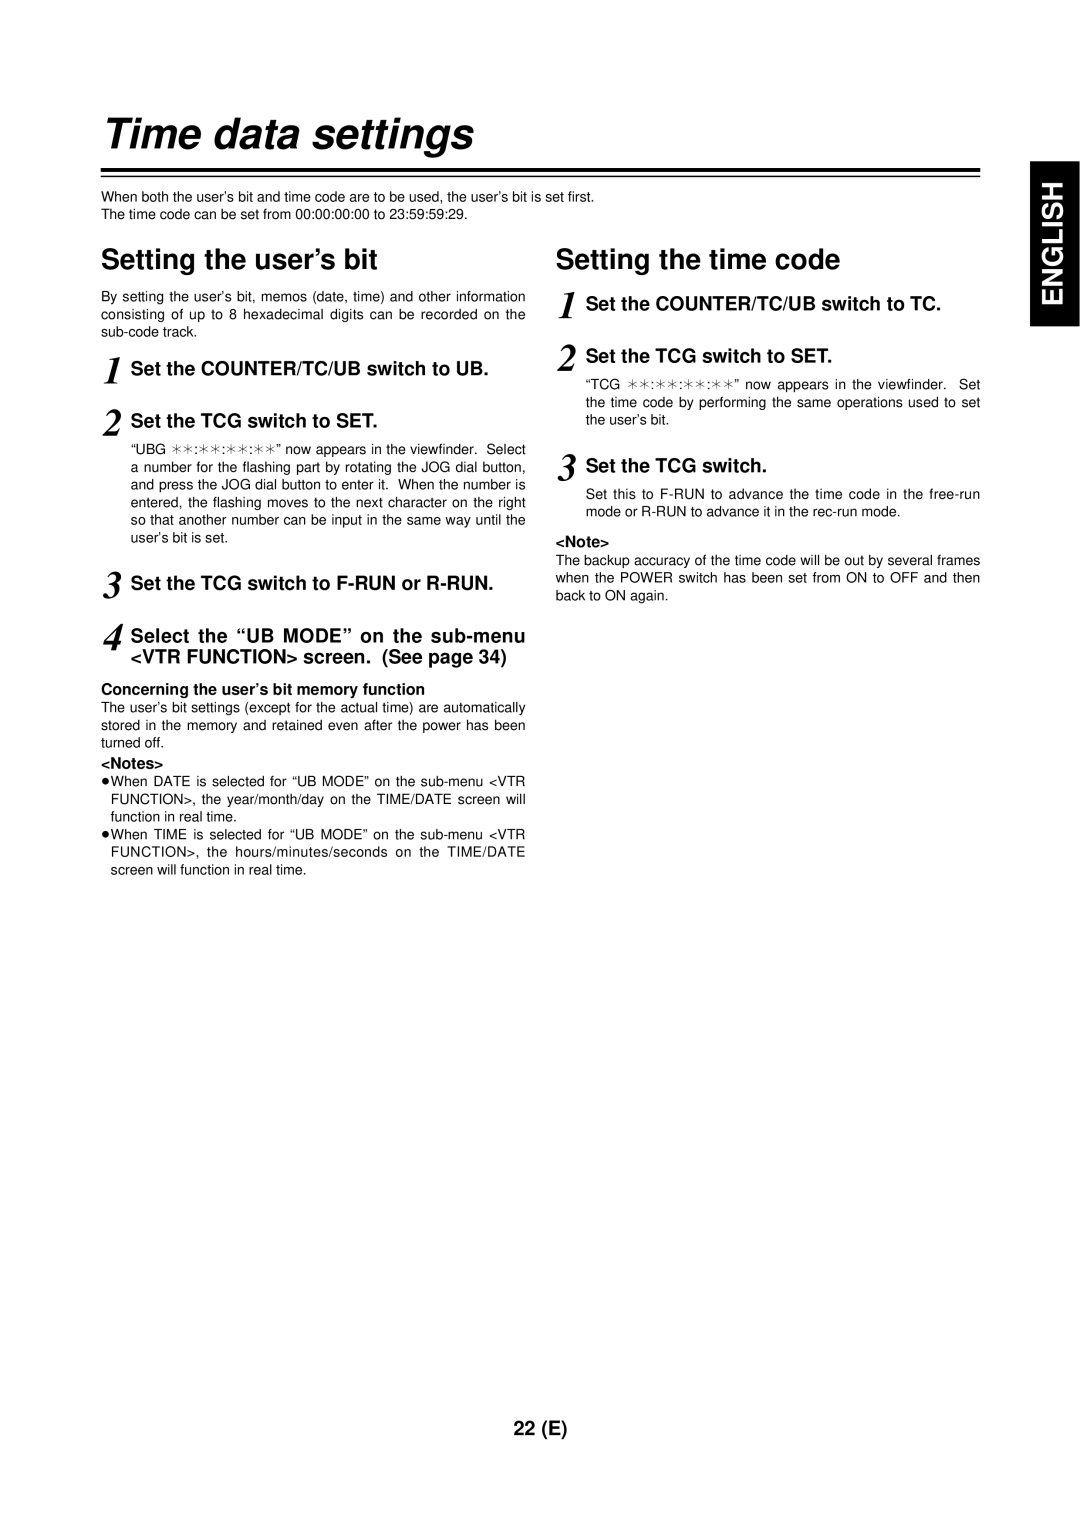
Using the unit with external components

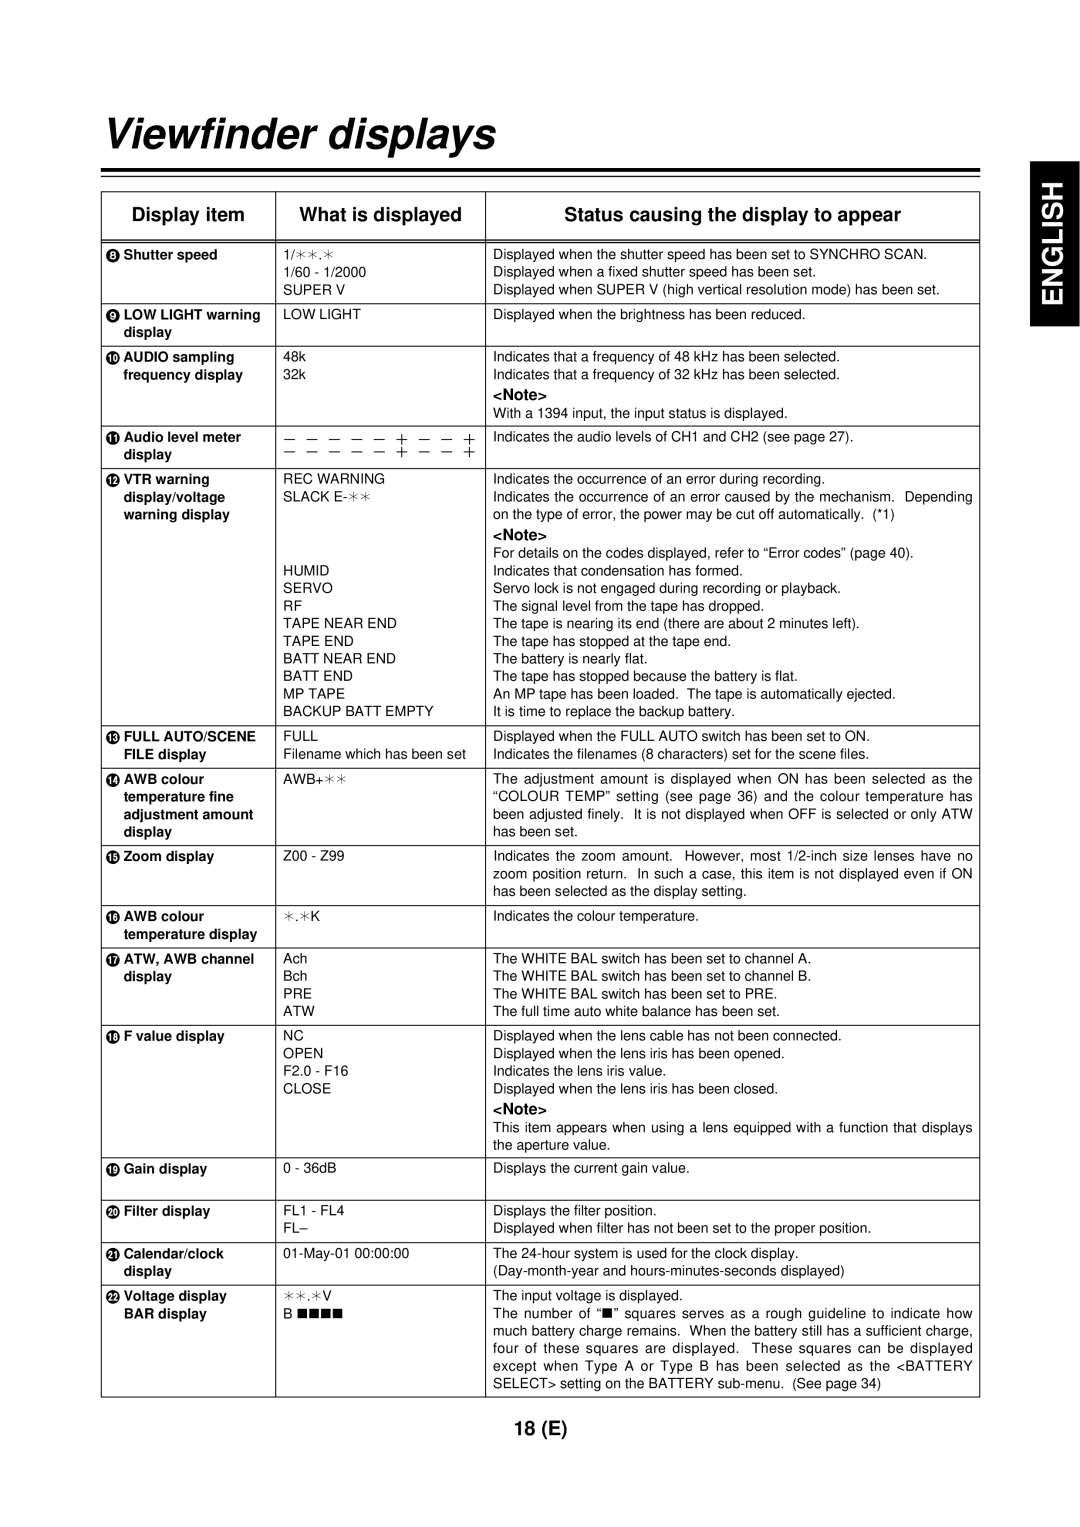
Connection to a video component with a DV connector

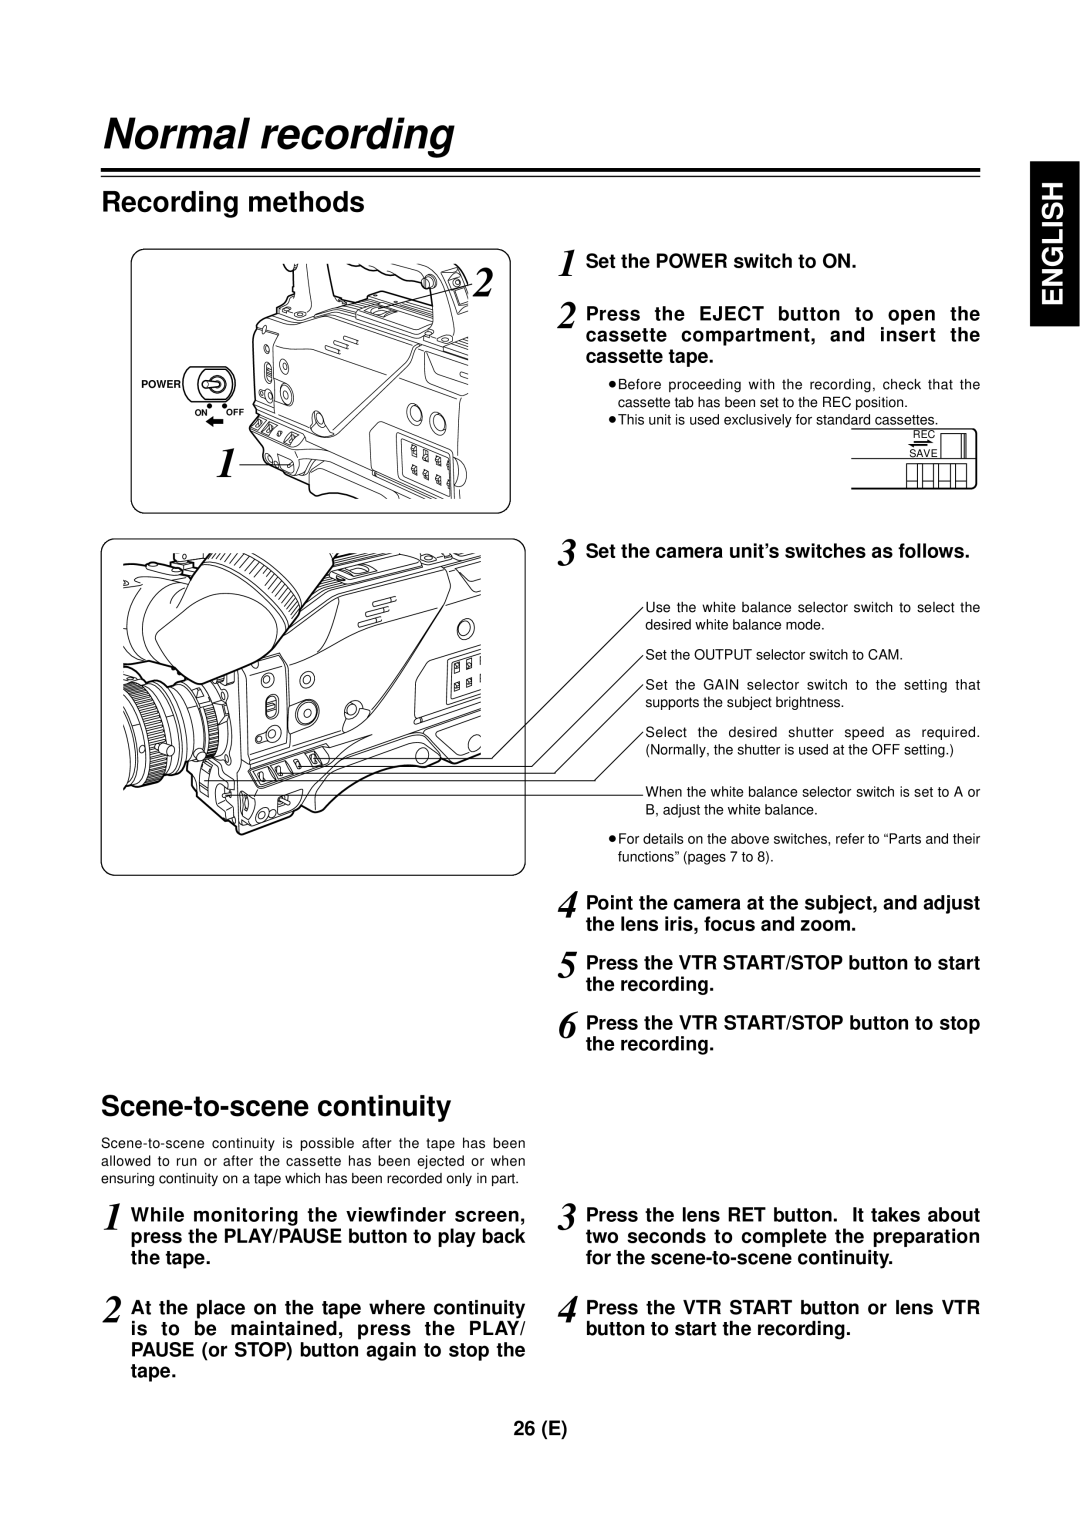
The unit can be used as a player by connecting it to a video component equipped with a DV connector using a DV cable. In either case, refer to the figure below for the connections.

Using the unit as a player

Select 1394 as the REMOTE SELECT setting on the sub-menu VIDEO OUT screen. (See page 34)

The unit can now be controlled from the external video component with the DV connector.

AG-DVC200

Video component with DV connector

To DV connector

DV/IF connector

DV cable

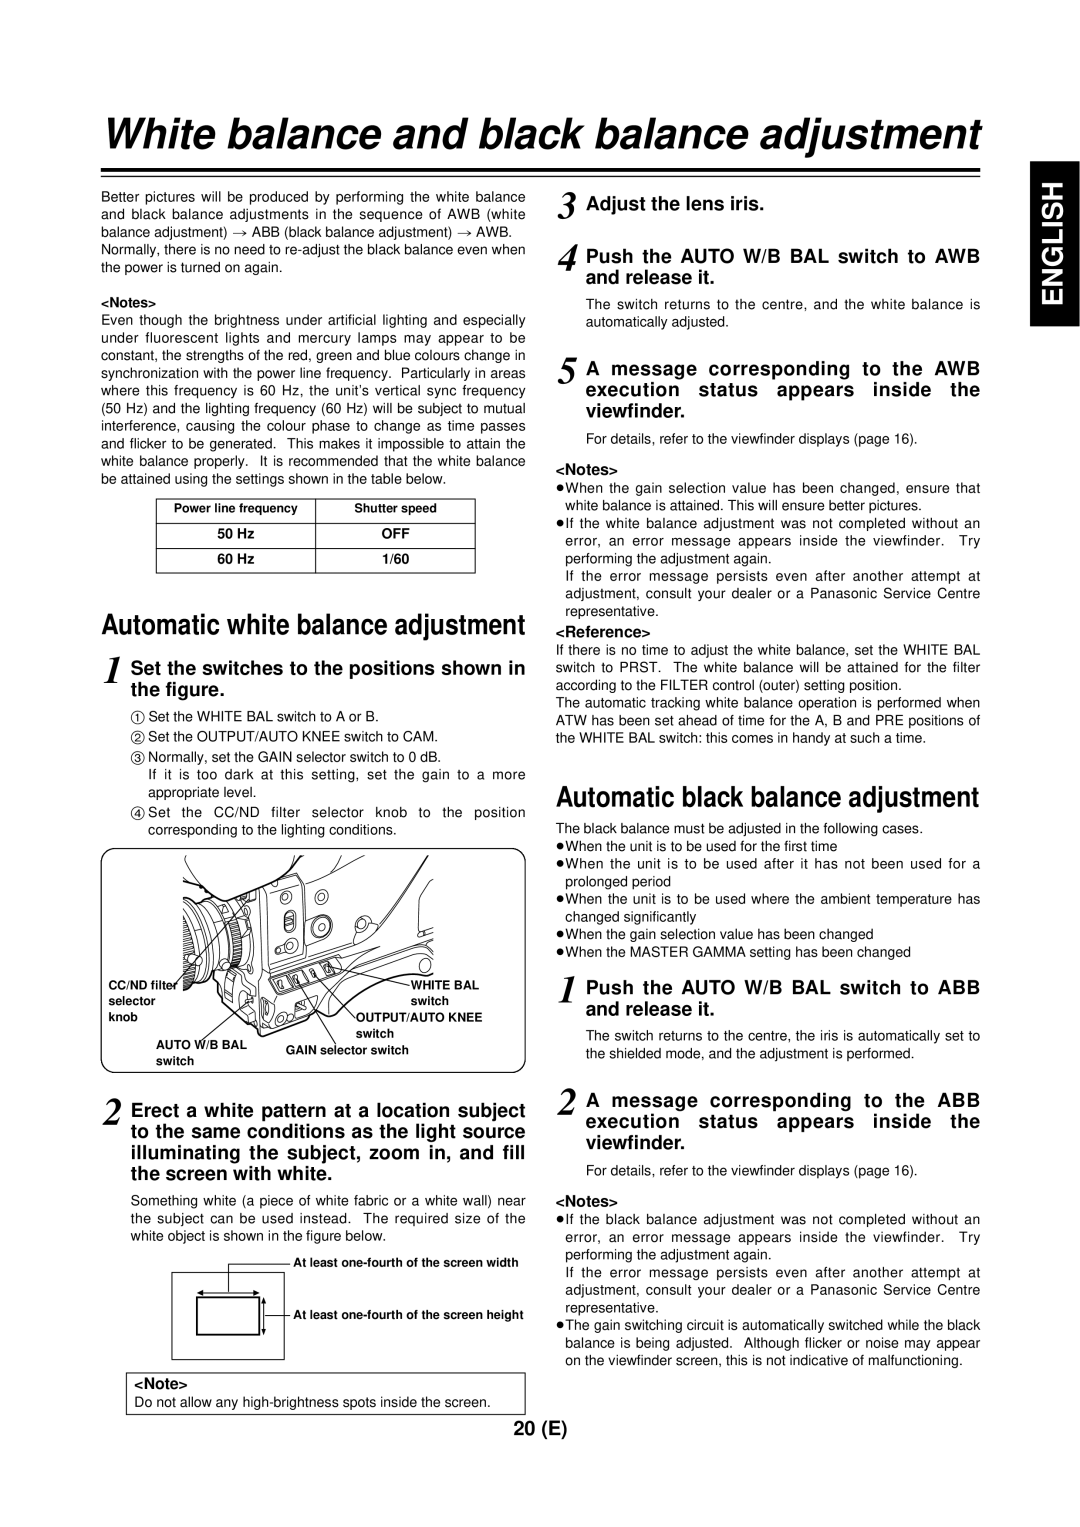
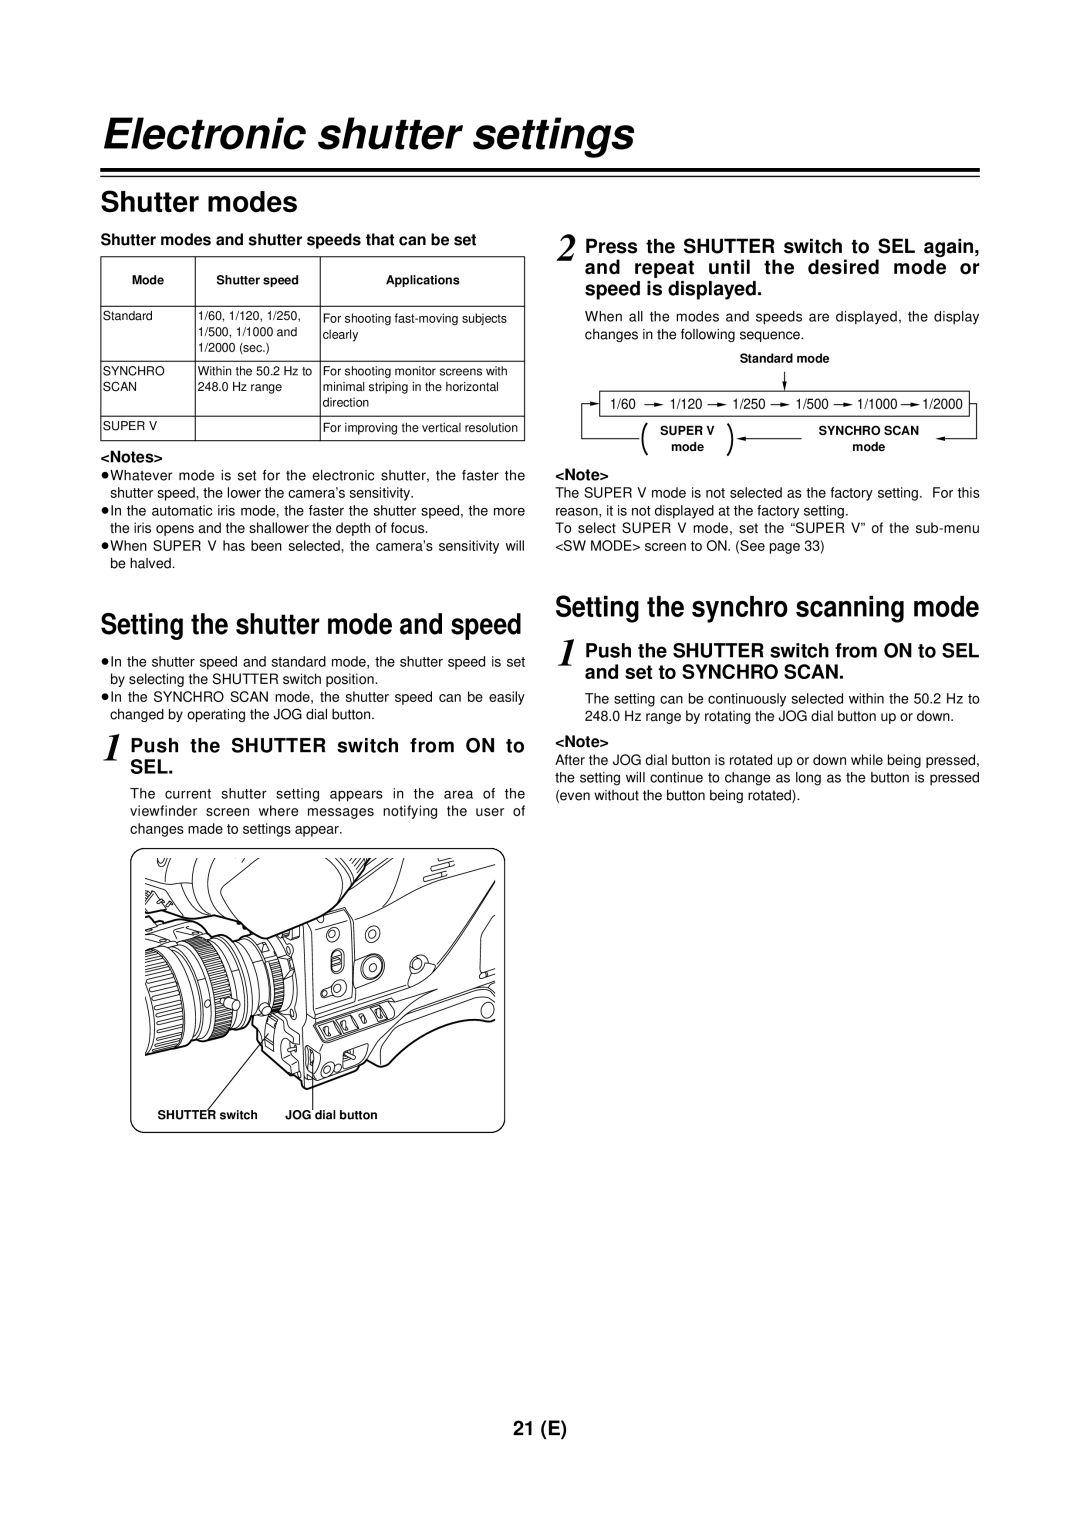
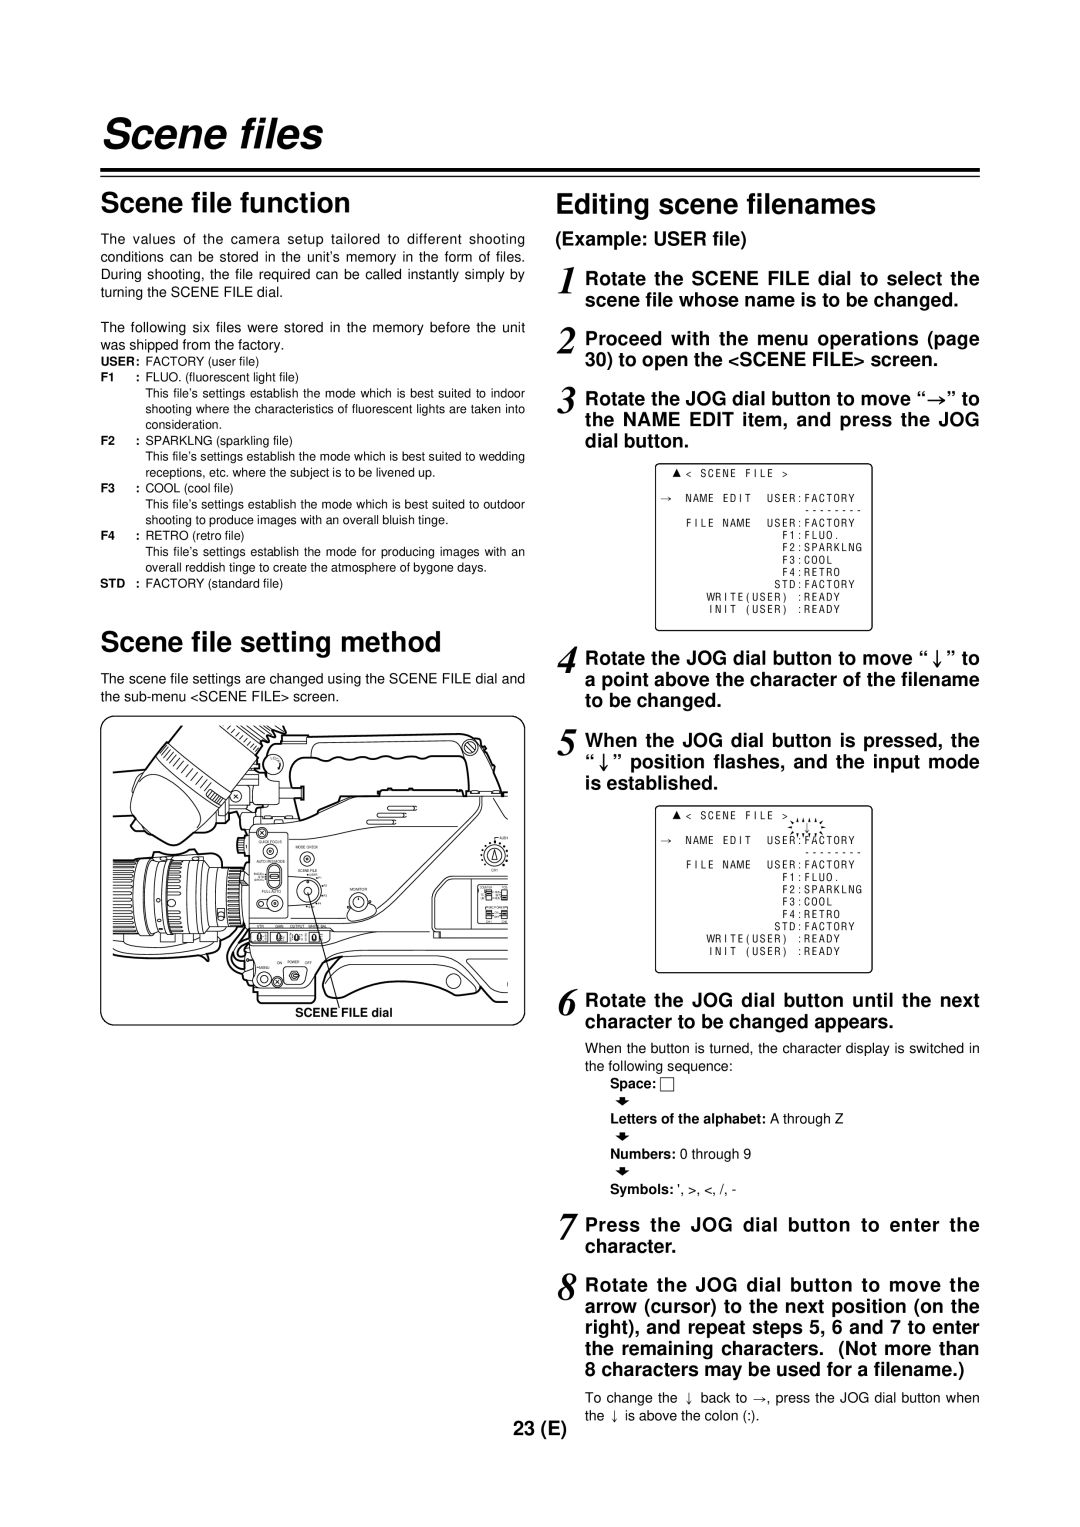
Connection to a PC capable of non-linear editing

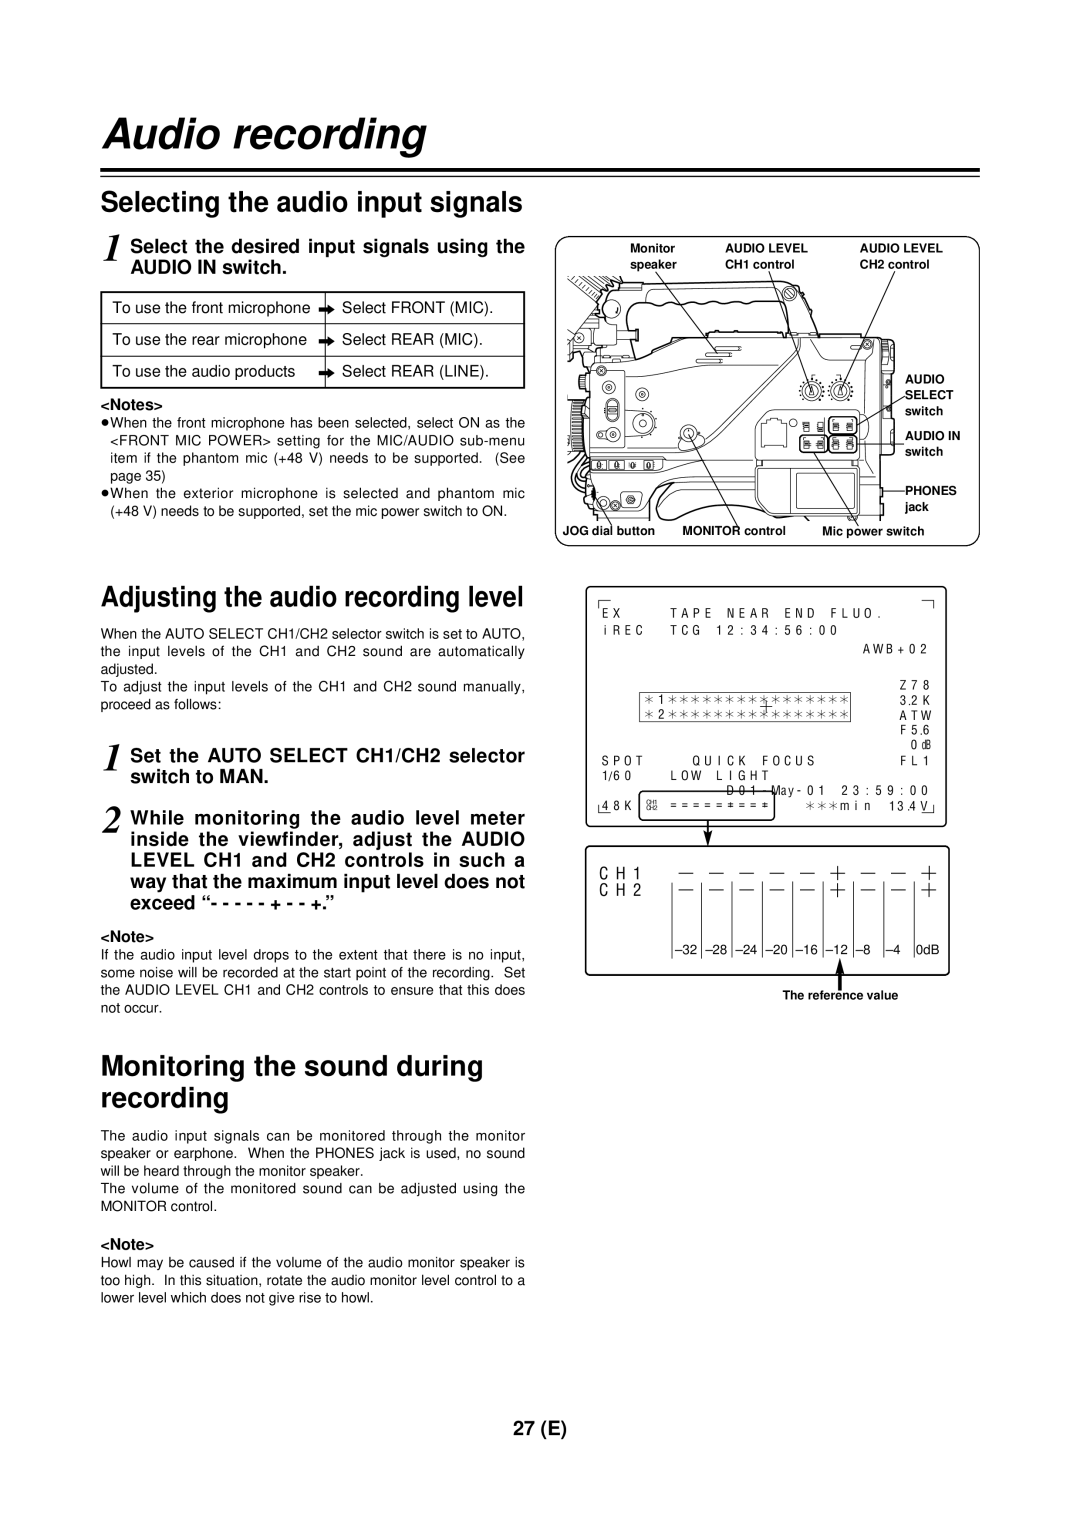
By connecting the unit to a PC capable of non-linear editing using a DV cable, the unit can be controlled from the PC and pictures and sound can be output to the PC.

Select 1394 as the REMOTE SELECT setting on the sub-menu VIDEO OUT screen. Refer to the figure below for the connections. (See page 34)

AG-DVC200

PC


To DV

DV/IF connector

connector


DV cable

<Notes>

When the unit is connected by cable to an exterior device, set the VTR STBY/SAVE switch to STBY to improve response by the unit. Further, as this unit is incapable of 1394 input, preview is not possible with some linear boards.

29 (E)
Image 30 Contents
AG- E Digital Video Camera RecorderPrecautions for Use To remove the battery/Verwijderen van de batterijVaroitus Lithium BatteryVarning Do not Remove Panel Cover by UnscrewingContents Features IntroductionRain cover System configurationCleaning tape Digital Video Camera RecorderParts and their functions Reset button Breaker switchMonitor volume control POWER/WARNING lampShutter switch Auto W/B white/black BAL switchGenlock in connector BNC = Viewfinder connectorTally lamp DV I/F connector complying with Ieee StandardDC OUT DC power supply output socket External DC input socketSet the battery type Remove the battery holderAttach the battery case to the unit PreparationAttachunit. the battery made by Sony to Using a battery pack made by Anton BauerUsing the NP-1B battery pack made by Sony AttachBauer. the battery pack made by AntonRaise the lens lever, and remove the mount cap Proceed with the flange back adjustment for the lensAttaching the lens Pulllens. down the lens lever to secureMicrophone Attaching the shoulder belt optional accessoryMounting the unit on a tripod Attaching the viewfinder Detaching the unit from the tripod attachmentSetting the camera ID Setting the date and timeSpace ∏ Letters of the alphabet a through Z White shading adjustment Lens adjustments and checksFlange back adjustment White shading checkViewfinder displays Viewfinder lamp displaysViewfinder screen status displays Iris Mode switch Switch settingsError result message Extender displayTemperature display ATW, AWB channel Temperature fineAdjustment amount Shutter speedSelecting the viewfinder screen display Push the Auto W/B BAL switch to ABB and release it White balance and black balance adjustmentSet the switches to the positions shown in the figure 50 HzPushSEL. the Shutter switch from on to Electronic shutter settingsSetting the synchro scanning mode Shutter modesSetting the time code Time data settingsSetting the user’s bit Set the TCG switchScene file function Scene file setting methodScene files Editing scene filenamesRotate the JOG dial button to move to the Write item How to use file selectReturning a scene filename to its default Press the Menu button to exit the menu operation List of scene file settings List of file settingsRecording methods Set the camera unit’s switches as followsNormal recording Scene-to-scene continuitySelect the desired input signals using the Audio in switch Selecting the audio input signalsAdjusting the audio recording level Audio recordingOther functions Using the unit as a player Using the unit with external componentsConnection to a video component with a DV connector Connection to a PC capable of non-linear editingUpon completion of the settings, press the Menu button Menu display enable/disableDisplaying sub-menus and deciding on settings Menu operationsSetting menu configuration Main 1/2Main 2/2 Menu contents Process SW ModeMain menu 1 of 2 main menu Additional ProcessVTR Function BatteryVideo OUT VTR OptionLens Shading Main menu 2 of 2 main menuMIC/AUDIO MARKER/ZEBRAVF Display 1/2 VF Display 2/2Genlock DiagnosticLED Camera IDServo SlackREC Warning HumidSet the power to OFF Battery ENDBattery Near END Emergency ejectMaintenance Error codesAudio system SpecificationsVideo system Tape transport systemOutput Optional accessory AJ-VF10Input OtherVQT9278-1 F0401T1051 @