JVC LVT1306-007A manual Connecting the power cord, Digital connection

Page 15

Digital connection

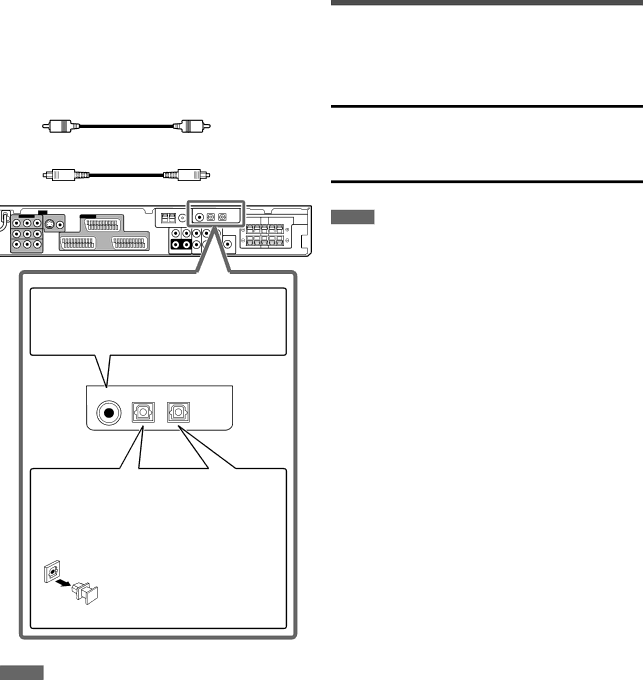
This receiver is equipped with three DIGITAL IN terminals—one digital coaxial terminal and two digital optical terminals.

To reproduce the digital sound, use the digital connection in addition to the analogue connection methods described on pages 7 to 10.

Digital coaxial cable (supplied: 1 cable)

Digital optical cable (not supplied)

When the component has a digital coaxial output terminal, connect it to the 1(DVR/DVD) terminal, using a digital coaxial cable (supplied).

Connecting the power cord

When all the audio/video connections have been made, connect the AC power plug to the wall outlet. Make sure that the plugs are inserted firmly. The standby lamp lights in red.

CAUTIONS:

Do not touch the power cord with wet hands.

Do not alter, twist or pull the power cord, or put anything heavy on it, which may cause fire, electric shock, or other accidents.

If the cord is damaged, consult a dealer and have the power cord replaced with a new one.

NOTES

Keep the power cord away from the connecting cables and the antenna. The power cord may cause noise or screen interference.

The preset settings such as preset channels and sound adjustment may be erased in a few days in the following cases:

When you unplug the power cord.

When a power failure occurs.

1(DVR/DVD) 2(VIDEO)

3(TV)

DIGITAL IN

When the component has a digital optical output terminal, connect it to the 2(VIDEO) or 3(TV) terminal, using a digital optical cable (not supplied).

Before connecting a digital optical cable, unplug the protective plug.

NOTES

When shipped from the factory, the DIGITAL IN terminals have been set for use with the following components:

– 1(DVR/DVD): For DVD recorder or DVD player

– 2(VIDEO):

For the component connected to the VIDEO


IN jacks

– 3(TV):

For TV

If you connect other components, change the digital input (DIGITAL IN) terminal setting correctly. See “Setting the digital input (DIGITAL IN) terminals—DIGITAL IN 1/2/3” on page 24.

Select the digital input mode. See “Selecting the analogue or digital input mode” on page 12.

11

Image 15
Contents LVT1306-007A RX-F31SIf in Doubt Consult a Competent Electrician Important for the U.KRX-F31S Above ALL Table of Contents Remote control TUNING, Tuning 9, MEMORY, FM ModeParts identification Front panel Display windowRear panel Getting started Before InstallationPutting batteries in the remote control Checking the supplied accessoriesFM antenna connection Connecting the FM and AM MW antennasConnecting the powered subwoofer Connecting the speakersSpeaker Layout Diagram Connecting the speakersConnecting video components Scart Terminal SpecificationsScart connection Audio/video connection For an analogue decoderFor T-V Link About DVD Multi Connecting another video component to the Video in jacks Digital connection Connecting the power cordBasic operations Turn on the powerSelecting the analogue or digital input mode To turn off the power into standbyAdjust the volume Selecting the digital decode modeListening with headphones Press TV Direct Adjusting the subwoofer audio positionOFF canceled Activating TV DirectTurning off the sounds temporarily Turning off the power with the Sleep TimerBasic adjustment of auto memory Signal and speaker indicators on the displayBasic settings From the remote control onlyTake your position where you listen to the sound RS LS On the front panel Basic setting itemsOperation through on-screen display menus Menu operation buttonsSetup menu configuration To select the desired submenu, press 5 or ∞ repeatedly Menu operating procedureTo select Setting MENU, press SET Button indications on the screenPress SET Setting the itemsSetting the speakers Setting subwoofer information-SUBWOOFERSetting the virtual surround back speaker Setting the speaker distanceSelecting the main or sub channel Setting the crossover frequency-CROSSOVER Setting bass soundUsing the Midnight mode Setting the low frequency effect attenuatorAuto Mode Manual Setting the Auto Function modeAuto Mode AUTO1 Auto Mode AUTO2Superimposing the menus Selecting the type of the input signalBasic adjustment items Sound adjustmentsTOP Menu 10 0 +10 To select Adjust MENU, press SETAdjusting the items Adjusting speaker output levelLS RS Reinforcing the bass-BASS Boost Adjusting the bass soundsSelecting the subwoofer sound phase Attenuating the input signal-INPUT ATTAdjusting the sound parameters for the Surround/DSP modes Adjusting the effect level for DSP modesMaking the center tone soft or sharp Tuner operations Tuning in to stations manuallyUsing preset tuning To store the preset stationsPress Tuner Preset Selecting the FM reception modeTo tune in a preset station From the remote control Press FM/AM to select the bandFrequency RT Normal indication Using the Radio Data System RDS to receive FM stationsWhat information can RDS signals provide? Press Display while listening to an FM stationPress PTY Search while listening to an FM station To search for a program using the PTY codesSearching for a program by PTY codes PTY codesTest Description of the PTY codesCanceled TA/NEWS/INFO NEWS/INFO News NewsDisplay Dolby Digital Creating realistic sound fieldsReproducing theatre ambience Introducing the Surround modesDTS 3D Headphone modeAbout other digital signals Dolby SurroundHALL2 Introducing the DSP modesDigital Acoustic Processor DAP modes HALL1All Channel Stereo mode ALL CH ST This mode cannot be used for multi-channel digital signalsActivating the Surround/DSP modes Surround modes Turn Multi JOG to select the Surround/DSP mode you wantTo cancel Surround/DSP modes Select and play any source other than DVD MultiHow does Auto Surr work? Channel + Operating other JVC productsDVD recorder or DVD player VCRTOP MENU/MENU Changing the remote control code for DVD recorderRelease DVR/DVD DVR/DVDTry to operate your TV by pressing TV Changing the transmittable signals for operating a TVOperating other manufacturers’ products Release TVManufacturers’ codes for VCR Changing the transmittable signals for operating a VCRRelease VCR Try to operate your VCR by pressing VCRManufacturers’ codes for STB Changing the transmittable signals for operating an STBRelease STB Try to operate your STB by pressing STBTroubleshooting Power Sound and picture Remote control TunerProblem Possible Cause Solution AM MW tuner SpecificationsAmplifier FM tuner IHF0405RYMMDWJEIN