Sanyo LNS-W10 Choosing a location for the base unit and handset cradle, Connecting the base unit

Page 6

GETTING STARTED

Choosing a location for the base unit and handset cradle

The base unit records and displays the indoor temperature, when selecting a location, observe the following guidelines:

∙ Choose a location that provides easy access to a 120-volt AC power source.

∙ Choose a location that will allow the telephone cable to reach a telephone jack. You can use an extension jack or cable if necessary.

∙ Place the base unit as high as possible to get a better radio frequency range with the handset. You may need to try several locations – such as upstairs, or near a first-floor landing – to find the best range. Solid structures such as walls and doors may reduce the signal strength.

∙ Do not place the base unit near a sink, bathtub, or shower.

∙ Do not place the base unit near objects that may cause radio interference, such as another telephone, large metal objects such a mirror or filing cabinet, or electrical appliances such as an electric stove, washing machine, microwave oven, television, and fluorescent lights.

∙ Do not place the unit near heat sources such as radiators or air ducts, or in a place subject to direct sunlight.

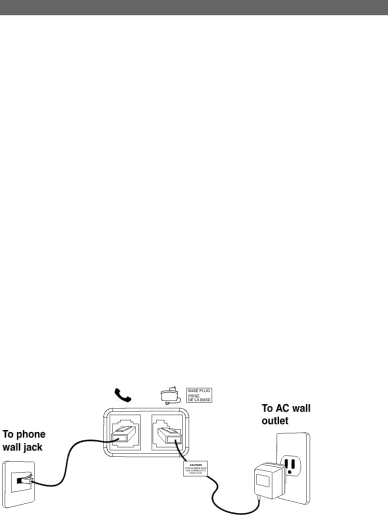
Connecting the base unit

1.Plug the AC adaptor into the power jack at the back of the base. Plug the other end into an electrical outlet.

2.Plug the telephone line cord into the tel. line jack at the back of the base. Plug the other end into a modular phone jack.

Note: Two adapters are shipped with this product. Please check the label on the adapter to make sure you are using the right one.

6

Image 6
Contents GHz Sanyo Canada IncTable of Contents Causes of Poor Reception ...………………..……………………30 Introduction Main Features GHz TechnologyOther features Compander Plus Noise ReductionChecking package contents Getting StartedModular jack Connecting the base unit Choosing a location for the base unit and handset cradleConnecting the handset cradle Batteries Charging the handset batteries Names and Controls HandsetBase unit Language Dial modeInitial Programming Handset nameKey tone Flash timeKey lock Handset ring toneAuto answer on / off Handset ring volume levelEarpiece volume level Tip To return to standby mode, pressClear message waiting Standby modeBasics Receiving a callReturning missed calls Correcting a dialing errorMaking a call Talk keyMute key C Low battery warningVoice mail indicator Handset locator page keyCaller ID list Caller ID FeaturesCaller ID with Call Waiting Reviewing Caller ID listStoring a name / number in the directory DirectoryDeleting entries from the Caller ID list Deleting the displayed entryKey Key of times pressed TipChanging a stored entry Making calls from the directoryDeleting an entry Storing caller ID entries in the directoryIdentifying a handset on the network MULTI-HANDSET ConfigurationRegistering a handset Intercom internal callIntercom ring tone Call togglingTransferring call between handsets Way conference callCall Waiting INT forCall back Changing the Handset BatteryBattery replacement and handling Display. Another party can answer the call by pressingHeadset Jack and Belt Clip Replacing the batteryRecycling NICKEL-METAL Hydride Batteries Headset connection headset not includedPower Failure LCD Screen MessagesLight Signals CHARGE/IN USE LED on the baseNo dial tone Sound SignalsTroubleshooting Dial tone is OK, but cannot dial outKeys do not work Handset does not ringCall was disconnected Phone beepsCannot register handset Cannot dial outNo Caller ID display Maintenance Maximize Battery PerformanceCaller ID error message Refresh battery Charge the battery for a full 15 continuous hoursKeep the contacts clean Do not replace the handset in the base after each callTechnical Information REN NumberSanyo Comfort Warranty Warranty ApplicationWhat is not Covered SOS Help Line Nationwide Customer Support