JVC MX-WMD90 Programming the Playing Order of the Tracks Program Play, To go to another track

Page 20

English

To locate a particular point in a track during play

On the unit:

Rotate the left jog dial.

Counterclockwise (1): Fast reverses the tacks.

Clockwise (`) :

Fast forwards the tracks.

On the remote control:

Press and hold 41or ¢`.

1: Fast reverses the tracks.

`: Fast forwards the tracks.

To go to another track

On the unit:

Rotate the right jog dial.

Counterclockwise (4): Goes back to the beginning of the current or previous tracks.

Clockwise (¢) : Skips to the beginning of the next or succeeding tracks.

On the remote control:

Press 41or ¢`repeatedly.

4: Goes back to the beginning of the current or previous tracks.

¢: Skips to the beginning of the next or succeeding tracks.

To go to another track directly using the number buttons

Pressing the number button(s) allows you to start playing the track number you want.

Ex.: For track number 5, press 5.

For track number 15, press +10, then 5. For track number 20, press +10, then 10.

For track number 32, press +10, +10, +10, then 2.

Programming the Playing Order of the Tracks — Program Play

You can arrange the order in which the tracks play before you start playing. You can program up to 32 tracks.

1 Load CDs.

If the current playing source is not the CD player, press #/ 8 on the CD player (or CD 6on the remote control), then 7 on the CD player (or 7on the remote control) before going to the next step.

2 Press PLAY MODE so that “ CD PROGRAM” appears in the main display.

Each time you press the button, play mode changes as follows:

CD PROGRAMCD RANDOM

Canceled (Continuous play)

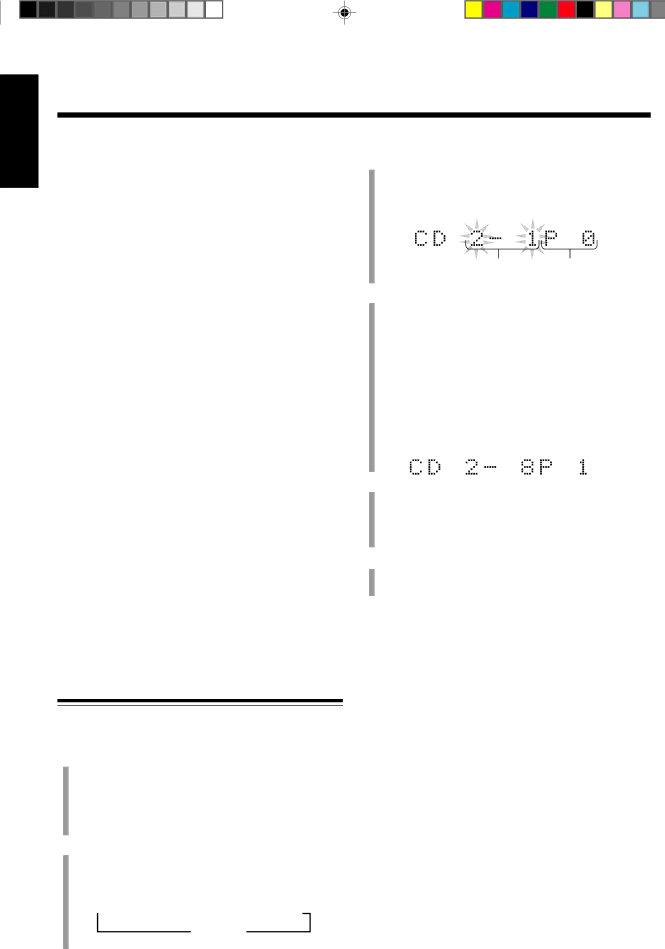
3 Press one of the CD number buttons (CD 1, CD 2, and CD 3) to select the CD number you want to play.

Ex. Disc No. 2 is selected

Disc No. and Track No. Step No.

4 Select the track from the CD selected in the above step.

On the unit:

Rotate the right jog dial to select the track number, then press SET.

On the remote control: Press the number buttons.

For how to use the number buttons, see “To go to another track directly using the number buttons” to the left.

Ex. Track No. 8 is selected

5 Program other tracks you want.

To program tracks from the same disc, repeat step 4.

To program tracks from a different disc, repeat steps 3 and 4.

6 Press #/ 8 on the CD player (or CD 6on the remote control).

The tracks are played in the order you have programed.

To stop during play, press 7on the CD player.

To exit from program play mode, press PLAY MODE once or twice, before or after play, so that the unit enters another playback mode (Random play or Continuous play mode).

To check the program contents

Before playing, you can check the program contents by pressing 41or ¢` on the remote control.

¢`: Shows the programed tracks in the programed order.

41: Shows them in the reverse order.

To modify the program

Before playing, you can erase the last programed track by pressing CANCEL. Each time you press the button, the last programed track is erased from the program.

When you eject a disc, the tracks selected from that ejected disc are erased from the program.

To add tracks in the program before you start play,

simply select track numbers you want to add.

– 17 –

Image 20
Contents MX-WMD90 Mises en garde, précautions et indications diverses For Canada/pour le Canada FacePrecautions IntroductionContents Location of the Buttons and Controls Front PanelDisplay Window Become familiar with the buttons and controls on your unitFront Panel Amplifier/tuner sectionMD deck a section MD deck B sectionRemote Control Remote ControlPutting the Batteries into the Remote Control Connecting AntennasGetting Started UnpackingConnecting Speakers You can connect the speakers using the speaker cordsAM antenna To connect an outdoor AM antennaConnecting Other Equipment To connect a cassette deckOutput terminal To start the display demonstration manuallyEquipment Finally Press DemoFront panel Remote control Basic and Common OperationsSetting the Clock Turning On the Power and Selecting the SourcesAdjusting the Volume To adjust the clock againCreating Your Own Sound Mode Manual Mode To use your own sound modeReinforcing the Bass Sound Activating the Surround EffectListening to FM and AM Broadcasts Tuning in a Station Presetting StationsTuning in a Preset Station To change the FM reception modePlaying Back CDs Loading CDs Playing Back the Entire Discs Continuous PlayBasic CD Operations To exchange CDs during playback of anotherTo go to another track directly using the number buttons To check the program contentsProgramming the Playing Order of the Tracks Program Play To go to another trackPlaying at Random Random Play Repeating Tracks or CDs Repeat PlayProhibiting Disc Ejection Disc Lock Tracks of all loaded CDs will play at randomPlaying Back MDs When using MD deck a When using MD deck BLoading MDs Playing Back the Entire MD Continuous PlayWhile playing an MD, you can do the following operations Basic MD OperationsTo change the display Indications Insert an MD Programming the Playing OrderTracks Program Play Press #/ 8 on MD deck B or MD B 6 on the remote control Insert MDsTracks of the loaded MDs will play at random Repeating Tracks Repeat PlayTo prohibit disc ejection Disc Lock Recording on MDs FM/AM Tape AUXBefore You Start Recording About the track marksTo avoid erasing important recordings Recording is only possible on MD deck BWhen recording from the cassette deck, start playing a tape Recording the External AUX Equipment AUX RecordingTo check the remaining time Press AUX againVarious Recording Functions Synchronized RecordingMD to MD Synchronized Recording Start playing the source on the external equipmentTo confirm the recording contents CD to MD Synchronized RecordingPress Start Enter On the unit only Load a CDSingle Track Recording First Track RecordingOn the unit only Load CDs Rotate the left jog dial to select the recordable MDListening Edit Recording On the unit only Prepare a CD or an MD as the source soundRepeat to program other tracks To stop any time during editing process and startTriple Recording Long Recording Prepare the source you want to record fromEditing MDs Introducing MD Editing Functions To join the divided tracks again, see the Join function Divide FunctionPress MD Edit Join Function Move FunctionTo divide the joined tracks, see the Divide function Rotate the right jog dial until Move ? appears Press SETCANCEL, then select the correct track number again Erase FunctionEdit MD deck B starts playing the MDALL Erase Function Assigning Titles to MDs Assigning a Title Using the Unit Changing the Title Press Enter Start to finish the current title entryYou can make a correction or change the title Make sure that the character you want to change is flashingTrack title entry indication mode appears when Press MD Title InputPress the button for the next character you want to input Press Enter to finish the current title entryYou can assign titles during play or recording Using the Timers PO WERUsing Recording Timer How Recording Timer actually worksTo turn on or off Recording Timer after its setting is done To turn on the Recording Timer, press SETUsing Daily Timer How Daily Timer actually worksVolume level will be set the previous level when Unit is turned offHow Sleep Timer actually works Timer PriorityUsing Sleep Timer Maintenance To clean the CDGeneral Notes Handling CDsUtoc User Table Of Contents Additional InformationMD Disc Types Atrac Adaptive TRansform Acoustic CodingSound Skip Guard Memory MD limitationsTroubleshooting Symptom Possible Cause ActionSignification Solution MD MessagesSpecifications EN, FR JVC 0199KSMMDWJEM