JVC MX-WMD90 manual Assigning Titles to MDs

Page 43

Assigning Titles to MDs

Continued

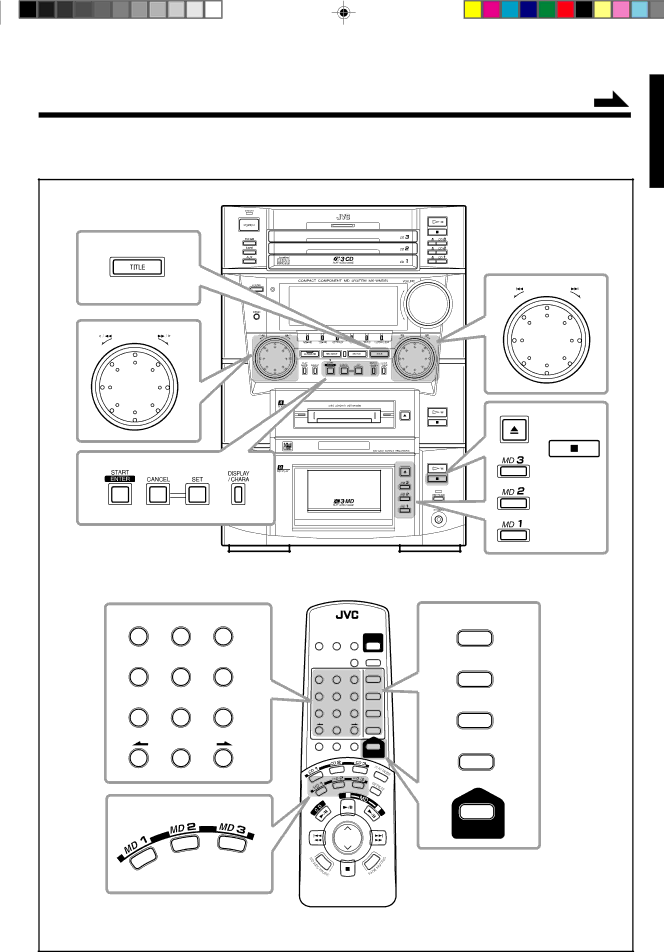
The buttons and controls enlarged in the illustration below are used and explained in this section (pages 41 to 44).

Front panel


+


MD


MD


Remote control


MARK

ABC

DEF


DISPLAY

REMOTE CONTROL RM-SEWMD90U

/CHARA

1

2

3


ACTIVE

POWER


SURROUND SOUND

BASS EX.


GHI

JKL

MNO


FM MODE

SLEEP


SET


DISPLAY

4

5

6

MARK

ABC

DEF


/CHARA


1

2

3


GHI

JKL

MNO

SET


PQRS

TUV

WXYZ

4

5

6


CANCEL

PQRS

TUV

WXYZ

CANCEL

7

8

9

7

8

9


ENTER


10

0

+10


ENTER

10

0

+10

FM/AM TAPE

AUX

MD TITLE


INPUT


A


MD TITLE


VOLUME


INPUT


– 40 –


English

Image 43
Contents MX-WMD90 Mises en garde, précautions et indications diverses Face For Canada/pour le CanadaIntroduction PrecautionsContents Become familiar with the buttons and controls on your unit Location of the Buttons and ControlsFront Panel Display WindowMD deck B section Front PanelAmplifier/tuner section MD deck a sectionRemote Control Remote ControlUnpacking Putting the Batteries into the Remote ControlConnecting Antennas Getting StartedTo connect an outdoor AM antenna Connecting SpeakersYou can connect the speakers using the speaker cords AM antennaTo connect a cassette deck Connecting Other EquipmentPress Demo Output terminalTo start the display demonstration manually Equipment FinallyBasic and Common Operations Front panel Remote controlTo adjust the clock again Setting the ClockTurning On the Power and Selecting the Sources Adjusting the VolumeActivating the Surround Effect Creating Your Own Sound Mode Manual ModeTo use your own sound mode Reinforcing the Bass SoundListening to FM and AM Broadcasts To change the FM reception mode Tuning in a StationPresetting Stations Tuning in a Preset StationPlaying Back CDs To exchange CDs during playback of another Loading CDsPlaying Back the Entire Discs Continuous Play Basic CD OperationsTo go to another track To go to another track directly using the number buttonsTo check the program contents Programming the Playing Order of the Tracks Program PlayTracks of all loaded CDs will play at random Playing at Random Random PlayRepeating Tracks or CDs Repeat Play Prohibiting Disc Ejection Disc LockPlaying Back MDs Playing Back the Entire MD Continuous Play When using MD deck aWhen using MD deck B Loading MDsTo change the display Indications Basic MD OperationsWhile playing an MD, you can do the following operations Tracks Program Play Programming the Playing OrderInsert an MD Insert MDs Press #/ 8 on MD deck B or MD B 6 on the remote controlTo prohibit disc ejection Disc Lock Repeating Tracks Repeat PlayTracks of the loaded MDs will play at random FM/AM Tape AUX Recording on MDsRecording is only possible on MD deck B Before You Start RecordingAbout the track marks To avoid erasing important recordingsPress AUX again When recording from the cassette deck, start playing a tapeRecording the External AUX Equipment AUX Recording To check the remaining timeStart playing the source on the external equipment Various Recording FunctionsSynchronized Recording MD to MD Synchronized RecordingOn the unit only Load a CD To confirm the recording contentsCD to MD Synchronized Recording Press Start EnterRotate the left jog dial to select the recordable MD Single Track RecordingFirst Track Recording On the unit only Load CDsTo stop any time during editing process and start Listening Edit RecordingOn the unit only Prepare a CD or an MD as the source sound Repeat to program other tracksTriple Recording Prepare the source you want to record from Long RecordingEditing MDs Introducing MD Editing Functions Press MD Edit Divide FunctionTo join the divided tracks again, see the Join function Rotate the right jog dial until Move ? appears Press SET Join FunctionMove Function To divide the joined tracks, see the Divide functionMD deck B starts playing the MD CANCEL, then select the correct track number againErase Function EditALL Erase Function Assigning Titles to MDs Assigning a Title Using the Unit Make sure that the character you want to change is flashing Changing the TitlePress Enter Start to finish the current title entry You can make a correction or change the titlePress Enter to finish the current title entry Track title entry indication mode appears whenPress MD Title Input Press the button for the next character you want to inputYou can assign titles during play or recording PO WER Using the TimersTo turn on the Recording Timer, press SET Using Recording TimerHow Recording Timer actually works To turn on or off Recording Timer after its setting is doneUnit is turned off Using Daily TimerHow Daily Timer actually works Volume level will be set the previous level whenUsing Sleep Timer Timer PriorityHow Sleep Timer actually works Handling CDs MaintenanceTo clean the CD General NotesAtrac Adaptive TRansform Acoustic Coding Utoc User Table Of ContentsAdditional Information MD Disc TypesMD limitations Sound Skip Guard MemorySymptom Possible Cause Action TroubleshootingMD Messages Signification SolutionSpecifications EN, FR JVC 0199KSMMDWJEM