JVC MX-WMD90 manual CD to MD Synchronized Recording, Press Start Enter, On the unit only Load a CD

Page 32

English

6 Press START (ENTER).

Recording starts, and the following information appears in the main display.

Remaining time of

Remaining time

the source track

on the MD

When recording is over, both MD decks stop.

When you record on a blank MD, the disc title of the source MD is automatically recorded (up to 64 characters).

A blank portion will be automatically created before each newly recorded track.

To stop recording, press 7either for MD deck A or B.

To remove the MDs, press 0 for MD deck A and for MD deck B.

To confirm the recording contents

Press DISPLAY/CHARA while recording.

The following information will appear on the display for a while.

Track No. of the source MD

Track No. of the current recording on the other MD

CD to MD Synchronized Recording

You can play back a CD and record it onto an MD in MD deck B.

Before you start recording in the following steps, you can —

cancel the setting, press REC MODE.

go back to the previous steps, press CANCEL.

On the unit ONLY:

1 Load a CD.

• You can make a program if you want (see page 17).

2 Insert a blank or recordable MD into the MD B loading slot.

3 Press REC MODE.

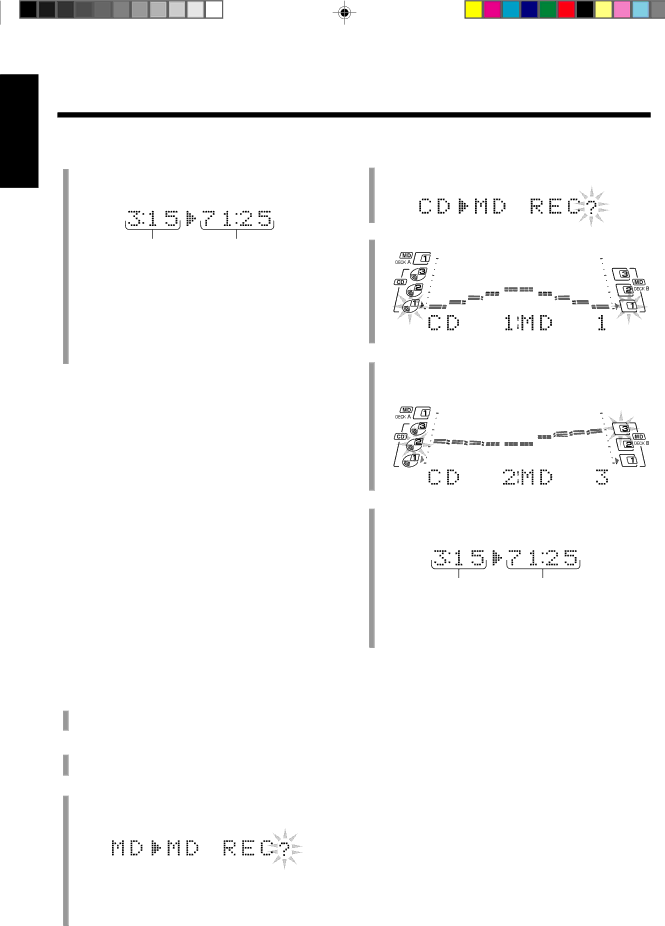
“MD 3MD REC?” appears in the main display. The MD 3MD lamp also lights.

To cancel the setting, press REC MODE again in the following steps 4 and 6. Each time you press the button, recording mode turns on and off alternately.

4 Rotate the left jog dial until “CD 3MD REC?” appears in the main display.

5 Press SET.

6 Rotate the left jog dial to select the source CD and the recordable MD.

Ex. CD 2 and MD 3 are selected

7 Press START (ENTER).

Recording starts, and the following information appears in the main display.

Remaining time of

Remaining time

the source track

on the MD

When recording is over, both MD deck B and CD player stop.

To stop recording, press 7either for CD player or MD deck B.

To remove the CD, press 0for the corresponding CD number.

• If you eject the CD currently playing, recording stops.

To remove the MD, press 0for MD deck B.

If you press the button while recording, the loading slot cover does not open.

To confirm the recording contents

Press DISPLAY/CHARA while recording.

The following information will appear on the display for a while.

Track No. of the source CD

Track No. of the current recording on the MD

– 29 –

Image 32
Contents MX-WMD90 Mises en garde, précautions et indications diverses For Canada/pour le Canada FacePrecautions IntroductionContents Location of the Buttons and Controls Front PanelDisplay Window Become familiar with the buttons and controls on your unitFront Panel Amplifier/tuner sectionMD deck a section MD deck B sectionRemote Control Remote ControlPutting the Batteries into the Remote Control Connecting AntennasGetting Started UnpackingConnecting Speakers You can connect the speakers using the speaker cordsAM antenna To connect an outdoor AM antennaConnecting Other Equipment To connect a cassette deckOutput terminal To start the display demonstration manuallyEquipment Finally Press DemoFront panel Remote control Basic and Common OperationsSetting the Clock Turning On the Power and Selecting the SourcesAdjusting the Volume To adjust the clock againCreating Your Own Sound Mode Manual Mode To use your own sound modeReinforcing the Bass Sound Activating the Surround EffectListening to FM and AM Broadcasts Tuning in a Station Presetting StationsTuning in a Preset Station To change the FM reception modePlaying Back CDs Loading CDs Playing Back the Entire Discs Continuous PlayBasic CD Operations To exchange CDs during playback of anotherTo go to another track directly using the number buttons To check the program contentsProgramming the Playing Order of the Tracks Program Play To go to another trackPlaying at Random Random Play Repeating Tracks or CDs Repeat PlayProhibiting Disc Ejection Disc Lock Tracks of all loaded CDs will play at randomPlaying Back MDs When using MD deck a When using MD deck BLoading MDs Playing Back the Entire MD Continuous PlayWhile playing an MD, you can do the following operations Basic MD OperationsTo change the display Indications Insert an MD Programming the Playing OrderTracks Program Play Press #/ 8 on MD deck B or MD B 6 on the remote control Insert MDsTracks of the loaded MDs will play at random Repeating Tracks Repeat PlayTo prohibit disc ejection Disc Lock Recording on MDs FM/AM Tape AUXBefore You Start Recording About the track marksTo avoid erasing important recordings Recording is only possible on MD deck BWhen recording from the cassette deck, start playing a tape Recording the External AUX Equipment AUX RecordingTo check the remaining time Press AUX againVarious Recording Functions Synchronized RecordingMD to MD Synchronized Recording Start playing the source on the external equipmentTo confirm the recording contents CD to MD Synchronized RecordingPress Start Enter On the unit only Load a CDSingle Track Recording First Track RecordingOn the unit only Load CDs Rotate the left jog dial to select the recordable MDListening Edit Recording On the unit only Prepare a CD or an MD as the source soundRepeat to program other tracks To stop any time during editing process and startTriple Recording Long Recording Prepare the source you want to record fromEditing MDs Introducing MD Editing Functions To join the divided tracks again, see the Join function Divide FunctionPress MD Edit Join Function Move FunctionTo divide the joined tracks, see the Divide function Rotate the right jog dial until Move ? appears Press SETCANCEL, then select the correct track number again Erase FunctionEdit MD deck B starts playing the MDALL Erase Function Assigning Titles to MDs Assigning a Title Using the Unit Changing the Title Press Enter Start to finish the current title entryYou can make a correction or change the title Make sure that the character you want to change is flashingTrack title entry indication mode appears when Press MD Title InputPress the button for the next character you want to input Press Enter to finish the current title entryYou can assign titles during play or recording Using the Timers PO WERUsing Recording Timer How Recording Timer actually worksTo turn on or off Recording Timer after its setting is done To turn on the Recording Timer, press SETUsing Daily Timer How Daily Timer actually worksVolume level will be set the previous level when Unit is turned offHow Sleep Timer actually works Timer PriorityUsing Sleep Timer Maintenance To clean the CDGeneral Notes Handling CDsUtoc User Table Of Contents Additional InformationMD Disc Types Atrac Adaptive TRansform Acoustic CodingSound Skip Guard Memory MD limitationsTroubleshooting Symptom Possible Cause ActionSignification Solution MD MessagesSpecifications EN, FR JVC 0199KSMMDWJEM