DeWalt 14-65l instruction manual Assembly Tools Required, Assembly Time Estimate

Page 7

ASSEMBLY

For your own safety, do not connect the machine to the power source until the machine is completely assembled and you read and understand the entire instruction manual.

ASSEMBLY TOOLS REQUIRED

Chuck Key/Wrench (Supplied)

ASSEMBLY TIME ESTIMATE

Assembly for this machine takes less than 30 minutes.

RAISING AND LOWERING THE HANDLE

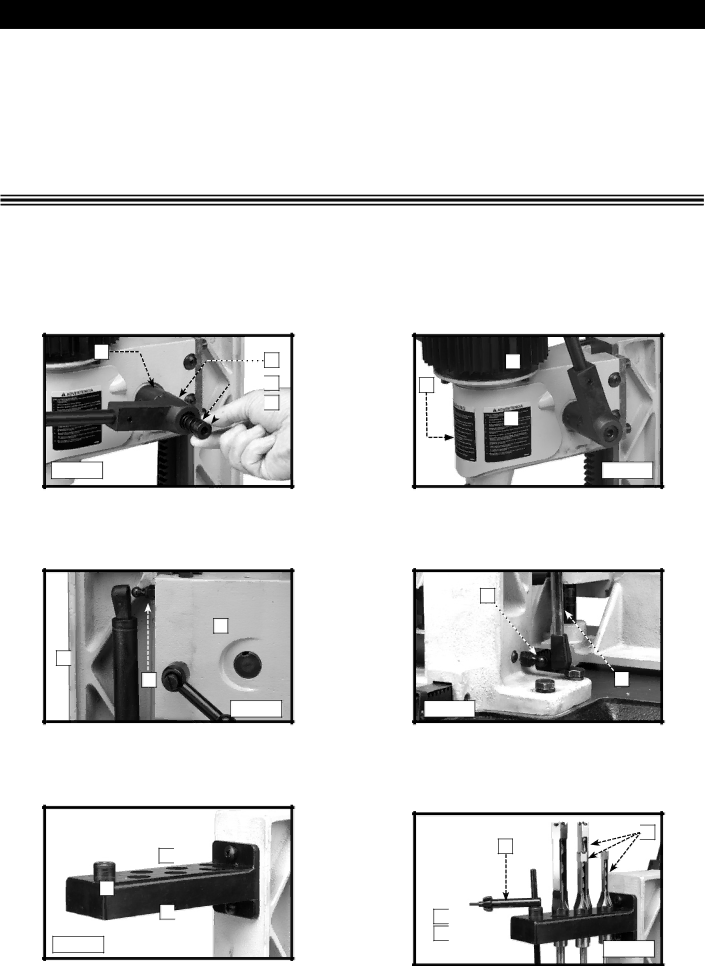
1.Attach the hub of the handle assembly (A) Fig. 1 to the end of the pinion shaft (B). Fasten the handle to the pinion shaft using the special screw (C) and spring (D).

2.Raise the mortising machine head (E) Fig. 2 to the "up" position by turning the handle (A) clockwise.

NOTE: The handle (A) is spring-loaded. Reposition it by pulling it out and moving it on pinion shaft (B).

B

A

D

C

Fig. 1

A

E

B

Fig. 2

ATTACHING THE HYDRAULIC CYLINDER

Place the head (A) Fig. 3 in the “up” position. Attach the hydraulic cylinder (B) to the two fittings, one located on the back of the head (C) Fig. 3, and the other on the column (D) Fig. 4. Push each end of the hydraulic cylinder on its fitting to secure the cylinder.

A

B

C

Fig. 3

D

B

Fig. 4

ATTACHING THE TOOL AND CHISEL HOLDER

1.Attach the tool and chisel holder (A) Fig. 5 to the back of the column, using the two M6x1x25mm screws (B) and M6 lockwashers.

2.Fig. 6 illustrates the stored chuck key/wrench (C), bushing (F) for use with extra long chisels, and chisels and bits (E).

B

A

B

Fig. 5

E

C

F

A

Fig. 6

7 - English

Image 7
Contents 14-651 Important Safety Instructions Table of ContentsSafety Guidelines Definitions Stay ALERT, Watch What YOU are DOING, and USE General Safety Rules Grounding Instructions Additional Specific Safety Rules Power Connections Motor SpecificationsMinimum Gauge Extension Cord Extension CordsFunctional Description Carton ContentsAssembly Tools Required AssemblyAssembly Time Estimate Attaching the Chisel and BIT Fastening the Machine to a Supporting SurfaceAttaching the Column Extension Operation Locking Switch in the OFF PositionAdjusting the Depth Stop ROD Adjusting the FenceAdjusting the Chisel Parallel to the Workpiece Adjusting the HOLD-DOWNAdjusting the Sliding FIT Between the Head and the Column Keep Machine Clean Troubleshooting MaintenanceLubrication & Rust Protection Free Warning Label Replacement ServiceAccessories Replacement PartsTwo Year Limited New Product Warranty WarrantyMesures DE Sécurité Définitions LES Instructions Importantes DE SureteLA Proposition DE Californie Lutilisation DE CET Outil Règles DE Sécurité GénéralesInstructions DE Mise À LA Terre Règles Spécifiques Additionnelles DE SûretéRaccordements Électriques Spécifications DU MoteurMesur Minimum DE Corde D’EXTENSION Cordon DE RallongeDésemballage ET Nettoyage Description FonctionnelleContenus DE Boite AVANT-PROPOSOutils Nécessaires Pour L’ASSEMBLEE AssemblageLestimation DE Temps Dassemblee Fixation DE LA Machine SUR UNE Surface DE Support Installation DU Bédane ET DE LA MècheInstallation DE LA Rallonge DE Colonne Réglage DE LA Tige DE Limitation DE LA Profondeur FonctionnementDémarrage ET Arrêt DE Machine Verrouillage DE L’INTERRUPTEUR EN Position D’ARRÊTRéglage DU Parallélisme DU Bédane À LA Pièce DE Bois Réglage DE LA Pièce DE RetenueRotation DE LA Colonne SUR 180 Degrés Pièces DE Rechange Depannage EntretienDémarrage Impossible Lubrification ET Protection Contre LA RouilleEntretien ET Réparation AccessoiriesRemplacement Gratuit DE Létiquette GarantiePautas DE SEGURIDAD/DEFINICIONES Instrucciones DE Seguridad ImportantesProposición DE California Normas Generales DE Seguridad Instrucciones DE Conexión a Tierra Normas Específicas Adicionales DE SeguridadConexiones a LA Fuente DE Alimentación Especificaciones DEL MotorCordón DE Extensión DE Calibre Mínimo Cordones DE ExtensiónDesempaquetado Y Limpieza Descripción FuncionalContenido DE Carton PrologoHerramientas DE Ensamblaje Requeridas EnsamblajeEstimación DEL Tiempo DE Ensamblaje Instalación DEL Cincel Y LA Broca Sujeción DE LA Máquina a UNA Superficie DE ApoyoAjuste DE LA Prolongación DE Columna Ajuste DE LA Varilla DE Tope DE Profundidad OperaciónArrancando Y Deteniendo LA Maquina Bloquee EL Interruptor EN LA Posición DE Apagado OFFAjustar EL Cincel Paralelo a LA Pieza DE Trabajo Ajuste DE LA Plantilla DE GuíaLocalizacion DE Fallas Mantenimiento Reemplazo Gratuito DE LAS Etiquetas DE Advertencia ServicioAccesorios Piezas DE RepuestoGarantía limitada de dos años para productos nuevos GarantiaDelta Machinery Highway 45 North Jackson, TN 800