Hitachi G 12SA2 Depressed Center Wheel Assembly and Disassembly, Confirm that the depressed

Page 13

English

DEPRESSED CENTER WHEEL ASSEMBLY AND DISASSEMBLY

WARNING: Never attempt to assemble or disassemble the depressed center wheel, unless the power switch is in the “OFF” position and the electrical cord has been disconnected from the receptacle.

1. Assembly

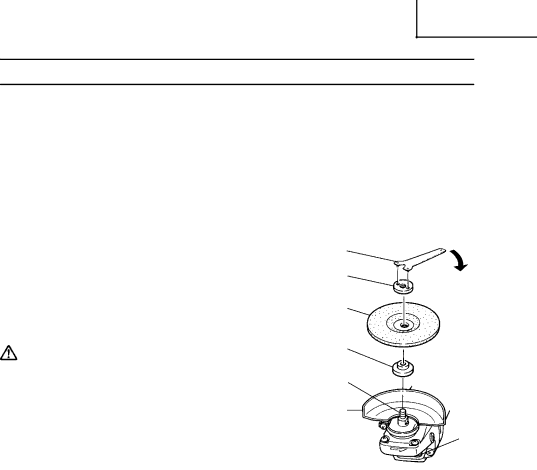
(1)Turn the disc grinder upsidedown so that the spindle is facing upward.

(2)Align the oval-shaped indentation of the wheel washer with the notched part of the spindle, then attach them.

(3)Fit the protuberance of the depressed center wheel onto the wheel washer.

(4)Screw the wheel nut onto the spindle.

(5)

While pushing the push button with one

Wrench


hand, lock the spindle by turning the

Wheel Nut


depressed center wheel slowly with the other

Tighten


Depressed Center


hand.


Tighten the wheel nut by using the supplied

Wheel


wrench as shown in Fig. 5.


Wheel Washer


CAUTION: Tighten the wheel nut securely


and confirm that the depressed

Spindle


center wheel does not wobble.


2.

Disassembly

Wheel


Guard


To remove the depressed center wheel,

Push


simply reverse the above-mentioned


Button


procedure.


Fig. 5

13

Image 13
Contents Advertencia AvertissementAmoladora Angular Table DES Matieres ContentsÍndice Meanings of Signal Words Important Safety InformationGeneral Safety Rules SafetyEnglish Never operate without all guards in place Specific Safety Rules and SymbolsUse right tool Keep motor air vent clean Blades and accessories must be securely mounted to the toolOperate power tools at the rated voltage Keep all screws, bolts and covers tightly in placeDouble Insulation for Safer Operation Make Them Available to Other Users and Owners of this ToolFunctional Description SpecificationsName of Parts Applications Assembly and Operation Prior to Operation Mounting the wheel guard Test the grinder before usingUse only properly rated depressed center wheels Check the push buttonGrinder Operation Assembly Depressed Center Wheel Assembly and DisassemblyDisassembly Confirm that the depressedMaintenance and Inspection Service parts list Service and repairsModifications Standard Accessories AccessoriesSignification DES Mots D’AVERTISSEMENT Informations Importantes DE SécuritéRegles Generale DE Securite SecuriteConserver CES Instructions Avertissement Lire et coxmprendre toutes les instructionsFrançais Regles DE Securite Specifiques ET Symboles Utiliser l’outil motorisé à la tension nominale Garder propres les évents d’air du moteurNe pas essuyer les parties en plastique avec du solvant Double Isolation Pour UN Fonctionnement Plus SUR Français NOM DES Parties Description FonctionnelleRemarque Avant L’UTILISATION Utilisations10.Vérifier la bouton-poussoir Essayer la meuleuse avant de l’utiliserUtilisation DE LA Meuleuse Déassemblage AssemblageEntretien ET Inspection Remplacement de la meule à dépression centraleInspection des vis Inspection des balais en carbone FigListe des pièces de rechange Entretien et réparationAccessoires Standard AccessoiresSignificado DE LAS Palabras DE Señalización Información Importante Sobre SeguridadNormas Generales DE Seguridad SeguridadGuarde Estas Instrucciones Advertencia Lea y entienda todas las instruccionesLesiones Emplee siempre un protector adecuado para el disco abombado Normas Y Símbolos Específicos DE SeguridadUtilice la herramienta correcta Maneje correctamente la herramientaNo limpie las partes de plástico con disolvente Maneje con cuidado las herramientas eléctricasAislamiento Doble Para Ofrecer UNA Operación MÁS Segura Español Nomenclatura Descripción FuncionalEspecificaciones NotaAplicaciones Montaje Y OperaciónAntes DE LA Operación Pruebe la amoladora antes de utilizarla Montaje del protector de la ruedaUtilice ruedas de disco abombado de la capacidad apropiada Compruebe el botón pulsadorConecte la alimentación de la amoladora. Fig Operación DE LA Amoladora AngularPresione con poca fuerza la amoladora Utilice el ángulo de amoladura apropiadoAjuste la operación de acuerdo con el acabado deseado Montaje Y Desmontaje DE LA Rueda DE Disco AbombadoArmado DesarmadoMantenimiento E Inspección Lista de repuestos Mantenimiento y reparaciónModificaciones Accesorios Estándar AccesoriosFrançais a No.élément B No. code C No. utilisé D Remarques Hitachi Koki Canada Co
Related manuals
Manual 52 pages 14.45 Kb