Miele Oven H 373-2 B, 05 808 630 manual Installing the oven

Page 60

Installing the oven

The oven must be installed into cabinetry before use.

Do not insulate the cabinet. This will prevent proper ventilation.

If the oven is to be installed under a counter top, a sealing strip must replace the stainless steel rail above the control panel. The sealing strip offers additional protection from any liquids that might spill down from the counter top.

The strip can be purchased from Miele.

^Connect the oven to the electrical supply.

The oven must be supported from underneath.

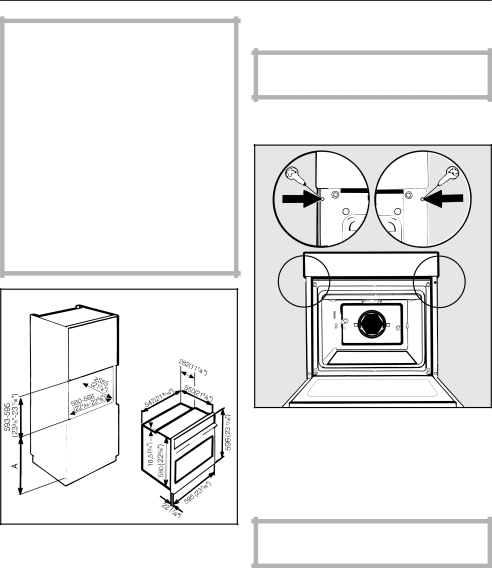
^Place the oven into the cabinet as far as the oven trim and align.

^Open the oven door and locate the two mounting screw holes in the oven frame. Mark and drill 6 mm pilot holes. Secure the oven to the cabinetry by inserting screws through the frame and into the cabinetry.

Only operate the appliance after it has been installed into the cabinetry.

60

Image 60
Contents Operating instructions Oven 373-2 B Contents Cleaning and care Electrical connection Installing the ovenBroiling Broiling Recommendations DefrostImportant Safety Instructions InstallationOven use Important Safety Instructions Disposal of an old oven General notesGuide to the oven Accessories Wire rack Baking TraysNon-tip safety notches Roasting pan and Anti-splash trayRotisserie Roast probeGrease filter Button Controls Symbol ControlsChild Safety Lock Energy-Conservation features To activate the Child Safety LockTo deactivate the Child Safety Lock Night dimmingBefore using for the first time Heat the ovenUsing the oven Interrupting cooking / turning off the ovenAt the end of the cooking time Adjusting the default temperature Duration Entering the time of day To conceal the time of dayTo make the time visible Programming the cooking time At the end of cookingTo program a cooking time to end automatically Checking, changing and canceling times entered Enter the start time and the length of cookingTo cancel a program To cancel an entered timeTo change Customizing a temperature setting Rapid heat To turn off Rapid heatSetting the timer To set the timerTo cancel the timer At the end of the timed periodGuide to the programs Baking ConvectionIntensiveSurround Top Heat Bottom Heat Roasting Auto Roast SurroundRoasting tips Roasting in a covered pot LRoasting on the rack K Roasting poultryUsing the roast probe Roasting with the Roast ProbeRoasting with the Roast Probe Time remaining display End of cooking timePlease note Roasting Recommendations MinBroiling Broil Maxi BroilFan Broil Broiling on the rack Broiling on the rotisserie Assemble the rotisserie as shownBroiling tips Broiling Recommendations Broil / Maxi Broil Fan Broil Runner Temp TimeDefrost Defrost Defrosting tipsCleaning and care Appliance frontStainless steel Stainless steel colored controlsPerfectClean Catalytic liners Catalytic cleaning process To clean at high temperaturesCleaning the oven cavity by hand To make cleaning easier Removing the oven doorOpen the door fully Removing the runners Removing the back panelRemoving the safety guard Lowering the upper heating element Remove the runnersRefitting the oven door Changing the light bulb Changing the light bulbChanging the light bulb Turning additional features on or off To turn an additional feature on or offFrequently asked questions What if the oven does not heat? Possible fault FixWhat if uneven browning occurs? Possible fault Fix Should a noise be heard after turning the oven off?Frequently asked questions After sales service Optional accessories HandlePizza pan Pizza stone Gourmet CasseroleCatalytic converter Catalytic linersPoultry clamp and Kabob griller Installation Instructions Caring for the environment Disposal of the packing materialsDisposal of an old appliance Electrical connection Installing the oven Page Page Page Alteration rights reserved