Crosley Refrigerator Top Mount manual Connecting Household Water Supply to Refrigerator

Page 5

CONNECTING HOUSEHOLD WATER SUPPLY TO REFRIGERATOR

WARNING

To avoid electric shock, which can cause death or severe personal injury, disconnect the refrigerator from electrical power before connecting a water supply line to the refrigerator.

CAUTION

To Avoid Property Damage:

Copper tubing is recommended for the water supply line. Water supply tubing made of ¼” plastic is not recommended since it greatly increases the potential for water leaks. Manufacturer will not be responsible for any damage if plastic tubing is used for supply line.

DO NOT install water supply tubing in areas where temperatures fall below freezing.

Chemicals from a malfunctioning softener can damage the ice maker. If the ice maker is connected to soft water, ensure that the softener is maintained and working properly.

IMPORTANT

Ensure that your water supply line connections comply with all local plumbing codes.

Before Installing The Water Supply Line,You Will Need

Basic Tools: adjustable wrench, flat-blade screwdriver, and PhillipsTM screwdriver

Access to a household cold water line with water pressure between 30 and 100 psi.

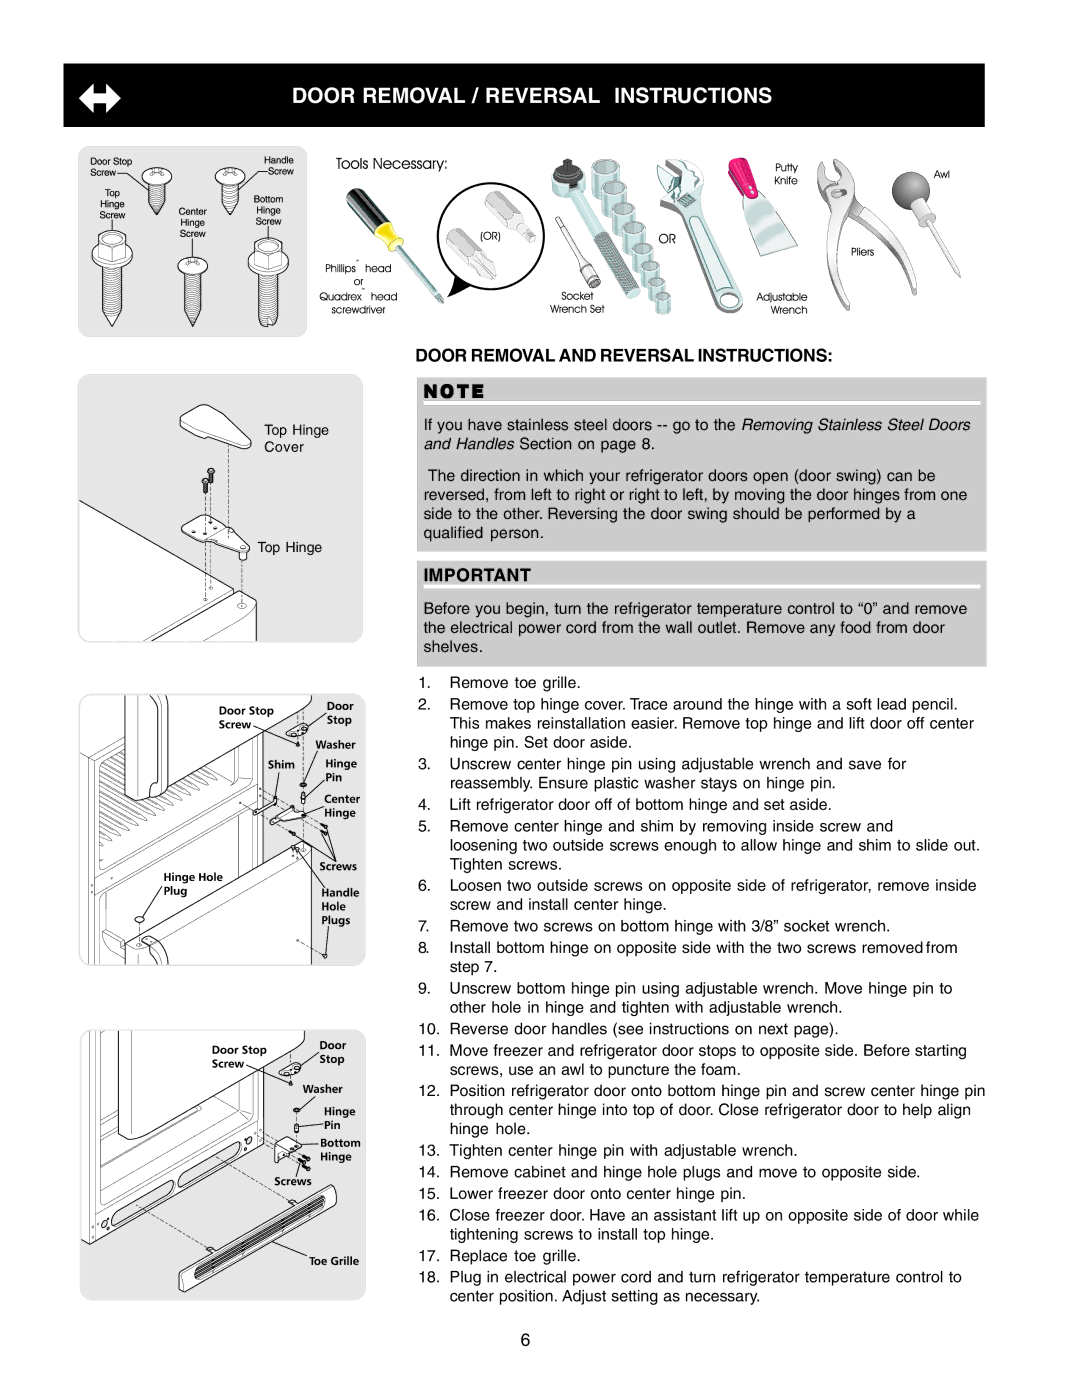
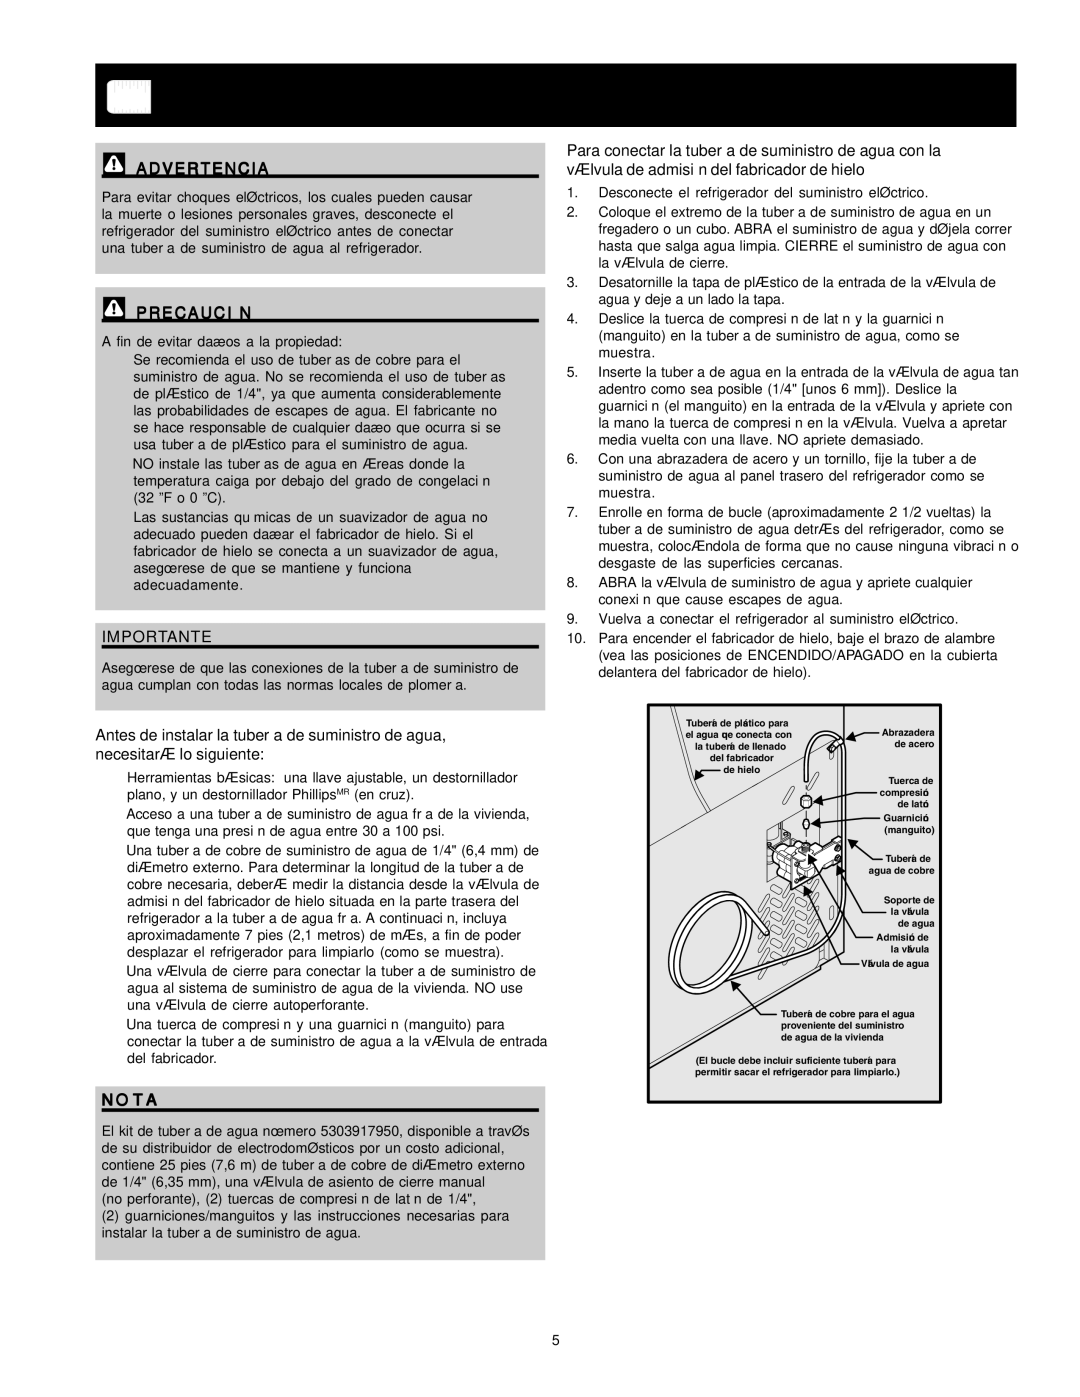
A water supply line made of ¼ inch (6.4 mm) OD, copper tubing. To determine the length of copper tubing needed, you will need to measure the distance from the ice maker inlet valve at the back of the refrigerator to your cold water pipe. Then add approximately 7 feet (2.1 meters), so the refrigerator can be moved out for cleaning (as shown).

A shutoff valve to connect the water supply line to your household water system. DO NOT use a self-piercing type shutoff valve.

A compression nut and ferrule (sleeve) for connecting the water supply line to the ice maker inlet valve.

NOTE

Water line kit number 5303917950, available from your appliance dealer at additional cost, contains 25 feet (7.6 meters) of ¼ inch OD copper tubing, a saddle type shutoff valve (nonpiercing), (2) ¼ inch brass compression nuts, (2) ferrules/sleeves, and instructions for installing a water supply line.

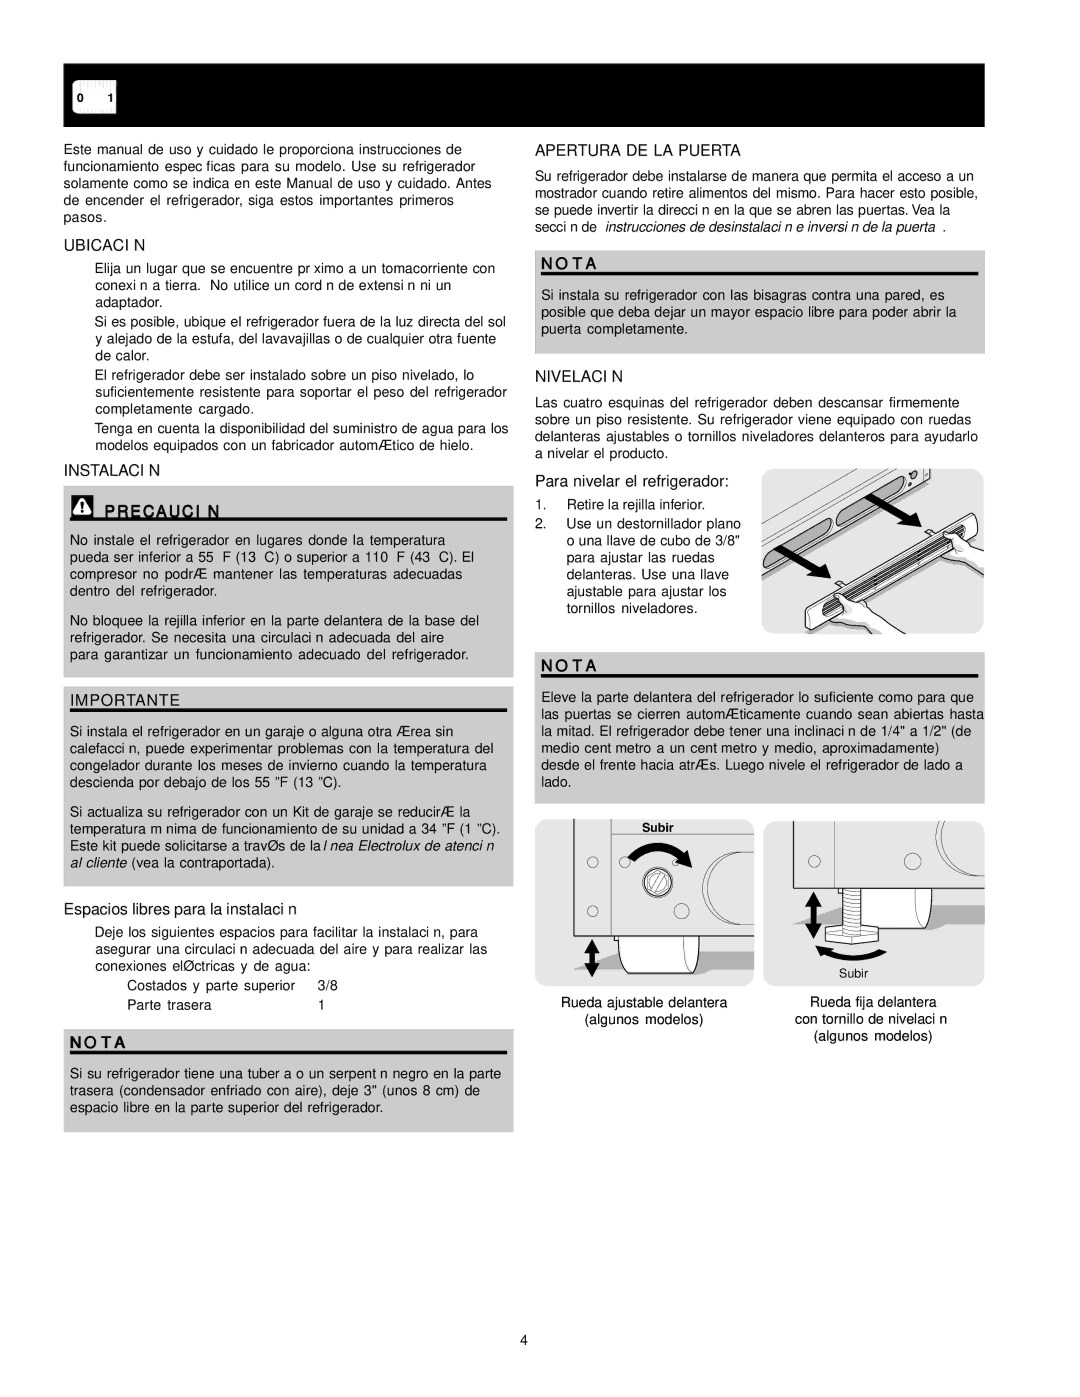
To Connect Water Supply Line To Ice Maker Inlet Valve

1.Disconnect refrigerator from electric power source.

2.Place end of water supply line into sink or bucket. Turn ON water supply and flush supply line until water is clear. Turn OFF water supply at shutoff valve.

3.Unscrew plastic cap from water valve inlet and discard cap.

4.Slide brass compression nut, then ferrule (sleeve) onto water supply line, as shown.

5.Push water supply line into water valve inlet as far as it will go (¼ inch). Slide ferrule (sleeve) into valve inlet and finger tighten compression nut onto valve. Tighten another half turn with a wrench; DO NOT over tighten.

6.With steel clamp and screw, secure water supply line to rear panel of refrigerator as shown.

7.Coil excess water supply line (about 2½ turns) behind refrigerator as shown and arrange coils so they do not vibrate or wear against any other surface.

8.Turn ON water supply at shutoff valve and tighten any connections that leak.

9.Reconnect refrigerator to electrical power source.

10.To turn ice maker on, lower wire signal arm (see ice maker front cover for ON/OFF position of arm).

5

Image 5 Contents
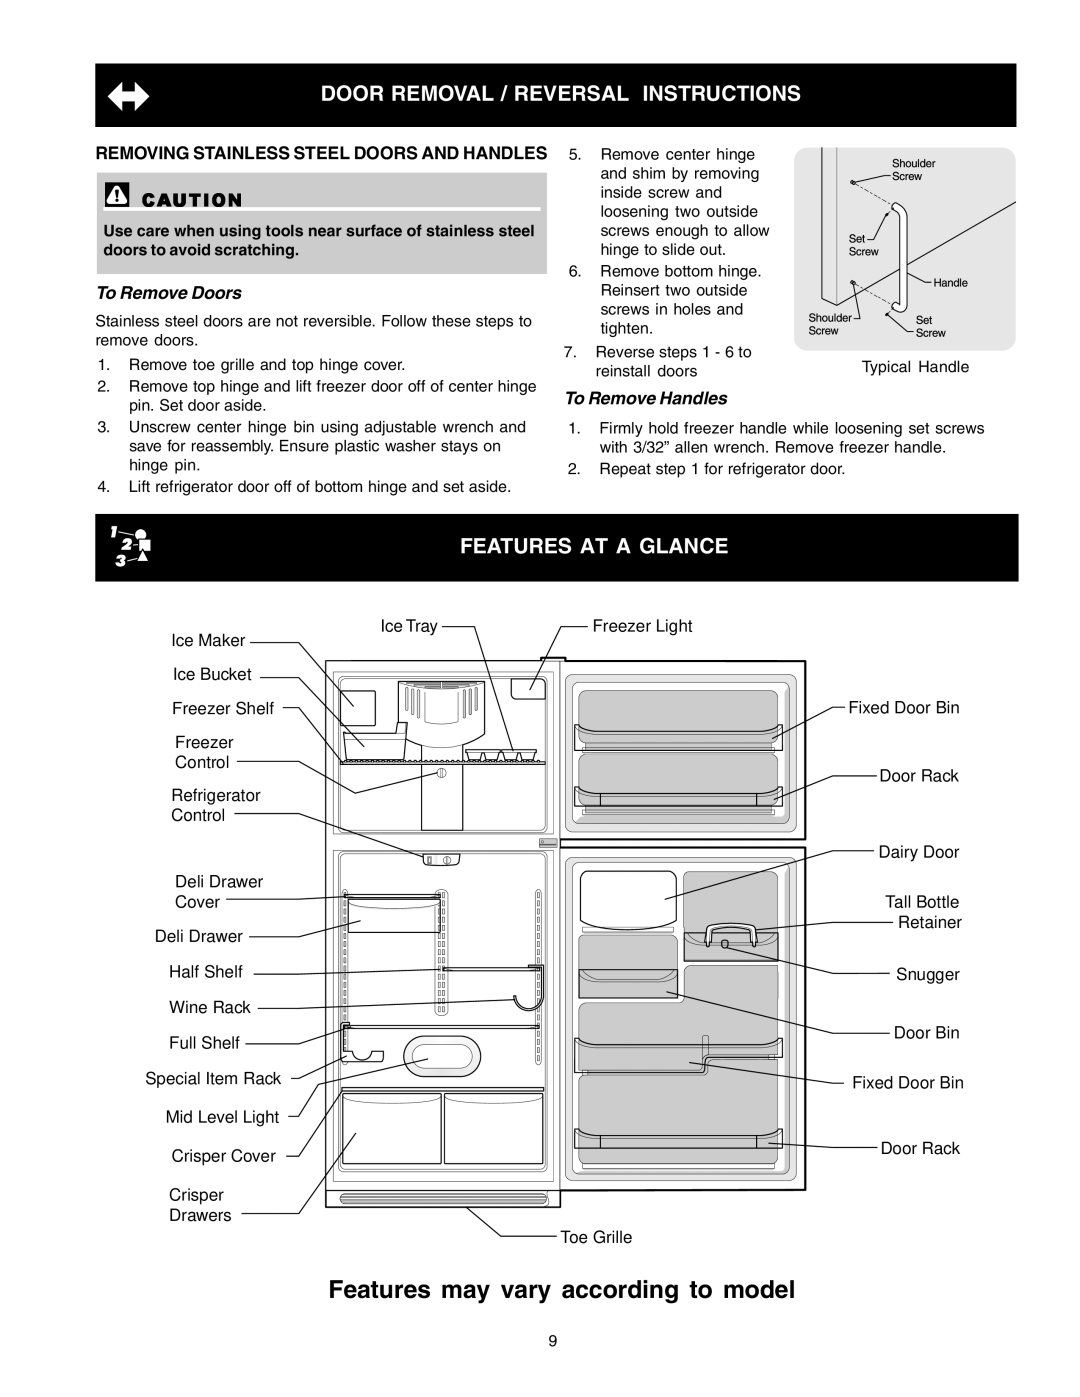
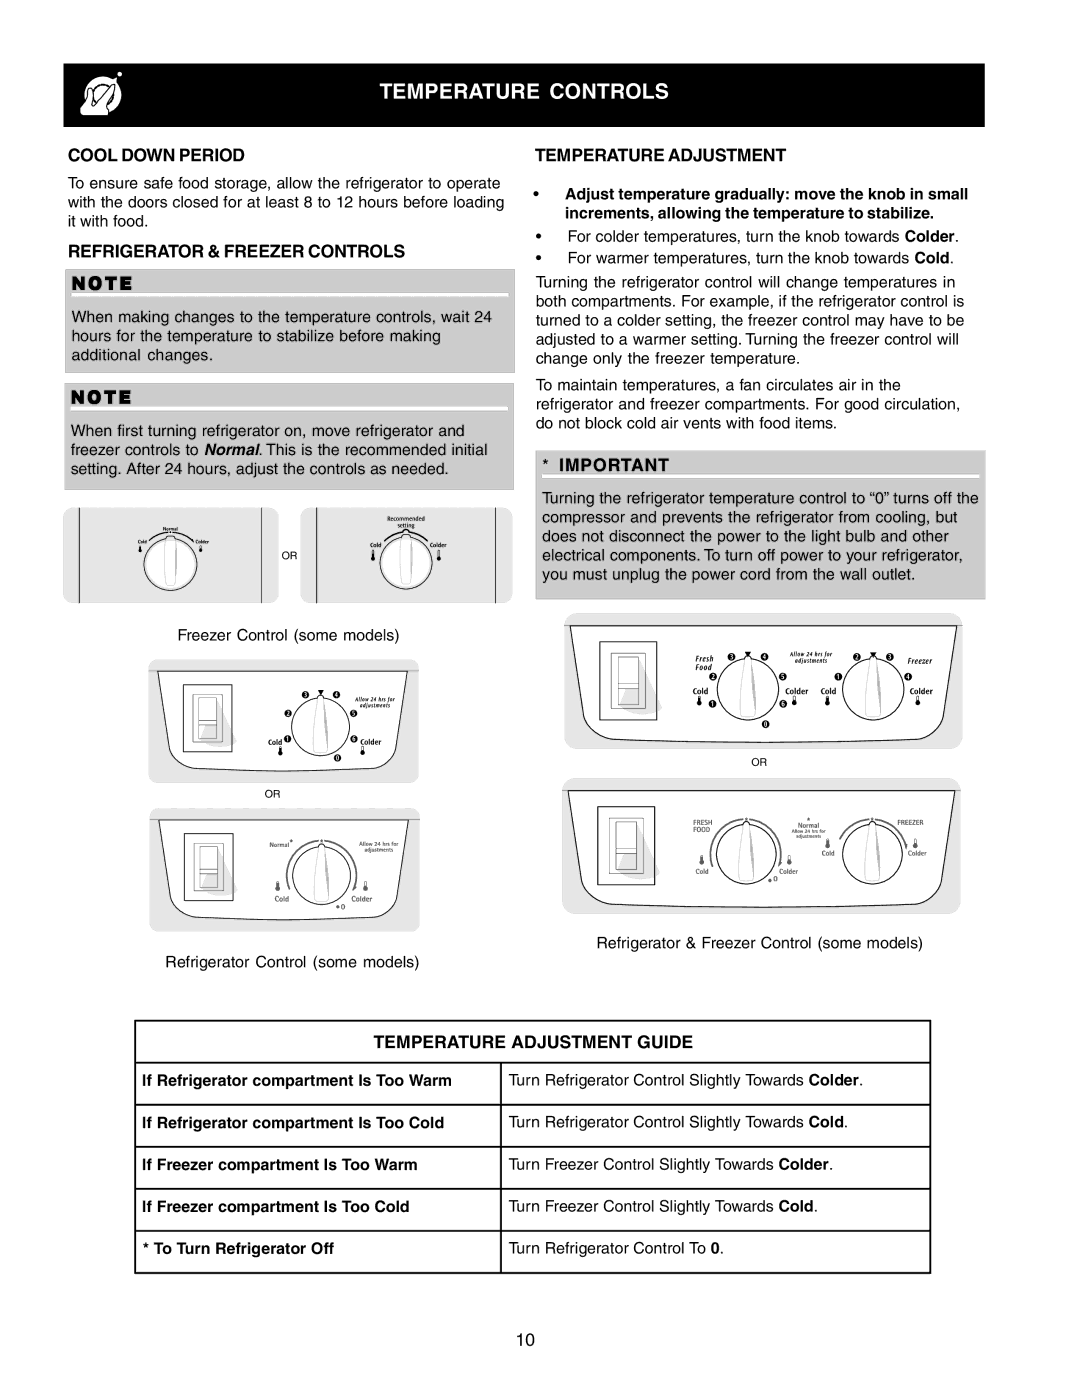
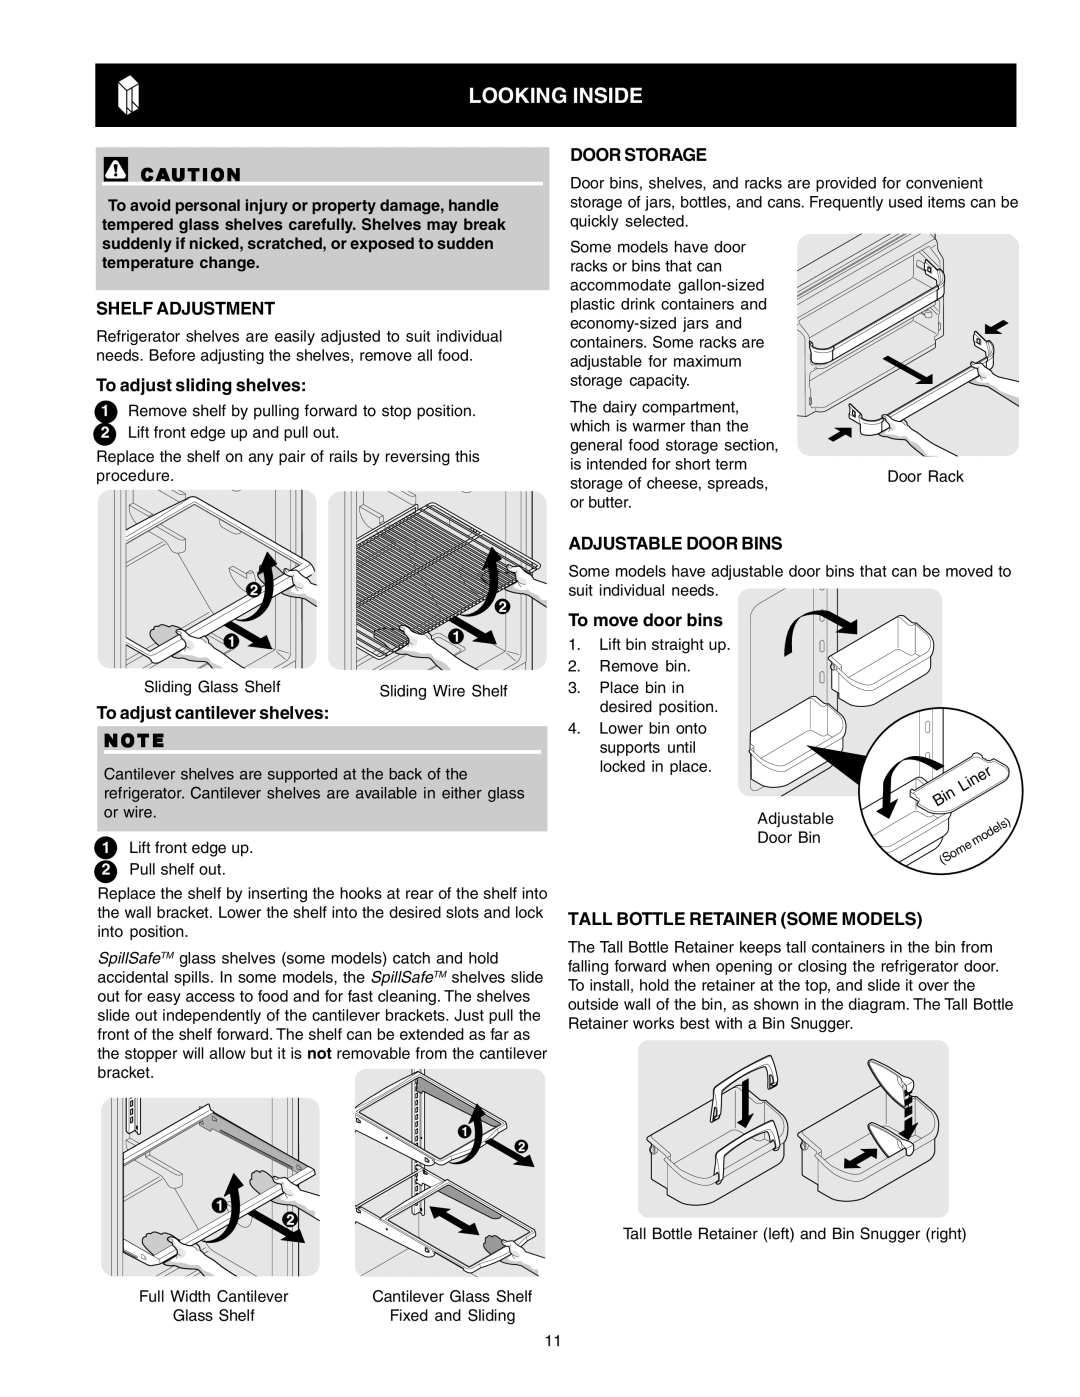
241824301 June Use & Care ManualPlease Read and Save These Instructions Welcome & CongratulationsForyour Safety Important Safety InstructionsChild Safety Electrical InformationInstallation InstallationLocation Door OpeningBefore Installing The Water Supply Line,You Will Need Connecting Household Water Supply to RefrigeratorDoor Removal and Reversal Instructions Door Removal / Reversal InstructionsTo Attach Freezer Handle To Remove Freezer HandleTrim Removal FULL-LENGTHTRIM Models only To Remove TrimTo Attachtrim To Remove Refrigerator HandleTo Attach Refrigerator Handle Removing Stainless Steel Doors and Handles Features AT a GlanceFreezer Light Special Item RackTemperature Adjustment Temperature ControlsTemperature Adjustment Guide Cool Down PeriodAdjustable Door Bins Shelf AdjustmentLooking Inside Door StorageHumidity Control Some Models Freezertilt OUT Doorrack Special Item Rack Some ModelsCrispers Some Models Deli Drawer Some ModelsEnergy Saving Ideas Food Storage & Energy Saving IdeasFood Storage Ideas Turningyour ICE Maker on ICE ServiceTurningyour ICE Maker OFF ICE Productionwhatto ExpectUnderstandingthe Soundsyou MAY Hear Normal Operating Sounds & SightsCare & Cleaning Care & Cleaning ChartReplacing the Freezer Light Bulb Some Models Never Clean Condenser Some ModelsThis warranty does not cover the following WarrantyRev /2006 Canada Crosley Corporation Cloverleaf DrBefore YOU Call 241813801 Junio Manual de uso y cuidadoPara EL Contacto DE Informacion DE Producto Bienvenido Y EnhorabuenaInstrucciones Importantes DE Seguridad Instalación Fin de evitar daños a la propiedad Conectar EL Suministro DE Agua AL RefrigeradorHerramientas necesarias Instrucciones DE DESINSTALACIÓN/INVERSIÓN DE LA PuertaPara Colocar Para Desinstalar LA Manija DEL CongeladorCongelador Para Colocar LA Manija DEL CongeladorPara Colocar LA Manija DEL Refrigerador Para Retirar LA Manija DEL RefrigeradorPara retirar las puertas Vista GeneralPeríodo DE Enfriamiento Controles DE TemperaturaControles DEL Refrigerador Y Congelador Nota Ajuste DE LA TemperaturaAjuste DE LAS Bandejas Vista InteriorAlmacenamiento EN LA Puerta Compartimientos Ajustables DE LA PuertaControl DE Humedad Algunos Modelos Vista Interior ContinuaciónCajones Para Verduras Algunos Modelos Cajón Para Charcutería Algunos ModelosAlmacenamiento de alimentos frescos Sugerencias Para EL Almacenamiento DE AlimentosSugerencias Para EL Ahorro DE EnergíaPara Encender EL Fabricador DE Hielo Servicio DE HieloProducción DE Hielo Funcionamiento Normal Sugerencias Para EL USO DEL Fabricador DE HieloInterpretación DE Sonidos QUE Puede Hacer SU Refrigerador Sonidos Y Señales Normales DE FuncionamientoCuidado Y Limpieza Tabla de cuidado y limpiezaReemplazo DE LA Bombilla DEL Congelador Algunos Modelos Cuidado Y Limpieza ContinuaciónCanada Cloverleaf Dr Winston-Salem, NC Información Sobre LA GarantíaPara el Contacto de Informacion de Producto Canadá Antes DE Solicitar Servicio TécnicoPièce no 241824301 Juin Guide dutilisation Et dentretienPour LE Contact Dinformation DE Produit Bienvenue ET FélicitationsPour Votre Sécurité Importantes Mesures DE SécuritéSécurité DES Enfants ÉlectricitéEmplacement InstallationInstallation Ouverture DE LA PorteDe distribution domestique Avant d’installer l’alimentation en eau, vous aurez besoinInstructions DE Dépose ET D’INVERSION DE LA Porte Remarque Instructions DE Dépose ET D’INVERSION DE LA PorteInstaller LA Installer LA Poignée DU CongélateurRetirer LA Poignée DU Congélateur Retirer LA Porte DU CongélateurRetirer LA Poignée DU Réfrigérateur Installer LA Poignée DU RéfrigérateurPoignées similaires à celles de la figure Retirer LA Poignée DU Réfrigérateur Fixer LA GarnitureRetirer LES Portes ET LES Poignées EN Acier Inoxydable Aperçu DES CaractéristiquesCommandes DU Réfrigérateur ET DU Congélateur Remarque Commandes DE TempératurePériode DE Refroidissement Réglage DE LA TempératureAjustement DES Clayettes VUE IntérieureRangement EN CONTRE-PORTE Balconnets RéglablesBacs À Légumes Certains Modèles VUE Intérieure SuiteBAC À Charcuterie Certains Modèles PORTE-BOUTEILLES DE VIN Certains ModèlesConservation DES Aliments Conservation DES Aliments ET Économies D’ÉNERGIEConservation des aliments frais Économies D’ÉNERGIEMise EN Marche DE LA Machine À Glaçons Distribution DE GlaçonsConseils Pour LA Production DE Glaçons Arrêt DE LA Machine À GlaçonsÉvaporateur Bruits ET Éléments Visuels D’UN Fonctionnement NormalPour Comprendre LES Bruits QUE Vous Entendez Entretien ET Nettoyage Tableau d’entretien et de nettoyageRemplacer L’AMPOULE DU Congélateur Certains Modèles Entretien ET Nettoyage SuiteCondenseur Sans Nettoyage Certains Modèles Cette garantie ne couvre pas Informations SUR LA GarantieAvant DE Faire Appel AU Service APRÈS-VENTE