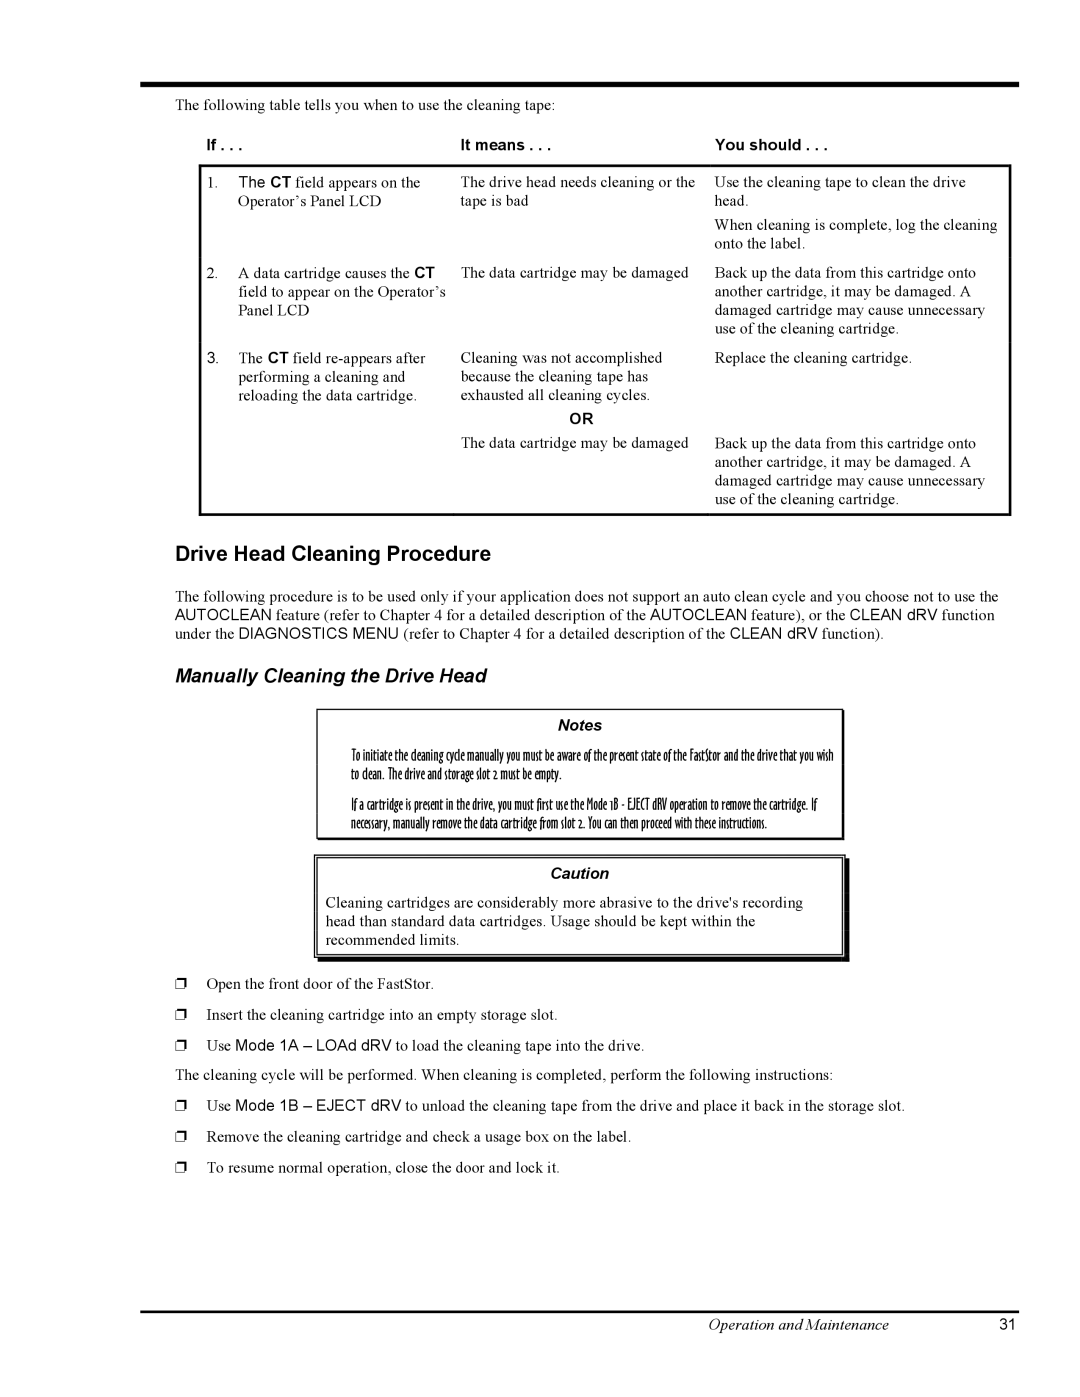
The following table tells you when to use the cleaning tape:
If . . . | It means . . . | You should . . . | |
|
|
|
|
1. | The CT field appears on the | The drive head needs cleaning or the | Use the cleaning tape to clean the drive |
| Operator’s Panel LCD | tape is bad | head. |
|
|
| When cleaning is complete, log the cleaning |
|
|
| onto the label. |
2. | A data cartridge causes the CT | The data cartridge may be damaged | Back up the data from this cartridge onto |
| field to appear on the Operator’s |
| another cartridge, it may be damaged. A |
| Panel LCD |
| damaged cartridge may cause unnecessary |
|
|
| use of the cleaning cartridge. |
3. | The CT field | Cleaning was not accomplished | Replace the cleaning cartridge. |
| performing a cleaning and | because the cleaning tape has |
|
| reloading the data cartridge. | exhausted all cleaning cycles. |
|
|
| OR |
|
|
| The data cartridge may be damaged | Back up the data from this cartridge onto |
|
|
| another cartridge, it may be damaged. A |
|
|
| damaged cartridge may cause unnecessary |
|
|
| use of the cleaning cartridge. |
|
|
|
|
Drive Head Cleaning Procedure
The following procedure is to be used only if your application does not support an auto clean cycle and you choose not to use the AUTOCLEAN feature (refer to Chapter 4 for a detailed description of the AUTOCLEAN feature), or the CLEAN dRV function under the DIAGNOSTICS MENU (refer to Chapter 4 for a detailed description of the CLEAN dRV function).
Manually Cleaning the Drive Head
Notes
To initiate the cleaning cycle manually you must be aware of the present state of the FastStor and the drive that you wish to clean. The drive and storage slot 2 must be empty.
If a cartridge is present in the drive, you must first use the Mode 1B - EJECT dRV operation to remove the cartridge. If necessary, manually remove the data cartridge from slot 2. You can then proceed with these instructions.
Caution
Cleaning cartridges are considerably more abrasive to the drive's recording head than standard data cartridges. Usage should be kept within the recommended limits.
❐Open the front door of the FastStor.
❐Insert the cleaning cartridge into an empty storage slot.
❐Use Mode 1A – LOAd dRV to load the cleaning tape into the drive.
The cleaning cycle will be performed. When cleaning is completed, perform the following instructions:
❐Use Mode 1B – EJECT dRV to unload the cleaning tape from the drive and place it back in the storage slot.
❐Remove the cleaning cartridge and check a usage box on the label.
❐To resume normal operation, close the door and lock it.
Operation and Maintenance | 31 |