SET


BAND/FM


STEREO


TUNING/


CLOCK


/

3

a

5

4

20


SETTING THE CLOCK

English


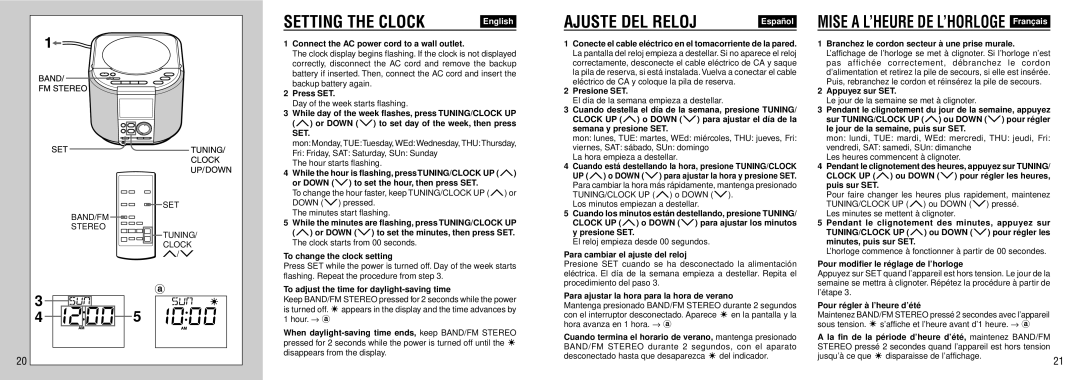
1Connect the AC power cord to a wall outlet.

The clock display begins flashing. If the clock is not displayed correctly, disconnect the AC cord and remove the backup battery if inserted. Then, connect the AC cord and insert the backup battery again.

2Press SET.

Day of the week starts flashing.

3While day of the week flashes, press TUNING/CLOCK UP (N) or DOWN (M) to set day of the week, then press

SET.

mon: Monday, TUE:Tuesday, WEd: Wednesday, THU:Thursday,

Fri: Friday, SAT: Saturday, SUn: Sunday The hour starts flashing.

4While the hour is flashing, press TUNING/CLOCK UP (N) or DOWN (M) to set the hour, then press SET.

To change the hour faster, keep TUNING/CLOCK UP (N) or DOWN (M) pressed.

The minutes start flashing.

5While the minutes are flashing, press TUNING/CLOCK UP (N) or DOWN (M) to set the minutes, then press SET. The clock starts from 00 seconds.

To change the clock setting

Press SET while the power is turned off. Day of the week starts flashing. Repeat the procedure from step 3.

To adjust the time for daylight-saving time

Keep BAND/FM STEREO pressed for 2 seconds while the power is turned off. appears in the display and the time advances by 1 hour. a

When daylight-saving time ends, keep BAND/FM STEREO pressed for 2 seconds while the power is turned off until the disappears from the display.

AJUSTE DEL RELOJ

Españ ol


1Conecte el cable elé ctrico en el tomacorriente de la pared. La pantalla del reloj empieza a destellar. Si no aparece el reloj correctamente, desconecte el cable eléctrico de CA y saque la pila de reserva, si está instalada. Vuelva a conectar el cable eléctrico de CA y coloque la pila de reserva.

2Presione SET.

El día de la semana empieza a destellar.

3Cuando destella el día de la semana, presione TUNING/ CLOCK UP (N) o DOWN (M) para ajustar el día de la semana y presione SET.

mon: lunes, TUE: martes, WEd: miércoles, THU: jueves, Fri:

viernes, SAT: sábado, SUn: domingo La hora empieza a destellar.

4Cuando está destellando la hora, presione TUNING/CLOCK UP (N) o DOWN (M) para ajustar la hora y presione SET. Para cambiar la hora más rápidamente, mantenga presionado TUNING/CLOCK UP (N) o DOWN (M).

Los minutos empiezan a destellar.

5Cuando los minutos está n destellando, presione TUNING/ CLOCK UP (N) o DOWN (M) para ajustar los minutos y presione SET.

El reloj empieza desde 00 segundos.

Para cambiar el ajuste del reloj

Presione SET cuando se ha desconectado la alimentación eléctrica. El día de la semana empieza a destellar. Repita el procedimiento del paso 3.

Para ajustar la hora para la hora de verano

Mantenga presionado BAND/FM STEREO durante 2 segundos con el interruptor desconectado. Aparece en la pantalla y la hora avanza en 1 hora. a

Cuando termina el horario de verano, mantenga presionado BAND/FM STEREO durante 2 segundos, con el aparato desconectado hasta que desaparezca del indicador.

MISE A L’HEURE DE L’HORLOGE Franç ais

1Branchez le cordon secteur à une prise murale. L’affichage de l’horloge se met à clignoter. Si l’horloge n’est pas affiché e correctement, dé branchez le cordon d’alimentation et retirez la pile de secours, si elle est insérée. Puis, rebranchez le cordon et réinsérez la pile de secours.

2Appuyez sur SET.

Le jour de la semaine se met à clignoter.

3Pendant le clignotement du jour de la semaine, appuyez sur TUNING/CLOCK UP (N) ou DOWN (M) pour ré gler le jour de la semaine, puis sur SET.

mon: lundi, TUE: mardi, WEd: mercredi, THU: jeudi, Fri:

vendredi, SAT: samedi, SUn: dimanche Les heures commencent à clignoter.

4Pendant le clignotement des heures, appuyez sur TUNING/ CLOCK UP (N) ou DOWN (M) pour ré gler les heures, puis sur SET.

Pour faire changer les heures plus rapidement, maintenez TUNING/CLOCK UP (N) ou DOWN (M) pressé.

Les minutes se mettent à clignoter.

5Pendant le clignotement des minutes, appuyez sur TUNING/CLOCK UP (N) ou DOWN (M) pour ré gler les minutes, puis sur SET.

L’horloge commence à fonctionner à partir de 00 secondes.

Pour modifier le ré glage de l’horloge

Appuyez sur SET quand l’appareil est hors tension. Le jour de la semaine se mettra à clignoter. Répétez la procédure à partir de l’étape 3.

Pour ré gler à l’heure d’é té

Maintenez BAND/FM STEREO pressé 2 secondes avec l’appareil sous tension. s’affiche et l’heure avant d’1 heure. a

A la fin de la pé riode d’heure d’é té , maintenez BAND/FM STEREO pressé 2 secondes quand l’appareil est hors tension jusqu’à ce que disparaisse de l’affichage.

21

Page 11
Image 11
Aiwa FR-TC5500 manual Setting the Clock, Ajuste DEL Reloj

FR-TC5500 specifications

The Aiwa FR-TC5500 is a versatile and technologically advanced audio system that caters to a wide range of listening preferences. Known for its reliability and innovative features, this model has captured the attention of audiophiles and casual listeners alike.

One of the most notable features of the Aiwa FR-TC5500 is its powerful sound output. The system is equipped with high-performance speakers that deliver clear, balanced audio across various frequencies. Whether you are listening to music, watching movies, or playing video games, the FR-TC5500 ensures that you experience every nuance of sound. The bass response is particularly impressive, providing depth and richness that adds to the overall audio quality.

The Aiwa FR-TC5500 is designed with advanced technologies, including Bluetooth connectivity. This enables users to easily connect their smartphones or tablets to the system, allowing for seamless streaming of music and podcasts. Moreover, the presence of USB and auxiliary inputs amplifies connectivity options, making it simple to engage various devices, such as laptops or MP3 players.

Another key characteristic of the FR-TC5500 is its user-friendly interface. The system features an intuitive control panel that allows users to navigate settings effortlessly. With dedicated buttons for volume adjustment, track selection, and play/pause functions, it caters to users of all ages and technical proficiency. Additionally, the LED display provides clear visibility of settings, ensuring that users can effortlessly monitor their audio preferences.

With a sleek and modern design, the Aiwa FR-TC5500 can seamlessly fit into any home or office environment. Its compact size makes it easy to place on shelves or desks without sacrificing sound quality. The system is not only aesthetically pleasing but is also built with durability in mind, ensuring long-lasting performance.

In summary, the Aiwa FR-TC5500 is an impressive audio system that offers powerful sound, versatile connectivity options, and user-friendly controls. Its blend of modern technology and thoughtful design makes it a top choice for those seeking a high-quality audio solution that enhances their listening experience. Whether you are an audiophile or simply enjoy quality sound, the Aiwa FR-TC5500 is equipped to meet your needs and exceed your expectations.