United States and Puerto Rico
For assistance and information
call toll free I=800=BUY=AIWA
Electric Power
NO USER-SERVICEABLE PARTS INSIDE REFER SERVICING TO QUALIFIED
SERVICE PERSONNEL.” Owner’s record
Installation
RADIO RECEPTION
CLOCK AND TIMER
PREPARATIONS
SOUND
7 Connect the right and left speakers to the main unit
Before connecting the AC cord
2 Connect the surround speakers to the main unit
3 Connect the supplied antennas
ONNECTING AN OUTDOOR ANTENNA
4 Connect the AC cord to an AC outlet
Game Demo
When to replace the batteries
To use SHIFT on the remote control
F PRESET on the remote control
Using the headphones
BBE SYSTEM
Turn VOLUME on the main unit, or press VOLUME on the remote control
The volume level is displayed as a number from Oto MAX
EQUALIZATION CURVE
SETTING A NEW EQUALIZATION CURV-E MANUALLY
SELECTING
PROGRAMMED
1 Press TUNER BAND to select a band, and press
PRESET NUMBER TUNING”
2 Press numbered buttons O-9 and +10 to select a preset number
1 Press TUNER BAND repeatedly to select the desired band
To ~lav one or two discs, placethe discson tray 1 and
a~@$~
Press CD, then press A OPEN/CLOSE to open the
disc compartment. Load discs with the label side up
4 Repeat steps 2 and 3 to program other tracks
RANDOM /REPEAT PLAY
1 Press PRGM twice while pressing SHIFT in stop mode
3 Press numbered buttons O-9 and +10 to program e a track.& Example
i=-.. . ~--~-=%.-==..,..! ?,!, w *,’ ,, L *W
MUSIC SENSOR “deck-l-only
7 Press TAPE and press A EJECT to open the cassette holder
2 Press 4 to start play
1 Insert the tape to be recorded on into deck
INSERTING BLANK SPACES
3 Press @ REC/REC MUTE to start recording
4 Press REC/REC MUTE to start recording
~ .-==+
1 Press TAPE
3 Press TAPE DECK 1/2 to select deck
6 Press REC/REC MUTE to start recording on the first side
3 Press EDIT/CHECK once while pressing SHIFT on the remote control
1 Insert the tape into deck
2 Press CD and load the discs
7 Press EDIT/CHECK while
remote control to select side B and program the
3 Press EDIT/CHECK twice while pressing SHIFT on the remote control
6 Repeat step 5 for the rest of the tracks for side A
1 Connect your microphone to the MIC jack
3 Adjust the volume and tone of the source
4 Turn the MIC VOLUME control to adjust the microphone volume
VOCAL FADER/MU-LTIPLEX FUNCTIONS #
4 Press +
1 Press PRGM u while pressing SHIFT
2 Press one of DISC DIRECT PLAY 1-3 to select a disc
3 Repeat step 2 to reserve other tracks
2 Press -44 DOWN or - UP to designate the hour, then press 11 SET
1 Press CLOCK, then press II SET within
seconds
1 Press SLEEP while pressing SHIFT
4 Select the duration for the timer-activated period
TIMER ‘RECORDING “-“‘-”””‘ ‘=-”’”““--”’--”””“’”’--‘ ‘
1 Press TIMER repeatedly to display@, then press
Repeat to designate the minute of the timer-on time
1 Press VIDEO/AUX or MD
VIDEO/AIJX JACKS, MD JACKS
CD DIGITAL OUT OPTICAL JACK
SUPER WOOFERS ~ JACKS
1Q. I, JJn .IJ \
100W
Instalacion
NO USER-SERVICEABLE PARTS INSIDE REFER SERVICING TO QUALIFIED
SERVICE PERSONNEL.” Anotacion del propietario
ELECTRIC SHOCK DO NOT REMOVE COVER OR BACK
DE LA RADIO
PREPARATIVES
SONIDO
RECEPCION
1 Conecte Ios altavoces derecho e izquierdo a la unidad principal
IMPORTANTE
2 Conecte Ios altavoces de sonido ambiental a la unidad principal
4 el cable de alimentacion de CA a una toma de CA
POSICIONAMIENTO DE LOS ALTAVO&S
CONEXION DE UNA ANTENA EXTERIOR
3 Conecte Ias antenas suministradas
Para disfrutar del juego
Para desconectar la alimentacion
Pulse T-BASS
CONTROL DE VOLUMEN
ECUALIZACION NUEVAS
AJUSTE MANUAL DE UNA NUEVA CURVA DE ECUALIZACION
“M’E-MO”RIZACION ‘“DE’
CURVAS
2 Pulse - DOWN o UP para seleccionar una emlisoram
‘- d LJ
SINTONIZACION MEDIANTE NUMERO DE PREAJUSTE
1 Pulse relpetidamente TUNER BAND para
N--”
REPRODUCCl@@##l&~.OS ...- COMPACTOS
Para rerxoducir uno o dos discos, ponga Ios discos en Ias
PLAY
3 Pulse Ios botones numerados O-9 y +10 para programar una cancion
REPRODUC-CION ALEATORIWREP’ETICION DE REPRODUCTION
if%==%%
2 Pulse DISC DIRECT PLAY 1-3 para seleccionar 0 un disco
Para detener la reproduction, pulse
Utilice solamente cintas tipo I normales
1 PulseTAPE y A EJECT para abrir el portacasete
2 Pulse +P para iniciar la reproduction
1 Inserte la cinta que vaya a grabar en la platina
INSERCION DE ESPACIOS’klN’G’iiikBAR
3 Pulse @ REC/REC MUTE para iniciar la grabacion m
1 Pulse TAPE
Pulse TAPE
Puke TAPE DECK 1/2 para seleccionar la platina
Pulse o REC/REC MUTE para iniciar la grabacion
Pulse Ct
EEiE3
‘ULT1 JoG~
1 Inserte la cinta en la platina
2 Pulse CD e introduzca ellos discos
‘s --3,7,%,9
~3,7,8,9
~ --4,5
VOZ/MULTIPLEX
Ajuste e volumen y el tono de la fuente de sonido
Gire el control MIC VOLUME para ajustar el vchmen del microfono
?ZRL
4 Pulse +- para iniciar la reproduction
1 Pulse PRGM una vez mientras pulsa SHIFT
Luego, pulse Ios botones numerados y +1 O para programar una cancion
3 Repita el paso 2 para reservar otras canciones
2 Antes de uue ~asen 4 srxwmdos, pulse ++ o -b
“1 Pulse CLOCK y Iuego pulse 11 SET antes de aue ~~n 4 segundos
“ Pulse + DOWN o B UP para designar la hors y luego pulse 1I SET
~, ... J U
Iuego pulse II SET antes de aue pasen 6 seaundos
1 Pulse repetidamente TIMER para visualizer ~, y
2,3,4\
GRABACION CON TEMPORIZADOR
1 Pulse VIDEO/AUX c MID
TOMAS VIDEO/AUX, TOMAS MD
TOMA CDI DIGITAL OUT OPTICAL
TOMAS SUPER WOOFERS d
~Est~ la platina2 en elmodo de pausa7 + pagina11
LSe ha pulsadoUnbotonde funci~nequivocado’?
Formato de
Seccion del sintonizador de FM
Potencia de salida
Entradas
“CAUTIONTO REDUCE THE RISK OF ELECTRIC SHOCK
RADIO
SPECIFICATIONS
CONNEXIONS
RECEPTION
Contr61er la chalne et Ies accessoires
1 Connecter Ies enceintes droite et gauche a I’appareil principal
2 Connecter Ies enceintes surround a I’appareil
principal
DES ENCEINTES “““‘‘
POSITIONNEMENT
3 Connecter Ies antennes fournies
4 Brancher Ie cordon secteur a une prise de courant
Page
SYSTE-ME’SUPEliT-BASS
1 Regler une courbe d’egalisation avec HIGH, LOW et MULTI JOG
MEMORISATION DES NOUVELLES COURBES D’EGALISATION
1 Appuyer sur LOW
3 Appuyer sur HIGH
1 Appuyer sur TUNER BAND pour selectionner une
ACCORD &iR UNE STATiON MEMORliiEE
+=-y- u’
selectionner une station
Appuyer sur CD, puis appuyer sur 4 OPEN/CLOSE
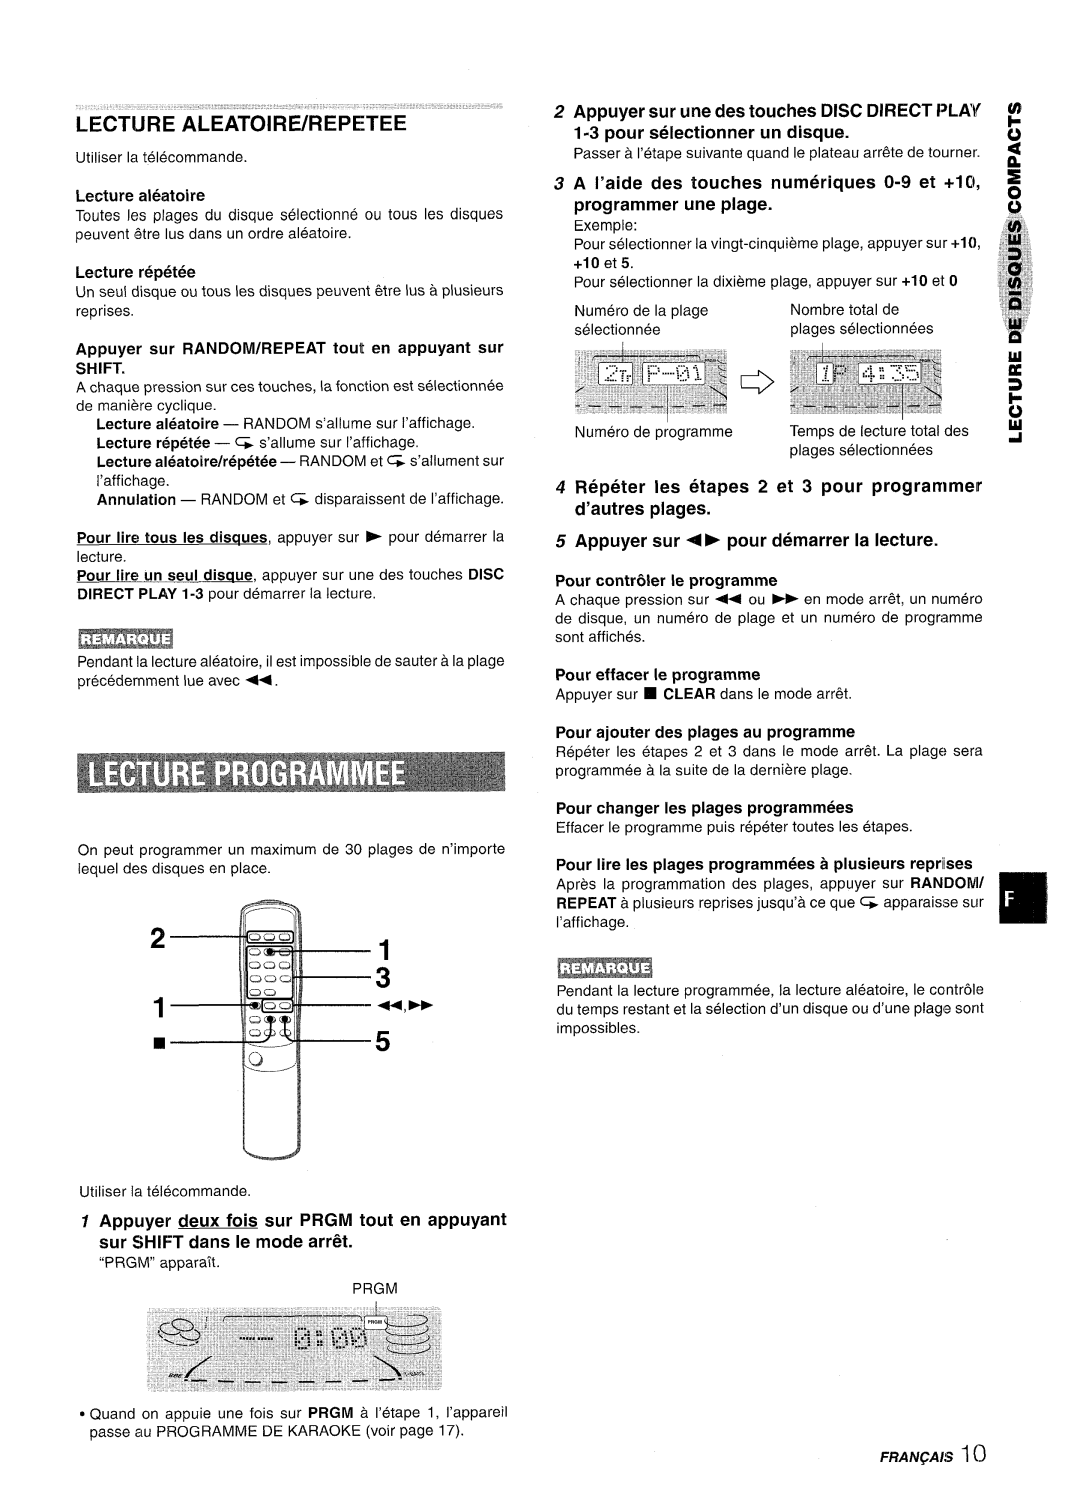
3 A l’aide des touches numeriques 0-9 et +10, ~ programmer une plage
2 Appuyer sur r,me des touches DISC DIRECT
1-3 pour selectionner
un disque
Pour demarrer la lecture quand I’alimentation est toupee
“’’c”
Utiliser seulement des cassettes de type I normales
2 Appuyer sur P pour demarrer la lecture
1 Inserw la cassette a enregistrer clans la platine
lNSERflON DESPAC-ES “BLANCS””’’’”““‘ ‘=
l’enre~istrement
3 Appuyer sur SYNCHRO DUBBING pour demarrer I’enregistrement
1 Appuyer sur TAPE
3 Appuyer sur TAPE DECK 1/2 pour selectionner la platine
4 Appuyer sur REC/REC MUTE pour demarrer I’enregistrement
2 Appuyer sur CD et mettre Ies disques en place
appuyant sur SHIFT de la telecommande
la telecommande
1 Inserer la cassette clans la platitne
Ensuite, programmer une plage a I’aide des
touches numeriques O-9 et +10 de la telecommande
3,7,8,9
1 Inserer la cassette clans la platine
1 Branchr?r Ie microphone a la prise MIC
3 Regler Ie volume et la tonalite de la source
4 Tourner la commande MIC VOLUME pour regler Ie volwne de microphone
FoNcnorw VOtiAL FADER/MULTIPLEi” k
4 Appuyer sur + pour demarrer la lecture
1 Appuyer une fois sur PRGM tout en appuyant sur SHIFT
2 Appuyer sur une des touches DISC DIRECT PLAY
3 Repeter I’etape 2 pour reserver d’autres plages
2 Dans Ies quatre secondes, appuyer wr ~ ou
1,2,3
1 Appuyer sur CLOCK puis appuyer sur II SET clans Ies quatre secondes
1 Appuyer sur SLEEP tout en appuyant sur SHIFT
ou - UP, puis appuyer sur II SET pour Ies regler
ENREGISTREMENT COMMANDE PAR LA MINUTERIE
2,3,4 P
2 Specifier Ies heures en appuyant sur - DOWN
AUTRE$ CX2NNEXIONS
PRISES VIDEO/AUX, PRISES MD
PRISE CD DIGITAL OUT OPTICAL
PRISES SUPER WOOFERS d
E=E=Il
Partie
Name/Nombre/Nom
AIWA CO., LT’D
al @ @ a @
C~// fO// h? I-877-BUY-AMM United States and Puerto Rico