DiiEE ti~~~
Electric Shock
Precautions
Be moved with care
Table of Contents
Connect the speaker cords to the tuner/amplifier unit
Connections
Placing the TWO Units Side by Side
Connecting AN Outdoor Antenna
Connect thesupplied antennas
Connect the AC cord to an AC outlet
Play Power Phones TUNER/ M Band
Using the Control Panel
Sound Mode
Before Operation
Opening and closing the top cover
Setting the Clock
To display the current time
Shift
Adjusting the Sound
When an FM stereo broadcast contains noise
Manual Tuning
To change the AM tuning interval
Tuner Band Mode Tuner
Preset Number Tuning
Presetting Stations
Repeat steps 1
Tuner
Loading a Disc
Operation
Playing a Disc
Load a disc with the label side up
Repeat Play
Random Play
Programmed Play
To clear the program
Quick random access
What is AN MD Mini DISC?
Types of MDS
Limitations of MD
Playing AN MD
Inserting AN MD
Press the MD Play button
Example
To repeat random play
To check the program
To clear the program
About the Index Mark
Various Ways of MD Recording
Auto Mark Function
Time Mark Function
Recording from a Desired Track
Recording a Whole CD
To record on a previously recorded MD
To change the display during recording
Press the CD MD button to start recording
Recording only ONE Track A CD
To stop recording before the end of the track
Cdmd Display
Programmed Recording
Recording from the Radio CD or Connected Equipment
Press the MD Mode button
Press the 11 button to start recording
Enter MD REC MD Mode
Press the MD Mode button twice
Extended Monaural Recording
To stop recording
Registering the Disc Title Track Title
Enter MD Mode Voumult 1JOG
0000
Within 10 seconds, press the Enter button
Press the MD Edit button so that Divide is displayed
Dividing a Track
0000 ‘.- -- 0 I 0-9,+10
Combining TWO Tracks
MD Edit Enter
Changing the Order Tracks
Erasing ALL Tracks on a Disc
Erasing Tracks
Erasing a Single Track
Within 8 seconds, press the Enter button
Within 4 seconds, press the 1I button
Timer Play and Timer Recording
Prepare the source and the recording source
Connecting Optional Equipment
Setting the Sleep Timer
Tape in Jacks
AUX in Jacks
Listening to External Sources
Care and Maintenance
MD Guide Messages
Solution
Message Cause
Specifications
Troubleshooting Guide
Parts Index
Advertencia
Precauciones
Explication De Ios simbolos graficos
Instalacion
Dailos aue necesitan ser reparados
Mantenimiento
Verifique su sistema y 10s accesorios
Registro del propietario
Antes de conectar el cable de alimentacion de CA
Conexiones
Conexion DE UNA Antena Exterior
Colocar LAS DOS Unidades UNA AL Lado DE Otra
Conecte Ias antenas suministradas
Conecte el cable de CA a una toma de CA
USO DEL Panel DE Control
Antes DE LA Operacion
Para encender la unidad
Uso de Ios auriculares
Utilization del mando a distancia
USI DEL Mando a Distanciaajuste DEL Reloj
Pulse el boton ++ o E- para designar el minute
Ajuste DEL Sonido
Pulse el boton 4+ o para seleccionar una estacion
Sintonizacion Manual
Para buscar rapidamente una emisora Busqueda Automatic
Cuando una emision en FM estereo contenga ruido
Sintonizacion Mediante Numero DE Preajuste
Preajuste DE Emisoras
Introduction DE UN Disco
Operacion
Reproduction DE UN Disco
Pulse el boton * CD Play
Reproduction Repetida
Reproduction Aleatoria
Reproduction Programada
Pulse el boton Prgm mientras pulsa el boton Shift
Tipos DE Minidisco
Lque ES UN MD MINIDISCO?
Limitaciones DE UN Minidisco
Reproduction DE UN Minidisco
Insercion DE UN Minidisco
Pulse el boton P MD Play
Shift I -MD Play
Repita el paso 2 para programar otras pistas
Para repetir la reproduction aleatoria
Para afradir pistas al programa
Varias Formas DE Grabacion DE Minidisco
Marcas Indicatorias
Funcion Auto Mark
Funcion Time Mark
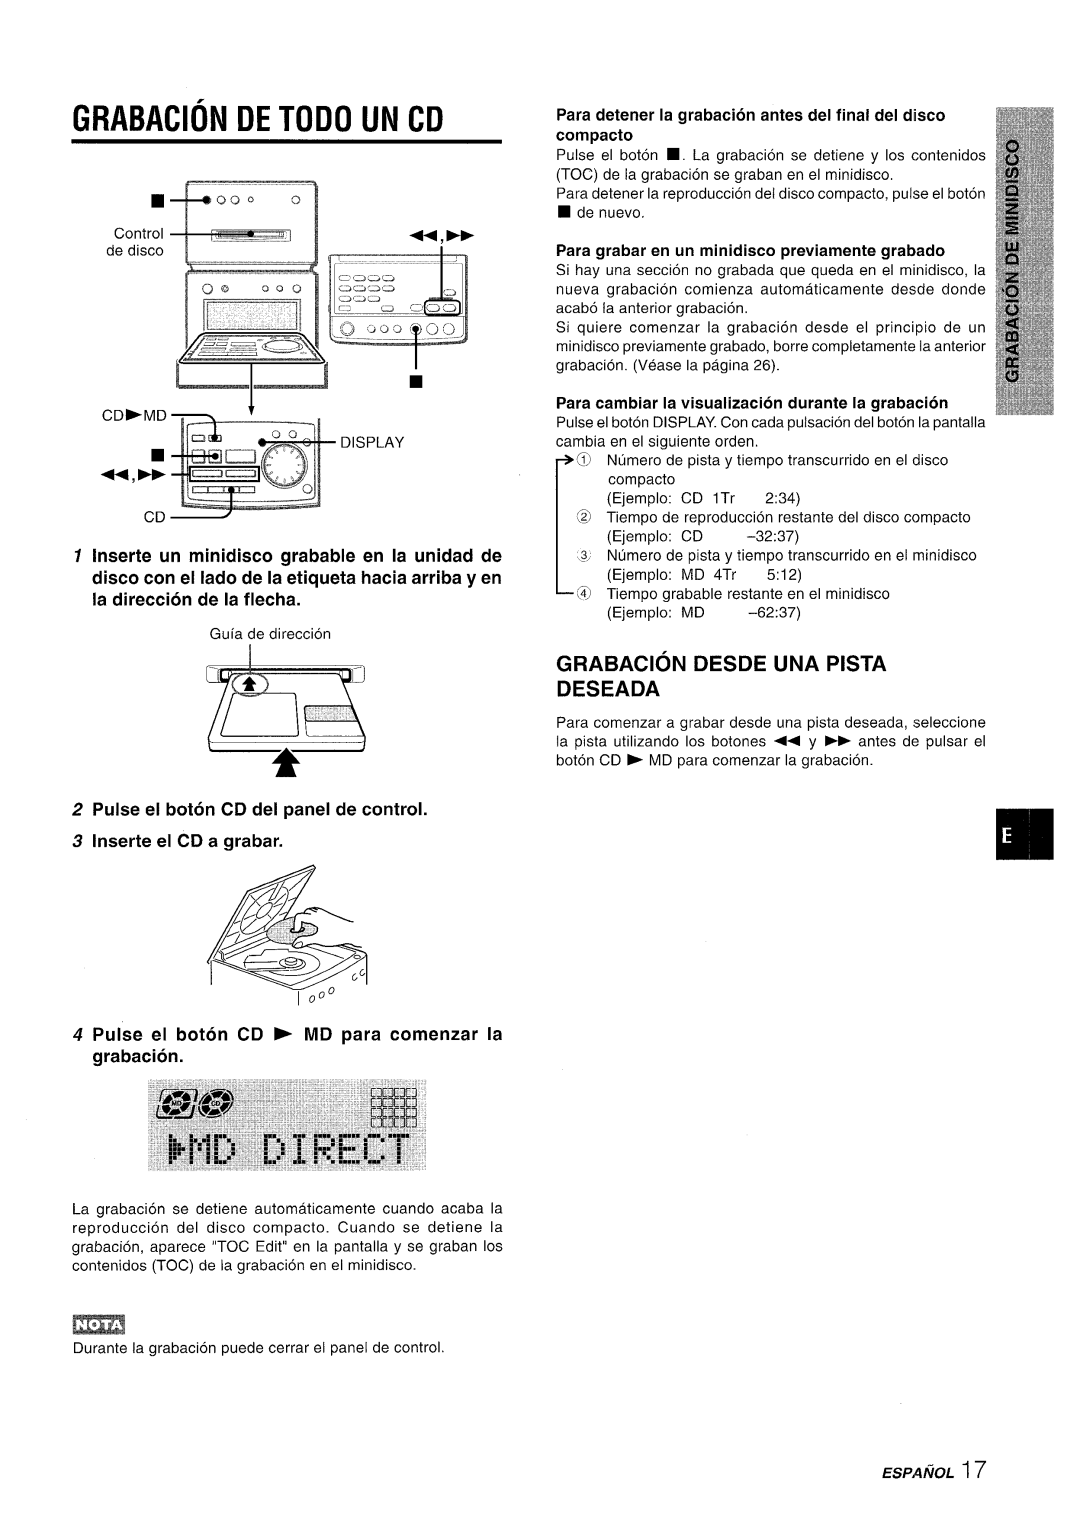
Grabacion Desde UNA Pista Deseada
Grabacion DE Todo UN CD
Para cambiar la visualization durante la grabacion
Para grabar en un minidisco previamente grabado
Apriete el boton CD F MD para comenzar a
Grabacion DE UNA Sola Pista DE UN CD
Para detener la grabaci6n antes del final del disco
Compacto
CD-MD Display
GRABAC16N Programada DE UN CD
Para detener la grabacion en cualquier momento
Para cambiar la visualization durante la grabacion
Para aiiadir marcas indicatorias durante la grabacion
Pulse el boton MD Mode
Grabacion Desde LA Radio UN CD O Equipo Conectado
Pulse el boton 11 para comenzar la grabacion
Para afiadir marcas indicatorias durante la grabacion
Pulse el boton MD Mode dos veces
Grabacion Extendida Ovionoaufw
Pulse el boton II para comenzar la grabacion
Pulse el boton Enter Extraiga el minidisco de la unidad
Enter MD Mode Voumulti JOG
Como insertar un espacio entre caracteres
Division DE UNA Pista
Antes de que transcurran 10 segundos, pulse el boton Enter
Combination DE DOS Pistas
0000
0000 0
Cambio DEL Orden DE LAS Pistas
Antes de que transcurran 8 segundos, apriete el boton Enter
Elimination DE Pistas
Antes de que transcurran 8 segundos, apriete ei boton Enter
Reproduction Y Grabacion CON Temporizador
Pulse el boton Power para apagar el sistema
Antes de que transcurran 4 segundos, pulse el boton
Seleccione la duration para el periodo activado por
Conexion DE Equipo Opcional
Configuration DEL Temporizador DE Apagado
Tomas Tape
Tomas AUX
Para Iimpiar la caja
Escucharfuentes Externas Cuidados Y Mantenimiento
Cuidado de as unidades
Cuidado de Ios discos compactos
Mensaje
Mensajes Indicadores DEL Minidisco
Causa
Especificaciones
Solucion a Pequenos Problemas
TUNER/BAND 9,10 Control OPEN/CLOSE
MD Eject
Installation
Explication des Symboles
Avertissement
Alimentation electriaue
Table DES Matieres
Avant de connecter Ie cordon secteur
Connexions
~.nitedulecteurde
Connexion D’UNE Antenne Exterieure
Pose DES Deux Unites Cote a Cote
Connectez Ies antennes fournies
Branchez Ie cordon secteur sur une prise de courant
Utilisa ‘ION DU Panneau DE Contr LE
Avant L’UTILISATION
00000
Insertion des piles
Reglage DE L’HORLOGE
Quand remplacer les piles
Utilisation de la touche Shift
Reglage DU SON
Reglage DU Volume
Accentuation DES Graves
EQ Egaliseur
Appuyez sur la touche ++ ou pour selectionner une station
Accordmanuel
Lorsqu’une emission FM stereo contient du bruit
Pour changer I’intervalle d’accord AM
Prereglage DES Stations
Autre faqon de selectionner une station prereglee
Accord SUR LES Numeros Preregles
Repetez Ies operations 1 et
Chargement D’UN Disque
Utilisation
Lecture D’UN Disque
Appuyez sur la touche * CD Play
Lecture Repetee
Lecture Aleatoire
Lecture Programmed
Type DE Minidisques
QU’EST-CE QU’UN Minidisque
Limitations D’UN Minidisql E
Lecture D’UN Minidisque
Mise EN Place D’UN Minidisque
Appuyez sur la touche MD Play
Repeat Prgm
AU Sujet DES Codes D’INDEX
Plusieurs FA~ONS ’ENREGISTRER UN Minidisque
Fonction Auto Mark
Fonction Time Mark
Enregistrement D’UNE Plage Desiree
Enregistfiement DE ’ENSEMBLE D’UN Disque Compact
Pour enregistrer sur un minidisque precedemment enregistre
Pour changer d’affichage Iors de I’enregistrement
Appuyez sur la touche CD MD pour commencer I’enregistrement
Enregistrement D’UNE Seule Plage D’UN Disque Compact
Pour arriXer I’enregistrement avant la fin de la plage
Pour enregistrer sur un minidisque precedemment Enregistre
+oo
Enregistrement Programme ’UN Disque Compact
CD-MD
Pour arr&er I’enregistrement a mi-chemin
Appuyez sur la touche MD REC
Appuyez sur la touche MD Mode
Pour arri5ter I’enregistrement
Pour ajouter des codes d’index Iors de ’enregistrement
EIVREGKTF?EMENT Double DUR~E Monophonique
Appuyez deux fois sur la touche MD Mode
Pour ajouter des codes d’index Iors de ’enregistrement
Pour arriXer ’enregistrement
Enregistrement DE Titres DE Diwie ET DE Plage
Pour changer un caractere
Division D’UNE Plage
Appuyez sur la touche MD Edit afin que Divide s’affiche
Coivibinaison DE Deux Plages
00Q0o +10
Changement DE L’ORDRE DES Plages
Effacement DE Toutes LES Plages D’UN Disque
Effacement DE Plages
Effacement D’UNE Seule Plage
0000
Dans Ies 4 secondes qui suivent, appuyez sur la touche
Lecture ET Enregistrement PAR LA Minuterie
Preparez la source et la source d’enregistrement
Si vous selectionnez I’enregistrement par minuterie
Connexion D’UN Appareil Optionnel
Reglage DE LA Minuterie DE Sommeil
Prisestape
Prises AUX
Soins ET Entretien
Ecoute DE Sources Externes
Pour nettoyer Ie coffret
Soin de I’appareil
Message
Messages D’AIDE DU LECTEUR/ENREGISTREUR DE Minidisques
Cause
Remede
Parite syntoniseur FM
Partie enregistreur De minidisques Specifications Generales
Partie amplificateur
RMS
Guide DE Depistage DES Defauts
Ilenregistreur ne repond pas aux commandes
II n’y a pas de son
Le Iecteur de disques compacts ne fonctionne pas
Demo TUNER/BAND Control OPEN/CLOSE
Eject FCDPLAY6,11 OPEN/CLOSE
Page