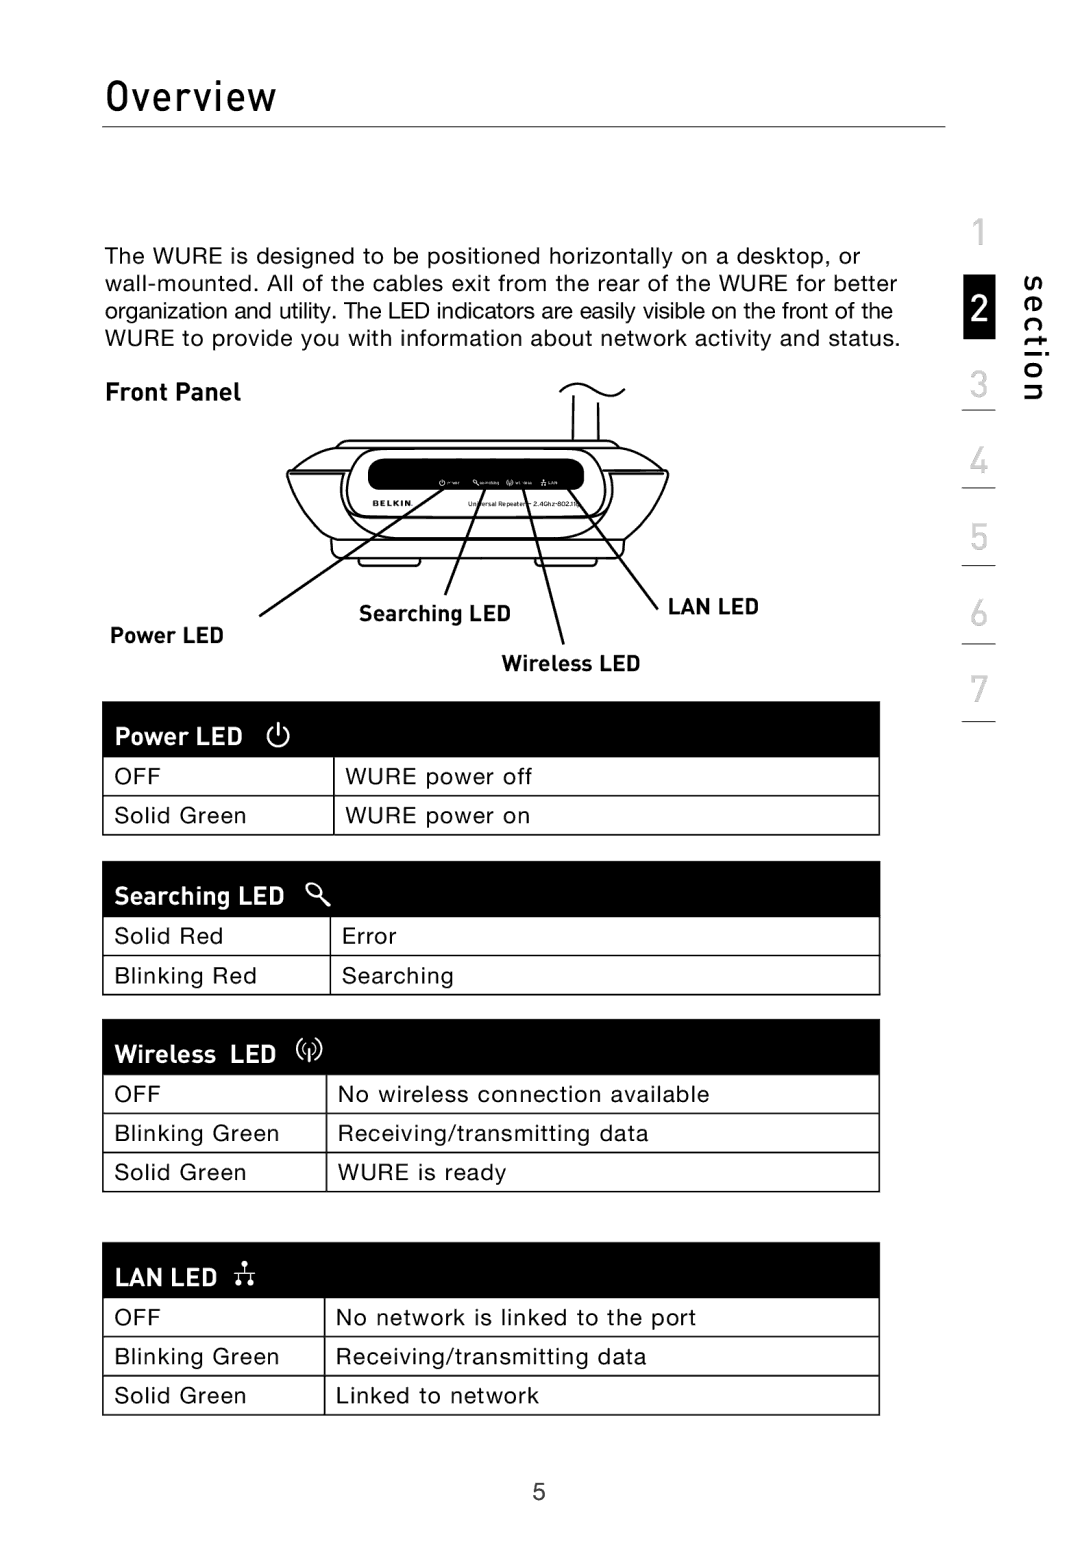
Range Extender Access Point
Wireless G Universal
Increase your wireless coverage
Range Extender Access Point
Wireless G Universal
F5D7132
1 Introduction
Table of Contents
section
Advantages of a Wireless Network
Introduction
1. Wireless Router or Access Point Placement
Introduction
3. Cordless Phone Placement
4. Choose the “quietest” channel for your wireless network
section
2. Avoid Obstacles and Interference
5. Secure Connections, VPNs, and AOL
US 877-736-5771 310-898-1100 ext
Europe 00 800 223 55 460 Australia
New Zealand 0800 235 546 Singapore
Power LED
Wireless LED
Overview
Front Panel
Back Panel Power Jack
Reset Button
a. Resetting the WURE
b. Restoring the Factory Defaults
Package Contents
Specifications
Wireless
System Requirements
Connecting as a Wireless Access Point
Configuring the WURE
Configuring as a Wireless Access Point 1. Connect
2. Install
3. Configure
Running the Easy Install Wizard Software
Running the Wireless Range Extender Management Utility
Configuring the WURE
4. Advanced Configuration
Configuring your WURE through the Web-Based Advanced User Interface
Configuring the WURE
Congratulations. Your WURE is now set up for access point
Configuring as a Wireless G Universal Range Extender
2. Configure
Connecting the WURE
Configuring with One-Touch Setup
Repositioning the WURE in a Weak Signal Area or Dead Spot
3. Reposition
Configuring the WURE
section
Using the Web-Based Advanced User Interface
Windows 98SE, Me, 2000, and XP
section
Logging into the WURE
Using the Web-Based Advanced User Interface
Logging out of the WURE
Understanding the Web-Based Advanced User Interface
1 Quick Navigation Links
Using the Web-Based Advanced User Interface
4 Login/Logout Button
6 LAN Settings
7 Features
Using the Web-Based Advanced User Interface
Wireless Basic
Changing the Wireless Network Name SSID
Using the Wireless Mode Switch
When to Use 54g-LRS Mode
Changing the Wireless Channel
54g-Auto Mode
Using the Broadcast SSID Feature
Using the Web-Based Advanced User Interface
section
Protected Mode
Using the Web-Based Advanced User Interface
Repeater Mode
Using the Web-Based Advanced User Interface
3. The status of your connection will show in the “Status” box
Using the Web-Based Advanced User Interface
section
Using the Web-Based Advanced User Interface
Securing your Wi-Fi Network
Name
WEP Wired Equivalent Privacy
64-Bit WEP
128-Bit WEP
Encryption Keys
Using the Web-Based Advanced User Interface
WPA Wi-Fi Protected Access
Sharing the Same Network Keys
Using a Hexadecimal Key
For instance AF 0F 4B C3 D4 = 64-bit key C3 03 0F AF 0F 4B B2
C3 D4 4B C3 D4 E7 = 128-bit key
Using the Web-Based Advanced User Interface
WEP Setup
64-Bit WEP Encryption
For instance AF 0F 4B C3 D4 = 64-bit WEP key
Using the Web-Based Advanced User Interface
128-Bit WEP Encryption
Using the Web-Based Advanced User Interface
section
C3 03 0F AF 0F 4B B2 C3 D4 4B C3 D4 E7 = 128-bit WEP key
WPA Setup
Changing the Wireless Security Settings
Setting WPA-Personal PSK
Using the Web-Based Advanced User Interface
section
Using the Web-Based Advanced User Interface
3. Enter your pre-shared key. This can be from eight to 63 characters and can be letters, numbers, or symbols. This same key must be used on all of the clients that you set up. For example, your PSK might be something like “Smith family network key”
Setting WPA2-Personal AES
Using the Web-Based Advanced User Interface
Setting MAC Address Filtering
To Enable an “Allow” List
To Enable a Deny List
MAC Address Control
Restoring Factory Default Settings
Changing System Settings
Setting or Changing the Administrator Password
section
Saving a Current Configuration
Changing System Settings
The configuration is now saved
section
Restoring a Previous Configuration
Changing System Settings
Updating Firmware
Checking for a New Version of Firmware
section
Downloading a New Version of Firmware
Changing System Settings
Updating the WURE’s Firmware
Changing System Settings
4. You will be asked if you are sure you want to continue. Click “OK”
Changing System Settings
section
Troubleshooting
Problem
Solution
Does the name of your wireless network appear in the results?
Troubleshooting
Problem
Solution
Problem
Solution
Troubleshooting
Problem
For example C3 03 0F AF 4B B2 C3 D4 4B C3 D4 E7 E4 = 128-bit key
Troubleshooting
Problem
Solution
Troubleshooting
Problem
Solution
5. Under “Data Encryption” select “WEP”
Troubleshooting
Problem
Solution
Problem
Troubleshooting
Problem
Solution
Problem
Supported Operating Systems
Enabling WPA-PSK no server
Troubleshooting
Problem
What’s the difference between 802.11b, 802.11g, 802.11a, and 802.11n?
Troubleshooting
Wireless Comparison Chart
Technical Support
US 877-736-5771 or 310-898-1100 ext
Troubleshooting
Information
FCC Statement
F5D7132 to which this declaration relates
DECLARATION OF CONFORMITY WITH FCC RULES FOR
Modifications
Canada-Industry Canada IC
Europe-European Union Notice
Information
Belkin Corporation Limited Lifetime Product Warranty
Information