English
Using the menus
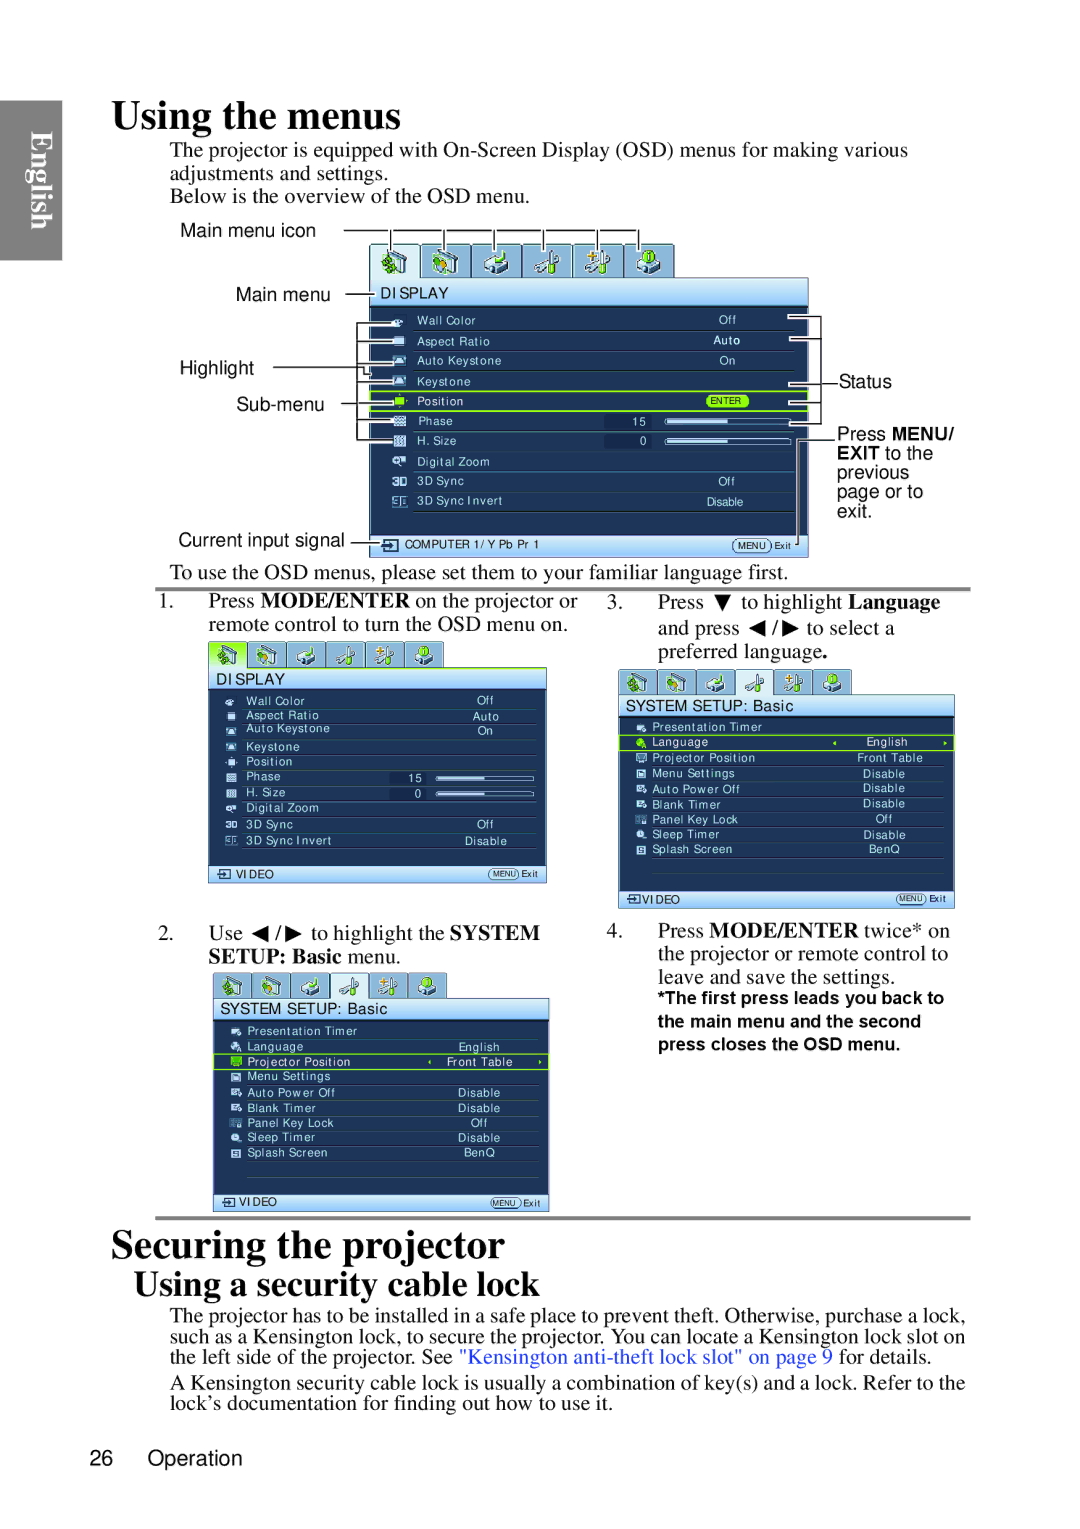
The projector is equipped with
Below is the overview of the OSD menu.
Main menu icon
Main menu |
|
|
|
|
|
|
| DISPLAY | Off |
|
|
|
|
|
|
|
| ||||
|
|
|
|
|
|
|
|
|
|
|
|
|
| ||||||||
|
|
|
|
|
|
|
|
|
|
|
| Wall Color |
|
|
|
|
|
|
|
| |
|
|
|
|
|
|
|
|
|
|
|
| Aspect Ratio | Auto |
|
|
|
|
|
|
|
|
|
|
|
|
|
|
|
|
|
|
|
|
|
|
|
|
|
|
| |||
Highlight |
|
|
|
|
|
|
|
|
|
|
| Auto Keystone | On |
|
|
|
|
|
|
| Status |
|
|
|
|
|
|
|
|
|
|
|
|
|
|
|
|
| |||||
|
|
|
|
|
|
|
|
| Keystone |
|
|
|
|
|
|
|
| ||||
|
|
|
|
|
|
|
|
|
|
|
|
|
|
|
| ||||||
|
|
|
|
|
|
|
|
|
|
|
|
|
|
|
| ||||||
|
|
|
|
|
|
|
|
| Position | ENTER |
|
|
|
|
|
|
|
| |||
|
|
|
|
|
|
|
|
|
|
|
|
|
|
|
|
|
|
|
| ||
|
|
|
|
|
|
|
|
|
|
|
| Phase | 15 |
|
|
|
|
| Press MENU/ | ||
|
|
|
|
|
|
|
|
|
|
|
|
|
|
|
|
| |||||
|
|
|
|
|
|
|
|
|
|
|
|
|
|
|
|
| |||||
|
|
|
|
|
|
|
|
|
|
|
| H. Size | 0 |
|
|
|
|
| |||
|
|
|
|
|
|
|
|
|
|
|
| Digital Zoom |
|
|
|
|
|
| EXIT to the | ||
|
|
|
|
|
|
|
|
|
|
|
| 3D Sync | Off |
|
|
|
|
| previous | ||
|
|
|
|
|
|
|
|
|
|
|
| 3D Sync Invert | Disable |
|
|
|
|
| page or to | ||
|
|
|
|
|
|
|
|
|
|
|
|
|
|
|
|
| exit. | ||||
|
|
|
|
|
|
|
|
|
|
|
|
|
|
|
|
|
|
| |||
Current input signal |
|
|
|
|
|
|
|
|
| COMPUTER 1/Y Pb Pr 1 | MENU | Exit |
|
|
| ||||||
|
|
|
|
|
|
|
|
| |||||||||||||
To use the OSD menus, please set them to your familiar language first.
1. | Press MODE/ENTER on the projector or | 3. | Press | to highlight Language | ||
| remote control to turn the OSD menu on. |
| and press | / | to select a | |
|
|
|
| preferred language. | ||
| DISPLAY |
|
|
|
|
|
| Wall Color | Off |
| SYSTEM SETUP: Basic |
| |
| Aspect Ratio | Auto |
| Presentation Timer |
| |
| Auto Keystone | On |
| English | ||
| Keystone |
|
| Language |
| |
|
|
| Projector Position | Front Table | ||
| Position |
|
| |||
|
|
| Menu Settings |
| Disable | |
| Phase | 15 |
|
| ||
| H. Size | 0 |
| Auto Power Off |
| Disable |
|
| Blank Timer |
| Disable | ||
| Digital Zoom |
|
|
| ||
| 3D Sync | Off |
| Panel Key Lock |
| Off |
|
| Sleep Timer |
| Disable | ||
| 3D Sync Invert | Disable |
|
| ||
|
| Splash Screen |
| BenQ | ||
|
|
|
|
| ||
| VIDEO | MENU Exit |
|
|
|
|
|
|
|
| VIDEO |
| MENU Exit |
2.Use  /
/  to highlight the SYSTEM SETUP: Basic menu.
SYSTEM SETUP: Basic
Presentation Timer |
|
Language | English |
Projector Position | Front Table |
Menu Settings |
|
Auto Power Off | Disable |
Blank Timer | Disable |
Panel Key Lock | Off |
Sleep Timer | Disable |
Splash Screen | BenQ |
VIDEO | MENU Exit |
4.Press MODE/ENTER twice* on the projector or remote control to
leave and save the settings.
*The first press leads you back to the main menu and the second press closes the OSD menu.
Securing the projector
Using a security cable lock
The projector has to be installed in a safe place to prevent theft. Otherwise, purchase a lock, such as a Kensington lock, to secure the projector. You can locate a Kensington lock slot on the left side of the projector. See "Kensington
A Kensington security cable lock is usually a combination of key(s) and a lock. Refer to the lock’s documentation for finding out how to use it.
26 Operation
