CombiMax
00 800 Brauninfoline
600 650
CombiMax
Gerätebeschreibung
Deutsch
Vorsicht
Überlastungsschutz
Kneten
Abnehmen der Universal- schüssel und des Deckels
Reinigung
Rühren
Schlagen mit dem Quirl r
Hacken
Schneiden, Raspeln und Reiben
Weiteres Zubehör
Sonderzubehör
Braun Zerkleinerer-Zubehör CH 600 Type
Geschwindigkeit Einschaltzeit Zitronat Zitronat und Nüsse
Vorsicht
Rezeptbeispiel Honig-Konfekt
Reinigung
English
Specifications
Pulse mode « pulse»
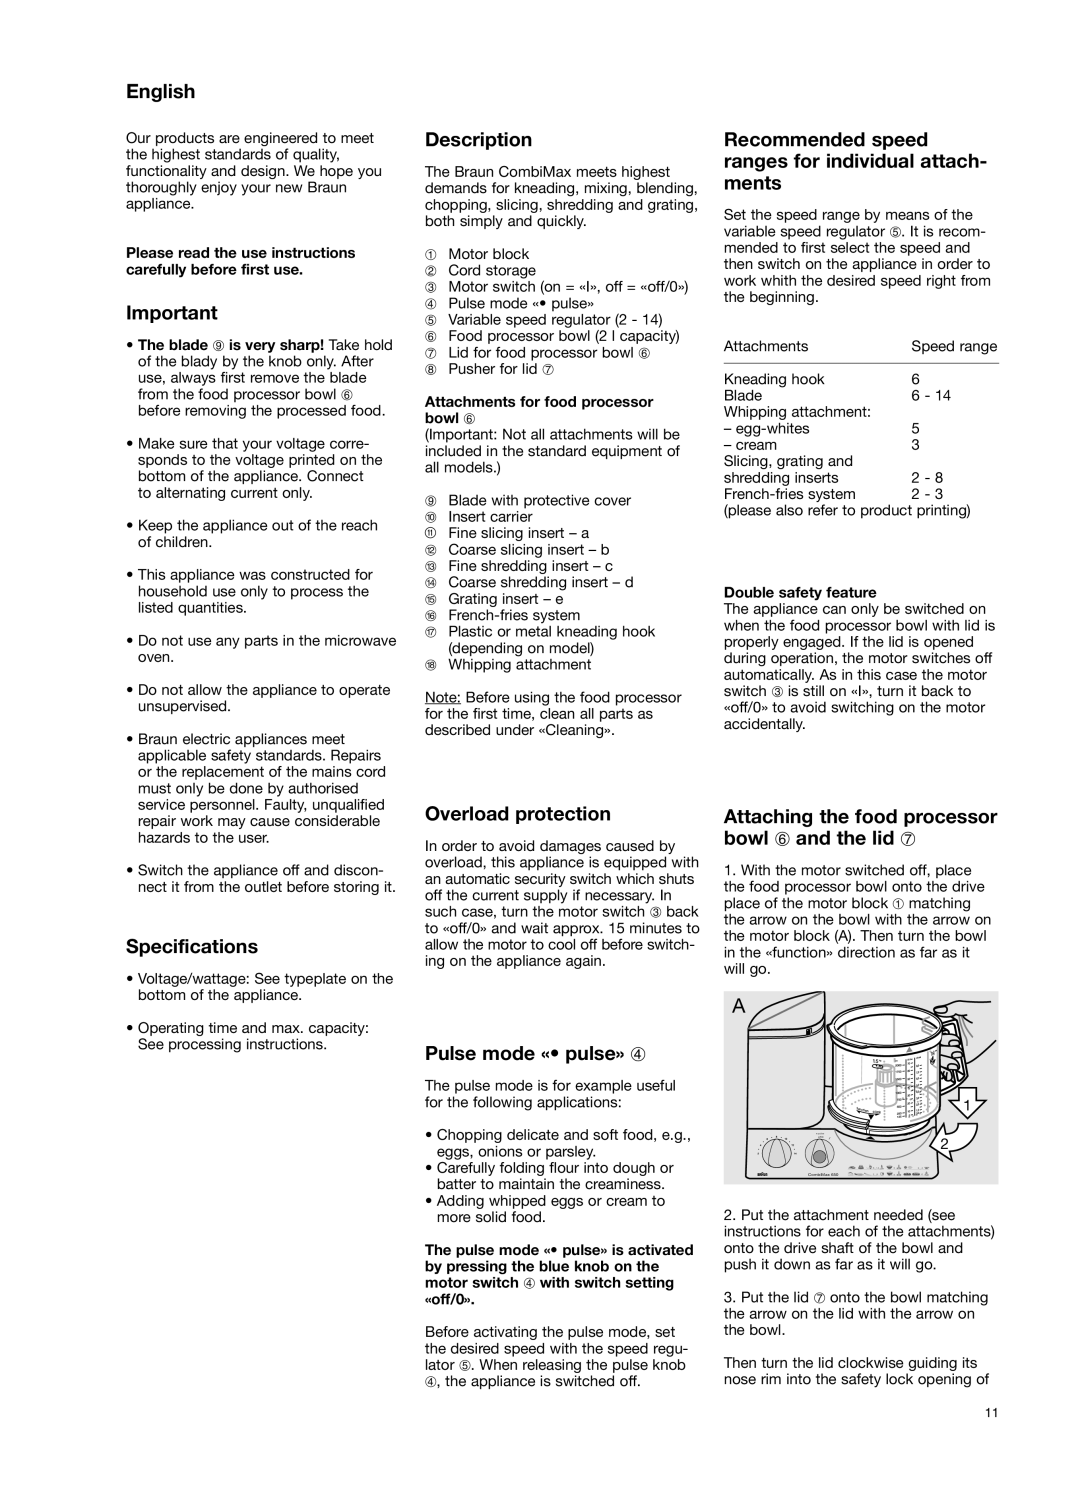
Description
Kneading
Cleaning
Removing the food processor bowl and the lid
Mixing
Slicing, shredding, grating
Other accessories
Chopping
Whipping with the whipping attachment r
Special accessories
Cleaning
Recipe example for max. power consumption Gingerbread
Processing examples recommended quantity max ml/200 g
Protection contre la surcharge
Français
Précisions
Double sécurité
Pétrir
Pour retirer le bol universel et le couvercle
Nettoyage
Mélanger
Émincer, râper, gratter
Autres accessoires
Hacher
Fouetter r
Accessoires spéciaux
Crus ou cuits/pas 20 30 sec Légumes/fruits ’aliments chauds
Nettoyage
Especificaciones
Español
Importante
Descripción
Amasar
Desmontando el recipiente procesador de alimentos y la tapa
Limpieza
Mezclar
Montar con el accesorio montador r
Picar
Cortar, cortar a tiras, rallar
Otros accesorios
Braun Citrus press PJ 600 Type 3200, Velocidad 2
Sujeto a cambios sin previo aviso
Accesorios especiales
Braun Accesorio picador CH 600 Type
Ejemplos de procesado cantidad recomendada max ml/200 grs
Precaución
Limpieza
Descrição
Português
Especificações
Protecção contra sobrecarga
Amassar
Remover o recipiente do processador e a tampa
Limpeza
Misturar
Bater com o acessório batedor r
Cortar
Fatiar, picar, ralar
Outros acessórios
Acessórios especiais
Receita exemplo para o consumo máximo de energia Biscoitos
Cuidado
Limpeza
Caratteristiche tecniche
Velocità di lavorazione consigliate per singolo accessorio
Italiano
Descrizione
Impasti duri
Rimuovere il recipiente universale e il coperchio
Pulizia
Impasti cremosi
Utilizzo del tritatutto
Utilizzo dell’accessorio per montare r
Altri accessori
Utilizzo delle lame per affettare, sminuzzare, grattugiare
Accessori speciale
Esempi di lavorazioni
Attenzione
Pulizia
Beschrijving
Nederlands
Belangrijk
Beveiliging tegen overbelasting
Kneden
Verwijderen van food- processorkom en de deksel
Schoonmaken
Mixen/mengen
Kloppen met de slagroom-/ eiwitklopper r
Hakken
Snijden, raspen, schaven
Overige hulpstukken
Braun Hakmolen accessoire CH 600 Type
Speciale accessoires
Braun Citruspers PJ 600 Type 3200, Snelheid 2
Schakelstand Tijd/Aantal Hoeveelheid Bewegingen met
Waarschuwing
Voorbeelden voor het gebruik van de hakmolen
Voorbeeldrecept voor maximale snelheid Honingkoek
Beskrivelse
Dansk
Vigtige sikkerhedsforanstaltninger
Anbefalede hastigheder til brug af tilbehørsdelene
Mixning
Afmontering af food processor skålen og låget
Æltning
Rengøring
Hakning
Øvrigt tilbehør
Braun Citruspresse PJ 600 Type 3200, Hastighed 2
Specielt tilbehør
Braun Hakketilbehør CH 600 Type
Vær forsigtig
Rengøring
Spesifikasjoner Beskrivelse
Norsk
Viktig
Montering av foodprocessor- bollen 6 og lokket
Elting
Demontering av foodprocessor-bollen og lokket
Rengjøring
Miksing
Snitting, riving, rasping
Hakking
Andre tilbehør
Spesial-tilbehør
Braun Sitruspresse PJ 600 Type 3200, Hastighet 2
Bearbeidingseksempler
Rengjøring
Beskrivning
Svenska
Viktigt
Rekommenderade hastigheter för tillbehören
Att knåda
Att ta av matberedarskålen och locket
Rengöring
Att mixa
Att vispa med vispen r
Att hacka
Att skära, stimla och riva
Tillbehör
Braun citruspress PJ 600 Type 3200, Hastighet 2
Extra tillbehör
Braun Hacktillsats CH 600 Type
Exempel på recept med maximal mängd Honungskaka
Viktigt
Rengöring
Tekniset tiedot
Suomi
Tärkeää
Laitteen osat
Vaivaaminen
Peruskulhon ja kannen irrottaminen
Puhdistus
Sekoittaminen
Hienontaminen
Muut lisäosat
Lisävarusteet
Varoitus
Puhdistus
Dane techniczne
Polski
Zaktadanie pojemnika uni- wersalnego 6 i pokrywki
Wyrabianie ciasta
Zdejmowanie pojemnika uni- wersalnego i pokrywki
Czyszczenie
Mieszanie
Ubijanie za pomocà Koƒcówki do ubijania r
Siekanie
Krojenie, przeciearanie, tarcie
Inne wyposa˝enie dodatkowe
Wyposa˝enie dodatkowe
Przyk∏ady przetwarzania produktów spo˝ywczych
Uwaga
Czyszczenie
Tanımlama
Türkçe
Önemli
Aµırı-yük koruması
Yoπurma
Yiyecek iµleme kase ve kapaπ∂n sökülmesi
Temizlik
Karıµtırma
Dilimleme, doπrama, rendeleme Çırpma ataçmanı r ile çırpma
Doπrama
Aksesuarlar
Özel Aksesuarlar
Maximum güç tüketimi için yemek örnekleri Zencefilli çörek
Dikkat
Iµleme örnekleri
Temizleme
˘ÓÈÛÙÒÌÂÓ˜ Ù·¯‡ÙËÙ˜ ÁÈ· οı ÂÍ¿ÚıËÌ·
ËÌ·ÓÙÈÎfi
∆ÔÔı¤ÙËÛË ÙÔ˘ ÌÔÏ ÂÂÍÂÚÁ·Û›·˜ 6 Î·È ÙÔ˘ η·ÎÈÔ‡
∞Ó¿ÌÈÍË
·ı·ÚÈÛÌfi˜
∑‡ÌˆÌ·
∞ӷοÙÂÌ·
∂Í¿ÚÙËÌ· ¯Ù˘ËÙ‹ÚÈ r
„ÈÌÔ
„ÈÌÔ, ÙÚ›„ÈÌÔ
∞ÏÏ· ÂÍ·ÚÙ‹Ì·Ù·
ÂÍÔ˘ÛÈÔ‰ÔÙË̤ӷ Û˘ÓÂÚÁ›· Ù˘
¶·Ú·Î·Ïԇ̠ÌËÓ ÂÙ¿ÍÂÙ ÙË Û˘Û΢‹ ÛÙ· ÔÈÎȷο
˘ÏÏÔÁ‹˜ Ô˘ ·Ú¤¯ÔÓÙ·È ÛÙË
·ı·ÚÈÛÌfi˜
‡˘ËÚ‡ ÓÚ Ô„ÛÁÍË
ÊÛÒÒÍËÈ
ËÔˆËÙË͇ˆËfl
ÀÏÔÛθÒÌ˚È ÂÊËÏ « pulse»
‡Ï¯˂‡ÌËÂ
ËÌflÚË ·Óθ¯ÓÈ Âïíóòúë Ë Í˚¯ÍË
ÓËÒÚ͇
ÈÂÂϯ˂‡ÌËÂ
‡ÂÁ‡ÌË ÎÓÏÚËÍÓ‚ Ë ÒÚÛÊÍË, ÚÂ͇
Ê۷͇
ÇÁ·Ë‚‡ÌËÂ Ò ÔÓÏÓ˘¸˛ ̇҇‰ÍË ‰Îfl ‚Á·Ë‚‡ÌËfl r
Ó‰ÛÍÚ˚, Ô‰̇Á̇˜ÂÌÌ˚ ‰Îfl
ËÔˆˇθÌ˚ ÔË̇‰ÎÂÊÌÓÒÚË
ËËÒÚÂχ, ËÁÏÂθ˜‡˛˘‡fl
·Ê‡Ë‚‡ÌËfl p
ÓËÒÚ͇
‰ÓÒÚÂÂÊÂÌËÂ
ËÏÂ˚ Ó·‡·ÓÚÍË
Izzo u
ÌÒÚ‡Ìӂ͇ ‚ÂÎËÍÓª πÏÌÓÒÚ¥ 6 Ú‡ Í˯ÍË
Ì͇ªÌҸ͇
‡ıËÒÚ ‚¥‰ Ô‚‡ÌÚ‡ÊÂÌÌfl
ËÔˆË٥͇ˆ¥fl
‡Ï¥¯Û‚‡ÌÌfl
ÁÌflÚÚfl ‚ÂÎËÍÓª πÏÌÓÒÚ¥ Ú‡ Í˯ÍË
ÓˢÂÌÌfl
ÈÂÂÏ¥¯Û‚‡ÌÌfl
‡¥Á‡ÌÌfl ÒÍË·Ó˜ÓÍ ¥ ÒÚÛÊÍË, ÚÂÚfl
ÊÛ·‡ÌÌfl
·Ë‚‡ÌÌfl Á‡ ‰ÓÔÓÏÓ„Ó˛ ̇҇‰ÍË ‰Îfl Á·Ë‚‡ÌÌfl r
ˉ·‡ÚË ˜ÂÂÁ ÏÂÂÊÛ ‰ËÎÂ¥‚ Ú‡ Ò‚¥ÒÌËı ˆÂÌÚ¥‚
ß̯¥ ̇҇‰ÍË
ËÔˆ¥‡Î¸Ì ÔË·‰‰fl
‡„‡Î¸Ì¥ ÛÏÓ‚Ë Á·Â¥„‡ÌÌfl
‚‡„‡
Braun ÄÍÒÂÒÛ‡ ‰Îfl ̇¥Á‡ÌÌfl CH 600 íËÔ
ËÍ·‰Ë Ó·Ó·ÍË
Page
Page
Page
Page
Page
Page
Page
For UK only
Guarantee
Garantie
Garantía
Takuu
Garanti
Warunki gwarancji
Braun
‡‡ÌÚËÈÌ˚ ӷflÁ‡ÚÂθÒÚ‚‡ ÙËÏ˚
ËÒÔÓθÁÓ‚‡ÌË ‚
Ì͇ªÌҸ͇
‰ÂÙÂÍÚË, ‚ËÍÎË͇̥ ÙÓÒ- χÊÓÌËÏË Ó·ÒÚ‡‚Ë̇ÏË