CPS5XVY
Operation Manual
GETTING READY SEWING BASICS UTILITY STITCHES EMBROIDERY APPENDIX
Computerized Sewing and Embroidery Machine
Declaration of Conformity For USA Only
Federal Communications Commission FCC
Important Safety Instructions
FOR USERS IN AUSTRALIA AND NEW ZEALAND
7For a longer service life
8For repair or adjustment
FOR USERS IN THE UK, EIRE, MALTA AND CYPRUS ONLY
SEWING BASICS
Contents
GETTING READY
UTILITY STITCHES
EMBROIDERY
Upgrading Your Machine’s Software
APPENDIX
Care and Maintenance
Troubleshooting
Introduction
Sewing Machine Features
Introduction / Sewing Machine Features
Included accessories
Accessories
Others
Accessories
Part Name
Part Code
Memo
Optional accessories
i Embroidery unit connector slot
Names of Machine Parts and Their Functions
Front view
Names of Machine Parts and Their Functions
f Main power switch
Needle and presser foot section
Right-side/rear view
d USB port connector
c “Needle Position” button
Operation buttons
a “Start/Stop” button
b “Reverse/Reinforcement Stitch” button
b Back key
Operation panel
h Settings key
a LCD liquid crystal display touch panel
1 GETTING READY
Use only the power cord included with this machine
Power supply precautions
When you are away from the machine After using the machine
When the power fails during use
Turning the Machine On/Off
Turning on the machine
Turning off the machine
Viewing the LCD
LCD Liquid Crystal Display Operation
LCD Liquid Crystal Display Operation
Changing the machine settings
a Turn on the sewing machine
bPresspanel. Settings key on the operation
X The settings screen appears
Switch screens using Previous page key and Next page key
h Presser foot replacement
Checking machine operating procedures
a Upper threading b Bobbin winding c Bobbin installation
d Needle replacement e Embroidery unit attachment
eAfter you finish looking, press Back key two times
dPressnext page. Next page key to switch to the
If you press Previous page key, you return to the previous page
† Example Upper threading
Winding the bobbin
Winding/Installing the Bobbin
Bobbin precautions
Winding/Installing the Bobbin
a Turn on the sewing machine bOpen the top cover
If the spool net is too long, fold it to fit the size of the spool
nPress “Start/Stop” button once to start winding the bobbin
Installing the bobbin
gReattach the bobbin cover
Upper Threading
Upper Threading
About the spool of thread
Set the spool of thread on the spool pin, and then thread the machine
Threading the upper thread
i Pass the thread under the thread guide plate, and then pull it up
cLower the presser foot lever to lower the presser foot
Threading the needle
Threading the needle manually without using the needle threader
Using the twin needle
kPress
i Attach zigzag foot “J”
j Turn on the sewing machine and select a stitch
When changing the sewing direction
Pulling up the bobbin thread
Replacing the Needle
Needle precautions
Tricot
Needle types and their uses
Replacing the Needle
Fabric Type/Application
Replacing the needle
Checking the needle
a Needle stopper
Install the twin needle in the same way
a Screwdriver b Needle clamp screw
Replacing the presser foot
Presser foot precautions
This section describes how to replace the presser foot
Replacing the Presser Foot
Replacing the Presser Foot
Removing and attaching the presser foot holder
Sewing Cylindrical Pieces
Sewing Cylindrical Pieces
Free-arm sewing
Free-arm sewing makes sewing cylindrical pieces easy
GETTING READY
The necessary preparations for sewing are described in this chapter
Adjusting the stitch width
Adjusting the stitch length
SEWING BASICS
Sewing
General sewing procedure
Sewing
Selecting stitching
X The fabric is now positioned to be sewn
Positioning the fabric
dWhen you have finished sewing, press “Needle Position” button
Starting to sew
starts, the machine will sew at a slow speed
Using the operation button
SEWING BASICS
d After sewing back to the beginning of the
Securing the stitching
f When the end of the stitching is reached, press
bPress “Start/Stop” button or press down on the foot controller
release “Reverse/Reinforcement Stitch” button
Cutting the thread
Using “Thread Cutter” button
gAfter 3 to 5 reverse stitches have been sewn
Using the thread cutter
Adjusting the stitch width
Setting the Stitch
Setting the Stitch
Adjusting the stitch length
Adjusting the thread tension
Upper thread is too loose
Automatically sewing reverse/ reinforcement stitches
Useful Functions
Functions useful in improving sewing efficiency are described below
Useful Functions
stitching, press “Reverse/Reinforcement Stitch” button once
Automatically cutting the thread
Mirroring stitches
Changing the sewing direction
Adjusting the presser foot pressure
Useful Sewing Tips
Trial sewing
Useful Sewing Tips
Sewing thick fabrics
Sewing an even seam allowance
Sewing thin fabrics
Sewing stretch fabrics
Sewing leathers or vinyl fabrics
a Tabs b Notches
Hands-free raising and lowering of the presser foot
a Seam b Presser foot c Centimeters d Inches e Needle plate
f 1.6 cm 5/8 inch
cRelease the knee lifter
Using the knee lifter aStop the sewing machine
Appliqué, Patchwork and
3 UTILITY STITCHES
Sewing overcasting stitches
Sewing Stretch Fabrics and
Left
Stitch Setting Chart
Utility stitches
UTILITY STITCHES
NeedleTwin
Stitch Setting Chart
FootPresser
Buttonhole stitch
Decorative stitch
Serpentine stitch
Hemstitching
stitch
utility
Other stitches
stitches
Left/RightFlipping
Gothic font
Outline
Adjustable Stitching Density
Adjustable Pattern Length/width
Selecting Stitching
Selecting Stitching
Stitch types
UTILITY STITCHES
straight stitch
Saving stitch settings
† Example Bus
† To use a stitch length of 2.0 mm for the
not saved unless is pressed another time
e Press
Overcasting Stitches
Sewing overcasting stitches using overcasting foot “G”
Overcasting Stitches
3-point
Sewing overcasting stitches using zigzag foot “J”
2-point
Stitch Name
Sewing overcasting stitches using the optional side cutter
a 2 cm 3/4 inch
hPosition the fabric in the side cutter
f Select a stitch
i Lowersewing.the presser foot lever, and then start
Basic Stitching
Basic Stitching
Basting
Basic stitching
Changing the needle position
f When sewing is finished, cut the thread
Attach blind hem foot “R”
Sew a blind hem according to the following procedure
Blind Hem Stitching
Blind Hem Stitching
If the needle catches too much of the hem fold
Buttonhole Stitching/Button Sewing
Buttonhole Stitching/Button Sewing
Buttonhole sewing
a 10 mm 3/8 inch b 15 mm 9/16 inch
a Presser foot scale
b Length of buttonhole diameter + thickness of button
c 5 mm 3/16 inch
fPullpossible.down the buttonhole lever as far as
bIt fits into the grooves, and then loosely tie it
d Select stitch
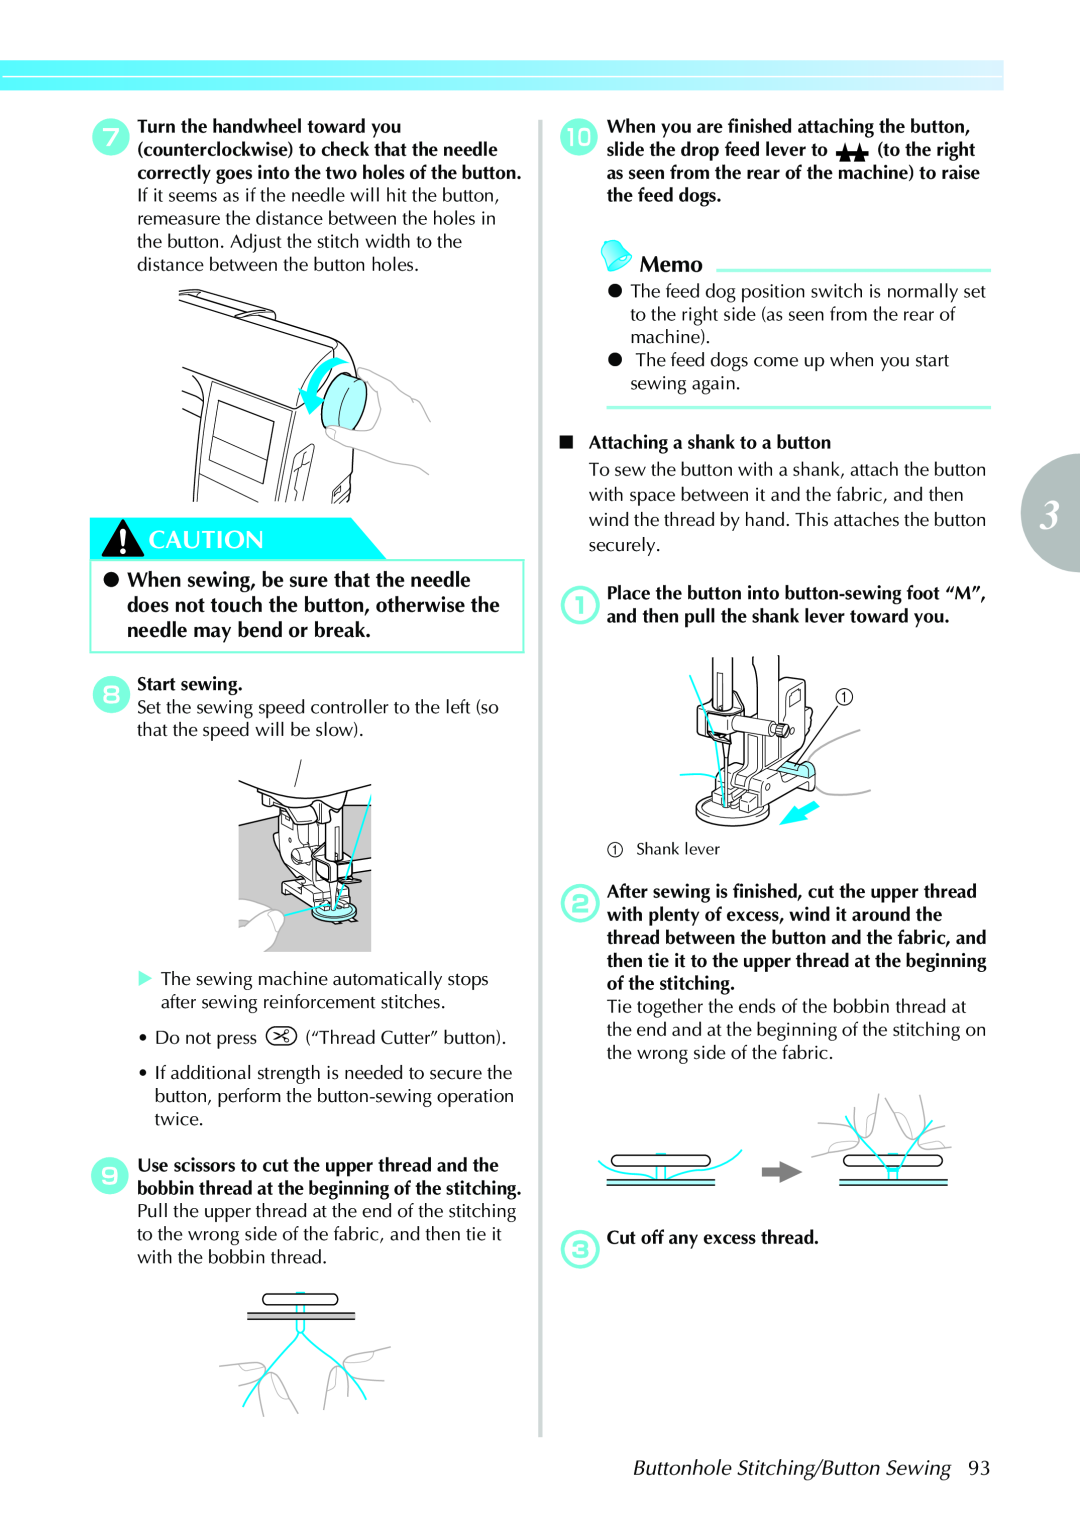
Button sewing
a Measure the distance between the holes in the button to be attached
c Attach button-sewing foot “M”
j When you are finished attaching the button
A zipper can be sewn in place
Zipper Insertion
Inserting a centered zipper
Zipper Insertion
Inserting a side zipper
a Pin on the left side b Needle drop point
a Basting stitching
nTopstitch around the zipper
Zipper/piping Insertion
Zipper/piping Insertion
A zipper and piping can be sewn in place
Inserting a piping
Stretch fabrics can be sewn and elastic tape can be attached
Sewing Stretch Fabrics and Elastic Tape
Stretch stitching
Elastic attaching
cSelect a stitch
Appliqué, Patchwork and Quilt Stitching
Appliqué, Patchwork and Quilt Stitching
Appliqué stitching
Piecing
Patchwork crazy quilt stitching
bAttach the 1/4 inch quilting foot
Using the optional 1/4 inch quilting foot
fWhen the end of the stitching is reached, stop the sewing machine
For a seam allowance on the left side
b Removeholder. the presser foot and the presser foot
Quilting
Free-motion quilting
a Pattern
Satin stitching using the sewing speed controller
a Feed dog position switch as seen from the rear of the machine
f Select stitch
ePress Back key
Reinforcement Stitching
Reinforcement Stitching
Triple stretch stitching
Bar tack stitching
UTILITY STITCHES
Darning
ePullpossible.down the buttonhole lever as far as
Eyelet Stitching
Eyelet Stitching
Horizontal Stitching
j Start sewing
Horizontal Stitching
hPressbutton. “Reverse/Reinforcement Stitch”
The utility stitches contain the following decorative stitches
Decorative Stitching
Decorative Stitching
Fagoting
a 1 cm 3/8 inch
Scallop stitching
Smocking
Shell tuck stitching
Joining
Heirloom stitching
Drawnwork Example aPull out several threads from the fabric
a 4 mm 3/16 inch
Sewing patterns
Sewing the Various Built-in Decorative Patterns
Sewing beautiful patterns
Sewing the Various Built-in Decorative Patterns
Changing the pattern size
Changing the stitch density
Each time you press it the number changes You can select from
Changing the length for satin stitches
The length for one satin stitch can be changed in five gradations
X It turns to and the pattern is longer
X The next pattern selected is moved half a width to the right
Shifting patterns
Combining patterns
aAfter.the patterns have been combined, press
cSelect the next pattern
dAfter all of the desired patterns are selected, start sewing
Repeating patterns
bPress , and confirm the pattern cPress Back key
Mirroring a pattern image
Checking the pattern
aPress
bPresspanel. Memory key on the operation
Saving patterns
cCheck the contents, and then press
Saving a pattern aCreatesave. the combined pattern that you wish to
piece of scrap fabric that is the same as that used for
Realigning the pattern
The pattern may not be sewn correctly, depending on
the type of fabric being sewn or the sewing speed. If
for horizontal pattern adjustment
Press to increase the horizontal space in the design
Horizontal pattern adjustment
X It returns to the screen for adjusting the pattern
Continue adjusting the pattern until it is sewn correctly
Designing a Pattern My Custom Stitch
Designing a Pattern My Custom Stitch
Drawing a sketch of the pattern
Entering the pattern data
patterns” page
To revise the pattern, press
Examples of designs
4 EMBROIDERY
Embroidery unit precautions
Setting the fabric
Using an embroidery card
EMBROIDERY
Embroidering Neatly
What to prepare
Embroidering Neatly
Embroidery step by step
Attaching the Embroidery Foot
This section describes how to attach the embroidery foot
Attaching the Embroidery Foot
Attaching the embroidery foot
f Hold the embroidery foot with your right hand, as shown
Removing the embroidery foot
Attaching the embroidery unit
Embroidery unit precautions
This section describes how to attach the embroidery unit
Attaching the Embroidery Unit
f Be sure that no objects or hands are near the
Attaching the Embroidery Unit
d Slide the embroidery unit onto the sewing machine arm
e Turn on the sewing machine
Removing the embroidery unit
Preparing the Fabric
Preparing the Fabric
Attaching an optional stabilizer material to the fabric
Setting the fabric in the embroidery frame
dTighten the adjustment screw by hand just enough to secure the fabric
bPlace the embroidery sheet on the inner frame
Attaching the Embroidery Frame
Attaching the Embroidery Frame
Attaching the embroidery frame
Removing the embroidery frame
Selecting Embroidery Patterns
Selecting Embroidery Patterns
Copyright information
Embroidery pattern types
Operation keys
LCD liquid crystal display operation
LCD button
† Example Welcome
Selecting characters
a Select the character stitches bSelect the character style
cSelect the characters
bSelect the pattern
Selecting an embroidery pattern
70 Embroidery patterns 66 Embroidery patterns
a Select the type of the embroidery pattern
cSelect the stitch
Selecting a frame pattern
a Press the frame pattern
bSelect the frame shape
Using an embroidery card sold separately
Sewing attractive finishes
Embroidering
a b d e
Embroidering a pattern
If the thread is pulled too tight, the needle may break or bend
Embroidering
hPress “Start/Stop” button again
dLower the presser foot lever
ePress “Start/Stop” button
g Use scissors to cut the thread at the beginning of the stitching
the sewing machine stops
Appliquéing
iLower the presser foot lever, and press “Start/Stop” button
Editing Patterns
Adjusting the layout
This section describes ways to edit, adjust, and reposition patterns
Editing Patterns
Starting point key
Layout key
Rotation key
Horizontal mirror image key
z You can also check the pattern size and
Thread runs out partway through a design
Resewing
Stopping while embroidering
kRestart the embroidery
hPress
jPress Forward one stitch to increase the needle count
If is pressed continuously, it moves forward 1 - 9 - 30 stitches
Using the Memory Function
Using the Memory Function
Embroidery data precautions
X After the pattern is saved, the initial screen appears again
Retrieving embroidery patterns from the computer
f Press
gAdjust the pattern as desired, and then begin embroidering
error message, repeat the procedure starting
e Select the pattern you wish to retrieve
5 APPENDIX
Simple sewing machine maintenance operations are described below
Care and Maintenance
Cleaning the machine surface
Cleaning the race
Care and Maintenance
Troubleshooting
neatly on the
Troubleshooting
is tangled or
skipped
in the LCD
the needle may break and cause injury
Error messages
A stitch other than the buttonhole, bar tack or darning stitch was
The upper thread has become tangled around the bobbin case, and the
Operation beep
Adjusting the LCD
Canceling the operation beep
Upgrading Your Machine’s Software
Index
Numerics
Upgrading Your Machine’s Software / Index
Page
Index
English 885-U11 XE0535-001 Printed in China