English Edition
Thank you for purchasing a Canon product
¢ EOS 10D Software Instructions
¢ EOS Digital Solution Disk ¢ Adobe Photoshop Elements Disk
Equipment Check List
¢ Eyecup Eb
Contents
107
Digital Camera Model DS6031
Safety Precautions
Page
Extended Storage
Avoid Condensation Related Problems
Avoid Strong Magnetic Fields
If Condensation Forms Inside the Camera
Camera
Handling Precautions
Lithium Battery for the Date and Time
Quick Start Guide
Mount the lens
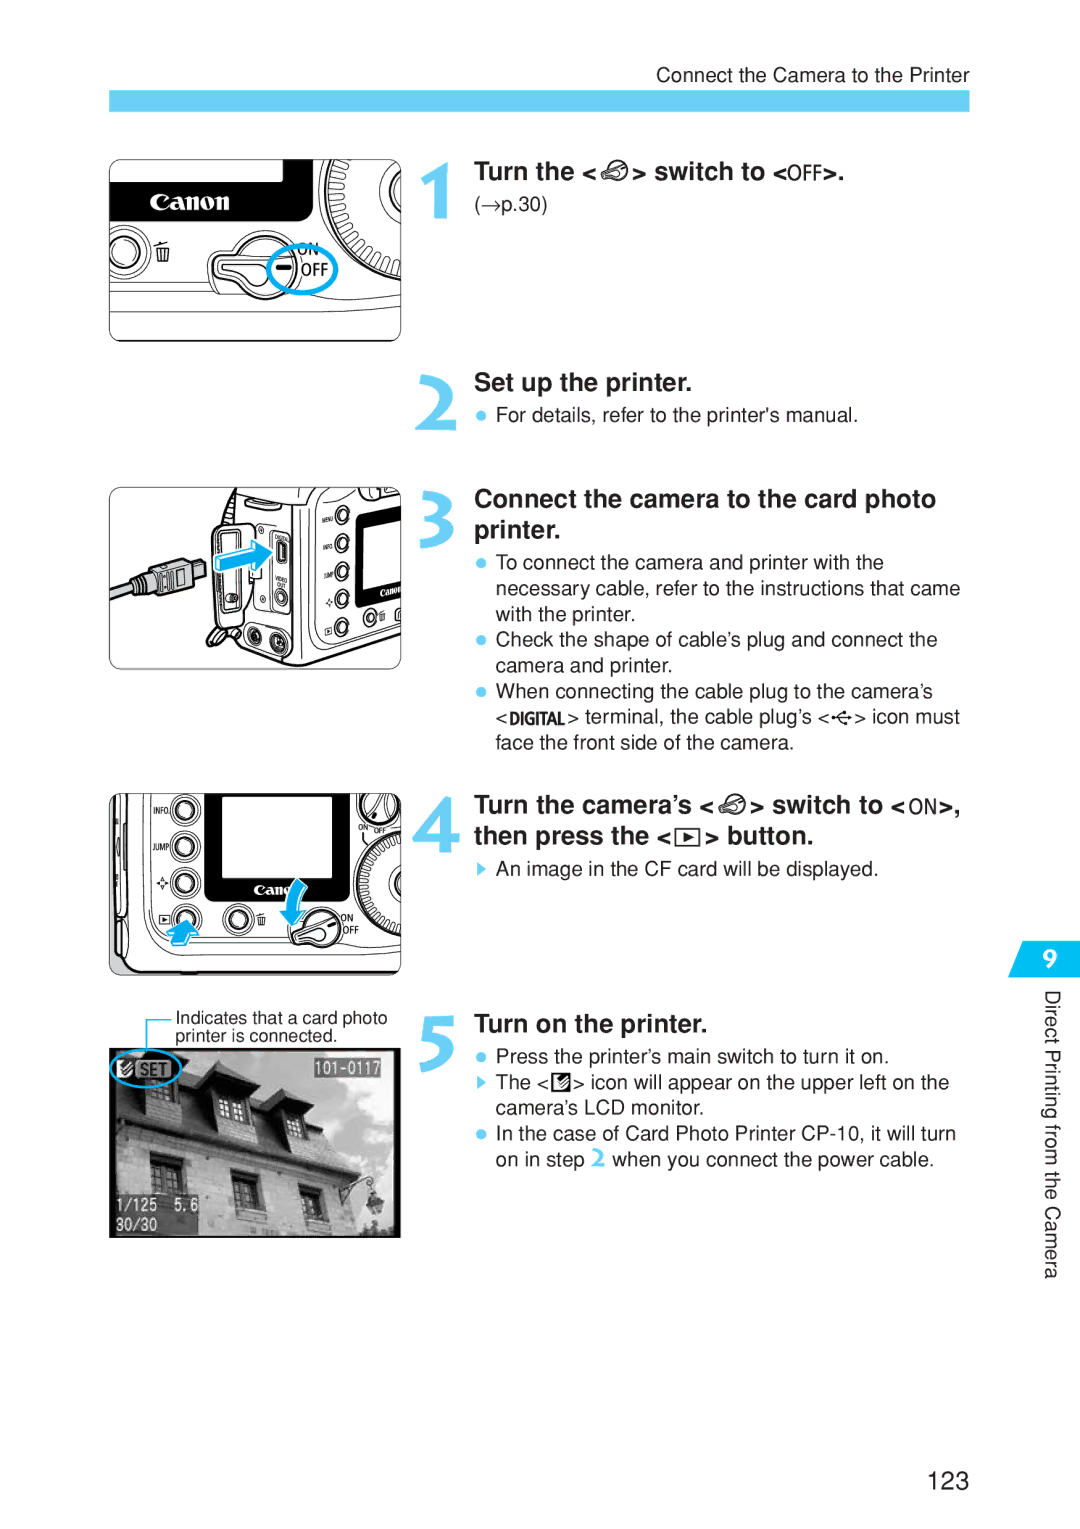
Turn the switch to
Set the focus mode 4switchAF. on the lens to
Set the Mode Dial to
Cover
Nomenclature
CF card slot cover
LCD Panel
Viewfinder Information
Mode Dial
DC coupler DR-400
Power cord side
AC Adaptor
DC coupler side
Conventions Used in this Manual
Before You1Start
Remove the cover
Recharging the Battery
Connect the power cord
Attach the battery
Page
Insert the battery into the camera
Installing the Battery
Battery Level Icons
Open the battery compartment cover
Removing the Battery
Battery Life
Remove the battery pack
Connect the DC Coupler
Using a Household Power Supply
Place the cord in the groove
Insert the DC coupler into the camera
Mounting and Detaching a Lens
Mounting a Lens
Detaching the Lens
Installing a CF Card
Open the cover
Insert the CF card
Remove the CF card
Removing the CF Card
Halfway pressing
Main Switch
Basic Operation
Shutter Button
Operating the Dial
Using the Electronic Dials
Menu item Setting Color-coded menu items
Menu Operations
Menu Screen
Setting Procedure
Menu item Settings and Description
Menu Selections and Default Settings
Clear the settings
Reverting to the Default Settings
On the menu, select Clear settings
Select Clear all camera settings
Horizontal shooting
Dioptric Adjustment
Turn the dioptric adjustment knob
Holding the Camera
Shooting
Set the Mode Dial to or
Turn the Mode dial to
Fully Automatic Shooting
Focus the subject
AF-Assist Beam with the Built-in Flash
Portrait
Landscape
Close-up
Sports
Night Portrait
Flash off
On the menu, select Review
Set the Review setting
Reviewing Images
Image Review
Set the Review time setting
Changing the Review Time
On the menu, select Review time
Page
Settings3for Shooting
Image-Recording Quality
On the menu, select Quality
Select the image-recording quality
Approx
Processing
On the menu, select Custom Functions
Select C.Fn-08 RAW+JPEG rec
Select the image-recording quality for the Jpeg image
Press the button
Setting the ISO Speed
ISO Speed in the Basic Zone Modes
ISO Speed in the Creative Zone Modes
Press the button Select the white balance setting
Selecting the White Balance
White Balance
Icon Application
White Balance Settings
Select an image
Custom White Balance
Shoot a white object
On the menu, select Custom WB
Press Button
Setting the Color Temperature
Set the color temperature
On the menu, select Color temp
Set the bracketing amount
White Balance Auto Bracketing
Canceling White Balance Auto Bracketing
Select the Set No
Select Set up
Settings
On the menu, select Parameters
Select the Set No. that was set
Select the parameter
Set the parameter
Return to the Parameters menu
Selecting Adobe RGB
Select any setting except Adobe RGB
Selecting a Color Space
Selecting sRGB
File Numbering Methods
On the menu, select File numbering
Select the file numbering method
Page
Take a vertical shot
Setting Auto Rotation
Set the Auto rotate setting
On the menu, select Auto rotate
Display the camera settings
INFO. Checking Camera Settings
4Focusing
Select the AF mode
One-Shot AF for Still Subjects
Focusing an Off-Center Subject
AI Servo AF for Moving Subjects
AI Focus AF for Automatic AF Mode Switching
Selecting a vertical AF point
Basic Procedure for AF Point Selection
Selecting an AF Point
Selecting a horizontal AF point
Display the desired AF point in red
Automatic Selection
Manual Selection
Display all the AF points in red
Registering an AF Point
Select C.Fn-07 AF point registration
Register the AF point
Press the button and button simultaneously
Switching to the Registered AF Point
Manual Focusing
When Autofocus Fails Manual Focusing
Page
Selecting the Metering Mode and Drive Mode
Press the button Select a metering mode
Selecting the Metering Mode
Evaluative Metering
Metering Modes
Press the button Select the drive mode
Drive Mode Selection
Select the self-timer
Self-timer Operation
Using the Eyepiece Cover
Remove the eyecup
Attach the eyepiece cover
Advanced Operations
Halfway
Program AE
Exposure Warnings
Differences Between and Full Auto
Shifting the Program
Shutter-Priority AE
Shutter Speed Display
Aperture-Priority AE
Aperture Value Display
Depth-of-field Preview
Manual Exposure
Determine the exposure
Automatic Depth-of-Field AE
Set the Mode Dial to Focus the subject
Set the exposure compensation amount
Setting Exposure Compensation
Auto Exposure Bracketing
On the menu, select AEB
Set the AEB amount
Canceling AEB
For
+/- 1/3 stop AEB +/- 2/3 stop AEB
Compose the shot and shoot
AE Lock
Set the shutter speed to
Bulb Exposures
Press the shutter button fully again
Mirror Lockup
LCD Panel Illumination
Press the shutter button fully
Shooting with a Flash
Check that the icon is lit
Using the Built-in Flash
Using the Built-in Flash in the Basic Zone
Turn the Mode Dial to Focus the subject
Built-in Flash Range
Using the Built-in Flash in the Creative Zone
Flash Sync Speed and Aperture Settings
Mode Shutter speed setting
Page
Using Red-eye Reduction
On the menu, select Red-eye on/off
Set the red-eye reduction
FE Lock
Flash Exposure Compensation
High-Speed Sync FP Flash
Flash Shot with Speedlite 550EX
Lamp is on
Taking Flash Shots in Each Shooting Mode
Full Auto Flash
Make sure the Speedlite 550EX’s pilot
FEB Flash Exposure Bracketing
High-Speed Sync FP Flash
Modeling Flash
Wireless Multi-Flash/E-TTL Autoflash Shooting
TTL and A-TTL Autoflash Speedlites
Using Non-Canon Flash Units
Image8Playback
Image Playback
Single image
View another image
Image with Shooting Information
Histogram
Highlight Alert
Display the index
Set the camera to the playback mode
From the index display, switch to any other display mode
Index Display
Scroll around
Magnified View
Display the image to be magnified
Magnify the image
Jump forward or back
Image Jump
Set the camera for playback
Set jump display
Automated Playback of Images Auto playback
On the menu, select Auto Play
Start the auto play
Rotating an Image
On the menu, select Rotate
Rotate the image
Open the cover Connect the cable
Connecting to a TV
Turn the TV on, and set the input switch
Set Switch to Press Button
Image Protection
On the menu, select Protect
Set the image protection
Display the erase menu
Erasing an Image
Erasing a Single Image
Select the image to be erased
Erasing All Images
Select All
Erase the images
Formatting the CF Card
On the menu, select Format
Format the CF card
120
Direct9Printing from the Camera
Connecting to a Card Photo Printer
Direct Printing
Connect the Camera to the Printer
Turn on the printer
Set up the printer
Turn the camera’s switch to Then press the button
Connect the camera to the card photo Printer
Connecting to a Canon BJ Printer
Print the image
Printing
Select the image to be printed
Set the printing options
While Stop is displayed on the LCD monitor, press
Stopping the Printing
Set the number of copies
Setting the Quantity
Setting the Printing Style
Printing Options
On the direct printing screen, select Style
Select the style setting
Set the style setting
Exit the style setting screen
Changing the trimming frame size
Trimming
On the printing style screen, select Trimming
Trim the image
Exit the trimming screen
Moving the trimming frame
Rotating the trimming frame
Dpof
Service for easy ordering
Print Order
With Dpof
Selecting the Images to be Printed
On the menu, select Print Order
Select Order
Select Mark all
Set the printing quantity
Printing Options
Select the set up option
Exit the set up screen
Set the set up option
Set the printing style
Direct Printing with Dpof
Connect the camera to the printer
Select Print
138
139
Menu Settings
Protect
Color temp
Parameters
ISO expansion
Review
Auto power Off
Print Order
Auto Play
File numbering
Auto rotate
LCD Brightness
Date/Time
Format
Clear settings
Sensor clean
Video system
Select the Custom Function No
Setting Custom Functions
Change the setting
On the menu, select Custom Functions C.Fn
Custom Function Settings
Does not emit/Fires
AF/AF lock, no AE lock
AE/AF, no AE lock
Emits/Fires
RAW+Small RAW+Medium RAW+Large
+/Enable +/Disable
Center AF point
Bottom Extreme left Right Left Extreme right Top
Enable
+/Enable
Previoustop if powered off menu
Disable
Av+/- AF point by QCD
Normal
Select Home Position
Select HP while pressing
AF pointM→Auto/Auto→ctr
Disable Enable
AF stop AF start
AE lock while metering
Clear all the Custom Function settings
Clearing All Custom Functions
Select Clear all Custom Functions
12Maintenance
Set the date display format
Setting the Date and Time
On the menu, select Date/Time
Set the date and time
Install a new battery
Replacing the Date/Time Battery
Set the switch to Remove the date/time battery cover
Remove the old battery
Select OK
Clean the image sensor
Terminate the cleaning
158
159
13Reference
SRGB
Basic Terminology
CF CompactFlash card
ISO speed
Aperture
File numbers and folders
Firmware
Depth of field
Exposure
Depth of field is affected as described below
AF Modes and Drive Modes
Function Availability Table
To the lens
Exposure Warning List
Program Line
AE Lock Effects
Shutter speed Aperture value
Stop increments
On-screen Messages
Paper jam Paper jammed during printing
Size
Message Description
Battery level is too
Media type error
Paper lever error
Message Description Waste tank full
Printer error
Error code Countermeasures
Error Codes
Power Source
Troubleshooting Guide
Shooting
Major Accessories optional
CF Card
Remote Switch RS-80N3
Timer Remote Controller TC-80N3
Macro Flash
EP-EX15
System Map
177
Type
Specifications
Autofocus
External Speedlite
Customize Function
152
Index
183
CT1-1241-000 Canon INC 0000Ni0.0

 > switch to <

 >.
>. > switch to <
 >,
>, 4 then press the <
 > button.