OperatorsManual Snow Thrower
Birth defects or other mproductNe harm
Warranty Statement Storage Safety Rules
Wash Hands After Handling
Preparation Operation
Training
Control and Operating Symbols
Maintenance and Storage
EcL
Stop
Contents of Parts BAG Actual Size
Knifeto outcarton
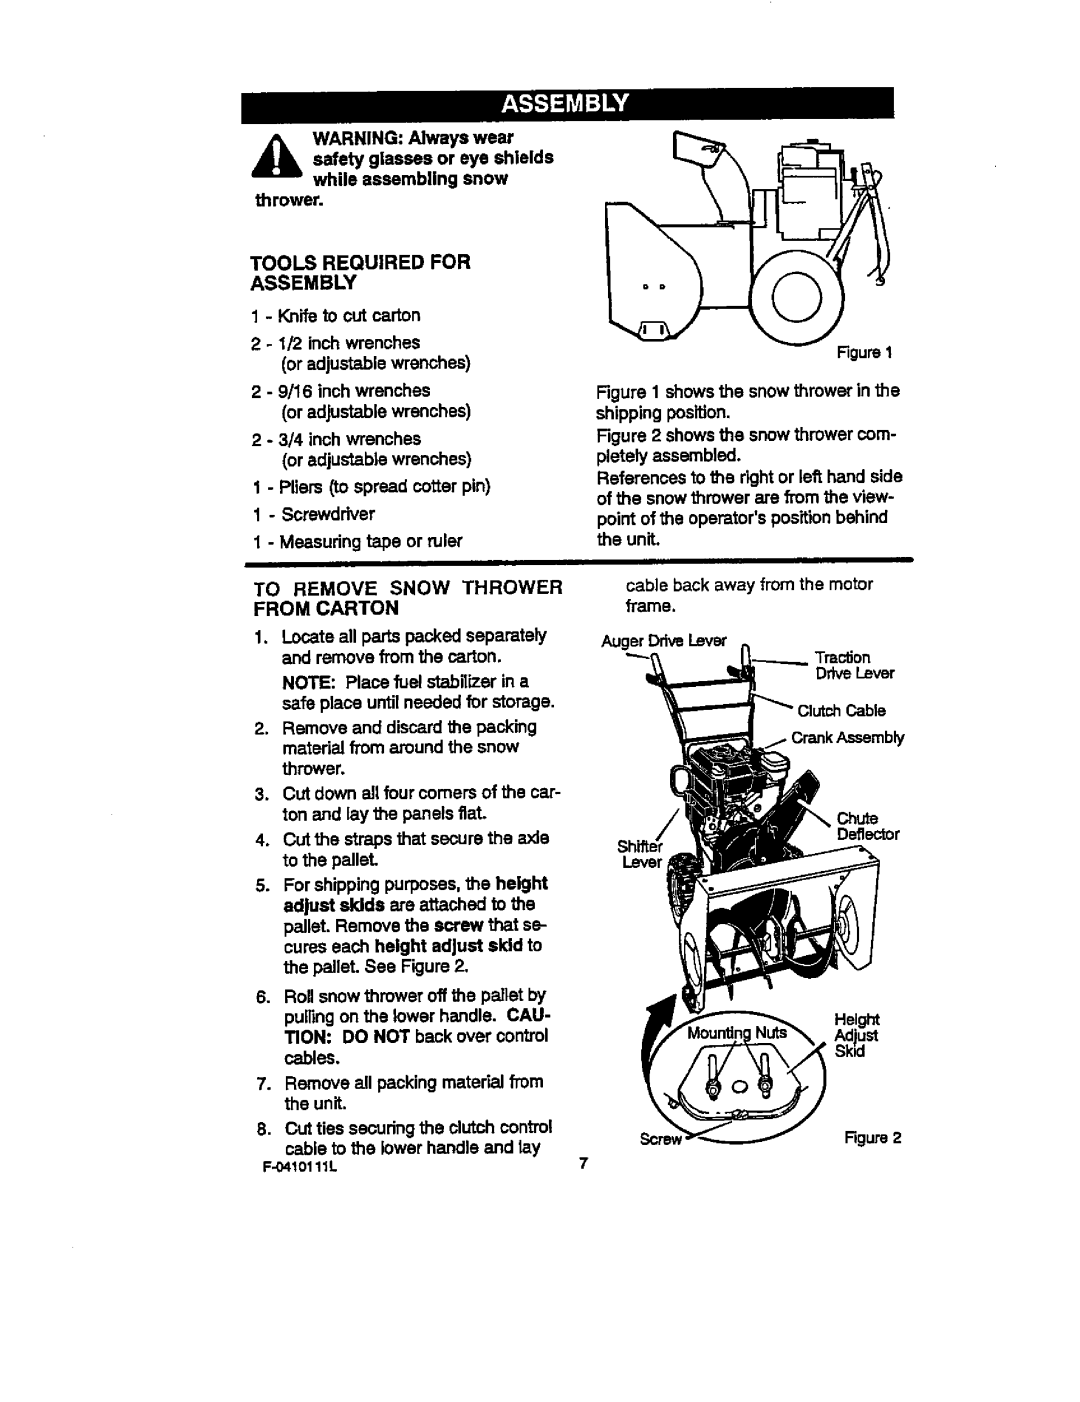
Tools Required for Assembly
To Remove Snow Thrower from Carton
UpperHandle remove
To Assemble the Handle Crank Assembly
Eye Bolt Ratwasher
HOW to SET the Skid Height
HOW to Assemble the Chute Deflector
HOW to SET the Length of the Cables
Checkust
Know Your Snow Thrower
Choke Control Gas PrimerCap Button Safety
Starter
To Throw Snow
HOW to Move Forward and Backward
To Stop Your Snow Thrower
To Control Snow Discharge
Before Starting the Engine
Check the OIL
Fill GAS
To Stop Engine
To Start Engine
RecoilStarter Receptacle
PowerCord
Frozen Starter
Snow Throwing Tips
To Remove Snow from Auger
General Recommendations
Customer Responsibilities
After Each USE
Snow Thrower
Engine Specifications
To Change Engine OIL
Engine
Lubrication
Spark Plug
To Adjust Scraper BAR
To Adjust Skid Height
Spark k
HOW to Remove Snow Hood
Cafouretor
Inch
Belt Adjustment
Engaged
Jure28
HOW to Replace the Belts
Spdng Traction DriveBelt DrivePulley Engine
Ring Swing Plate
Install the belt cover.Tighten screw see
HOW to Check Adjust the Cables
Belt Guide Adjustment
Auger Drive Cable Adjustment
CableAdjustment
Traction Drive Cable Adjustment
Bracket
Auger Housing Speed ControlRod
HOW to Adjust or Replace the Friction Wheel
Chain
Check the adjustment of the friction
Spacer
HOW to Replace Auger Shear Bolt
Engine
Other
Trouble Cause Correcon
Sears .Emission Control Defects Warranty Coverage
Cold start enrichment sys
Typicallyfoundona certifiedengine
Craftsman 24 6HP Snow Thrower 536.881550 Engine
Ref, DrivePage Ref. Auger HousingPage
25-220 13 14 25-329
Description
Key
Craftsman 24 6HP Snow Thrower 536.881550 Frame
Craftsman 24 6HP Snow Thrower 536.881550 Gear Case
236
Craftsman 24 6HP Snow Thrower 536.681550 Drive
218 207
NU,IEPS HE I/4-20
Craftsman 24 6HP Snow Thrower 536.881550 Drive
6O9
Ref.Auger HousingPage
Craftsman 24 6HP Snow Thrower 536.881550 Discharge Chute
6O3 601
Bolt
Chute Assembly
Washer
KNOB, Wing
523
Craftsman 24 6HP Snow Thrower 536.881550 Auger Housing
49O5OO527
522
BEARING,BALL
BRUSH, Cleanout
SPACER,FRICTION Pulley
RETAINER,BALLBRNG
762
Craftsman 24 6HP Snow Thrower 536.881550 Handle
73O 729 74O
746
Craftsman 24 6HP Snow Thrower Handle
Craftsman 24 6HP Snow Thrower 536.881550 Chute ROD
Ref.Auger HousingAssy
852-10
GROMME, EYE Bolt
Craftsman 24 6HP Snow Thrower 536.881550 Shift Yoke
Decals
Craftsman 24 6HP Snow Thrower 536.881550 Wheels
O410111L55
Briggs & Stration Engine
Ring Set
Briggs & Stratton Engine
40 692194 Retalnar-Valve 45 690977 Tappet-Valve
S92I
51%
BowlVent
Key No. PartNo. Descdption
Gasket-Intake Required 95 691636 Screw
J613Y
Starter Shield
309 696818 Motor-Starter 316 690370 Screw
1095 638215 Gasket Set-Valve 1196 696692 Screw
1211 496144 Pulley/Spring
0410111L62
Almacenamiento
ManeJeel combustiblecon cuidado.ste es sitamente inflamable
CAPACITACI6N
Del solhaos que el combusdble
Permitsque el motory el quitanlevesse
Alejadode la bujlapare evitarun arran- que accidental
Mantenimiento Y Almacenamiento
Coleor
Sjmbolos DE Control Y OPERACI6N
Despaelo Patpldo
Ananque de motor
Peligro
Sjmbolos DE Control Y Operacin
Abajo Arriba Izquierda Derecha
Peugro
Contenido DE LA Bolsa DE Partes Famaiioreal
Palanca de Patinasde
Herramientas Necesarias
Como Sacar EL Quitanieves DE LA Caja
Palancade propulsibn De la barrena Portran Cabledd embmgue
C6MO Ensamblar EL Mango Y EL Conjunto DE LA Manivela
C6MO Ajustar LOS Patines DE Altura
CMO Ensamblar EL Deflector DEL Tubo DE Descarga
CMO Establecer LA Longitud DE LOS Cables
USTADEREVISI6N
Avs
Conozca SU Quitanieves
C6MOUSAR EL Pasador DE Enganche DE LA Rueda
C6M0 Avanzary Retroceder
C6M0 Controlar LA Descarga DE
Lanzamiento DE Nieve
Combustible
Motor
Antes DE Encender EL Motor
Antes DE Arrancar EL Motor
Arranque DEL Motor
Parada DEL Motor
Carel motor,asegresede haberleido la informacl6nsiguiente
Qua manual
C6mo hacerarrancarel motorenfri0
Enchufedel cord6n
Manlt,e arran- de alimentad6n
Arranque Congelado
MaHJadel ananquemanuaJse enrolls lentamerrte
DE Nieve
C6MO Quitarla Nievey Escombrosatascadosdela Barrena
Consejos Sobre EL Lanzamiento
Suelte la palancade propulsi6nde la ba
Responsabilidadesdel Propietario Recstrosde Serwcio
Capadtadasoesab doreparacb
Recomendaciones Generales
Motor ESPEClRCAClONES
Cambio DE Aceite
Motor
BUJiA
Llenofull
Patnde ajuste AloJamlentode altura de la barrena Rgura
El arranque accidental del mo
Ajuste DE LA Barra Raspadora
Como Desmontar LA Cubierta Protectora
C6MO Reemplazar LAS CO- Rreas
Ajuste DE I.AS Correas
Guta Puesta
Vuelva a poner la cubierta de la
0410111L86
Figura
Polea
Mamas de alinearnlento Figure
Como Revisar Y Ajustar LOS Cables
Ajustesdela Correaguja
Ajustes DEL Cable DE PROPULSI6N
C6MO Ajustar 0 Reemplazar LA Rueda DE Friccin
Fura
Figura88
De partesencontrarpemosde seguridad adicionales
C6MO Reemplazar LOS Pernos DE Seguridad DE LA Barrena
Motor
Quitanieves
Otras Indicaciones
CORRECClON
Problema Causa
Su sisternade controlde emisionesinclwe
Laina ea mnte ened Us deAm6ricaydt
Ustedincluyondoel dlagn6stico,laspartesy la mano de obra
Duranteel periodode lagarang=,Cualquier
Bujas
Sin Costo
Es necesadose g
O410111L99
Canada
Your Home
Sears Parts and Repair Center Anytime,dayornightU.S.A.only
MY-HOME Anytime, day or night