E R G U I D E
Table of Contents
Welcome
P O R T a N T S a F E T Y I N S T R U C T I O N S
Use the refrigerator only for its intended purpose
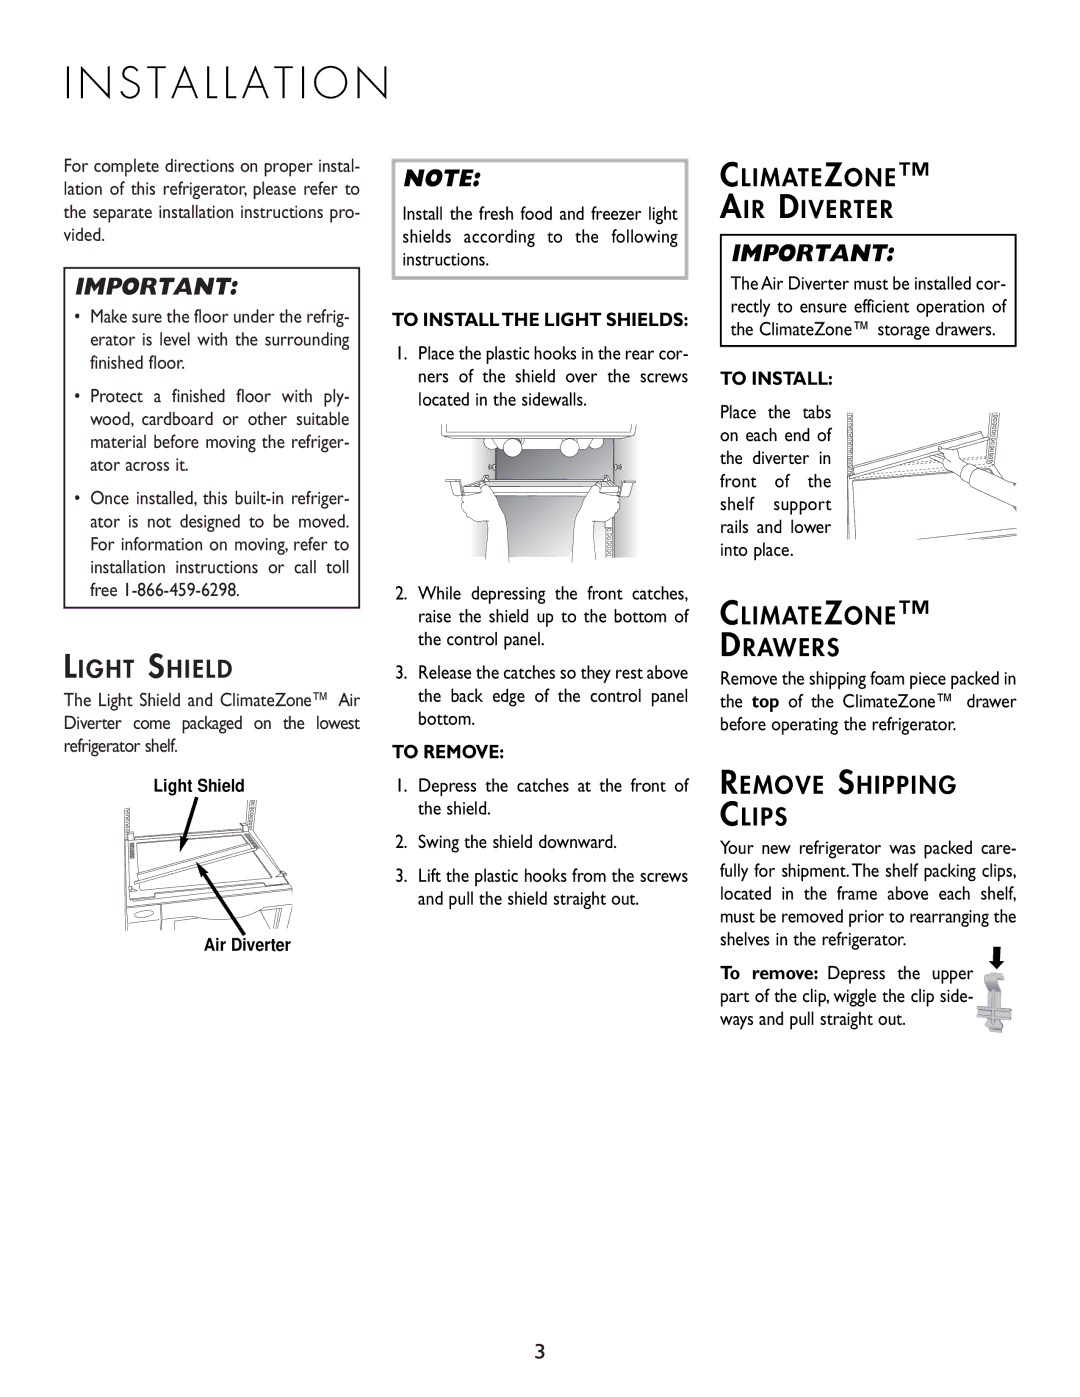
Installation
Climatezone AIR Diverter
Climatezone Drawers
Light Shield
To Remove the Machine Compartment Cover
C H I N E C O M P a R T M E N T
To Replace the Machine Compartment Cover
Unit Power
Temperature Adjustments
Door Alarm
N T R O L C E N T E R
Set the switch to the desired mode C or F
Power Interrupt
FAHRENHEIT/CELSIUS Display
Standard Adjustable Shelves
E S H F O O D C O M P a R T M E N T
Shelves
Elevator Shelf
Citrus
Meats
Cauliflower Salads Peaches Vegetables
Set drawer on side tracks
Adjustable Dairy Compartment Drop Down Door Bins
O R S T O R a G E
Automatic Humidity Control
Door Baskets
Adjustable Wire Shelves
Wire Freezer Baskets
E E Z E R C O M P a R T M E N T
Freezer Elevator Shelf
T O M a T I C I C E M a K E R
ICE BIN
Dispensing Water and ICE
CRUSH, CUBE, Water Pads
Dispenser Light
Dispenser Lock
Initial Filter Cartridge Installation
T E R F I L T E R
Replacing the Filter Cartridge
Periods of NON-USE
Max. Op. Press
Replacement Filter Cartridges
Yes Class
Temperature
Eggs and Dairy
Fresh Meats and Poultry
Leftovers
G E T a B L E S E L E C T I O N a N D O R a G E C H a R T
Apricot is pale yellow to greenish-yellow Produce setting
Green stems Produce setting
If they are shriveled or soft Citrus setting
Both ends Citrus setting
Color that is creamy or yellowish Produce setting
Select pears that are firm and unblemished
Blemishes or growth cracks Texture
Yellow underneath, it is immature
I N T E N a N C E
Light Bulb Replacement
Condenser
To Replace the Bulb Behind the Lower Climatezone Drawer
R M a L O P E R a T I N G S O U N D S
R E a N D C L E a N I N G
L L F O R S E R V I C E
Fresh Food or Freezer Door Difficult to Open
C E S S O R I E S
Refrigerator a la Carte Storage Drawer
What is not Covered by These Warranties
To Receive Warranty Service
Your name, address and telephone number
Guide DE L’UTILISATEUR
Bienvenue
Table DES Matières
Conseils pour la manipulation, le rangement et
Numéro de modèle Numéro de série
S T R U C T I O N S D E
« OFF » Arrêt ou « O »
Cordon d’alimentation Avec fiche de Branchement à Broches
Démonter les portes
Cabochon
Déflecteur D’AIR Climatezone
Tiroirs Climatezone
Enlèvement DES Agrafes ’EXPÉDITION
M P a R T I M E N T M a C H I N E
Pour Enlever LE Couvercle DU Compartiment Machine
Alarme DE Porte
Mise EN Marche DE L’APPAREIL
Réglages DE Température Initiaux
Réglages DE LA Température
Panne DE Courant
Affichage FAHRENHEIT/CELSIUS
La température la plus élevée
Placer l’interrupteur à l’échelle désirée C ou F
M P a R T I M E N T R É F R I G É R a T E U R
Clayettes ET Étagères
Tagère Elevator
Tiroir «À LA CARTE» Pour Réfrigérateur
Réglages du tiroir ClimateZone
Chou-fleur Salade et Pêches Légumes
Placer le tiroir dans les rails latéraux
Vierge
Commande Automatique ’HUMIDITÉ
Bacs DE Porte Réglables
Casier Laitier
Amovibles
M P a R T I M E N T C O N G É L a T E U R
Clayettes Métalliques Réglables
Tagère DE Congélateur À Manivelle Elevator
Paniers Métalliques DU Congélateur
BAC À Glaçons
Coller ensemble et
Pour Enlever LE BAC
Inverser la méthode pour remettre le bac à glaçons
Distributeur D’EAU ET DE Glaçons
Touches Pour Glace PILÉE, GLAÇONS, EAU
Lampe DU Distributeur
Verrouillage DU Distributeur
Installation DE LA Première Cartouche DE Filtre
Périodes DE NON-UTILISATION
Remarques Spéciales
Dérivation Du filtre
Remplacement DES Cartouches DU Filtre
UKF7002AXX Goût, odeur, chlore, spores et plomb
Cuno Incorporated Research Parkway Meriden, CT
De fonct. min F 0,6 C De fonct. max F 38 C
Oeufs ET Produits Laitiers
Viandes ET Volaille Fraîches
Restes
Fruits ET Légumes Frais
B L E a U D E C O N S E R V a T I O N S L É G U M E S
Abricots
Ananas
Baies
Mûres
Pastèques
Pêches
Poires
Pommes
Remplacement DE L’AMPOULE
Condenseur
Pour Nettoyer
Compartiment Réfrigérateur Inférieur
Pour Remplacer
U I T S D E F O N C T I O N N E M E N T N O R M a U
T R E T I E N E T N E T T O Y a G E
Installer le filtre ou la dérivation du filtre
La porte est ouverte
Cordon non branché Pas d’électricité à la prise
Appuyer sur la touche « ON/OFF » MARCHE/ARRÊT
C E S S O I R E S
Pour Recevoir DES Prestations DE Garantie
NE Sont PAS Couverts PAR Cette Garantie
Guía DEL Usuario
Bienvenida
Tabla DE Materias
Consejos para la Compra,Almacenamiento y
Fecha de Compra
Advertencia
Retire las puertas
S T a L a C I Ó N
Pantalla DE LA LUZ
Deflector DE Aire Climatezone
Gavetas Climatezone
M P a R T I M I E N T O M E C Á N I C O
Desmontaje DE LA Tapa DEL Compartimiento Mecanico
Alarma DE LA Puerta
Tecla DE Puesta EN Marcha
Ajuste Inicial DE LA Temperatura
Ajustes DE LA Temperatura
Falla DE Energia Electricia
Despliegue EN Grados Fahrenheit Celsius
Durante la interrupción de la
Coloque el interruptor en el modo deseado C o F
F R I G E R a D O R
Parrillas
Parrilla Elevator
Desmontaje
Desmontaje DE LAS Gavetas Climatezone
Reinstalacion DE LAS Gavetas Climatezone
Control
Automático
DE LA Humedad
Desmontaje
N G E L a D O R
Parrillas DE Alambre Ajustables
Canastas DE Alambre DEL Congelador
Gaveta DEL Hielo
Depósito DEL Hielo
Q U I N a a U T O M Á T I C a D E H a C E R H I E L O
Desmontaje DEL Deposito DEL Hielo
S T R I B U I D O R a U T O M Á T I code
L T R O D E L a G U a
Instalación Inicial DEL Cartucho Filtrante
Períodos DE no USO
Avisos Especiales
Cartuchos Filtrantes DE Repuesto
UKF7002AXX Sabor, olor, cloro, quistes y plomo
207 Kpa
862 Kpa
Huevos Y Productos Lácteos
Carnes Frescas DE Vacuno Y DE AVE
Sobras
Frutas Y Verduras Frescas
Achicoria Roja
Alcachofas
Betabeles
Bretones
Arándano Agrio
Bayas
Moras
Arándanos
Peras
Piña/Ananá
Pomelo/Toronja
Sandía
N T E N I M I E N T O
Condensador
Reemplazo DEL Foco
Parrilla
Retire todos los alimentos de la gaveta ClimateZone
Levante y retire la parrilla de vidrio
Vuelva a colocar las gavetas
Para Reemplazar
N I D O S N O R M a L E S D E L N C I O N a M I E N T O
I D a D O Y L I M P I E Z a
T E S D E S O L I C I T a R S E R V I C I O
C E S O R I O S
T a S
T a S
Para Recibir Servicio Bajo LA Garantía
LO QUE no Cubren Estas Garantías